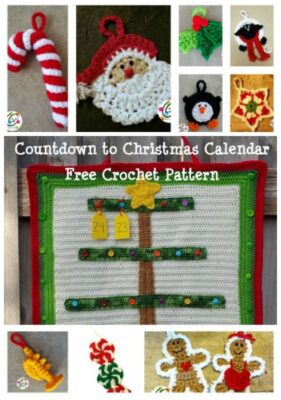
Free Pattern: Countdown Calendar
Let’s make an advent calendar together one piece at a time.
This has been a favorite of ours since it was released in 2014. A lot of new ornaments have been designed since this was designed so I have been rounding them up and will be sharing them with you each week from now until Thanksgiving.
Growing up we had a wonderful advent calendar. It had a large tree in the middle, with pockets along the bottom to hold little ornaments. My sister and I would take turns hanging an ornament on the tree. When my kids were little I painted a wooden tree and little wooden ornaments for our advent calendar. My two oldest kids also loved taking turns hanging an ornament.
Over the years I have become a little obsessed with different countdown calendars. I have made mittens that held little goodies, little bags that hung along the mantel and many others. I’ve always wanted a wall hanging like my mom had. For two years I have wanted to design a crocheted version. This year I was determined to get it done and am tickled with how it turned out!
This pattern is for the base of the calendar. There are 24 ornaments listed at the end of this post, plus lots of others to choose from so you can pick and choose your favorites.

Instead of pockets, I chose a quicker (and even cuter) option…BUTTONS! Throughout this month we will make ornaments from free patterns by our favorite crochet designers. These will hang on the buttons around the outer edge of the calendar. Each day in December one ornament will be moved to the tree. I added little tags to show an option in case numbers are desired. My mom is the Sissix Queen and I cut these little tags at her house, then will write each day with a thin Sharpie marker. I will give more ideas for numbers along the way.
Let’s Get Started!
Part 1: The Wall Hanging Center
Materials Needed for our first part: H (5mm) crochet hook, 400 yds worsted weight white or soft white yarn.
Video: Crochet the white rectangle
Crochet Along Plan of Attack
Every Wednesday and Saturday, starting Sept 11th, a different ornament theme will be posted (based on the list of 24 ornaments at the end of this post). Everyone will be encouraged to make an ornament. If we stick to the timeline we will finish the calendar and ornaments by the end of November.
Scroll down to view the free pattern or purchase an ad-free, downloadable PDF version from my Ravelry Shop or new Snappy Shop.
Wed, Sept 11: Itty Bitty Snowman by Snappy Tots
Sat, Sept 14: Peppermint Candies by Petals to Picots
Wed, Sept 18: Granny Square Stocking by Eating Out Loud
Sat, Sept 21: Playful Penguin by Simply Collectible Crochet
Wed, Sept 25: Snowflakes by Ambassador Crochet
Sat, Sept 28: Santa by Dly’s Hooks and Yarns
Wed, Oct 2: Wreath by Oombawka Designs
Sat, Oct 5: Holly by Trifles N Treasures
Wed, Oct 9: Festive Sheep by Fiber Flux
Sat, Oct 12: Candy Canes by Yarnspirations
Wed, Oct 16: Trees by Snappy Tots
Sat, Oct 19: Cardinal by Hatch-ed With Love
Wed, Oct 23: Star by Zooty Owl
Sat, Oct 26: Trumpet by Kim Lapsley Crochet
Wed, Oct 30: Angel by Kim Guzman
Sat, Nov 2: Gingerbread boy by Bella Crochet
Wed, Nov 6: Gingerbread girl by Bella Crochet
Sat, Nov 9: Mittens by Cobblers Cabin
Wed, Nov 13: Bell by A La Sascha
Sat, Nov 16: Bulb by Yarnspirations
Wed, Nov 20: Ice Skates from All Crafts Blogs (use an H hook)
Sat, Nov 23: Reindeer by Tales of a Crafty Mommy
Wed, Nov 27: Gingerbread House by Ursula with decorations added from Gingerbread house from Lion Brand
Sat, Nov 30: Bear by Jaime D. Designs
Snappy Countdown Calendar
Please click here to add this to your Ravelry favorites and library.
Materials and Details
This list is for the calendar base only and does not include materials for miscellaneous ornaments.
- Yarn: Worsted weight in a variety of colors.
Yarn used in sample:- Center: 400 yds Red Heart Soft White
- Inner Border: 250 yds Red Heart Spring Green
- Middle Border: 250 yds Red Heart Paddy Green (darker than in sample) OR 250 yds Red Heart Super Saver Green Tones
Sample was made with Red Heart With Love Clover (discontinued) - Outer Border: 250 yds Red Heart Cherry
- Tree: 200 yds Red Heart Green Tones
- Crochet Hook: H
- Miscellaneous: yarn needle, 24 buttons in shades of green (miscellaneous sizes from 1/2-3/4″), 24 buttons in bright colors (miscellaneous sizes from 1/2-3/4″), sewing needle and thread, two 1/2″ (or close in thickness) dowels 28″ long.
- Gauge: not necessary for this project
- Size: 28″ long x 25″ wide
- Difficulty: Beginner with basic crochet skills. Help is always available through email.
Special Stitch (to be used in the border)
Herringbone Half Double Crochet (HHDC): Yarn over and insert the hook into the next stitch. Yarn over and pull the loop through the stitch AND through the first loop on the hook. Two loops remain on hook. Yarn over again and pull the loop through both loops on the hook.
Photo tutorial and video if needed: How to crochet the HHDC
DIRECTIONS – Main Wall Hanging Piece
The project starts with the white center.
1. With an H hook and Soft White yarn, ch 71, sc in second chain from hook and in each ch across. (70sts)
2-58. Ch 2, turn, hdc in same st and in each st to end of row.
59. Ch 1, turn, sc in each st to end of row.
60. Do not turn. This step will be worked around outer edge of rectangle.
Work 2 more sc (for a total of 3sc) in last st of row #59. Sc evenly down left side of rectangle, working 3sc in last st. Sc in each st across short edge of rectangle, working 3sc in last st. Sc evenly along 2nd long side of rectangle, working 3sc in last st. Sc in each st across 2nd short edge of rectangle, sl st to join.
Do not weave in ends. We will continue with our next yarn from this point.
At this point your piece should measure approximately 20″ wide by 22″ high.
Outer Borders: Continue from point where step #60 finished. From this point on, each step will be worked around outer edge of piece.
1. Change to lime green yarn. Ch 2, hdc in each st to corner, work (2hdc, ch 1, 2hdc) in corner st, repeat two more times, hdc in each st to last corner, work (2hdc, ch 1, hdc) in last st, sl st to join.
2-3. Repeat previous step.
4. Change to darker green yarn. Ch 1, sc in same st, hhdc (see “special stitch” on page 1) in each st to corner, work (2sc, ch 1, 2sc) in corner st*, repeat two more times, hhdc in each st to last corner, work (2sc, ch 1, sc) in last st, sl st to join.
Notes: Yes, I did mean to have you work sc in the corner stitches. The hhdc st is shorter than regular hdc and I liked it this way best. I added the Herringbone stitch to help maintain the rectangle shape because it doesn’t tend to stretch as much as other crochet stitches.
The beginning corner might appear to be creeping down the side a little. Don’t worry. Mine did that and it turned out just right.
5. Repeat previous step.
6. Change to red yarn. Ch 2, hdc in each st to corner, work (2hdc, ch 1, 2hdc) in corner st, repeat two more times, hdc in each st to last corner, work (2hdc, ch 1, hdc) in last st, sl st to join.
7. Repeat previous step.
8. Ch 1, sl st in each st to end of round, sl st to join. Finish off and weave in ends.
Notes: some people (me included) tend to work sl st tighter than other sts. Be careful and try to keep the tension similar to previous sts or it will make your edges wonky. Do not add extra sts in the corners. Just sl st in each st all the way around.
The base of the calendar is complete.
Tree
Main Trunk:
1. With an H hook and brown yarn, ch 71, sc in 2nd ch from hook and in each chain across. (70sts)
2. Ch 2, turn, hdc 45, sc 25.
3. Ch 1, turn, sc 25, hdc 45.
4. Ch 2, turn, hdc 45, sc 25. Finish off, leaving a long tail for sewing to calendar. Set aside.
Top Tree Branch:
1. With an H hook and green yarn, ch 45, hdc in 3rd ch from hook and in each ch across. (43sts)
2. Ch 2, turn, hdc in each st to end of row.
3. Ch 1, turn, sc in each st to end of row. Finish off, leaving a long tail for sewing to calendar. Set aside.
Second Branch From Top:
1. With an H hook and green yarn, ch 55, hdc in 3rd ch from hook and in each ch across. (53sts)
2. Ch 2, turn, hdc in each st to end of row.
3. Ch 1, turn, sc in each st to end of row. Finish off, leaving a long tail for sewing to calendar. Set aside.
Third Branch From Top:
1. With an H hook and green yarn, ch 66, hdc in 3rd ch from hook and in each ch across. (64sts)
2. Ch 2, turn, hdc in each st to end of row.
3. Ch 1, turn, sc in each st to end of row. Finish off, leaving a long tail for sewing to calendar. Set aside.
Bottom Branch:
1. With an H hook and green yarn, ch 72, hdc in 3rd ch from hook and in each ch across. (70sts)
2. Ch 2, turn, hdc in each st to end of row.
3. Ch 1, turn, sc in each st to end of row. Finish off, leaving a long tail for sewing to calendar. Set aside.
Assembly: Fold calendar in half to find middle. Pin trunk along center line with thinner end towards the top and bottom of trunk along 2nd row from bottom edge. It is easiest to sew the tree pieces in place if you ay the calendar on a flat surface. Sew the branches along the lines from the rows to keep pieces straight.
With a yarn needle and yarn tail from the trunk piece, sew the outer edge of the trunk piece to the calendar piece.
Place one long edge of the bottom branch on the 9th row from the bottom edge of the white part of the calendar. With a yarn needle and yarn tail from the branch, sew the outer edge of the branch piece to the calendar piece.
There are 10 white rows between the top of the lower branch and the bottom of the next branch. Sew each branch in place.
Star
1. With an H hook and yellow yarn, start with a magic circle of 5 sts (or preferred method for starting a circle of 5
sc sts), join and pull closed. (5sts)
2. Ch 2, 2 hdc in each stitch to end of round, sl st to join. (10sts)
3. Ch 2, hdc, 2 hdc in next st repeat to end of round, sl st to join. (15 sts)
4. Ch 5, sl st in 2nd ch from hook, (working down the ch 5) sc, hdc, dc, sk 1 sc on circle and sl st 2, repeat to end of
round.
5. Sc in ea st around star with ch 1 at the tip of each point. Finish off, leaving a long tail for attaching star to
calendar piece.
With a yarn needle and yarn tail, sew the outer edge of the star to the top of the tree.
Buttons On Tree
With matching thread and sewing needle, sew buttons to tree branches, evenly spaced: 4 buttons on top branch, 6 buttons on both middle branches, 8 buttons on bottom branch.
Buttons on Border
With matching thread and sewing needle, sew buttons along last green round of border. There are 7 buttons evenly spaced down each side, 8 buttons across the bottom (not including side buttons), 2 buttons at the top (evenly spaced from top buttons along side).
Casings
Along the top and bottom back of the calendar piece are two long casings to slide the dowels through. There is also a small “pocket” at each corner to hold the dowel ends.
Top/bottom casings (make 2):
1. With H hook and matching yarn, ch 40, hdc in 3rd ch from hook and in each chain to end. (38sts)
2-4. Ch 2, turn, hdc in each st to end of row.
Finish off and weave in ends.
With the back of the calendar facing you, find the center of the top and bottom edge. Place a pin to mark the spot. Center the casing pieces along each edge. Use red yarn to stitch a long edge of each casing to the outer edge of the calendar so it won’t show through on the front side. Use green yarn for stitching the bottom edge of each casing in place.
Pockets (make 4)
1. With an H hook and red yarn, ch 10, sc in 2nd ch from hook and in each chain across. (9sts)
2-5. Ch 2, turn, hdc in each st to end of row.
Finish off, leaving a tail for sewing corner pocket in place.
Each corner pocket is sewn along 3 edges, leaving the edge facing the top/bottom casings open. See photo for placement.

Hanger (make 2)
1. With an H hook and yarn (color of choice), ch 61, sc in 2nd ch from hook and in each ch across. (60sts)
2. Ch 1, turn, sc 10, hhdc 50.
3. Ch 1, turn, hhdc 50, sc 10. Finish off, leaving a tail for sewing sc end to form a loop
With a yarn needle and yarn tail, sew the bottom edge of the sc end to where sc change to hhdc. This creates a loop to slide onto the dowel.
Slide one dowel through the center top casing. Slip one hanger loop over each end of the dowel and towards the casing. Slip each dowel end into a corner pocket. Repeat for other side. Tie ends into a bow. The hanger will stretch so tie the bow close to the top of the calendar.
Slide the other dowel through the center bottom casing. Slip each dowel end into a corner pocket.
Ornaments
These ornaments were designed by a variety of designers, including me (snappy tots).
Please be aware: most of the following links If you find one that does not work please send me an email.
1. Itty Bitty Snowman by Snappy Tots
2. Peppermint Candies by Petals to Picots
3. Granny Square Stocking by Eating Out Loud
4. Playful Penguin by Simply Collectible Crochet
5. Snowflakes by Ambassador Crochet
6. Santa by Dly’s Hooks and Yarns
7. Wreath by Oombawka Designs
8. Holly by Trifles N Treasures
9. Festive Sheep by Fiber Flux
10. Candy Canes by Yarnspirations
11. Trees by Snappy Tots
12. Cardinal by Hatch-ed With Love
13. Star by Zooty Owl
14. Trumpet by Kim Lapsley Crochet
15. Angel by Kim Guzman
16. Gingerbread boy by Bella Crochet
17. Gingerbread girl by Bella Crochet
18. Mittens by Cobblers Cabin
20. Bulb by Yarnspirations
21. Ice Skates from All Crafts Blogs (use an H hook)
22. Reindeer by Tales of a Crafty Mommy
23. Gingerbread House by Ursula with decorations added from Gingerbread house from Lion Brand
24. Bear by Jaime D. Designs
Extra Ornaments
Personalize your calendar even more by substituting some of these ornaments that might fit your family.


The ornaments are great on trees, as tags, on wreaths and stockings.