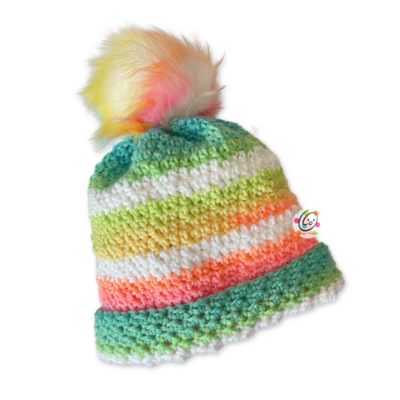
Free Pattern: Happy Day Beanie
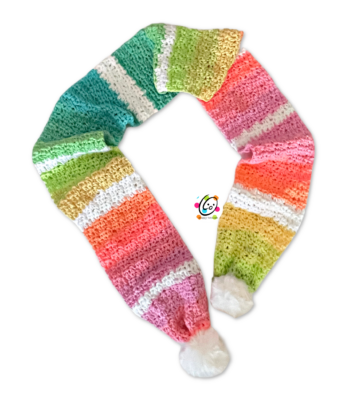
Have you ever bought an embellishment like buttons, an applique or, like in this case, a giant Pompom and held onto it until the perfect project came along? That is what I did with this wonderfully colorful 4″ faux fur pom. It finally spoke to me and said it wanted to top off a hat made from this yarn that matches it perfectly!
This year I am working on gift sets each month, one per week. I thought a set with a fun and colorful scarf, beanie and mitts would be a great gift for lots of people. This beanie could be made for almost anyone on your gift list and from a variety of yarns. It is also made from basic stitches so even beginners could give it a try.
I used Red Heart Super Saver in Retro Stripe and some Red Heart Super Saver White (or white metallic is super cute too) for the whole set. The colors make me happy and match the pompom I’ve been dying to use!

These two patterns are part of the 2022 Scarf and Hat of the Month cal with The Stitchin Mommy and Oombawka Design Crochet. Each month three beanie and three scarf patterns are released and you get can get the patterns for free for a limited time.
The Beanies
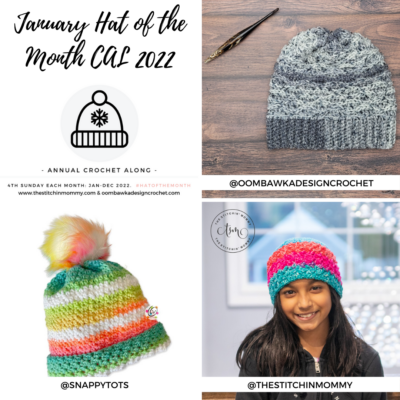
The pattern for my beanie is available free below and you can get the other two beanie patterns at the following links:
- Simply Sublime Hat by The Stitchin Mommy
- Drifter Hat by Oombawka Design Crochet
The Scarves

The crochet patterns for the three scarves shown can be found at the links below:
- Happy Day Scarf by Snappy Tots
- Simply Sublime Scarf by The Stitchin Mommy
- Drifter Scarf by Oombawka Design Crochet
About The Giant Pompom
I purchased my pompom from Hobby Lobby. The brand is Yarnology and if you measure just the core it is 3″ across. Fluffed up it is easily 4″ across or more.
I have held onto it for a year, waiting for the perfect project of it. Of course, now I cannot find a link to purchase the exact pompom online so I have searched for some that are similar and have great reviews:
- Yarnology Large Pomfrom Hobby Lobby
Rainbow Pixie Pom on Etsy - Pack of 12 on Amazon – these look really close to the one I used in my sample. The one I bought was the same price ($14) for one that they want for a dozen. I used a coupon, but still paid $8 for my ONE pom.
Matching Patterns
Happy Day Beanie Free Crochet Pattern
The pattern for this beanie is available for free below.
Get this pattern for free until 2/5/22. CLICK HERE to add it to your cart and check out. No coupon code needed.
Materials & Details
- Yarn: 180 yards ww yarn. Sample yarn: 120 yards RHSS Retro, 60 yards RHSS White Metallic
- Crochet Hook: I (5.5mm)
- Notions: Yarn needle for weaving in ends, 1 XL pompom
- Gauge: 4” of the pattern = 11.5 rounds and 13 sts
- Sizes: Child Small, Child Large, Teen/Adult
Tips
- Numbers at the beginning of each line may refer to steps and not indicate the number of rows.
- The stitch count remains the same unless stitch count is noted at the end of the line.
- If you have any questions about this pattern please contact [email protected].
Directions
Note about all sizes:
This hat begins at the top with a chain and joined to work in the round.
When the beanie length is complete, the top of the beanie will be cinched in and the pompom added.
Directions for Child Small size
- This beanie is designed to be slouchier than a regular, fitted beanie.
- It should be approximately 2” longer than usual for a beanie to allow for the bottom cuff and top closure.
- Finished length as written (with a 1.5” cuff): 7-7.5”
- This project is worked from the top of the hat to the bottom. Change colors as desired.
1. Leave a yarn tail in the beginning for closing the top of the beanie. With an I hook and ww yarn, ch 54, sl st in first ch to join for working in the round, making sure chain is not twisted. (54sts)
2. Ch 1, sc in same st and in each st to end of round, sl st to join.
Note about working in the round and color changes
- From this point on, I worked the sample in continuous rounds, placing a marker at the beginning of each round.
- Change colors in the middle of the last dc of the round. This technique will create a slight jog in colors, but since I used a self striping yarn it already was creating that appearance.
- For straighter color changes, end each round with a sl st in the first st to join and begin each round with “ch 1, sc in the same st” and then continue as written.
3. Place a marker for working in the round. Sc in the next st, hdc in the next st, dc in the next st, *sc, hdc, dc*, repeat to end of round.
4. Repeat the previous row, changing colors as desired until the beanie measures 8”. The next section will add approximately 1” to the length.
5-7. *sc in the next st, hdc in the next st*, repeat to end of round.
8. *sc in the next st, hdc in the next st*, repeat to end of round. Sl st in the next st. Finish off and weave in ends.
The bottom edge is folded up approximately 1.5”.
Top: With a yarn needle, use the beginning yarn tail to weave in and out of the beginning round of sts. Pull the yarn tail to cinch closed the beginning edge. Secure the yarn to hold this in place.
Use the remaining yarn to sew a pompom to the top of the beanie.
Directions for Child Large/Preteen size
- This beanie is designed to be slouchier than a regular, fitted beanie.
- It should be approximately 2” longer than usual for a beanie to allow for the bottom cuff and top closure.
- Finished length as written (with a 1.5” cuff): 8”
- This project is worked from the top of the hat to the bottom. Change colors as desired.
1. Leave a yarn tail in the beginning for closing the top of the beanie. With an I hook and ww yarn, ch 60, sl st in first ch to join for working in the round, making sure chain is not twisted. (60sts)
2. Ch 1, sc in same st and in each st to end of round, sl st to join.
Note about working in the round and color changes
- From this point on, I worked the sample in continuous rounds, placing a marker at the beginning of each round.
- Change colors in the middle of the last dc of the round. This technique will create a slight jog in colors, but since I used a self striping yarn it already was creating that appearance.
- For straighter color changes, end each round with a sl st in the first st to join and begin each round with “ch 1, sc in the same st” and then continue as written.
3. Place a marker for working in the round. Sc in the next st, hdc in the next st, dc in the next st, *sc, hdc, dc*, repeat to end of round.
4. Repeat the previous row, changing colors as desired until the beanie measures 8.5”. The next section will add approximately 1” to the length.
5-7. *sc in the next st, hdc in the next st*, repeat to end of round.
8. *sc in the next st, hdc in the next st*, repeat to end of round. Sl st in the next st. Finish off and weave in ends.
The bottom edge is folded up approximately 1.5”.
Top: With a yarn needle, use the beginning yarn tail to weave in and out of the beginning round of sts. Pull the yarn tail to cinch closed the beginning edge. Secure the yarn to hold this in place.
Use the remaining yarn to sew a pompom to the top of the beanie.
Directions for Teen/Adult size
- This beanie is designed to be slouchier than a regular, fitted beanie.
- It should be approximately 2” longer than usual for a beanie to allow for the bottom cuff and top closure.
- Finished length as written (with a 1.5” cuff): 9.5”
- This project is worked from the top of the hat to the bottom. Change colors as desired.
1. Leave a yarn tail in the beginning for closing the top of the beanie. With an I hook and ww yarn, ch 66, sl st in first ch to join for working in the round, making sure chain is not twisted. (66sts)
2. Ch 1, sc in same st and in each st to end of round, sl st to join.
Note about working in the round and color changes
- From this point on, I worked the sample in continuous rounds, placing a marker at the beginning of each round.
- Change colors in the middle of the last dc of the round. This technique will create a slight jog in colors, but since I used a self striping yarn it already was creating that appearance.
- For straighter color changes, end each round with a sl st in the first st to join and begin each round with “ch 1, sc in the same st” and then continue as written.
3. Place a marker for working in the round. Sc in the next st, hdc in the next st, dc in the next st, *sc, hdc, dc*, repeat to end of round.
4. Repeat the previous row, changing colors as desired until the beanie measures 9”. The next section will add approximately 1” to the length.
5-7. *sc in the next st, hdc in the next st*, repeat to end of round.
8. *sc in the next st, hdc in the next st*, repeat to end of round. Sl st in the next st. Finish off and weave in ends.
The bottom edge is folded up approximately 1.5”.
Top: With a yarn needle, use the beginning yarn tail to weave in and out of the beginning round of sts. Pull the yarn tail to cinch closed the beginning edge. Secure the yarn to hold this in place.
Use the remaining yarn to sew a pompom to the top of the beanie.
Pin To Save For Later