Free Pattern: Penguin Pocket Ornament
Growing up I had an aunt that loved Christmas. She wrapped the most beautiful presents and put a lot of thought into each one. You could tell which present belonged to each person based on the colors and embellishments she chose.
Most of the presents we give now are gift cards, but I still like to give something with each one so the recipient has a gift to open too. I started giving fun socks with the cards because everyone can use socks. Throughout the year I watch for ones that I think are good for each person. This year, for example, my daughter has been running a lot so she will get a pack of nice running socks with her gift card.
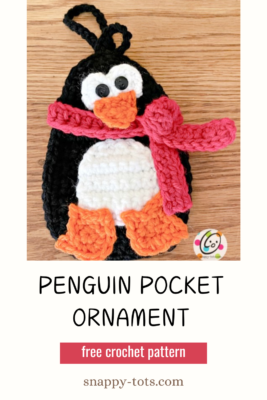
This year I decided to make tags to go on their package to hold the gift card. This penquin pocket will be cute on a package and then can either be added to the tree or tied around a basket.
Penguin Pocket Ornament Crochet Pattern
The pattern for this project is available below.
Free Download
Black Friday Freebie: This pattern is available to download for free as part of my Black Friday event. Please visit the event page to get the pattern. Offer ends 12/1/24.
About the Pattern
This is designed to hold a gift card, money, or small gift. It could also be lightly stuffed if a pocket is not needed.
Materials
- Yarn: worsted weight – 50 yards Black, 20 yards White, 20 yards for scarf, small amount of orange.
- Crochet Hook: H (5mm)
- Miscellaneous Supplies: Yarn needle, 2 small black buttons for eyes, sewing needle, matching thread
- Optional: scissors, tape measure, small amount of stuffing for non-pocket version
Details
Finished Measurements: 4” wide x 5.5” tall
Tips
- The first stitch of each row is worked into the same stitch as the turning chain unless noted otherwise.
- Numbers at the beginning of each line may refer to steps and not indicate number of rows.
- Instructions are written with color changes as shown in sample. Substitute colors as desired.
- Stitch count remains the same unless noted at the end of the line.
- Reminder: sc 3 = sc one st in each of the next 3 sts; 3sc in next st = work 3sc sts in the next (one) st.
Body (make 2)
This starts at the top of the penguin’s head.
1. With an H hook and black worsted weight yarn, ch 4, 2sc in the 2nd ch from hook, sc, 2sc in the last ch from hook. (5sts)
2. Ch 1, turn, 2sc in the same st, sc 3, 2sc in the last st. (7sts)
3. Ch 1, turn, sc in the same st and in each st to end of row.
4. Ch 1, turn, 2sc in the same st, sc 5, 2sc in the last st. (9sts)
5. Ch 1, turn, sc in the same st and in each st to end of row.
6. Ch 1, turn, 2sc in the same st, sc 7, 2sc in the last st. (11sts)
7. Ch 1, turn, sc in the same st and in each st to end of row.
8. Ch 1, turn, 2sc in the same st, sc 9, 2sc in the last st. (13sts)
9. Ch 1, turn, sc in the same st and in each st to end of row.
10. Repeat the previous row for an additional 9 rows.
11. Ch 1, turn, sc2tog, sc 9, sc2tog. (11sts)
12. Ch 1, turn, sc2tog, hdc 7, sc2tog. (9sts)
13. This step creates the hanger top and is worked around the outer edge of the penguin.
Note: the front body piece has a shorter hanger than the back. The back loop is meant to go through the front loop to close the pocket and then hang on the tree.
First body piece (front with short hanger): Ch 1, do not turn. 2sc in the same st, sc evenly up the side of the penguin, 2sc in the first st on the top row, ch 10, sk 1, 2sc in the last st. Sc evenly down the side of the penguin, 2sc in the first st on the bottom row, sc in each st to end of row, sl st in the first st to join. Finish off and weave in ends.
Second body piece (back with longer hanger): Ch 1, do not turn. 2sc in the same st, sc evenly up the side of the penguin, 2sc in the first st on the top row, sl st in the next st, ch 22, sl st in the same st, 2sc in the last st. Sc evenly down the side of the penguin, 2sc in the first st on the bottom row, sc in each st to end of row, sl st in the first st to join. Finish off and weave in ends.
Repeat for the second body.
Tummy (make 1)
1. With an H hook and worsted weight white yarn, ch 7, 2sc in the 2nd ch from hook, sc 4, 2sc in the last ch. (8sts)
2. Ch 1, turn, sc in the same st and in each st to end of row.
3. Repeat the previous row for an additional 4 rows.
4. Ch 1, turn, sc2tog, sc 4, sc2tog. (6sts)
5. Ch 1, turn, sc2tog, hdc 2, sc2tog. (4sts) Finish off, leaving a long tail for sewing in place.
With a yarn needle, use the white yarn tail to sew the tummy to the front body piece (with the shorter hanger) near the bottom.
Eyes (make 1)
1. With an H hook and worsted weight white yarn, ch 6, sc in the 2nd ch from hook and in each ch across. (5sts)
2. Ch 1, turn, sc in the same st, hdc, ch 1, sl st in the next st, ch 1, hdc in the next st, ch 1, sl st in the same st. Finish off, leaving a long tail for sewing in place.
With a yarn needle, use the white yarn tail to sew the eyes to the front body piece (with the shorter hanger) near the top.
With a sewing needle and black thread, sew the buttons on top of the white piece. See main photo for placement.
Feet (make 2)
1. With an H hook and worsted weight orange yarn, create a magic loop of 5 sc sts (or preferred method for starting a circle of 5 sc sts), pull to close, sl st to join. (5sts)
2. Ch 3, sl st in the 2nd ch from hook, sc in the 3rd ch from hook, sl st in the next st on the circle, (hdc, ch 2, sl st in the 2nd ch from hook, hdc) in the next st, sl st in the next st, ch 3, sl st in the 2nd ch from hook, sc in the 3rd ch from hook, sl st in the next st on the circle, 3hd c in the next st, sc, sl st in the first ch from beginning to join.
Finish off, leaving a long tail for sewing in place.
With a yarn needle, use each orange yarn tail to sew the feet to the front body piece (with the shorter hanger) near the bottom.
Beak
1. Leave a long yarn tail in the beginning for sewing. With an H hook and worsted weight orange yarn, ch 5, sc in the 2nd ch from hook, sc 3. (4sts)
2. Ch 1, turn, sc2tog, sc2tog. (2sts)
3. Ch 1, turn, sl st in the last st. Finish off and weave in end.
With a yarn needle, use the beginning yarn tail to sew the beak in place, slightly overlapping the bottom edge of the eyes.
Assembly
Pocket Version: After all pieces have been sewn on the front, stack the top piece on top of the back piece, wrong sides together.
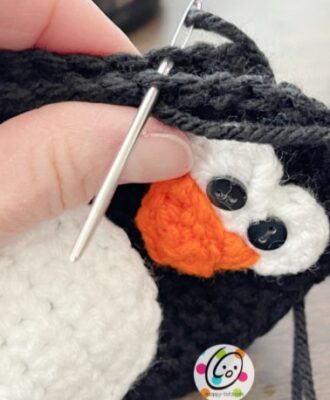
With a long piece of black yarn (to match the body) and a yarn needle, start at the left side of the eyes. Match the sts of both body pieces and sew together until you reach the opposite side of the eyes. See photo.
Tip: I worked into the inside loops of each piece instead of the full st.
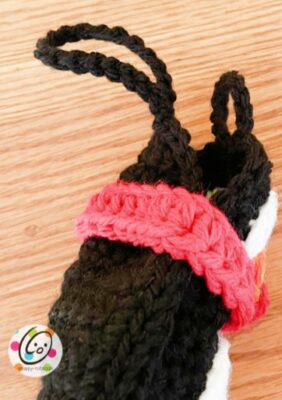
Non-pocket Version: Follow instructions above, but add a small amount of stuffing between the body pieces and sew the seams together all the way around the piece.
Scarf (make 1)
With an H hook and worsted weight yarn (red in sample), ch 52, hdc in the 3rd ch from hook and in each ch across. (50sts) Finish off and weave in ends.
Wrap the scarf around the neck area and start a knot at one side. Do not knot the scarf. There is not enough “fabric”. Instead, lay the scarf ends as shown in the photo. Use a yarn needle and long piece of matching yarn to sew the top scarf piece in place.
Place something fun inside, pull the long loop through the short loop to lock it in place and hang from the tree or tie to a gift.
Pin To Save For Later




What a cute little pocket penguin. All your designs are awesome!