

Free Crochet Pattern: Puffy Heart Scarf
Maybe it is because Valentine’s is just around the corner or because I miss being able to hug family and friends, but I decided I wanted to make a scarf with big, puffy hearts. I grabbed a skein of “Red Heart Super Saver Ombre” yarn and got to work. I hope you like what I created.
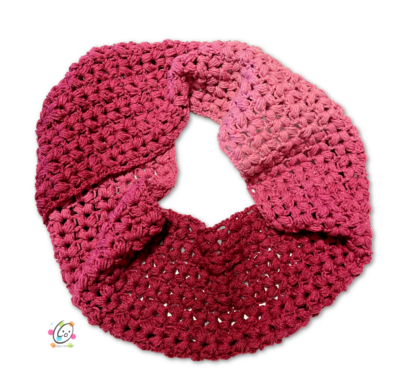

I designed this so it could be made in any length since I get frustrated looking for scarf patterns that fit just what I want. This way you can make everything from a long scarf to a short cowl.
Matching Patterns You Might Enjoy
- Free: Circle of Love Scarf
- Free: Chunky Puffy Heart Cowl
- Free: Circle of Love Beanie
- Paid: Puffy Heart Beanie
Puffy Heart Scarf Pattern
The crochet pattern for this scarf is available for free below. An ad-free, downloadable pattern is available for a small fee: Ravelry | Etsy
Materials and Details
- Yarn: 482 yards ww yarn for a 58″ long scarf. Sample: Red Heart Super Saver Ombre in Anemone. Note: For a longer scarf you will need more than one skein of this yarn.
- Crochet Hook: I (5.5mm)
- Notions: Yarn needle for weaving in ends and sewing end seam.
- Size: 8″ wide x 58″ long or desired length. I used one full skein, 482 yards, for this length. It creates a circle scarf that is 29″ long.
- Gauge: 4” with an I hook = 3.5″ puff clusters x 6 rows of puff clusters
Tips
- Stitch count remains the same for the entire scarf
- If you have any questions about this pattern please contact [email protected].
Special Stitch: Puff Stitch
There are a variety of puff stitches. Please follow the instructions below for how I work this particular puff.
Puff Stitch: YO, insert hook in next st and pull up a loop, *YO, insert hook in same st and pull up a loop*, repeat 2 more times. There should be 9 loops on the hook. YO and carefully pull the yarn through all of the loops on the hook. Ch 1.
Tips for this special stitch:
- You will YO and pull up a loop 4 times and have 9 loops on your hook. Once you get the hang of it this goes pretty quickly.
- I did loose the loops a few times and had to redo the puff so don’t worry if that happens.
- The “ch 1” at the end finishes off the puff st.
- When pulling up each loop, pull the loop up a little higher than you would if working a regular stitch. This will make it easier to get your hook through all the loops at the end PLUS it makes you puff … puffier 😁
Directions
1. With an I hook and ww yarn, ch 32, sc in the 2nd ch from hook and in each ch across. (31sts)
2. Ch 3, turn, sk the first st (at the base of the turning ch) and the next 2 sts, (puff, ch 1, puff) in the next st. Note: remember to “ch 1” after each puff. So, after the first puff you will have a ch 1 to finish that puff and another ch 1 between the two puffs. *sk 3 sts, (puff, ch 1, puff) in the next st*, repeat until 3 sts remain, sk 2, dc in the last st.
3. Ch 3, turn, sk the first st and the next 2 sts, (puff, ch 1, puff) in the ch 1 space between the puffs from the previous row, *(puff, ch 1, puff) in the next ch 1 space from the previous row*, repeat across. Work a dc in the top of the ch 3 from the previous row.
4. Repeat the previous row until the scarf is the desired length.
Note: If you are using one skein, make sure you leave at least 36″ of yarn after the last puff row so you will be able to work step 5.
5. Ch 1, turn, sc in each st across, making sure you end with 31sts. Finish off, leaving a long yarn tail for sewing the two ends together IF you are making a circle scarf. For a straight scarf, weave in the ends.
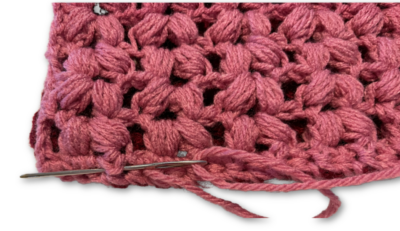
Finishing a Circle Scarf
I crossed the ends of my scarf and lined up the short ends. With a yarn needle, I used the yarn tail to sew the ends together. The edge is at the bottom of the scarf in the photo below.

After sewing the two ends together, I flattened the seam and wove the yarn tail in and out of the sts, right next to the seam (see photo below). This helped the seam lay flat and is a totally optional step.
Show Me Your Scarves
If you make a scarf please share a picture so I can see. You can either email it to me or post it online and tag me with #snappytots.
Pin To Save For Later


