

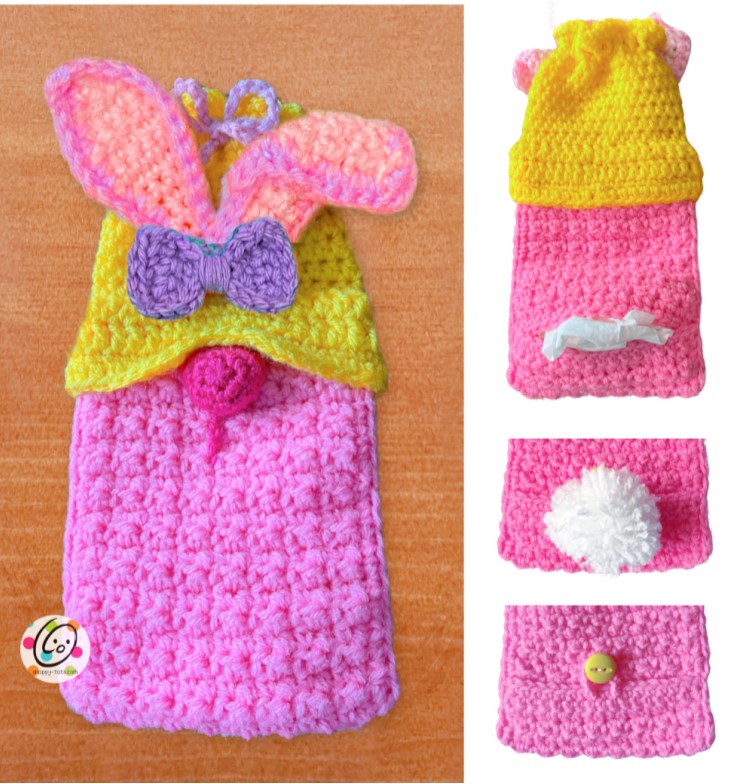
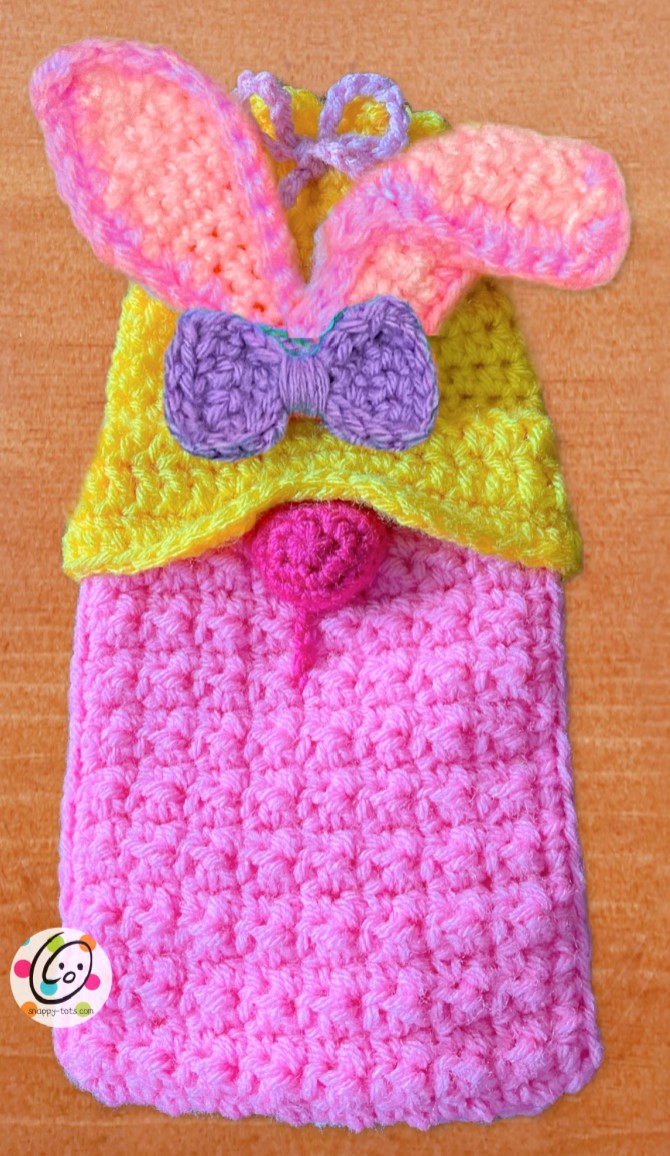
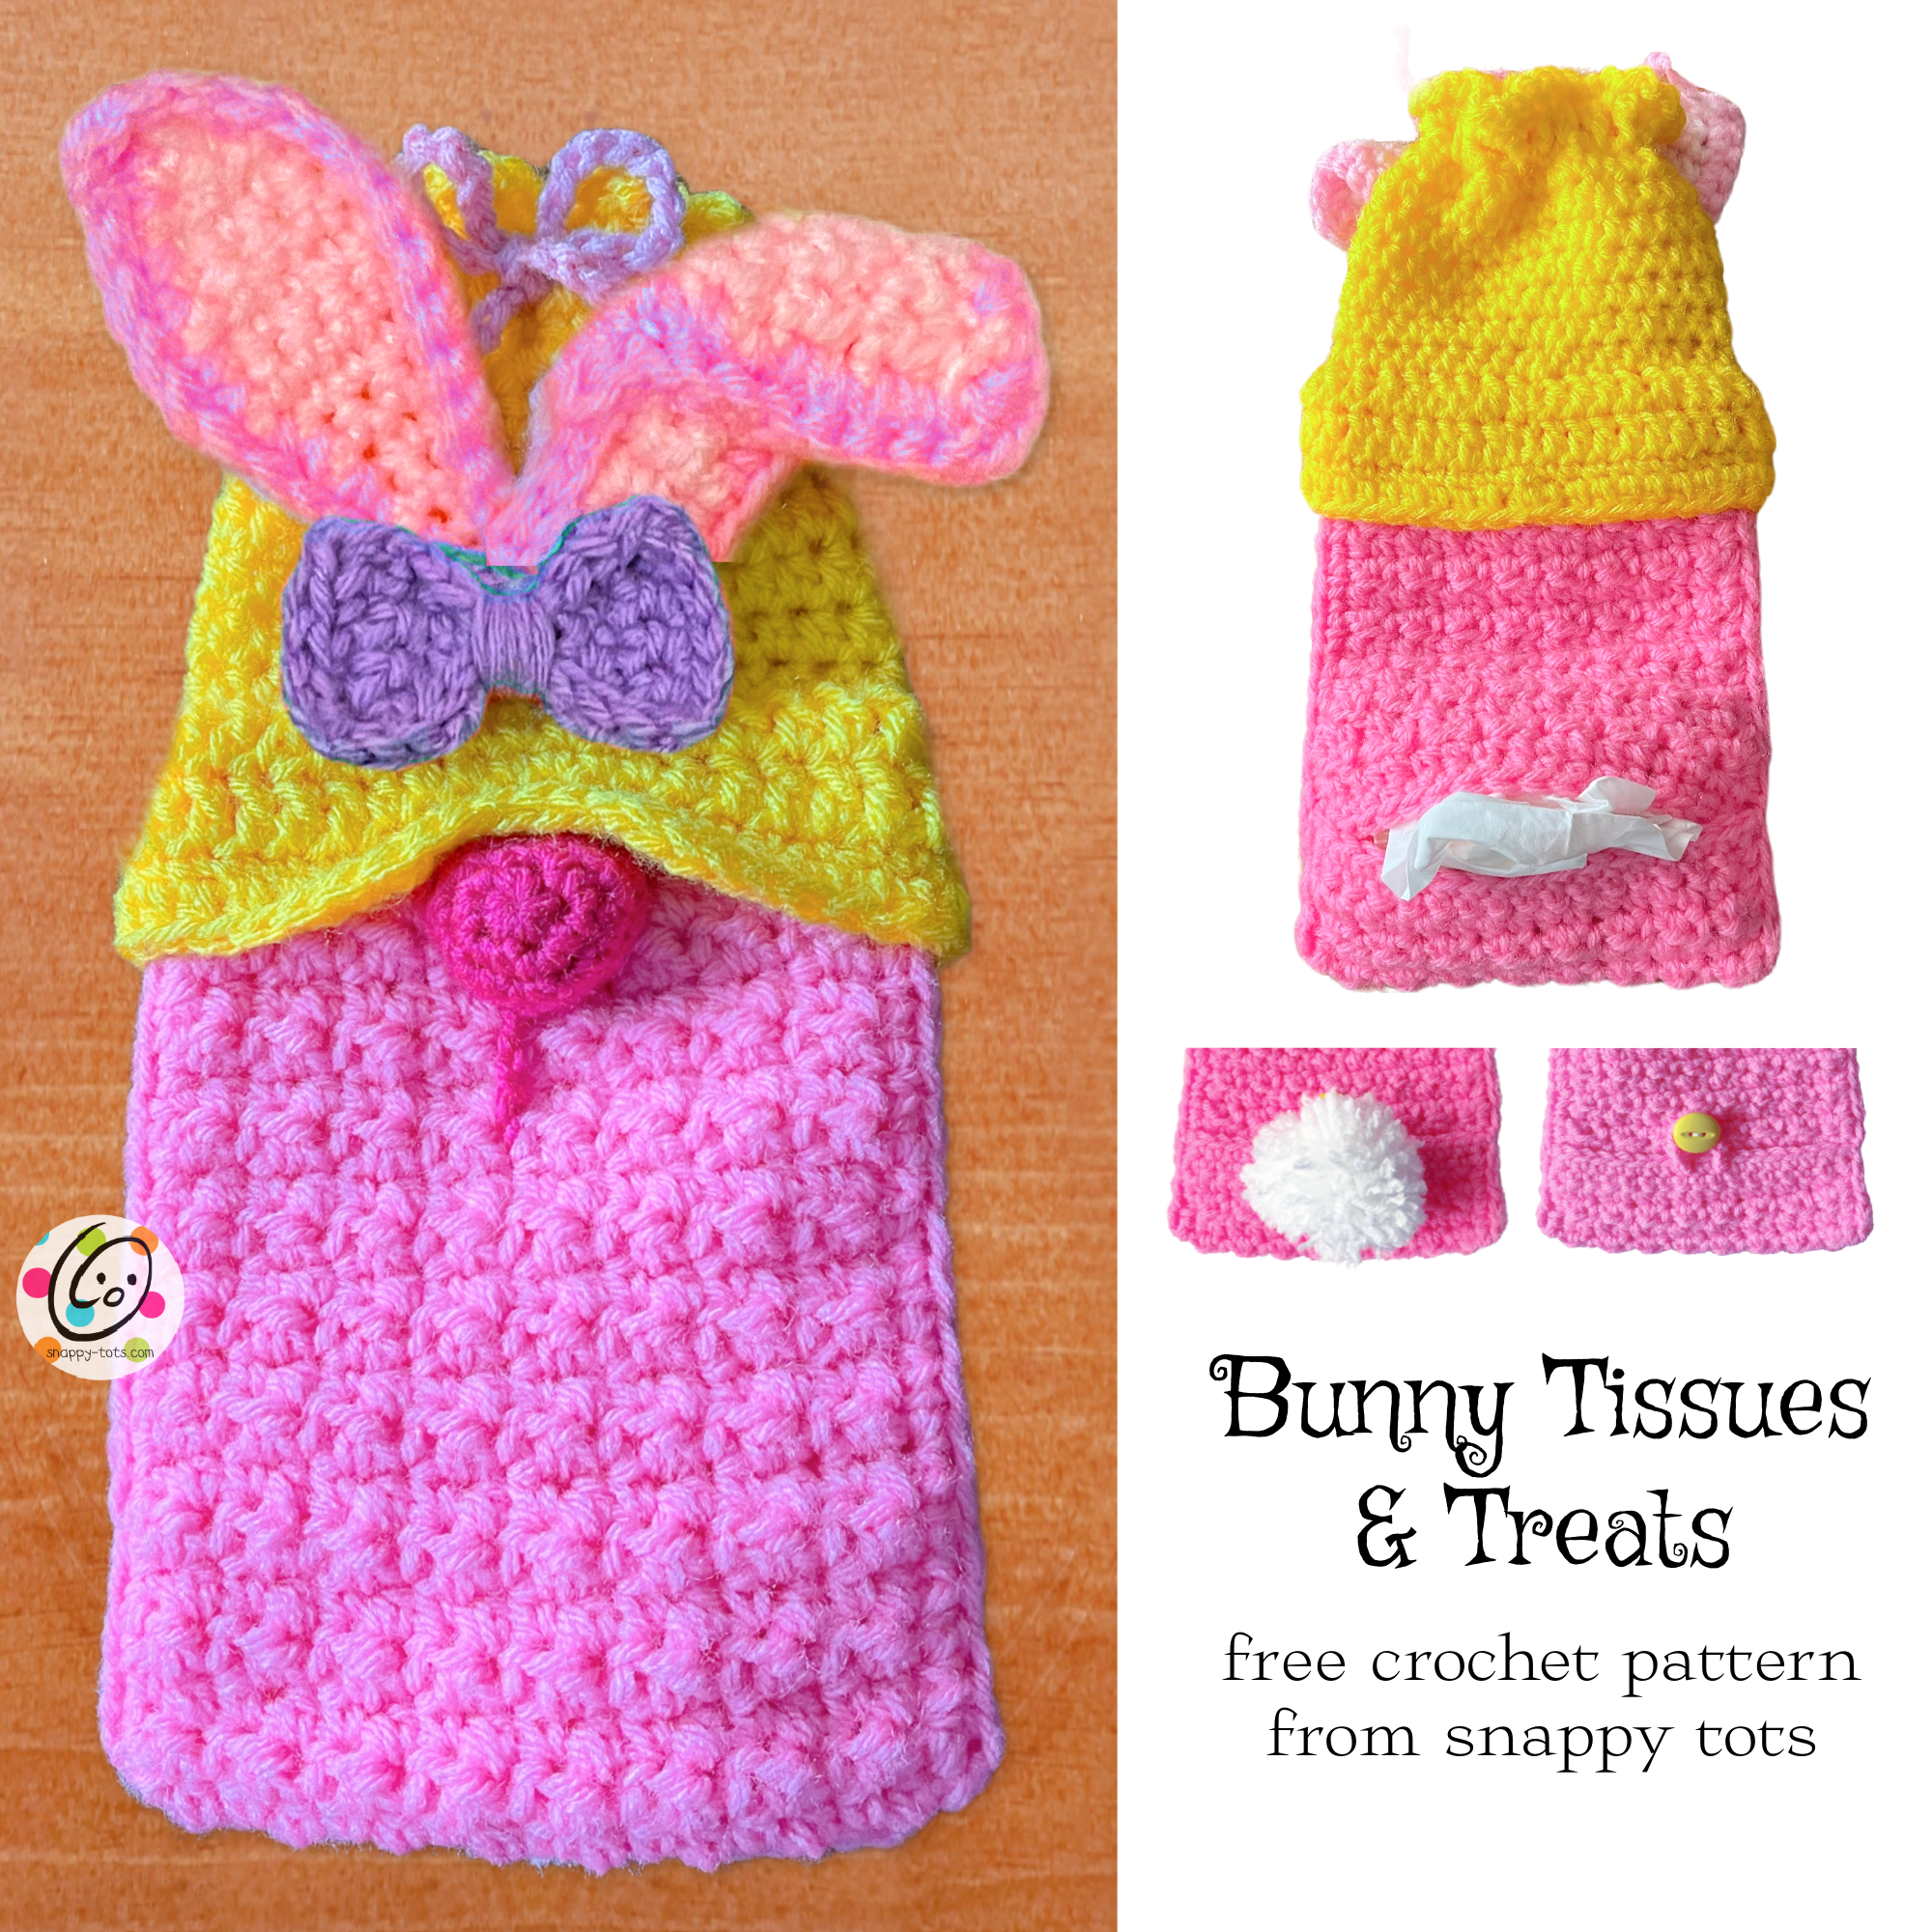
Free Pattern: Bunny Tissues and Treats
One of my most favorite things to give as gifts are tissue holders. Over the years I have made several, from plain to animals, even a double tissue holding gnome. I thought it would be fun to make one for Easter that can hold tissues and treats…or just treats.

More Tissue Holders
Bunny Tissues and Treats Crochet Pattern
The pattern is available for free below, plus a downloadable, ad free pdf is available from my shops: Ravelry | Etsy
Materials
- Worsted Weight Yarn: 150-175 yards Sample yarns: (RHSS = Red Heart Super Saver) Body – RHSS Pretty N Pink Hat – RHSS Bright Yellow Nose – RHSS Shocking Pink Ears – RHSS Baby Pink, Petal Pink Bow – RHSS Medium Purple Drawstring: Bernat Super Value Lilac Tail (optional): White
- Crochet Hook: H (5mm)
- Notions: Yarn needle, straight pins for holding pieces during assembly.
- Optional: ½” button, measuring tape, scissors, 1 small pack of tissues
Measurements
- Finished Measurements: 10.5” high x 5.5” across
- Gauge: not needed for this project.
Tips
- The first stitch of each row is worked into the same stitch as the turning chain unless worked in the round.
- Numbers at the beginning of each line may refer to steps and not indicate number of rows.
- Stitch count remains the same unless noted at end of row/round.
- Finger shape the pieces for a smooth edge.
- Reminder: sc 3 = sc one st in each of the next 3 sts; 3sc in next st = work 3sc sts in the next (one) st
If you have any questions, comments or suggestions please email [email protected].
HI! Thank you for choosing to make one of my designs. It means the world to me and I hope this will be an enjoyable experience. If you have any questions or need help in anyway please do not hesitate to contact me. The quickest reply: email [email protected] and put “911 pattern help” in the subject line.
About This Project
The bag is created in pieces, seamed together, and then the hat and ears are added. I have listed the directions in an order I hope will make it easiest for you. Please follow the tips along the way for the most enjoyable experience. I have also included different options for finishing the bunny’s bum (back of bag). All variations use the same main pieces.
Order of Directions
- One long rectangle that will fold up on the bottom edge.
- One shorter rectangle for the back
- Bag assembly
- Hat
- Features: Ears, Bow, Nose
Back Variations
The back of the back can be finished off in a couple different ways. The bag is created the same way no matter which option will be used.
This was designed with an opening in the top and an opening approximately 2” from the back, bottom edge to hold a small pack of tissues.
If preferred, a small button and loop can be added to the back opening to access the inside pocket instead.
The bag can have one large section (accessed from the top, drawstring opening and back opening) OR a seam can be added to create two smaller sections.
Long Rectangle
This is worked back and forth in short rows.
1. With an H hook and worsted weight yarn (Pretty N Pink in sample) ch 17, sc in 2nd ch from hook and in each ch across. (16sts)
2. Ch 1, turn, hdc in same st, sc in next st, *hdc, sc* repeat to end of row.
3. Repeat the previous row for an additional 24 rows.
4. This step is worked around the outer edge of the rectangle. Ch 1, do not turn. Sc in the same st, st evenly down the side of the rectangle. (sc, ch 1, sc) in the first st of the bottom edge, sc in each st until 1 st remains, (sc, ch 1, sc) in the last st. Sc evenly up the side of the rectangle, (sc, ch 1, sc) in the first st of the row, sc in each st to end of row. Sl st in the first sc to join.
Finish off and weave in ends. This is the right side of the piece. Set aside.
Shorter Rectangle
This is worked back and forth in short rows.
1. With an H hook and worsted weight yarn (Pretty N Pink in sample) ch 17, sc in 2nd ch from hook and in each ch across. (16sts)
2. Ch 1, turn, hdc in same st, sc in next st, *hdc, sc* repeat to end of row.
3. Repeat the previous row for an additional 14 rows.
4. This step is worked around the outer edge of the rectangle. Ch 1, do not turn. Sc in the same st, st evenly down the side of the rectangle. (sc, ch 1, sc) in the first st of the bottom edge, sc in each st until 1 st remains, (sc, ch 1, sc) in the last st. Sc evenly up the side of the rectangle, (sc, ch 1, sc) in the first st of the row, sc in each st to end of row. Sl st in the first sc to join.
Finish off and weave in ends. This is the right side of the piece. Set aside.
Bag and Pocket Assembly
To create the back pock at sew the rectangles together, please follow the steps below in order:
- Place the long rectangle right side down on a flat surface.
- Place the shorter rectangle on top of the long rectangle, wrong sides together. Make sure the short edges at one end are lined up. Pin the short edges at this end together.
- Fold the opposite end of the long rectangle back against itself, overlapping the short rectangle ½”. Pin all edges together.
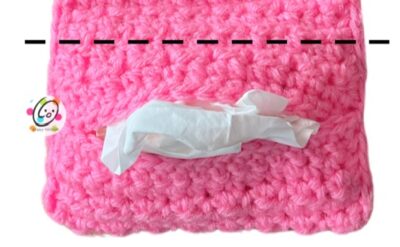
- With a yarn needle and long piece of matching yarn, sew the side seams together. Note: I like to sew the edges together just inside the outer edges instead of wrapping around the stitches. See the dotted line in closeup below.

Optional: Pocket Division
The bag can be one big section or divided into 2 sections. Whether or not the back opening will be used for tissues, you might want to add a seam to create a small “pocket” in the back.
With a yarn needle and long piece of matching yarn, sew the layers together 3” from the bottom edge. See dotted line in photo below.
Hat
This starts as a separate piece and then is added to the bag.
1. With an H hook and worsted weight yarn (Bright Yellow in sample), ch 40, sl st in the last ch from hook to join in a loop. Make sure the chain isn’t twisted. (40sts)
2. Ch 1, sc in each ch to end of round, sl st to join.
3. Ch 1, dc in the same st, dc 15, hdc, sc 6, hdc, dc 16, sl st to join.
4. Ch 1, dc in the same st, *dc2tog, dc 3*, repeat 2 more times, hdc, sc 6, hdc, *dc2tog, dc 3*, repeat 2 more times, dc, sl st to join. (34sts)
5. Slip over the top opening of the bag, lining up the “nose indent” with the center front of the bag. The current starting of the round should be near center back. Pin in place if needed.
Note: the number of sts on the top of the bag should be close to 34sts. Since there are seams at each side, the sts of the bag and hat might not line up perfectly. Use the hat sts as the guide, working into the bag sts as possible.
Ch 1. Working through both layers, hdc in the same st and in each st to end of round, sl st to join. (34sts)
6. Ch 1, hdc in the same st and in each st to end of round, sl st to join.
7. Repeat the previous round for an additional 6 rounds.
8. This round is where the drawstring will be added. Ch 1, dc in the same st and in each st to end of round, sl st to join.
9. Work the sts of this round between the posts of the previous round to help open up the sts for the drawstring to easily pass through. Ch 1, sc between the posts to end of round, sl st to join.
10. *ch 1, sl st in the next st*, repeat to end of round. Finish off and weave in ends.
Features
Ears (make 2)
1. With an H hook and worsted weight yarn for inside of ear (Lighter pink in sample) , ch 5, sc in 2nd ch from hook, sc 3. (4sts)
2-6. Ch 1, turn, sc 4.
7. Ch 1, turn, 2sc in same st, sc 2, 2sc in last st. (6sts)
8-9. Ch 1, turn, sc 6.
10. Ch 1, turn, sc2tog, sc 2, sc2tog. (4sts)
11. Ch 1, turn, sc 4.
12. Ch 1, turn, sc2tog, sc2tog. (2sts)
13. Ch 1, turn, sc2tog.
14. Finish off current yarn and change to darker pink. This step is worked around the outer edge of the ear. Ch 1, sc evenly down side of ear. 2sc in first st of bottom/beginning row, sc 2, 2sc in last st. Sc evenly up side of ear.
Work the following in the tip of the ear: sc, hdc, ch1, sl st down the side of the ear. Finish off, leaving a long tail for sewing in place.
Repeat for the second ear.
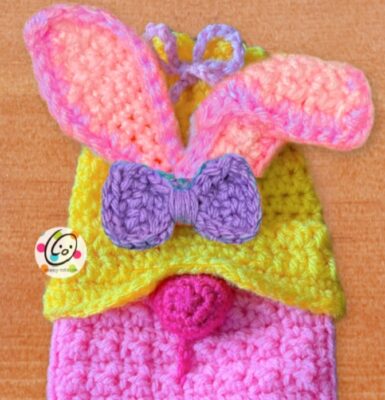
Tip: For the sample, I folded one edge of each ear in, on top of itself a little at the bottom edge before sewing to the bag. This makes the edge of the ear bend inward, creating more dimension.
With a yarn needle, use the yarn tail to sew the bottom edge of each ear to the center front of the bag approximately 1.5” from the top of the nose indent of hat. See photo for placement.
Bow
1. With an H hook and worsted weight yarn (Medium Purple in sample), ch 6, sc in the 2nd ch from hook and in each ch across. (5sts)
2. Ch 1, turn, sc in the same st and in each st across.
3. Ch 1, turn, sc2tog, sc, sc2tog. (3sts)
4. Ch 1, turn, sc2tog, sc. (2sts)
5. Ch 1, turn, sc in the same st, sc.
6. Ch 1, turn, 2sc in the same st, sc. (3sts)
7. Ch 1, turn, 2sc in the same st, sc, 2sc in the last st. (5sts)
8-9. Ch 1, turn, sc in the same st and in each st across.
10. This step is worked around the outer edge of the bow. Ch 1, sl st in the same st. Sl st evenly down the long side of the bow. Ch 1, sl st in the first st of the beginning edge of the bow. Sl st in each st across. Ch 1. Sl st evenly down the next long side of the bow. Ch 1, sl st in each st across the last row of the bow. Finish off and weave in ends.
Take a long piece of matching yarn and wrap it around the middle of the bow several times, cinching in the center. Secure the yarn. Use the remaining yarn and a yarn needle to sew the bow overlapping the base of the ears.
Nose
1. With an H hook and worsted weight yarn (shocking pink in sample), start with a magic circle of 5 sc sts (or preferred method for starting a circle of 5 sc sts), pull closed and place marker for working in the round. (5sts)
2. 2sc in each st to end of round. (10sts)
3. *sc, 2sc in the next st*, repeat to end of round. (15sts)
4. Sc in each st to end of round. Finish off, leaving a long tail for sewing in place.
Lightly stuff the nose.
With a yarn needle, use the yarn tail to sew the open edge of the nose to the bag, slightly under the hat edge and in a triangle shape. Stitch a short line straight down from the tip of the nose. See photo.
Drawstring
With an H hook and worsted weight yarn (Lilac in sample), ch 75. Finish off, leaving 2” tails at each end. Do not tie a knot in the ends yet.
Use a yarn needle and the yarn tail from one end of the drawstring to weave in and out of the DC round at the top of the hat, starting in the middle front, until the ends are even.
Tie a knot in each end. Trim yarn tails. Pull to close and tie in a bow.
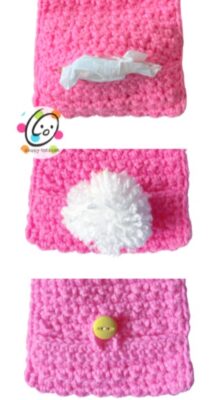
Back Pocket
Tissue Pocket: Insert a small pack of tissues. Done.
Pompom Tail: This can be added to any of the versions either over the button or above.
Cut a piece of white yarn 8” long. This will be used to tie around the middle of the pompom. Set aside.
Wrap a strand of white yarn around the palm of your hand 50 times. Carefully slide the loops off your hand.
Use the 8” piece to wrap around the middle of the yarn loops and snugly tie a knot.
Hold onto the ends of this piece of yarn.
Trim the loops and pom as desired.
Use the yarn tails to tie the pompom to the back of the bag (see photo for placement).
Carefully pull the strands of yarn apart for a frizzy, fuller look.
Button Closure: For an option without tissues, a button and loop closure is good to hold in any small items.
With a sewing needle and matching thread, sew a button (⅝-¾”) to bag, slightly above the pocket opening (see photo for placement).
With an H hook and matching yarn, ch 7, finish off, leaving a yarn tail at each end.
Use a yarn needle and each yarn tail to sew the ends of this loop directly below the button, across the opening.
Contact & Snappy Spots
Please visit Snappy Tots online for giveaways, new release announcements, events and fun.
- Blog: http://snappy-tots.com
- Shop: http://shop.snappy-tots.com
- Facebook: http://www.facebook.com/snappytots
- Pinterest: http://www.pinterest.com/snappytots
- Instagram: http://www.instagram.com/snappytots
- Twitter: http://www.twitter.com/snappytots
If you have any questions, comments or suggestions please email [email protected].
I hope you will enjoy this pattern and I would love to see what you make. Please share pix as a ravelry project or tag me in social media posts by adding #snappytots.
Pin To Save For Later


So cute Heidi ❣️❣️❣️ happy Easter to you and your family ❤️