• home
    • Blog
    • Contact
  • Subscribe
  • Crochet Patterns
    • Free Patterns
      • Weekly Freebies
        • Weekly Projects
        • Weekly Wash Patterns
    • Ravelry Shop
    • Shopify Shop
    • Etsy Shop
    • Free Patterns (new to old)
    • Free Patterns (by Category)
  • DIY
    • Cricut
  • Community
  • Events
    • SS 2023
    • Great Summer Gift Event 2023
    • Birthmonth Celebration
    • Make Ahead Mondays
  • SPECIALS
  • 0 items
  • home
    • Blog
    • Contact
  • Subscribe
  • Crochet Patterns
    • Free Patterns
      • Weekly Freebies
        • Weekly Projects
        • Weekly Wash Patterns
    • Ravelry Shop
    • Shopify Shop
    • Etsy Shop
    • Free Patterns (new to old)
    • Free Patterns (by Category)
  • DIY
    • Cricut
  • Community
  • Events
    • SS 2023
    • Great Summer Gift Event 2023
    • Birthmonth Celebration
    • Make Ahead Mondays
  • SPECIALS
  • 0 items

snappy tots

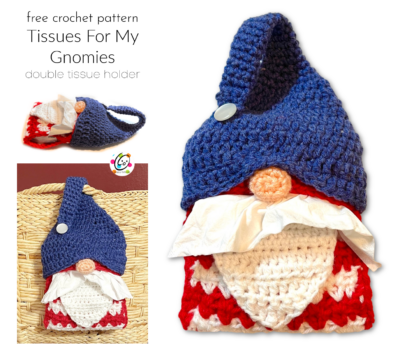
Tissues For My Gnomies – Double Tissue Holder

I love making tissue holders for gifts. They are something everyone can use and they are quick to whip up. They make wonderful stocking stuffers and are a unique item for craft fairs too.

This little guy is extra handy because he will hold two little tissue packs (because one little back is just not enough). His hat will button around the strap of your bag or hang from something so he can always be handy.

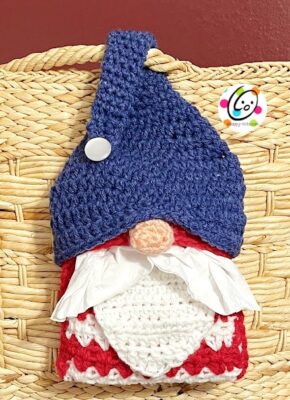
Tissues for my gnomies – Double Tissue Holder

This pattern is available to view here on my blog for free below.

Materials

  • Worsted Weight Yarn: 150-175 yards 
  • Crochet Hook: H (5mm)
  • Notions: Yarn needle, ½” button, straight pins for holding pieces during assembly.
  • Optional: Measuring tape, scissors, ¾ button, 2 small packs of tissues

Measurements

  • Finished Measurements: 10.5” high x 5.5” across
  • Gauge: not needed for this project.

Tips – Please read before you begin the project.

  • First stitch of each row is worked into the same  stitch as the turning chain.
  • Numbers at the beginning of each line may refer to steps and not indicate number of rows.
  • Stitch count remains the same unless noted at end of row/round.

If you have any questions about this pattern please contact [email protected].

Directions

Color changes: for stripes, work 2 rows per color. You can carry the unused yarn up the side of the piece. This will be covered at the end.

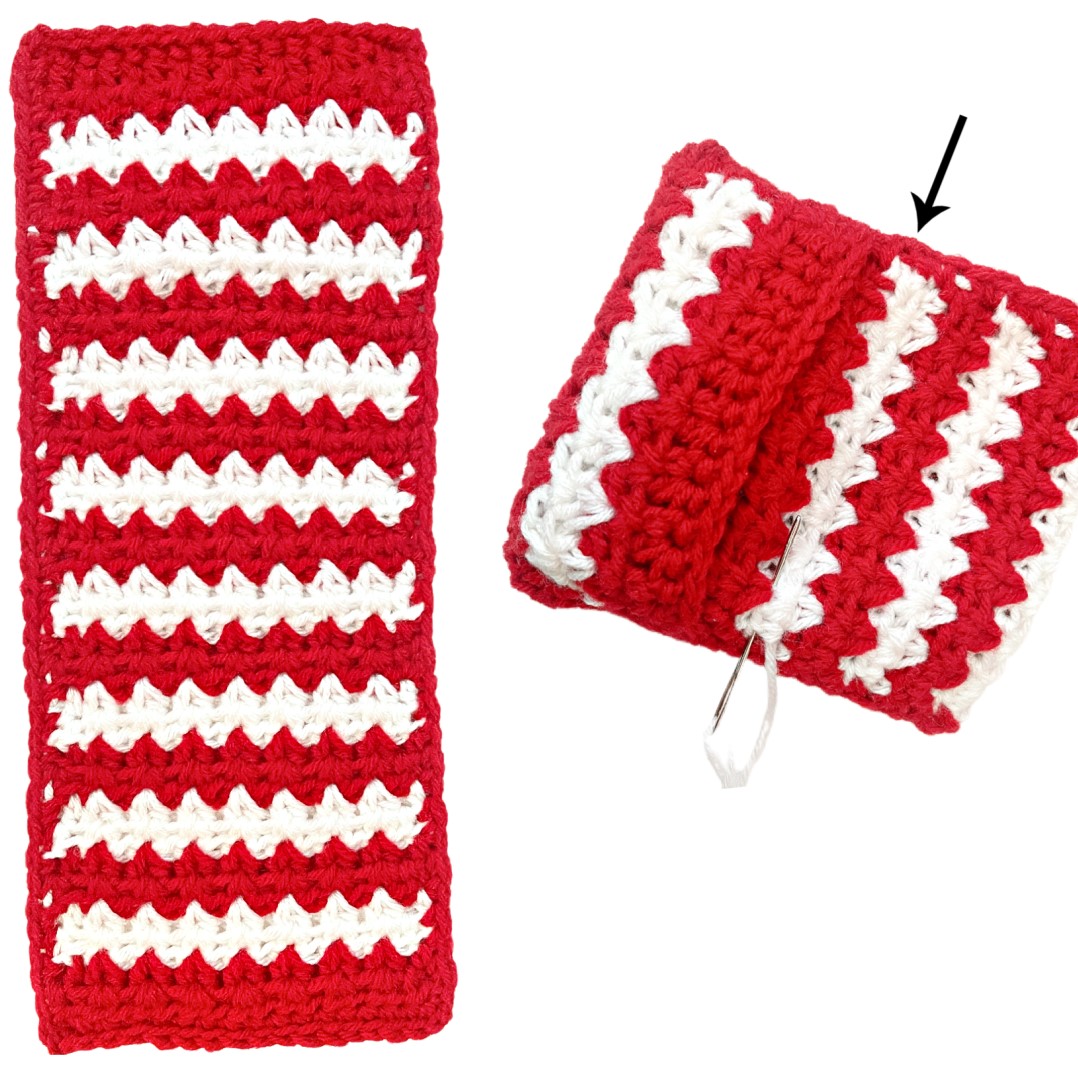
1. With an H hook and red yarn ch 17, sc in 2nd ch from hook and in each ch across. (16sts)

2. Ch 1, turn, hdc in same st, *sk 1, 2hdc in next st*, repeat until 1 st remains, hdc in last st.

3. Ch 1, turn, hdc in same st, 2hdc between each pair from the previous row, hdc in last st. 

      Tip: Think of each 2hdc from previous row as a V. Work the 2hdc in the middle of the V. 

4. Repeat the previous step for an additional 32 rows. (34 cluster rows total)

5. Ch 1, turn, sc in same st and in each st to end of row until 1 st remains, (sc, ch 1, sc) in last st. (17sts + 1 ch)

6. This step is worked around the outer edge of the rectangle. *Pivot to work down the long edge/side of rows. Sc 34-36 sts evenly spaced across the edge. (sc, ch 1, sl st) in first st of bottom row, sl st loosely in each st across, working (sl st, ch 1, sc) in last st, * repeat once. Finish off and weave in ends. This is the right side of the piece.

Pocket Assembly

To create the pockets, please follow the steps below in order:

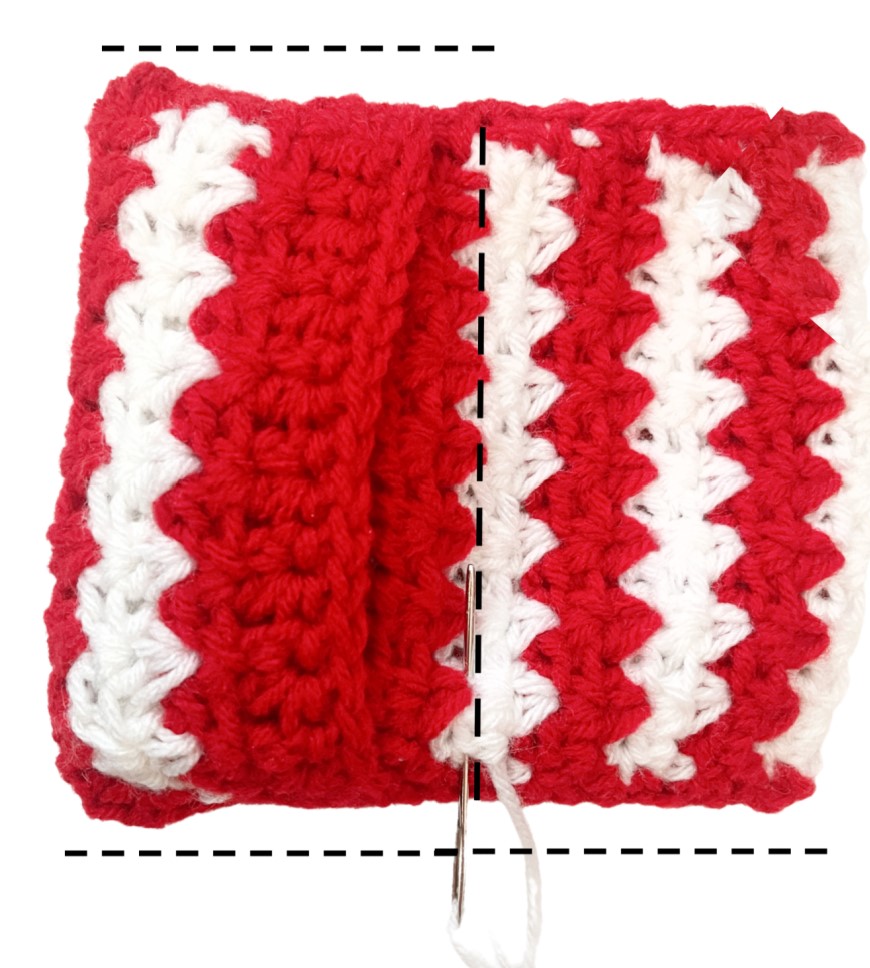
1. Flip the piece over so the right side of the piece is down on a flat surface.

2. Fold the left edge between the fourth and fifth cluster rows as shown in the photo below. Pin in place if needed.

3. Fold the right edge and tuck it under the left edge approximately ½” as shown in the photo below. Pin the layer edges together.

4. With a yarn needle and matching yarn, sew the following areas together (see stitch lines in graphic below):

Sew layers together at bottom edge.

Sew layers together at top edge from left edge to first ridge of right layer. 

Divide into two pockets by sewing a vertical line left of the first ridge of the right layer. See middle line below.

Nose

1. With an H hook and light peach yarn, start with a magic circle of 6 sc sts (or preferred method for starting a circle of 6 sc sts), pull closed and place marker for working in the round. (6sts)2. 2sc in each st to end of round. (12sts)

3. Sc in each st to end of round.

4. *sc2tog, sc 4*, repeat once. (10sts) Finish off, leaving a long tail for sewing in place. 

Lightly stuff the nose. 

With a yarn needle, use the yarn tail to sew the open edge of the nose to the edge of the top flap. See the main photo for placement.

Beard

1. Leave a long tail in the beginning. With an H hook and white yarn, ch 15, sc in the 2nd ch from hook and in each ch across. (14sts)

2. Ch2, turn, 2hdc in the same st, hdc 12, 2hdc in the last st. (16sts)

3. Ch 2, turn, hdc2tog, hdc 12, hdc2tog. (14sts)

4. Ch 2, turn, hdc2tog, hdc 10, hdc2tog. (12sts)

5. Ch 2, turn, hdc in the same st and in each st to end of row. 

6. Ch 2, turn, hdc2tog, hdc 8, hdc2tog. (10sts)

7. Ch 2, turn, hdc2tog, hdc 6, hdc2tog. (8sts)

8. Ch 1, turn, sc2tog, sc 4, sc2tog. (6sts)

9. Ch 1, turn, sc2tog. (hdc, dc) in the next st, (dc, hdc) in the next st, sc2tog. Finish off, leaving a tail for sewing in place.

With a yarn needle, use the yarn tail from the beginning to sew the beginning flat edge to the rectangle edge tucked under the first edge. See main photo for placement.

Hat

1. With an H hook and blue yarn, ch 6, sl st in the last st from hook to create a circle. Ch 1, sc in each ch to end of round. (6sts) This creates a buttonhole at the tip of the hat. 

2. Ch 1, sc in the same st, sc 2. (3sts) Leave remaining sts unworked.

3. Ch 1, turn, sc in the same st, sc 2. (3sts)

4. Ch 1, turn, 2sc in the same st, sc 2. (4sts)

5. Ch 1, turn, sc in the FLO of each st. Do not turn the piece. Continue working around into the back loops of the same row. Sc 4. Place a marker for working in the round.  (8sts)

6-8. Sc in each st to end of round.

9. 2sc in the next st, sc 7. (9sts)

10-12. Sc in each st to end of round. 

13. 2sc in the next st, sc 8. (10sts)

14-16. Sc in each st to end of round.

17. 2sc in the next st, sc 9. (11sts)

18-19. Sc in each st to end of round. 

20. 2sc in the next st, sc 10. (12sts)

21. *2sc in the next st, sc 3*, repeat to end of round. (15sts)

22. *2sc in the next st, sc 4*, repeat to end of round. (18sts)

23. *2sc in the next st, sc 5*, repeat to end of round. (21sts)

24. *2hdc in the next st, hdc 6*, repeat to end of round. (24sts)

25. *2hdc in the next st, hdc 7*, repeat to end of round. (27sts)

26. *2hdc in the next st, hdc 8*, repeat to end of round. (30sts)

27. *2hdc in the next st, hdc 9*, repeat to end of round. (33sts)

28. *2hdc in the next st, hdc 10*, repeat to end of round.  (36sts)

29. *2hdc in the next st, hdc 5*, repeat to end of round. (42sts)

30. *2hdc in the next st, hdc 20*, repeat to end of round. (44sts)

31. Sc in the next st, sl st in the next st. This is the next st of the round. Ch 1, sc in the same st, sc 3, hdc, dc 38, hdc, sl st to join. 

32. Sl st 4, hdc, dc 37, hdc, sc, sl st to join. Finish off, leaving a long tail for sewing in place.

Fold the tip of the hat down to find button placement. See main photo. 

With a sewing needle and thread, sew the button in place. 

Slip the hat over the top edge of the tissue holder (closest to the nose). Pull the bottom edge of the hat down until it is even with the opening. With a yarn needle and matching yarn, sew the bottom edge to the tissue holder.

With a yarn needle, use the yarn tail from the bottom edge of the hat to sew the bottom edge to the tissue holder.

Insert a pack of pocket tissues in both compartments.

Pin To Save For Later

Filed Under: General

Join My Mailing List

Get the latest snappiness, freebies, and special offers.

You’ll Also Love

Free Pattern: Hedgie Beanie
Quick Gifts To Crochet
Free Patterns: Irene’s Spider Headbands

Comments

  1. Lisa says

    at

    Such a cute pattern. Thanks. 🤗💝

  2. Cristy says

    at

    Thank you for pattern for marlybird 24days quickys.

Trackbacks

  1. 24 Days of Knit and Crochet Gift Ideas and Quick Patterns - Marly Bird says:
    at

    […] HOLIDAY ARMADILLO – Snappy Tots has the most adorable tissue cover pattern for you as our bonus today! CLICK HERE FOR FREE PATTERN! […]

Next Post >

Free Pattern: Heart Warming Pack

HI! I am Heidi and I am so glad you are here. I hope you will enjoy my crochet and crafty creations, plus the quirky things I share.

Products

  • Great Summer Gift Event $15.00
  • Seasonally Snappy 2023 Year Long Event $22.50

Search For More Snappiness

Disclaimer

I may get a commission for purchases made through links in this post/on this site at no extra charge to you.

SnappyTots™ property is owned by Heidi Yates.

Heidi’s Top Crafty and Life Picks

Heidi’s Top Crafty and Life Picks
  • Email
  • Facebook
  • Instagram
  • Pinterest
  • YouTube

instagram

Follow @snappytots

snappytots

Crochet 🧶 DIY Crafty Life and 2 fur babies
🌟FREE patterns @ link below🌟
#snappytots

Snappy Tots ~ Crochet ~ DIY
It's almost here! The best season of the year star It's almost here! The best season of the year starts Saturday. I have 2 awesome freebies for you to celebrate. My Beach Comber Beanie and Mitts make a great set for all ages. 
You can download them for free until Saturday night, 9/23/23.

They can be made in everyday, with pumpkins, for the holidays, and more.
https://snappy-tots.com/counting-down-to-fall-2/

#freecrochet #crochetpatterns #crochetbeanie #craftfairitems
I made Ducke a hoodie to wear for the first Bronco I made Ducke a hoodie to wear for the first Broncos game of the season. Isn't he adorable?! He has such a cute expression in this pic.

The pattern is now available! It is free to follow along on my blog or you can get the pdf for 40% off through 9/24/23 with coupon code: fall40 
https://www.ravelry.com/patterns/library/goose-hoodie

 #freecrochet #redheartyarns #freecrochetpatterns #yarnspirations #crochetlove #crochetaddict #gooseclothes #porchgoose
Add some Halloween into your life with this quick Add some Halloween into your life with this quick and easy spider headband. There are sizes for kids and adults.
The pattern is free to follow along on my blog. 
https://snappy-tots.com/free-patterns-irenes-spider-headbands/ 

#freecrochet #freecrochetpatterns #halloweencrochet #yarnspirations #redheartyarns
Tomorrow is the LAST day to save 75% off almost al Tomorrow is the LAST day to save 75% off almost all of my patterns this year. I won't be doing another discount this big until January so grab your patterns for gifts and decor through the holidays. 

Like this guy...he is SUPER cute and can be made out of almost any yarn. The pattern is only $1.50 (reg $6). The discount is applied in the cart. No coupon needed. https://www.ravelry.com/patterns/library/monster-pillow-shams

Please share with your friends so they can save big too... and it helps me a lot.

Full shop: click the link in my bio > pattern shops 

*mini goose, duck, and seasonal event flags not included in the sale.

 #crochetaddict #crochetlove #halloweencrochet #crochetsale #halloweendecor
Day 3 freebie is one of my favorites. Please come Day 3 freebie is one of my favorites. Please come get the pattern for free until Tuesday, 9/12/23. I hope you will love making this and please share pix of your creations. 
Click the link in my bio > blog or visit https://snappy-tots.com/counting-down-to-fall-2/

Made from Red Heart Super Saver yarns.

 #falliscoming #freecrochetpatterns #freepatterns #crochetaddict #crochetpattern #yarnspirations #freecrochet
Fall is coming and freebie #1 is now available to Fall is coming and freebie #1 is now available to download until noon mt, 9/10/23.
This is one of my early designs, but still in my top 10 personal favorites! I hope you will love it too! 

Click the link to visit my blog or visit: https://snappy-tots.com/counting-down-to-fall-2/
 #freepatterns #freecrochetpatterns #crochetlove #crochetaddict #falliscoming
🌻I’m loving sunflowers and counting down the 🌻I’m loving sunflowers and counting down the days til fall! 
This is one of my most favorite scrubbies. I hope you’ll like it too 😁
The pattern is free to follow along on my blog: https://snappy-tots.com/free-pattern-sunflower-scrubbies/

#freecrochetpattern #crochetscrubbies
Make Ahead Mondays are back! There are four patter Make Ahead Mondays are back! There are four patterns, one for each monday in August, available to download for free until 10/1/23. Watch for another freebie each Monday til the end of the year.
https://snappy-tots.com/happy-new-year-lets-rock-2023/

#freecrochetpatterns #freepatterns #crochetaddict #crochetlove
I finished a blanket yarn “mop top” for a spec I finished a blanket yarn “mop top” for a special gift. He makes me giggle and is super cute next to the original one 😊 

Get the pattern here: https://snappy-tots.com/free-pattern-mop-tops/

If you make one please tag me so I can see too 😊

These are simple little guys that make great bean bags too! 
These whip up quickly and are perfect for using up scraps.

Don't forget to enter the end-of-CAL giveaway by this Sunday, July 2, 2023 at 11:59 pm Eastern: https://undergroundcrafter.com/2023/03/20/2023-softie-crochet-along/

#freecrochetpattern #calcentralcrochet #crochet
Which one would you pick? A friend of mine asked i Which one would you pick? A friend of mine asked if I had a LARGE, cute bag she could borrow for the weekend. As I was looking I found these two and forgot how much I love them! 😊 which one do you think she picked?

These patterns are just $1.25 and $1 each this weekend (reg $4-5). They both have alter egos too 🤪

Large cream tote (14” wide x 16” tall (without handle) x 3” deep) : https://www.ravelry.com/patterns/library/trick-or-treat-bags-and-flags

Ladybug bag (17” across x 15” tall (measured flat, not including handle): https://www.ravelry.com/patterns/library/buggy-totes

Everything is on sale this weekend (ends 6/25/23): https://snappy-tots.com/everythings-on-sale/

#crochetcommunity #crochetedwithlove
#crocheters #crochetersofinstagram #crocheteveryday 
#ilovecrochet 
#crochetfun
#crochetallthethings
Load More Follow on Instagram

Come Say Hi

  • Facebook
  • Twitter
  • Pinterest
  • Shop
  • youtube
Please join our creative crew.
  • Facebook
  • Twitter
  • Pinterest
  • Shop
  • youtube

Copyright © 2023 snappy tots · Theme by 17th Avenue