Free Pattern: Crochet an Adventure
A few years ago, I designed a special, whimsical blanket with a matching bag to keep in the car to use on picnics, park visits, and sunny days (mine is in the trunk of my car… and probably has some dried grass woven in now).
The pattern also includes a bag to carry the blanket, books, snacks, and more. Click here to jump to the pattern section.


Some of my favorite memories include special blankets:
- Spreading out a blanket in the spring through fall for a picnic or to play games and read books
- Building blanket forts
- Cheering on our favorite soccer players
- Bundling up during a movie, on a car ride, and cuddling with loved ones
Whimsical Free Snappy Patterns You Might Enjoy
- Cat in MY hat crochet pattern
- Seuss Sayings Printable
- Mini Top Hat and Bow
- Ready to Read Tote
- Marni’s Blanket Lapghan
Some of My Favorite Books
My daughter, an avid reader, has reminded me of the joy and importance of reading. I love how much she reads. She also has shared some of her creative writing on a blog, The Riveting Raven. You can also follow her on Instagram @the.riveting.raven where she shares what she is reading and some of her favorites.
I am a very slow reader so I tend to be picky about what I read. My favorite books seem to be more because of the life experiences at the time I read them. I know, I am a weirdo. Here are my all time favorites:
- Dr. Seuss: audible | GoodReads
- To Kill A Mockingbird by Harper Lee: audible | GoodReads
- The complete Harry Potter Series by J.K. Rolling (especially the first one): audible | GoodReads
- All Creatures Great and Small series by James Herriot: audible | GoodReads
I often listen to books through audible so I have included links for both the audible version (for those that might use audible) and a link for the book review/info.
Here are some of my recent favorite books:
- Greenlights by Matthew McConaughey: audible | GoodReads
- Ella Minow Pea, A Novel in Letters by Mark Dunn: audible | GoodReads
- I collect the classics and Stephen King books and hope to own and read them all someday. I am about halfway there.
- Currently listening to – Atomic Habits by James Clear: audible | GoodReads
My Family’s favorites:
- Two of my mom’s favorite author’s: Agatha Christie, Mary Higgin’s Clark
I will always remember my mom being able to read really quickly and I bet she has read every book by those two authors… and many, many more. - Nicolas’ favorite (my oldest son) – Can’t Hurt Me by David Goggins: audible | GoodReads
Nicolas goes on and on about this book, quoting it often. It has had a big impact on him. - Hillary’s suggestion (my daughter) – Daisy Jones and the Six by Taylor Jenkins Reid: audible | GoodReads
Hillary had several great suggestions and I could have made a list of them. You really will want to follow her on Instagram @the.riveting.raven if you are looking for books. - Hayden’s suggestion (my youngest son, age 15) – The Kane Chronicles by Rick Riordan: audible | GoodReads Hayden really enjoys this series!
- Kelly’s suggestion (my sister) – The Sweetness at the Bottom of the Pie by Alan Bradley: audible | GoodReads
Kelly has also always been an avid, fast reader. She is the one I think of when I think of sitting on a blanket reading a book. I think she stole all of the “quick reading” genes! - Kayleigh’s suggestion (my daughter in law) – The Outsiders by S.E. Hinton: audible | GoodReads
I hope you will take time to enjoy moments with a book. I often hear people say that books make a great escape from reality. Let’s go!
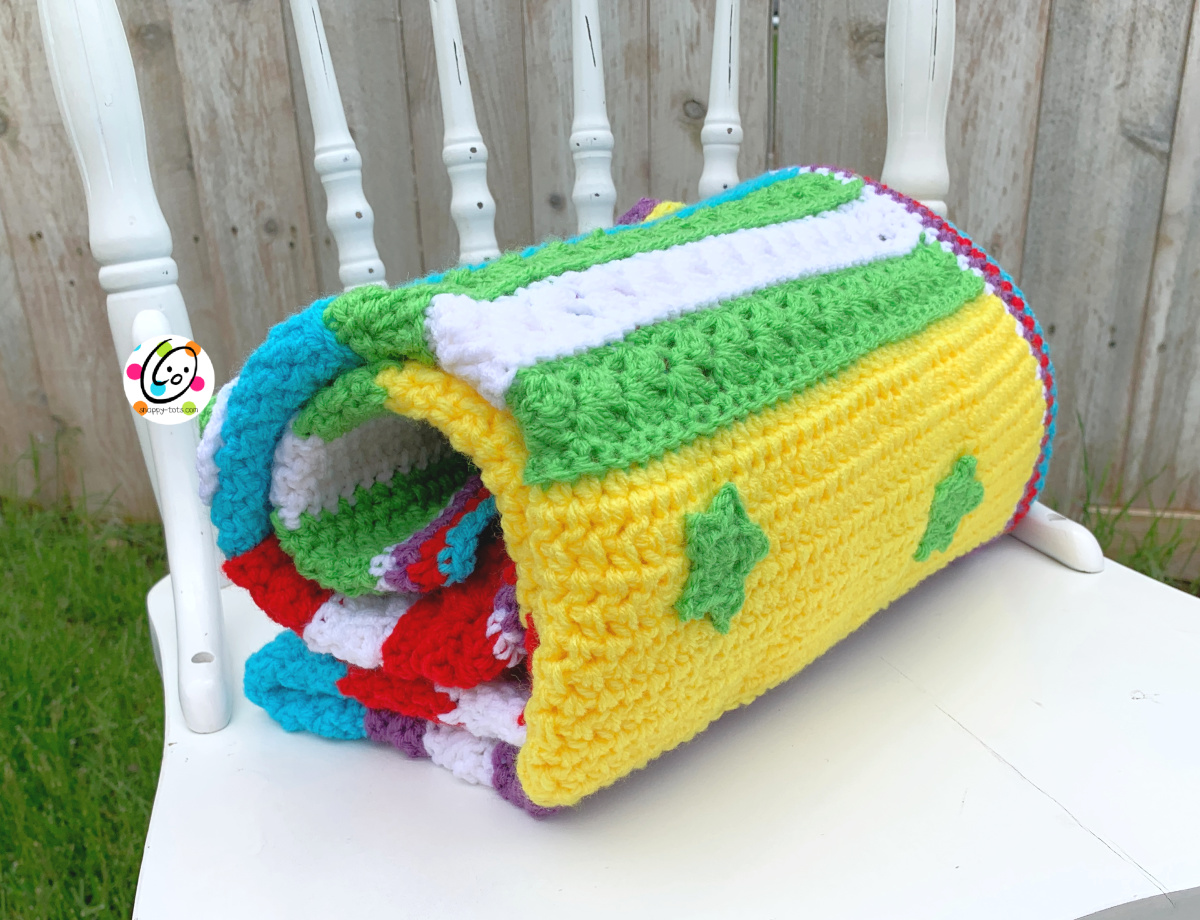
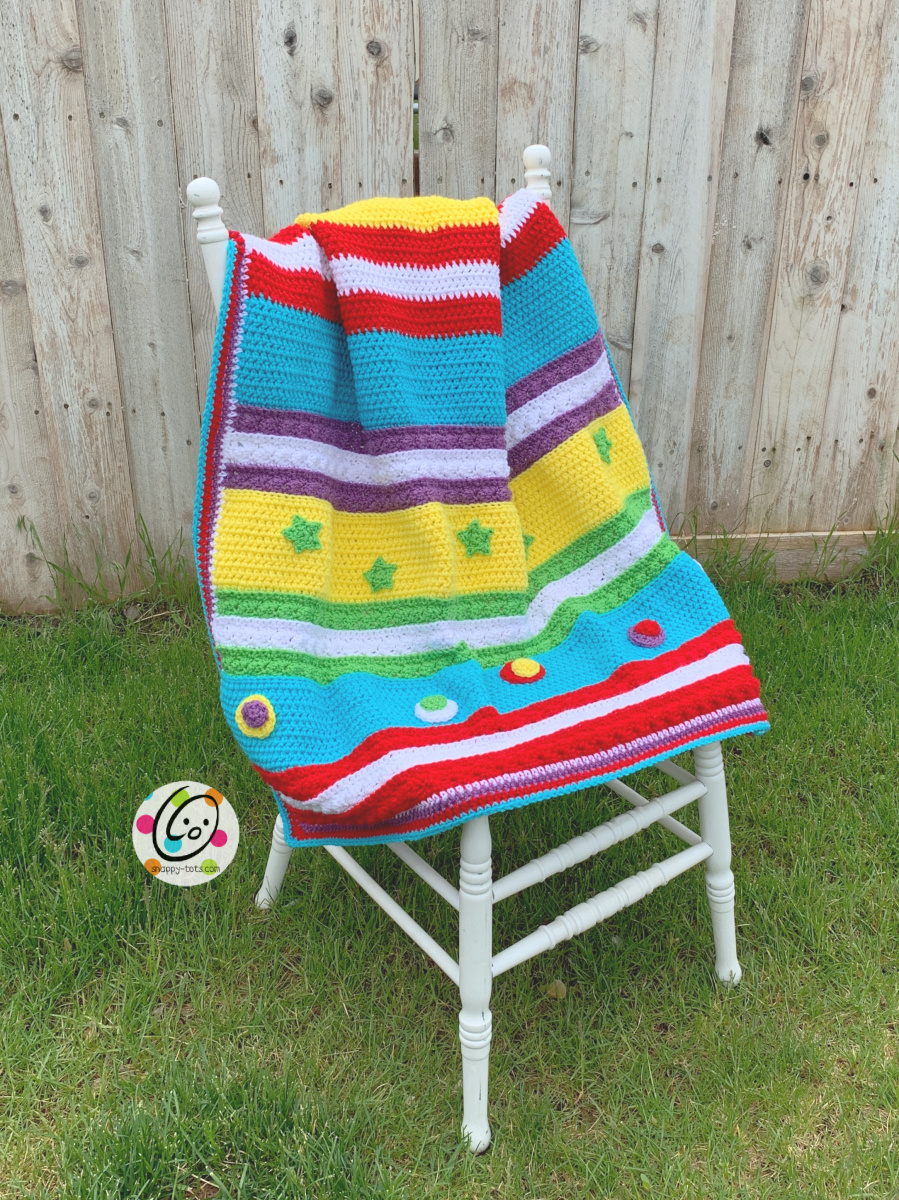
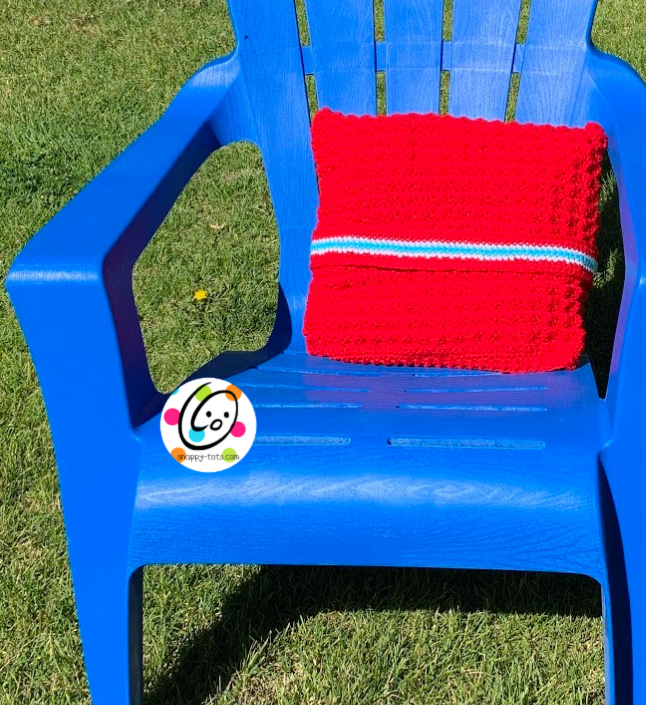
Adventure Places Pillow, Lapghan, and Bag Crochet Pattern
The pattern for this project is available below to follow along for free. An ad-free downloadable pdf for this “Adventure Travel Blanket and Bag” is available from my pattern shops: Ravelry
The Pillow and Laghan
Materials
- Yarn: worsted weight yarn in a variety of colors
- Yarn used in main sample: Approximately 350 yards of each – Red Heart Super Saver White, Bright Yellow, Turqua, Spring Green, Cherry, Medium Purple
- Crochet Hook: I (5.5mm)
- Notions: Yarn needle for weaving in ends
- Optional: Measuring tape, scissors, pillow form or stuffing
Measurements
- Finished Measurements:
Pillow – 20” wide x 17” high
Lapghan – 41” wide x 41” long or desired length - Gauge: 13 hdc sts and 10 rows of hdc worked between posts
Tips
- First stitch of each row is worked into the same stitch as the turning chain and not counted as a st.
- Numbers at the beginning of each line may refer to steps and not indicate number of rows.
- Stitch count remains the same unless noted at end of row/round.
- Try to choose yarns of similar weight. Since worsted weight yarns can vary in thickness it might affect the width of the sections.
- If you have any questions about this pattern please contact [email protected].
.
Directions
- The pillow and lapghan start the same.
- Several rows are designated to be worked in BLO (back loop only). The right side of the piece should be towards you for each of these rows.
- Be careful when working the sc rows to not work these rows tighter than others. The hdc rows tend to be thicker than others and will ripple if the sc rows are too tight.
1. With an I hook and red yarn, ch 112, sc in 2nd ch from hook, sc in each ch. (111sts) Stitch count will remain the same for the entire piece.
2. Ch 2, turn, hdc in same st, *(sc, 2dc) in next st, sk 2*, repeat until 2 sts remain, hdc 2.
Note: at the end of the row it will seem like there are 4 sts left. Remember the repeat section ends with
sk 2, then work the hdc 2.
3. Repeat previous row.
4. Ch 1, turn, sc in same st and in each st to end of row.
5. Change to white yarn. Ch 1, turn. Work this row in BLO. Sc in same st and in each st to end of row.
6. Ch 2, turn, hdc in same st, *(sc, 2dc) in next st, sk 2*, repeat until 2 sts remain, hdc 2.
7. Repeat previous row.
8. Ch 1, turn, sc in same st and in each st to end of row.
9. Change to red yarn. Ch 1, turn. Work this row in BLO. Sc in same st and in each st to end of row.
10. Ch 2, turn, hdc in same st, *(sc, 2dc) in next st, sk 2*, repeat until 2 sts remain, hdc 2.
11. Repeat previous row.
12. Ch 1, turn, sc in same st and in each st to end of row.
13. Change to blue yarn. Ch 2, turn. Work this row in BLO. Hdc in same st and in each st to end of row.
14. Work the sts for this section between the posts of the previous row. Ch 2, turn, hdc between each post to
end of row.
15. Repeat previous row for an additional 10 rows.
Note: This section will have 12 rows when complete.
16. Change to green yarn. Ch 1, turn. Work this row in BLO. Sc in same st and in each st to end of row.
17. Ch 2, turn, hdc in same st, *(sc, 2dc) in next st, sk 2*, repeat until 2 sts remain, hdc 2.
18. Repeat previous row.
19. Ch 1, turn, sc in same st and in each st to end of row.
20. Change to white yarn. Ch 1, turn. Work this row in BLO. Sc in same st and in each st to end of row.
21. Ch 2, turn, hdc in same st, *(sc, 2dc) in next st, sk 2*, repeat until 2 sts remain, hdc 2.
22. Repeat previous row.
23. Ch 1, turn, sc in same st and in each st to end of row.
24. Change to green yarn. Ch 1, turn. Work this row in BLO. Sc in same st and in each st to end of row.
25. Ch 2, turn, hdc in same st, *(sc, 2dc) in next st, sk 2*, repeat until 2 sts remain, hdc 2.
26. Repeat previous row.
27. Ch 1, turn, sc in same st and in each st to end of row.
Rows 13-27 create a “section” of the pillow/lapghan and measures approximately 8”. For the lapghan version, this “section” will be repeated until lapghan is desired length.
28. Change to yellow yarn. Ch 2, turn. Work this row in BLO. Hdc in same st and in each st to end of row.
29. Work the sts for this section between the posts of the previous row. Ch 2, turn, hdc between each post to
end of row.
30. Repeat previous row for an additional 10 rows.
Note: This section will have 12 rows when complete.
31. Change to purple yarn. Ch 1, turn. Work this row in BLO. Sc in same st and in each st to end of row.
32. Ch 2, turn, hdc in same st, *(sc, 2dc) in next st, sk 2*, repeat until 2 sts remain, hdc 2.
33. Repeat previous row.
34. Ch 1, turn, sc in same st and in each st to end of row.
35. Change to white yarn. Ch 1, turn. Work this row in BLO. Sc in same st and in each st to end of row.
36. Ch 2, turn, hdc in same st, *(sc, 2dc) in next st, sk 2*, repeat until 2 sts remain, hdc 2.
37. Repeat previous row.
38. Ch 1, turn, sc in same st and in each st to end of row.
39. Change to purple yarn. Ch 1, turn. Work this row in BLO. Sc in same st and in each st to end of row.
40. Ch 2, turn, hdc in same st, *(sc, 2dc) in next st, sk 2*, repeat until 2 sts remain, hdc 2.
41. Repeat previous row.
42. Ch 1, turn, sc in same st and in each st to end of row.
End here for pillow version. Skip to “pillow assembly” on page 6.
43. Change to blue yarn. Ch 2, turn. Work this row in BLO. Hdc in same st and in each st to end of row.
44. Work the sts for this section between the posts of the previous row. Ch 2, turn, hdc between each post to
end of row.
45. Repeat previous row for an additional 10 rows.
Note: This section will have 12 rows when complete.
At this point, the lapghan can be finished in two ways.
- Entire blanket repeats cluster rows and hdc rows (continue as written).
- Remaining part of blanket is hdc rows only as shown in main sample (skip to “Sample Version”).
46. Change to red yarn. Ch 1, turn. Work this row in BLO. Sc in same st and in each st to end of row.
47. Ch 2, turn, hdc in same st, *(sc, 2dc) in next st, sk 2*, repeat until 2 sts remain, hdc 2.
48. Repeat previous row.
49. Ch 1, turn, sc in same st and in each st to end of row.
50. Change to white yarn. Ch 1, turn. Work this row in BLO. Sc in same st and in each st to end of row.
51. Ch 2, turn, hdc in same st, *(sc, 2dc) in next st, sk 2*, repeat until 2 sts remain, hdc 2.
52. Repeat previous row.
53. Ch 1, turn, sc in same st and in each st to end of row.
54. Change to red yarn. Ch 1, turn. Work this row in BLO. Sc in same st and in each st to end of row.
55. Ch 2, turn, hdc in same st, *(sc, 2dc) in next st, sk 2*, repeat until 2 sts remain, hdc 2.
56. Repeat previous row.
57. Ch 1, turn, sc in same st and in each st to end of row.
Keep repeating rows 13-27 in choice of colors until piece is desired length.
Skip to “Border” section.
Sample Version
After step 45, continue below:
From this point on, work the sts between the posts of the previous row.
46. Change to red yarn. Ch 2, turn, hdc between each post to end of row.
47. Repeat previous row for an additional 4 rows.
48. Change to white yarn. Ch 2, turn, hdc between each post to end of row.
49. Repeat previous row for an additional 4 rows.
50. Change to red yarn. Ch 2, turn, hdc between each post to end of row.
51. Repeat previous row for an additional 4 rows.
52. Change to yellow yarn. Ch 2, turn, hdc between each post to end of row.
53. Repeat previous row for an additional 4 rows.
54. Change to green yarn. Ch 2, turn, hdc between each post to end of row.
55. Repeat previous row for an additional 4 rows.
56. Change to white yarn. Ch 2, turn, hdc between each post to end of row.
57. Repeat previous row for an additional 4 rows.
58. Change to green yarn. Ch 2, turn, hdc between each post to end of row.
59. Repeat previous row for an additional 4 rows.
End here for a finished blanket approximately 41” long (after borders added) or continue for a longer blanket.
Weave in all ends.
Lapghan Border
These steps are worked around the outer edge of the lapghan.
1. With an I hook, attach white yarn to a corner st. Ch 1, sc in same st and evenly down the long side of the lapghan.
Work (sc, ch 1, sc) in the first st of the row. Sc in each st across until 1 st remains, (sc, ch 1, sc) in last st.
Sc evenly up the long side of the lagphan.
Work (sc, ch 1, sc) in the first st of the row. Sc in each st across until 1 st remains. Sc in last st, ch 1, sl st in first st of round.
2. Change to purple yarn. Ch 2, hdc in same st and in each st across the long side.
Work (2hdc, ch 1, 2hdc) in the ch 1 space at the corner, hdc in each st across, (2hdc, ch 1, 2hdc) in the ch 1 space at the corner.
Hdc in each st across the long side.
Work (2hdc, ch 1, 2hdc) in the ch 1 space at the corner, hdc in each st across, 2hdc in the ch 1 space at the corner, ch 1, sl st in first st to join.
3. Change to red yarn. Ch 2, hdc in same st and in each st across the long side.
Work (2hdc, ch 1, 2hdc) in the ch 1 space at the corner, hdc in each st across, (2hdc, ch 1, 2hdc) in the ch 1 space at the corner.
Hdc in each st across the long side.
Work (2hdc, ch 1, 2hdc) in the ch 1 space at the corner, hdc in each st across, 2hdc in the ch 1 space at the corner, ch 1, sl st in first st to join.
4. Change to blue yarn. Ch 1, sc in same st and in each st across the long side.
Work 3sc in the ch 1 space at the corner, sc in each st across, 3sc in the ch 1 space at the corner.
Sc in each st across the long side.
Work 3sc in the ch 1 space at the corner, sc in each st across, 2sc in the ch 1 space at the
corner, ch 1, sl st in first st to join. Finish off and weave in ends.
Stars (make 5 or more)
1. With an I hook and green yarn, create a magic loop of 10sts (or preferred method for starting a circle of 10 sc sts), join and pull closed. (10sts)
2. *ch 3, sl st in 2nd ch from hook, hdc in 3rd ch, sk 1 st on circle, sl st in next st on circle*, repeat to end of
round. (5 points)
Finish off, leaving a long tail for attaching to the lapghan/pillow. With a yarn needle, use the yarn tail from each star to sew the stars to the yellow section(s).
Stacked Dots (make 5 or more of each set)
Choose contrasting colors for dots.
Small/center dots
1. With an I hook and yarn color of choice, create a magic loop of 6 sts (or preferred method for starting a circle of 6 sc sts), pull closed and sl st to join. (6sts)
2. Ch 1, 2sc in each st to end of round, sl st to join. (12sts) Finish off, leaving a yarn tail for sewing in place. Set aside.
Large/back dots
1. With an I hook and yarn color of choice, create a magic loop of 6 sts (or preferred method for starting a circle of 6 sc sts), pull closed and sl st to join. (6sts)
2. Ch 2, 2hdc in each st to end of round, sl st to join. (12sts)
3. Ch 1, *sc, 2sc in next st*, repeat to end of round, sl st to join. (18sts) Finish off, leaving a yarn tail for sewing in place. Set aside.
With a yarn needle, use the yarn tail from each large dot to sew to the blue section.
With a yarn needle, use the yarn tail from each small dot to sew one on top of each large dot.
Pillow Assembly
Fold pillow piece with right sides together, matching the ends of the rows together (not the beginning and ending rows). With matching yarn and a yarn needle, sew the edges together, leaving approximately 12” unsewn.
Turn pillow piece right side out and stuff pillow or insert pillow form. Tip: to keep stuffing from working through stitches, I suggest inserting a small pillow case first and then stuffing the case.
Finish sewing the remaining section closed.
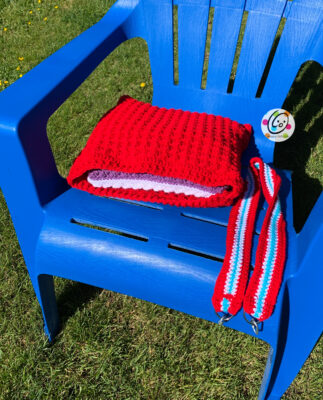
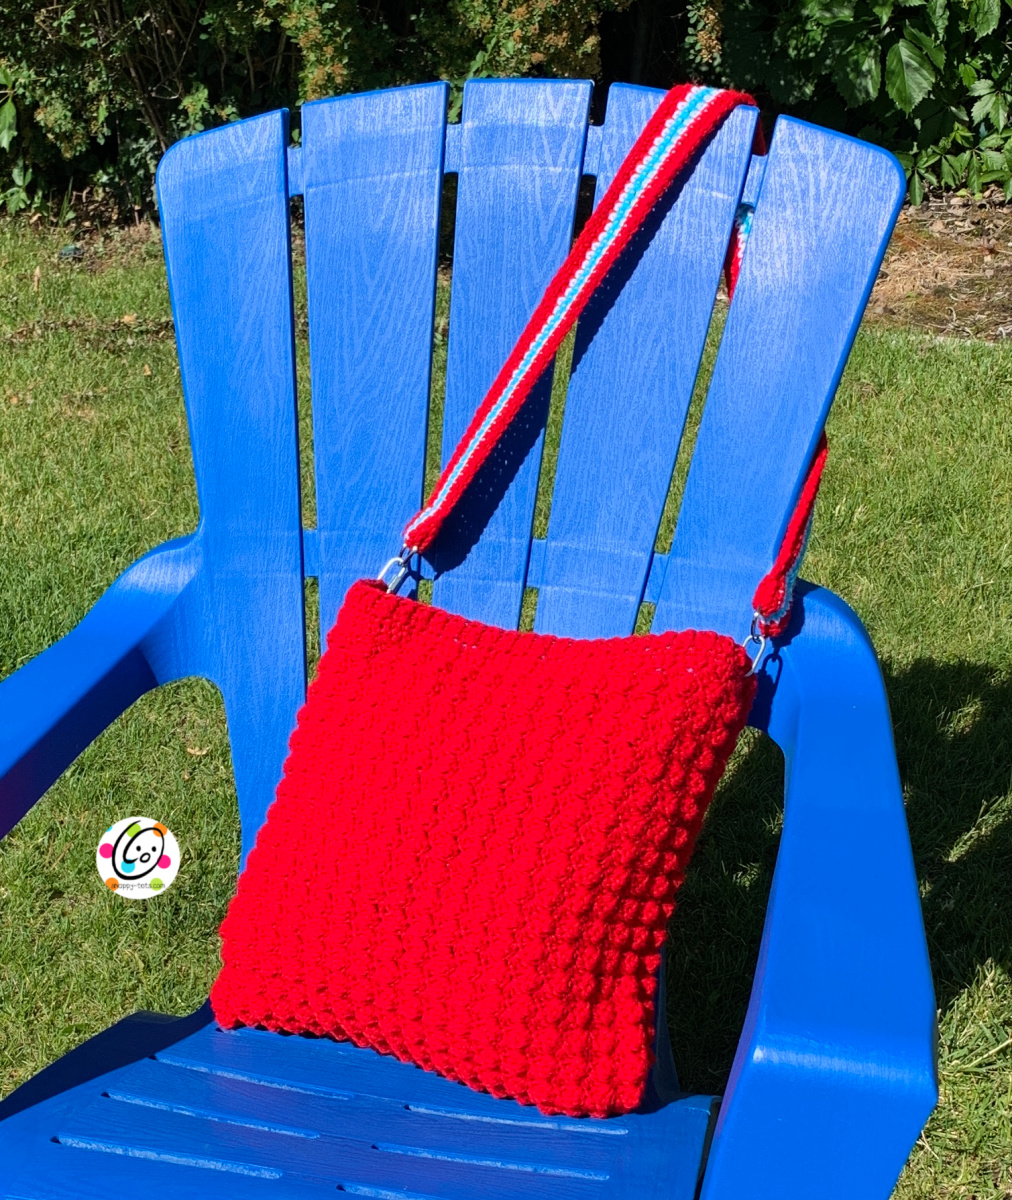
Adventure Places Bag
Materials
- Yarn: worsted weight yarn in choice of colors
- Yarn used in main sample: Approximately 350 yards of Red Heart Super Saver Cherry, 40 yards Red Heart Super Saver Turqua and White
- Crochet Hook: I (5.5mm)
- Notions: Yarn needle for weaving in ends, 2 1″ D rings, 2 hooks (carabiner or quick link hooks)
- Optional: Measuring tape, scissors
Measurements
- Finished Measurements: 15-16” square
- Gauge: not needed for this project
Tips
- First stitch of each row is worked into the same stitch as the turning chain.
- Numbers at the beginning of each line may refer to steps and not indicate number of rows.
- Stitch count remains the same unless noted at end of row/round.
- Try to choose yarns of similar weight. Since worsted weight yarns can vary in thickness it might affect the width of the sections.
- If you have any questions about this pattern please contact [email protected].
Directions
Bag
1. With an I hook and red yarn, ch 58, sc in 2nd ch from hook and in each ch across. (57sts) Stitch count will remain the same for the entire piece.
2. Ch 1, turn, sc in same st and in each st to end of row.
3. Ch 2, turn, hdc in same st, *(sc, 2dc) in next st, sk 2*, repeat until 2 sts remain, hdc 2.
Note: at the end of the row it will seem like there are 4 sts left. Remember the repeat section ends with
sk 2, then work the hdc 2.
4. Repeat previous row 67 more times or until piece is approximately 30” long from starting edge.
5. Ch 1, turn, sc in same st and in each st to end of row.
6. Repeat previous row.
7. Fold piece in half, matching the short edges. Pivot piece to work across the edge of the bag. Working through both layers, sl st evenly down the side to the folded edge. Finish off and weave in ends.
Attach matching yarn to the top edge at the opposite side and repeat.
8. Turn piece right side out. Attach yarn to any st on top of bag. Ch 1, sc in same st and each st to end of round, sl st to join.
9. Ch 2, hdc in same st and in each st to end of round, sl st to join.
10. Ch 2, *FPHDC around next post, BPHDC around next post*, repeat to end of round, sl st to join. Finish off and weave in ends.
Handle
1. With an I hook and red yarn, ch 121 (or until handle is desired length), sc in 2nd ch from hook and in each ch across. (120sts) Stitch count will remain the same for the entire piece.
2. Ch 1, turn, sc in same st and in each st to end of row.
3. Change to white yarn. Ch 1, turn, sc in same st and in each st to end of row.
4. Change to turquoise yarn. Ch 1, turn, sc in same st and in each st to end of row.
5. Ch 1, turn, sc in same st and in each st to end of row.
6. Change to white yarn. Ch 1, turn, sc in same st and in each st to end of row.
7. Change to red yarn. Ch 1, turn, sc in same st and in each st to end of row.
8. Ch 1, turn, sc in same st and in each st to end of row.
9. This step is worked around the outer edge of the handle. Ch 1, sc in same st. Pivot piece and sc evenly across short end of handle. Ch 1. Pivot piece to work across long edge. Sl st loosely in each st to end of row. Ch 1, sc in same st. Pivot piece and sc evenly across short end of handle. Ch 1. Pivot piece to work across long edge. Sl st loosely in each st to end of row. Finish off, leaving a long yarn tail for sewing bottom of handle.
Slip this end of the handle through a D ring and wrap the short end over the bar edge and against itself. Use a yarn needle and the yarn tail to sew the layers together.
Slip the opposite end of the handle through the second D ring and repeat.
Clip the D ring to a hook and then clip the hook to one top edge of the bag. Repeat for the second handle end.
I hope you will make one for happy moments with kids, family, friends, or for quiet alone time. If you do, please tag #snappytots when posting on social media so I can see your adventures.
Pin To Save For Later