
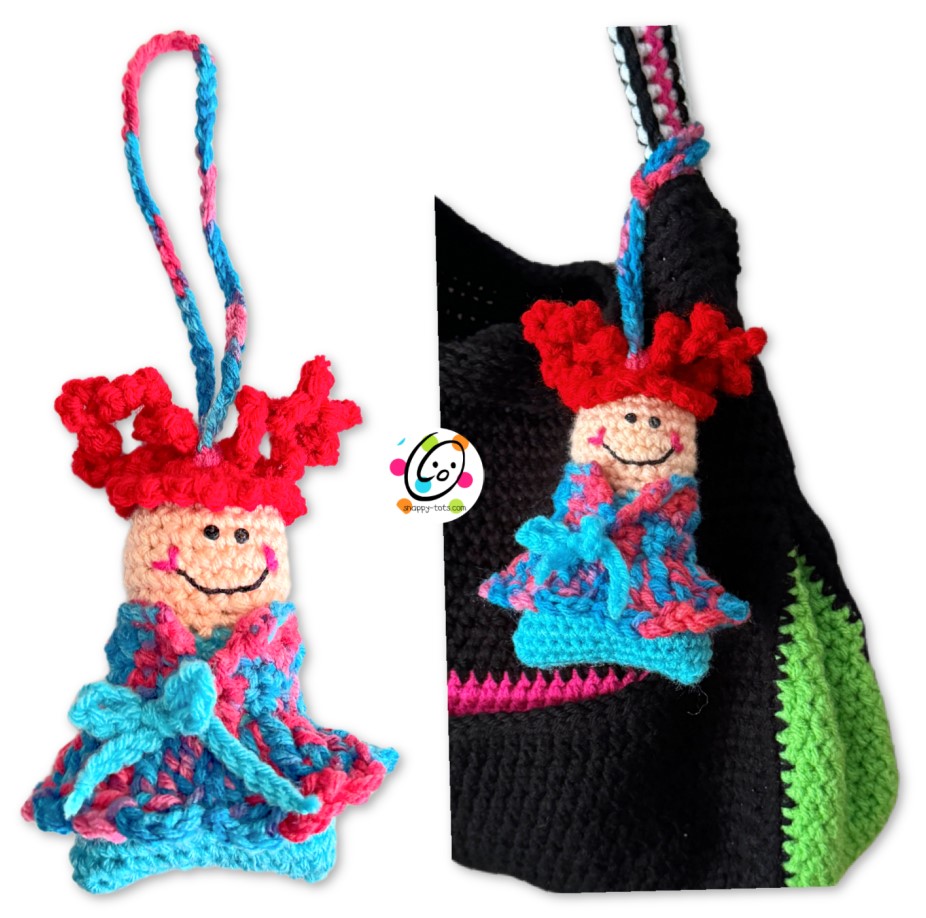
Free Pattern: Happy Keychain
I thought it would be fun to have a snappy little friend to hang from my supply bag. This little happy girl can be made in any colors and could even be made from blanket yarn for a pillow friend.
How the 2025 Gift to Myself Crochet Along Works
On weekdays from January 2 through January 31, 2025, we’ll share a free crochet pattern that you can make for yourself. You can make these fabulous and free projects to keep, for gifts, or to donate to charity while chatting with other crocheters in the Underground Crafters Facebook and Ravelry groups and sharing your projects to win giveaway prizes!
We’ve partnered with Crochet Foundry, GlassEyesOnline, KennyClayCo, KnitPal, Knitter’s Relief Balm, MBT Creates, and Unicorn to bring you some great prizes in our end-of-CAL giveaway. Don’t forget to enter the giveaway at the bottom of this post by Sunday, February 2, 2025 at 11:59 p.m. Eastern.
How to get this pattern
- Free pattern on this page: Scroll down to see the pattern, here on this blog post, for free.
- Printable PDF: Ad-free, downloadable PDF is available for FREE as part of The Gift to Myself Crochet Along, hosted by Underground Crafter. Scroll down for more info.
January 17, 2025 is my day to be featured in this crochet along. The pattern will be forever free to view here on my blog, but I would like to give you the pdf for free until the end of January, 2025. Click the button below to download the pdf of this pattern.
Happy Keychain Crochet Pattern
Materials
- Yarn: Small amounts of worsted weight yarn in a variety of colors.
Sample colors: Red Heart Super Saver: Cherry, BonBon Print, Turqua; I Love This Yarn Lt Peach - Crochet Hook: G (4.25-4.5mm)
- Miscellaneous: yarn needle, size 10 black crochet cotton or black embroidery floss for mouth, small amount of stuffing, 2 tiny black buttons, sewing needle, black thread
Measurements
- Finished Measurements: 4.5” tall x 3.5” across widest point
- Gauge: not needed for this project.
Tips – please take a second to read this section
- The first stitch of each row is worked into the same stitch as the turning chain unless noted.
- Numbers at the beginning of each line may refer to steps and not indicate number of rows.
- Stitch count remains the same unless noted at end of row/round.
- If you have any questions about this pattern please contact [email protected].
- Finger shape the pieces for a smooth edge (see tips on last page)
- Reminder: sc 3 = sc one st in each of the next 3 sts; 3sc in next st = work 3sc sts in the next (one) st
Body
This project starts at the top/head and is worked in rounds to the bottom.
1. With a G hook and worsted weight yarn for the hair (Sample: Red Heart Super Saver Cherry), start with a magic circle of 8 sc sts (or preferred method for starting a circle of 8 sc sts), pull closed and sl st to join. (8sts)
2. Ch 1, *sc, 2sc in next st*, repeat to end of round, sl st to join. (12sts)
3. Ch 1, *sc 2, 2sc in next st*, repeat to end of round, sl st to join. (16sts)
4. Finish off the current yarn and change to yarn for the face (Sample: I Love This Yarn Lt Peach). Work this round in BLO. Ch 1, *2sc in next st, sc 7*, repeat once, sl st to join. (18sts)
5. Ch 1, *2sc in next st, sc 8*, repeat once, sl st to join. (20sts)
6-8. Ch 1, sc in each st to end of round, sl st to join.
9. Ch 1, *sc2tog, sc 2*, repeat to end of round, sl st to join. (15sts)
10. Ch 1, *sc2tog, sc 3*, repeat to end of round, sl st to join. (12sts)
Note: it is easiest to apply the face now. With black embroidery floss and a yarn needle, stitch the mouth in place. Sew 2 tiny black buttons in place with a sewing needle and black thread.
With a yarn needle and pink yarn stitch a heart (V shape) at each end of the mouth.

11. Finish off the current yarn an change to yarn for the body (Sample: Red Heart Super Saver Turqua). Ch 1, *sc 2, 2sc in the next stitch*, repeat to end of round, sl st to join. (16sts)
12. Flatten the piece with the face centered on top. Place a marker at each side. From this point on, the increases will be at each side/edge (or close) to create an oval body shape.
Do not chain one at the beginning of this round. Place a marker for working in the round. *sc 7, 2sc in the next st*, repeat once. (18sts)
13. *sc 8, 2sc in the next st*, repeat once. (20sts)
14. *sc 9, 2sc in the next st*, repeat once. (22sts)
15. *sc 10, 2sc in the next st*, repeat once. (24sts)
16. *sc 11, 2sc in the next st*, repeat once. (26sts)
17. *sc 12, 2sc in the next st*, repeat once. (28sts)
18. *sc 13, 2sc in the next st*, repeat once. (30sts)
19-20. Sc in each st to end of round.
21. *sc2tog, sc 4*, repeat to end of round. (25sts) Finish off, leaving a tail for sewing bottom seam.
Stuff the head and body. Flatten the doll with the face center top. With a yarn needle and yarn tail, sew bottom edges together. Stuff the bottom corners so they are rounded.
Hair
Bangs: With the bottom of the doll towards you, use a G hook to attach matching yarn to a remaining loop at the bottom edge of the hair section. *ch 3, sl st in the next st*, repeat to end of round. Finish off and weave in ends.
Curly Loops: With a G hook and worsted weight yarn to match the top (Sample: Red Heart Super Saver Cherry), ch 45, 2sc in the 2nd ch from hook, sl st in next ch, *3sc in next ch, sl st in next ch*, repeat to end of chain. Finish off, leaving a long tail for sewing to the head.

With a yarn needle, use one yarn tail to sew the ends of the chain together.
Fold the circle in half with the center in the middle. See photo.
Sew the center together, creating two loops.
Use the remaining yarn to sew this spot to the center top of the head.
Hanger: This can be made short to slip over a key ring/caribiner or long to wrap around a handle.
With a G hook and yarn color of choice (Sample: Red Heart Super Saver BonBon Print), ch 30 for short (ch 50 for long). Finish off, leaving a long tail for sewing to the head.
With a yarn needle, use the yarn tails to sew each end around the middle of the hair (center of head).
Dress
1. With a G hook and worsted weight yarn (Sample: Red Heart Super Saver BonBon Print), ch 19, sc in the 2nd ch from hook and in each ch across. (18sts)
2. Ch 1, turn, sc in the same st and in each st to end of row.
3. Ch 1, turn, *sc 5, 2sc in the next st*, repeat to end of row. (21sts)
4. Ch 1, turn, *sc 6, 2sc in the next st*, repeat to end of row. (24sts)
5. Ch 1, turn, sc in each sst to end of row. Sl st in the first st of the row to join in a circle.
6. The beginning ch of this round is counted as a st. Ch 3, tr in the same st, tr in the next st, *2tr in the next st, tr in the next st*, repeat to end of round, sl st in the top of the beginning ch to join. (36sts)
7. *ch 3, sk 1, sl st in the next st*, repeat to end of round. Finish off and weave in ends. (12 loops/bumps across bottom edge).
Sash/bow: With a G hook and worsted weight yarn (Sample: Red Heart Super Saver Turqua), ch 50. Finish off, leaving 4” at each end. With a yarn needle and one yarn tail, weave in and out of the sc sts above the tr round.
Pull the ends until even. Trim yarn tails.
Place the dress on the doll. Pull the sash a little snug and tie into a bow.
How to wrap around a handle: Place the loop behind the handle. Slide the doll through the loop (bottom first) and pull until the loop is snug against the handle.
Pin To Save For Later

Do you have a pattern for those little miniature puppies. They look felted by are crocheted
Thank you 😊 wonderful design!