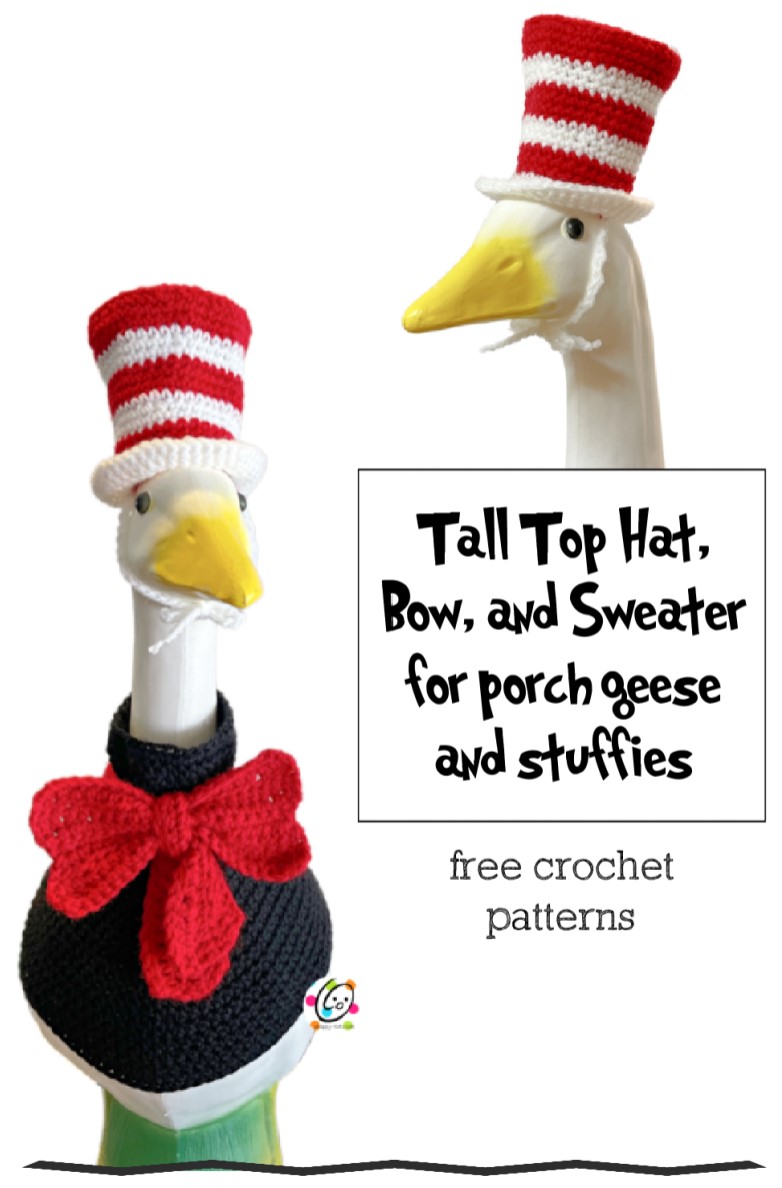
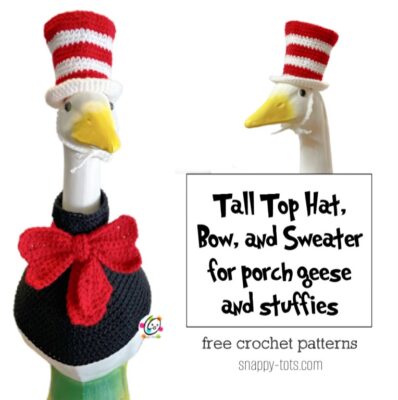
Free Pattern: Top Hat For Goose and Stuffies
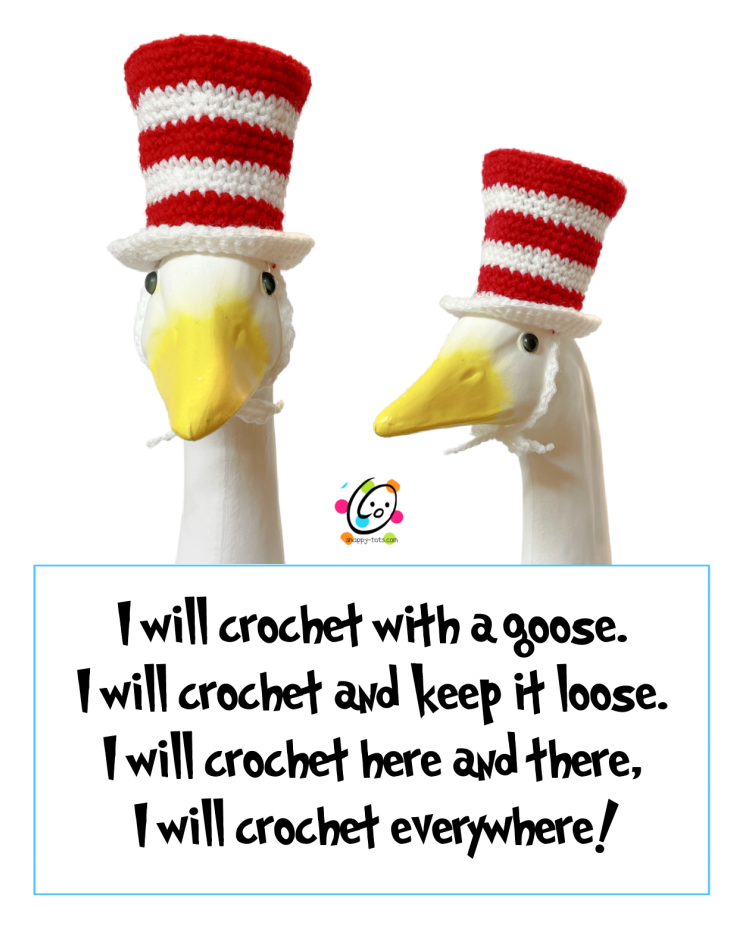
I’m a HUGE Dr. Seuss fan so “Ducke”, my porch goose, needed a hat to celebrate Dr. Seuss’ birthday / Read Across America on March 2nd. This hat is similar to my Mini Top Hat and Bow Tie but taller and slopes in more towards the brim.
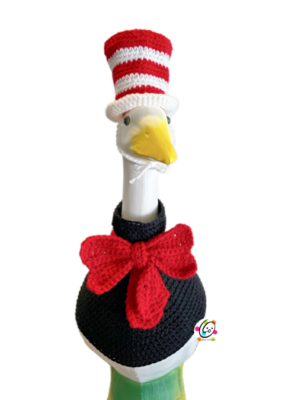
The Full Outfit
After making the hat I decided my goose needed more…hey, it is still pretty cold outside in March and I didn’t want a naked goose freezing on the porch.
Jump To The Patterns
Click the links below to go right to the pattern for each item:
Watch for more fancy outfits to come each month. You can find more “Ducke and Goose” patterns at THIS LINK.
Where To Get The Goose
This is designed for a 23” goose statue and can be found at the following shops:
- Miles Kimball: https://www.mileskimball.com/buy-large-white-goose-23-h-310493
- Amazon: https://amzn.to/3AdRWSP
More Seuss-ish Snappy Stuff
- Cat in MY hat crochet pattern
- Seuss Sayings Printable
- Something Fishy hat and scarf
- Snappy Top Hats Pack
- Mini Top Hat and Bow Tie
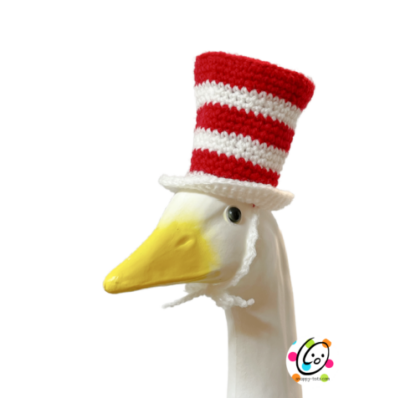
Tall, Striped Top Hat Crochet Pattern
This crochet pattern is available for free below.
The hat is designed to fit large goose statues. The hat also fits my “Mr. Snappy” doll too. These are also cute on store-bought stuffed animals.
Materials & Details
- Yarn: Worsted weight. 50 yards each Red Heart Super Saver Cherry, White
- Crochet Hook: H (5mm)
- Measurements: 3.5” across opening and top x 2.5” tall
Tips – Please read before you begin the project.
- The first stitch of each row is worked into the same stitch as the turning chain.
- Numbers at the beginning of each line may refer to steps and not indicate the number of rows.
- Stitch count remains the same unless noted at end of row/round.
- If you have any questions about this pattern please contact [email protected].
Top Hat
1. With an H hook and worsted weight yarn (Red in sample), start with a magic circle of 8 sc sts (or preferred method for creating a circle of 8 sc sts), pull closed and sl st to join. (8sts)
2. Ch 1, 2sc in each st to end of round, sl st to join. (16sts)
3. Ch 1, *sc, 2sc in the next st*, repeat to end of round, sl st to join. (24sts)
4. Ch 1, *sc, 2sc in the next st*, repeat to end of round, sl st to join. (36sts)
5. Ch 1, *sc 5, 2sc in the next st*, repeat to end of round, sl st to join. (42sts)
6. Ch 1, *sc 6, 2sc in the next st*, repeat to end of round, sl st to join. (48sts) 3.5” across
7. Work this round in BLO and a little more snug than the previous rounds. Ch 1, sc in each st to end of round, sl st to join.
8. Ch 1, sc in the same st and in each st to end of round, sl st to join.
9. Ch 1, *sc 4, sc2tog*, repeat to end of round, sl st to join. (40sts)
10. Change to white yarn. Do not finish off the red. I carried it on the inside of the hat to prevent weaving in a ton of ends. Ch 1, sc in the same st and in each st to end of round, sl st to join.
11. Ch 1, *sc 6, sc2tog*, repeat to end of round, sl st to join. (35sts)
12. Ch 1, sc in the same st and in each st to end of round, sl st to join.
13. Change back to the red yarn. Do not finish off the white. Ch 1, sc in the same st and in each st to end of round, sl st to join.
14-15. Ch 1, sc in the same st and in each st to end of round, sl st to join.
16. Change back to the white yarn. Do not finish off the red. Ch 1, sc in the same st and in each st to end of round, sl st to join.
17. Ch 1, *sc 5, sc2tog*, repeat to end of round, sl st to join. (30sts)
18. Ch 1, sc in the same st and in each st to end of round, sl st to join.
19. Change back to the red yarn. Do not finish off the white. Ch 1, sc in the same st and in each st to end of round, sl st to join.
20-21. Ch 1, sc in the same st and in each st to end of round, sl st to join.
22. Finish off the red yarn and change to white. Work this round in FLO. Ch 1, sc in the same st and in each st to end of round, sl st in the first st to join.
23. Ch 1, *sc 5, 2sc in the next st*, repeat to end of round, sl st to join. (35sts)
24. Ch 1, *sc 4, 2sc in the next st*, repeat to end of round, sl st to join. (42sts)
25. Ch 1, *sc 5, 2sc in the next st*, repeat to end of round, sl st to join. (49sts)
26. Make sure the sts of this round is the same tension as before. Do not ch 1. Sl st in each to to end of round. Finish off and weave in ends.
Chin Tie
Fold the hat in half with the buckle in the middle to find the placement for the ties. With an H hook and ww yarn (white to match the duck), attach the yarn to an inside loop (so it doesn’t show on the outside of the hat). Ch 30. Finish off and tie a knot in the end of the chain. Repeat for the opposite side.
Bow Crochet Pattern
Materials & Details
- Yarn: Worsted weight. 50 yards each Red Heart Super Saver Cherry
- Crochet Hook: I (5.5mm)
Tips – Please read before you begin the project.
- The first stitch of each row is worked into the same stitch as the turning chain.
- Numbers at the beginning of each line may refer to steps and not indicate the number of rows.
- Stitch count remains the same unless noted at end of row/round.
- If you have any questions about this pattern please contact [email protected].
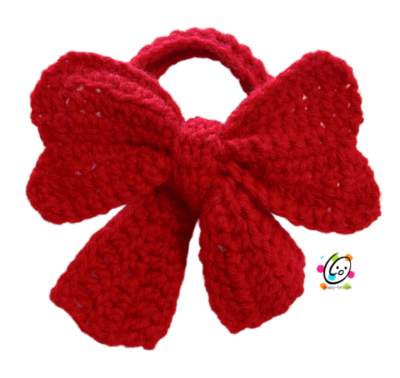
This bow is made in two pieces, the tie and the main bow piece.
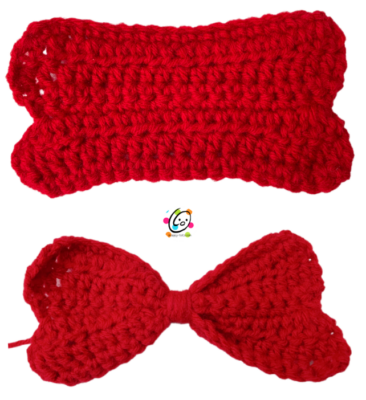
Main Bow Piece
1. With an I hook and ww yarn, ch 19, sc in the 2nd ch from hook and in each ch across. (18sts)
2. Ch 2, turn, 2dc in the same st, dc, hdc 14, dc, 2dc in the last st. (20sts)
3. Ch 2, turn, dc in the same st, dc, hdc 16, dc 2.
4. Ch 1, turn, sc2tog, sc16, sc2tog. (18sts)
5. Ch 1, turn, sc2tog, sc 14, sc2tog. (16sts)
6. Ch 2, turn, 3dc in the same st, dc, hdc 12, dc, 3dc in the last st. (20sts)
7. Ch 2, turn, 2dc in the same st, dc, hdc 16, dc, 2dc in the last st. (22sts)
8. Ch 1, turn, sc2tog, sc 18, sc2tog. (20sts) Finish off and weave in ends.
Center wrap: Cut a long piece of matching yarn and attach one end to the middle of the bow piece. Cinch in the middle section of the bow and wrap the yarn piece around the middle several times. Secure the yarn at the back and weave in the end. Set this piece aside.
Tails (make 1)
1. With an I hook and ww yarn, ch 61, sc in the 2nd ch from hook and in each ch across. (60sts)
2-4. Ch 3, turn, dc in the same st, dc 4, hdc 2, sc 46, hdc 2, dc 5.
5. Ch 1, turn, loosely sl st in each st across. Finish off and weave in ends.
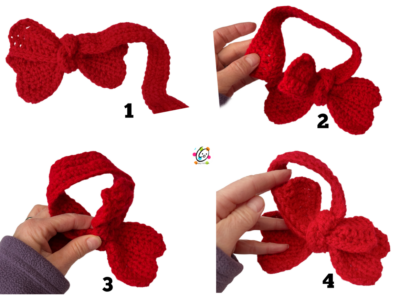
Assembly (see photos below)
- Tie the tail around the middle of the bow piece so one end of the tail is approximately 3″ long. Do not pull this tight.
- Take the other end of the yarn tail and create a circle as in photo #2.
- Lift the first/shorter tail up and insert the second/longer tail under the knot.
- Pull the second tail through the center knot. Pull both yarn tails until they are approximately . I wanted one a little longer than the other. If possible, slip the middle loop over the goose’ head and down to where you would like it to be on his/her neck. Pull the tail ends until the neck loop is next to the neck but not too tight. You want to be able to slip this back over the head.
- Pull the middle part of the tail piece, next to the knot, just enough to tighten the center knot.
Pin To Save For Later