Snappy Tots

Snappy Tots
  • Home
  • Crochet Patterns
    • All Free Patterns
    • Free Patterns by Category
    • Shopify Shop
    • Ravelry Shop
  • Birthdays
  • Weekly Wash
  • Events
    • Calendar of Events
    • Seasonally Snappy 2021
    • Holiday Friends CAL
  • Cricut
  • DIY
  • Info
    • Community
    • Policies and Disclosures
    • Legal

Weekly Wash #25: Cleaning Spots

Earlier this year I made some “Whiteboard cloths” and hung them on command hooks by my whiteboards. They have been AMAZING! I wash them once a week and my boards have never been cleaner. My granddaughter (age 2) even uses them to clean the board after doodling.

When my daughter needed some new whiteboard erasers I told her I would make some. She has some wipe off dots around her classroom to write on. You can see two in the photo below right behind my granddaughter. There is a lime green one below the blue one. These dots got me thinking…

This is my cutie patootie grand daughter…and yes her mom was right off to the side. Lucy had just finished turning on the light and was proud of herself for doing it.

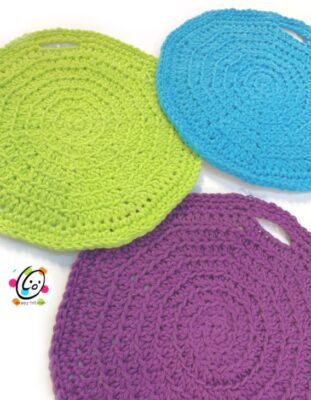
Round cloths in colors to match her room would be fun. …and so the “Cleaning Spots” were born. These could be used to clean whiteboards, dishes, or in the bath too.

Cleaning Spots Pattern

The crochet pattern for this scrubber is available for free below.
A downloadable, ad-free pattern that includes the instructions and all pictures will also available to purchase from my Ravelry Shop soon.


Materials

  • Yarn: 100% cotton
  • Crochet Hook: I (5.5mm)
  • Misc: yarn needle for securing ends.

Details

  • Size: 6.5” across
  • Gauge: not needed for this project

Directions 

1. With an I hook and yarn, start with a magic circle of 5 sc sts (or preferred method for starting a circle of 5 sc sts), pull closed and place a marker for working in the round. (5sts)

2. 2sc in each st to end of round. (10sts) 

NOTE: Work in BLO (back loops only) for each round from this point on.

3. (sc, hdc) in next st, 2hdc in each st to end of round. (20sts)

4. *hdc, 2hdc in next st*, repeat to end of round. (30sts)

5. *hdc 2, 2hdc in next st*, repeat to end of round. (40sts)

6. *hdc 3, 2hdc in next st*, repeat to end of round. (50sts) 

7. *hdc 4, 2hdc in next st*, repeat to end of round. (60sts)

8. *hdc 5, 2hdc in next st*, repeat to end of round. (70sts)

9. *hdc 6, 2hdc in next st*, repeat until 7 sts remain, hdc 6, (hdc, sc) in the last st. (80sts) 

10. Sl st in the next st. This is the new start of the round. Work in both loops from this point on. This step creates the hanger at the top of the cloth. Ch 1, 2sc in the same st, sc 7, 2sc in the next st, sc in the next st, ch 7, sk 5, sc in the next st, *2sc in the next st, sc 7*, repeat to end of round, sl st in the first st to join. (90sts)

11. Ch 1, 2sc in the same st, sc 9, *2sc in the next st, sc 9*, repeat to end of round, sl st to join. (101sts)

12. Sl st in each st to end of round. Finish off and weave in ends.

Pin To Save For Later

Comments

  1. 11

    Laura Jueschke says

    at

    Please let me know! Thank you!

  2. 12

    Laura Jueschke says

    at

    I have made two of these now…..the first one came out 10″ round with the “I” hook. Then I made another with a “F” hook….it came out 8″ round. I don’t know how you got the circle to be 6.5″! You must be a tight crocheter! LOL! I tried doing it tight with the F hook….but still bigger then 6.5″!

    • 13

      Heidi says

      at

      wow really? I have only had a few people say they have to go up a hook size to match my gauge, but not this big of a difference. I need to make her a few more and will add measurements per round so we can see. Very interesting. Thank you for sharing.

  3. 14

    Jan Frick says

    at

    Heidi, on round 10 it says to start working in both loops. Where were we supposed to start working in the back loop only?

    • 15

      Heidi says

      at

      Right above step 3 it says to start working in BLO from that point on.

      • 16

        Cindy Stewart says

        at

        Heidi I don’t see the work in BLO at all… (I copied/pasted what shows up to us on the blog post pattern:

        2sc in each st to end of round. (10sts)
        (sc, hdc) in next st, 2hdc in each st to end of round. (20sts)
        *hdc, 2h) …

        can you show me where it is? thanks <3

      • 17

        Heidi says

        at

        That is so crazy!!! My screen kept showing it was there but it wasn’t showing on the blog. I updated it and now it shows. I am sorry about that. Thank you for mentioning it.

  4. 18

    Laura Jueschke says

    at

    When you made these cute cleaning spots….did you crochet in the back loop only around? It looks like there is a ridge all around! Please let me know! Thank you for the cute pattern!

    • 19

      Heidi says

      at

      Right above step 3 it says to start working in BLO from that point on.

      • 20

        Laura Jueschke says

        at

        There is nothing above step 3 on my computer screen! Just step 2. I have read this all the way through….and nothing about “BLO”! Hmmmm!

      • 21

        Heidi says

        at

        That is so crazy!!! My screen kept showing it was there but it wasn’t showing on the blog. I updated it and now it shows. I am sorry about that. Thank you for mentioning it.

HI! I am Heidi and I am so glad you are here. I hope you will enjoy my crochet and crafty creations, plus the quirky things I share.

  • Email
  • Facebook
  • Instagram
  • Pinterest
  • Twitter
  • YouTube

Reader Favorites

SnappyTots™ property is owned by Heidi Yates.

Here you will find a quirky spin on crochet, crafts, family travel and her two favorite furry humans.

Find Patterns by Category

Please join our creative crew.
SnappyTots" property owned by Heidi Yates