
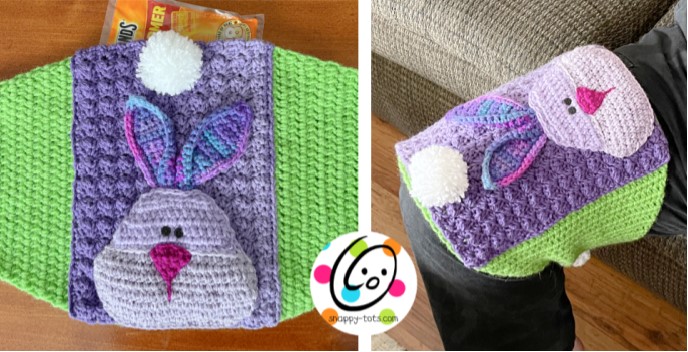
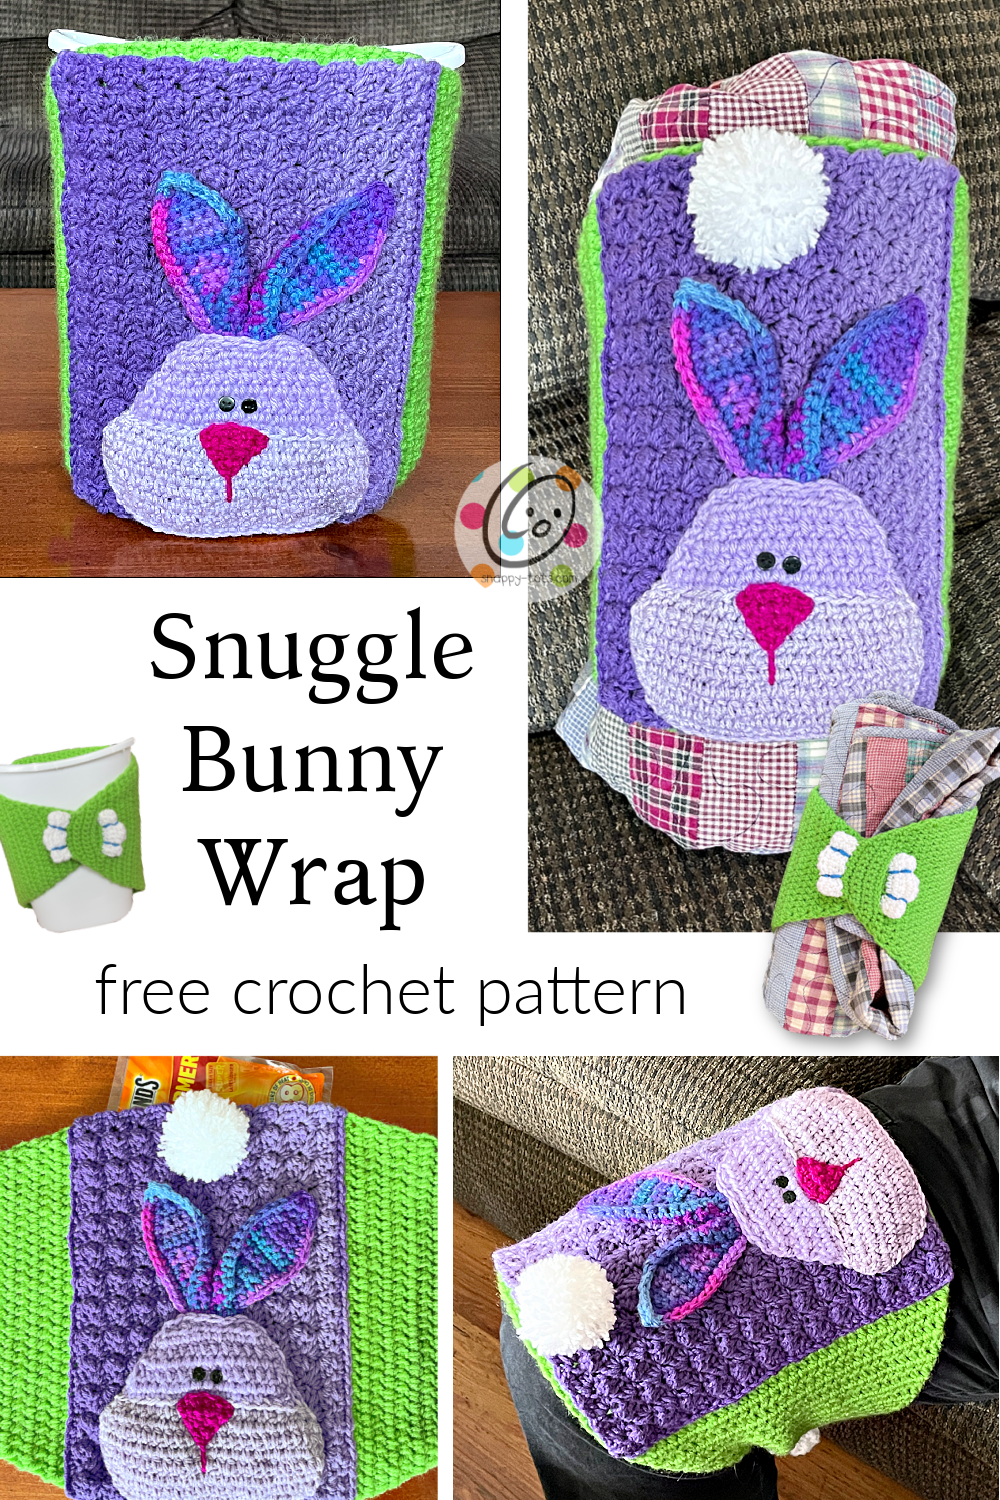
Free Pattern: Snuggle Bunny Wrap
For the past year, my joints haven’t like me much. I have found that using heat and ice have really helped, but it is hard to keep them in place. This was originally designed to hold 2 large heat packs or an ice pack on my leg. It wraps around and connects underneath to hold them in place.
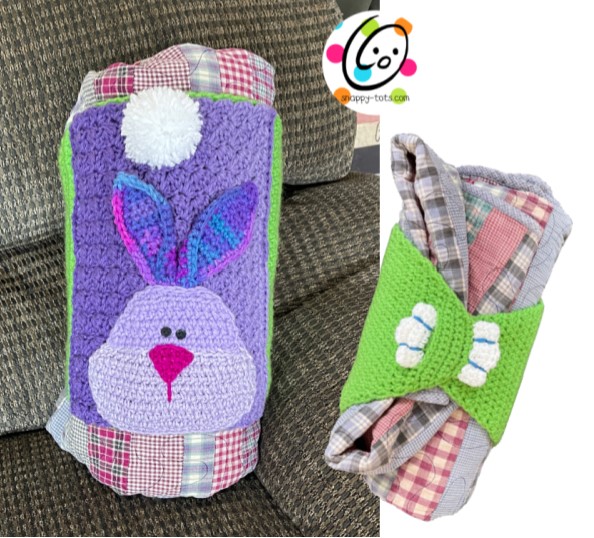
Mine wasn’t as cute as this one. Just plain, made from scraps. The more I looked at it, the more I dreamed of it becoming a snuggle buddy.
After using it several times, I decided it would be a cute wrap to hold my blanket rolled up. If you want to crochet a blanket to snuggle with and then have the bunny wrap around it, try my Ribby Quick Crochet Blanket. It is fun and easy to make, plus it is snuggly to use.
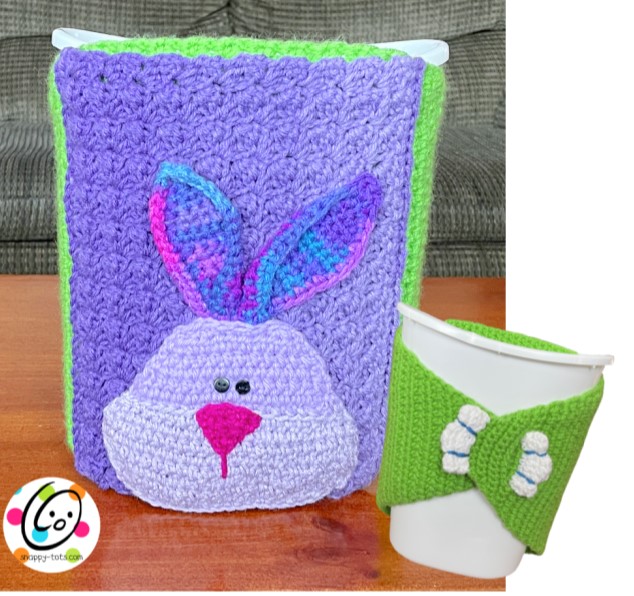
Then, of course, I had to try it on a basket. I think this would be fun in any color combo and even without the bunny.
Snuggle Bunny Wrap Crochet Pattern
The pattern is available for free below, plus a downloadable, ad free pdf is available from my Ravelry shop.
Directions
Variations: This can be used as a basket wrap, to hold hot and cold packs, wrapped around a blanket, and more. All of these options use the same pattern below.
Materials and Details
- Yarn: worsted weight
RHSS = Red Heart Super Saver
Full Piece (back) – 150 yards RHSS Spring Green
Front Bunny Rectangle – 75 yards RHSS Ombre Violet; Bunny Head – 25 yards each RHSS Pale Plum, RH With Love Light Lavende; small amount RHSS Shocking Pink for the nose
Ears – 20 yards RHSS Grape Fizz
Tail (optional) – 20 yards White - Crochet Hooks: H (5mm)
- Notions: Yarn needle for weaving in ends, 2 – 9mm black buttons, sewing needle, thread
- To hold the hands in place more securely, I suggest adding a large sew on snap under the paw that slips through. (optional)
- Measurements: 27” long x 11” wide
- Gauge: 4” with an H hook = 11.5 rows hdc x 13 hdc (worked between the posts)
Tips
- The first stitch of each row is worked into the same stitch as the turning chain unless worked in the round.
- Numbers at the beginning of each line may refer to steps and not indicate number of rows.
- Stitch count remains the same unless noted at end of row/round.
- If you have any questions about this pattern please contact [email protected].
Directions
This project consists of 2 main pieces.
Main Piece (bright green in sample)
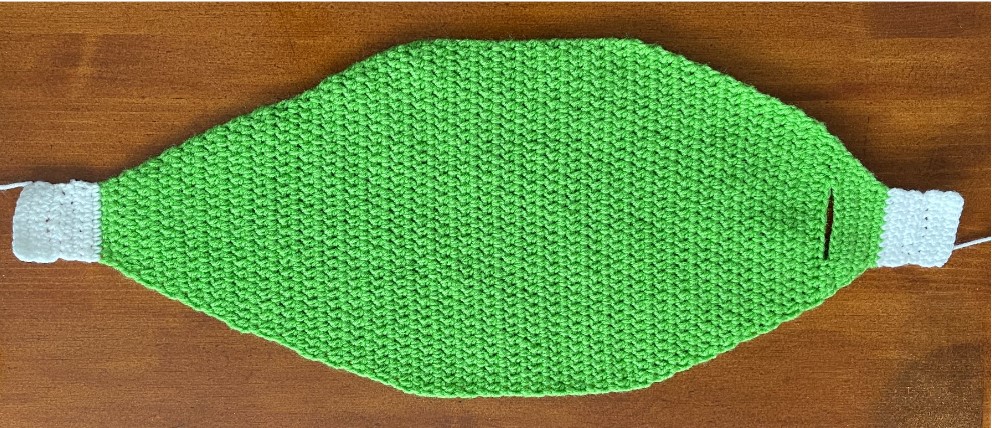
1. With an H hook and worsted weight yarn (Spring Green in sample), ch 10, sc in the 2nd ch from hook and in each ch across. (9sts)
2. Ch 1, turn, sc in the same st and in each st to end of row.
3. Ch 1, turn, hdc in the same st and in each st to end of row.
4. From this point on, until noted in pattern, work the sts between the posts of the previous row instead of in the stitch. This is done by inserting the hook slightly lower than where you would for a regular stitch. This creates a flatter, more dense fabric without the ridges usually created when working back and forth in rows. See help photos at the end of this pattern if needed. It is important to note this creates a slightly wider, shorter gauge (included in pattern) then a usual hdc stitch.
Ch 1, turn, 2hdc between the first 2 posts, hdc between the posts until 2 posts remain, 2hdc between the last 2 posts. (11sts)
5. Ch 1, turn, hdc between the first 2 posts and between the posts to the end of the row. (stitch count stays the same).
6. Ch 1, turn, 2hdc between the first 2 posts, hdc between the posts until 2 posts remain, 2hdc between the last 2 posts. (13sts)
7. Ch 1, turn, hdc between the first 2 posts and between the posts to the end of the row. (stitch count stays the same).
8. Repeat steps 6-7 until there are 33 sts.
9. Ch 1, turn, 2hdc between the first 2 posts, hdc between the posts until 2 posts remain, 2hdc between the last 2 posts. (35sts) At this point, the piece should be approximately 10.75” wide.
Note: If your piece measures a little smaller or larger from this measurement that is ok. It is not crucial for this project.
10. Ch 1, turn, hdc between the first 2 posts and between the posts to the end of the row. (stitch count stays the same).
11. Repeat the previous row for an additional 20 rows.
12. Ch 1, turn, hdc2tog, hdc between the posts until 2 posts remain, hdc2tog. (33sts)
13. Ch 1, turn, hdc between the first 2 posts and between the posts to the end of the row. (stitch count stays the same).
14. Repeat steps 12-13 until there are 19 sts.
15. Ch 1, turn, hdc2tog, hdc between the posts until 2 posts remain, hdc2tog. (17sts)
16. Work the remaining rows IN the st instead of between the posts. This step creates the keyhole to slip one paw through. Ch 1, turn, sc in the same st, sc 3, ch 9, sk 9, sc 4. (8 sts + 9 chs)
17. Ch 1, turn, sc2tog, sc 13, sc2tog. (15sts)
18. Ch 1, turn, sc in the same st and in each st to end of row.
19. Ch 1, turn, sc2tog, sc 11, sc2tog. (13sts)
20. Ch 1, turn, sc2tog, sc 9, sc2tog. (11sts)
21. Ch 1, turn, sc2tog, sc 7, sc2tog. (9sts)
22-23. Ch 1, turn, sc in the same st and in each st to end of row.
Finish off and weave in ends.
Paws
1. With an H hook and white yarn, pull up a loop in the first st of one short end of the main piece. Ch 1, sc in the same st and in each st to end of row. (9sts)\
2-3. Ch 1, turn, sc in the same st and in each st to end of row.
4. Ch 1, turn, sc2tog, sc, hdc, 2hdc in the next st, hdc, sc, sc2tog. (8sts)
5. Ch 1, turn, 2sc in the same st, sc, hdc, hdc2tog, hdc, sc, 2sc in the last st. (9sts)
6-7. Ch 1, turn, sc in the same st and in each st to end of row.
Finish off, leaving a long tail for sewing. Repeat for the opposite end.
Fold one paw piece in half, against itself. With a yarn needle, use the yarn tail to sew across each side and the bottom edge.
With a yarn needle and contrasting yarn, create the toe divisions by stitching through both layers and pulling the top edge down to create the indents. Repeat this a few times so the stitching stands out. See main photos.
Repeat for the opposite paw.
Set this piece aside.
Bunny Rectangle
1. With an H hook and worsted weight yarn (Ombre Violet in sample), ch 42, sc in 2nd ch from hook and in each ch across. (41sts)
2. Ch 2, turn, hdc in same st, *sk 2, (sc, hdc, dc) in next st*, repeat until 1 st remains, hdc in last st.
3. Repeat the previous row for an additional 18 rows.
4. Ch 1, turn, sc in the same st and in each st to end of row.
Finish off, leaving a long tail for sewing to the main piece. Set aside.
Bunny Head
The head starts at the bottom edge with the lighter color.
1. With an H hook and lighter shade of worsted weight yarn, ch 21, sc in the 2nd ch from hook and in each ch across. (20sts)
2. Ch 1, turn, hdc in the same st and in each st across.
3. Ch 1, turn, 2hdc in the same st, hdc 18, 2hdc in the last st. (22sts)
4. Ch 1, turn, hdc in the same st and in each st across.
5. Ch 1, turn, 2hdc in the same st, hdc 20, 2hdc in the last st. (24sts)
6. Ch 1, turn, hdc in the same st and in each st across.
7. Ch 1, hdc2tog, hdc 20, hdc2tog. (22sts)
8. Ch 1, hdc2tog, hdc 18, hdc2tog. (20sts)
9. Ch 1, sc2tog, sc, hdc 14, sc, sc2tog. (18sts)
10. Finish off the current color, leaving a long tail to use to sew the bottom half of the head in place when complete. Change to the darker yarn. Do not turn the piece over. Start the fist st at the right end of this row. Ch 1, sc in the BLO of each st to end of row. (18sts)
11. Ch 1, turn, hdc2tog, hdc 14, hdc2tog. (16sts)
12. Ch 1, turn, hdc2tog, hdc 12, hdc2tog. (14sts)
13. Ch 1, turn, hdc2tog, hdc 10, hdc2tog. (12sts)
14. Ch 1, turn, hdc in the same st and in each st across.
15. Ch 1, turn, hdc2tog, hdc 8, hdc2tog. (10sts)
16. Ch 1, turn, sc2tog, sc, hdc 4, sc, sc2tog. (8sts) Finish off, leaving a long tail for sewing.
With a yarn needle, use the yarn tails to sew the head to the bunny rectangle with the bottom edge of the head next to the bottom edge of the rectangle.
Nose
1. Leave a yarn tail in the beginning for sewing the nose to the face. With an H hook and worsted weight yarn (Shocking Pink in sample), ch 6, sc in 2nd ch from hook, sc 4. (5sts)
2. Ch 1, turn, sc2tog, sc, sc2tog. (3sts)
3. Ch 1, turn, sc2tog, sc. (2sts)
4. Ch 1, turn, sc2tog. Finish off and weave in end.
With a yarn needle, use the beginning yarn tail to sew the nose to the middle of the bunny head with the top edge slightly overlapping onto the darker yarn section. Stitch a straight line down from the tip of the nose.
Eyes: With a sewing needle and black thread, sew 2 black buttons above the nose.
Ears (make 2)
1. With an H hook and worsted weight yarn (Grape Fizz in sample) , ch 5, sc in 2nd ch from hook, sc 3. (4sts)
2-6. Ch 1, turn, sc 4.
7. Ch 1, turn, 2sc in same st, sc 2, 2sc in last st. (6sts)
8-9. Ch 1, turn, sc 6.
10. Ch 1, turn, sc2tog, sc 2, sc2tog. (4sts)
11. Ch 1, turn, sc 4.
12. Ch 1, turn, sc2tog, sc2tog. (2sts)
13. Ch 1, turn, sc2tog.
14. This step is worked around the outer edge of the ear. Ch 1, sc evenly down side of ear. 2sc in first st of bottom/beginning row, sc 2, 2sc in last st. Sc evenly up side of ear.
Work the following in the tip of the ear: sc, hdc, dc. Sc around the dc post. Sc in each st down the side of the ear.
Finish off, leaving a yarn tail for sewing the ear in place.
Fold the bottom edge of one ear (see main photo). With a yarn needle, use the yarn tail to sew the bottom of the ear right next to the top of the head (or slightly underneath).
Tip: I like to sew the bottom edge and inner edge of the ear in place, leaving the other side unsewn.
Repeat for the second ear.
Place the bunny rectangle on top of the main piece. Center the pieces, using the lines from the rows to make sure it is straight. Use pins to hold in place if needed. With a yarn needle, use the yarn tails (matching yarn) to sew the sides and edge (next to the face) of the bunny rectangle to the main piece. Leave the opposite end unsewn.
Extras
Pompom: A large, white pompom could be added to the opposite end of the bunny head.
Cut a piece of white yarn 8” long. This will be used to tie around the middle of the pompom. Set aside.
- Wrap a strand of white yarn around the palm of your hand 50 times. Carefully slide the loops off your hand.
- Use the 8” piece to wrap around the middle of the yarn loops and snugly tie a knot.
- Hold onto the ends of this piece of yarn.
- Trim the loops and pom as desired.
- Use the yarn tails to tie the pompom to the end of the wrap (see photo for placement).
- Carefully pull the strands of yarn apart for a frizzy, fuller look.
Snap: One paw slips through the keyhole to hold the wrap in place. However, for a secure hold I suggest adding a large sew on snap (or 2 smaller ones). This is sewn on the underside of the paw that slips through the keyhole. Check placement on the paw and main piece first.
Use a sewing needle and thread to sew the snap pieces in place.
Heart Warming Pack
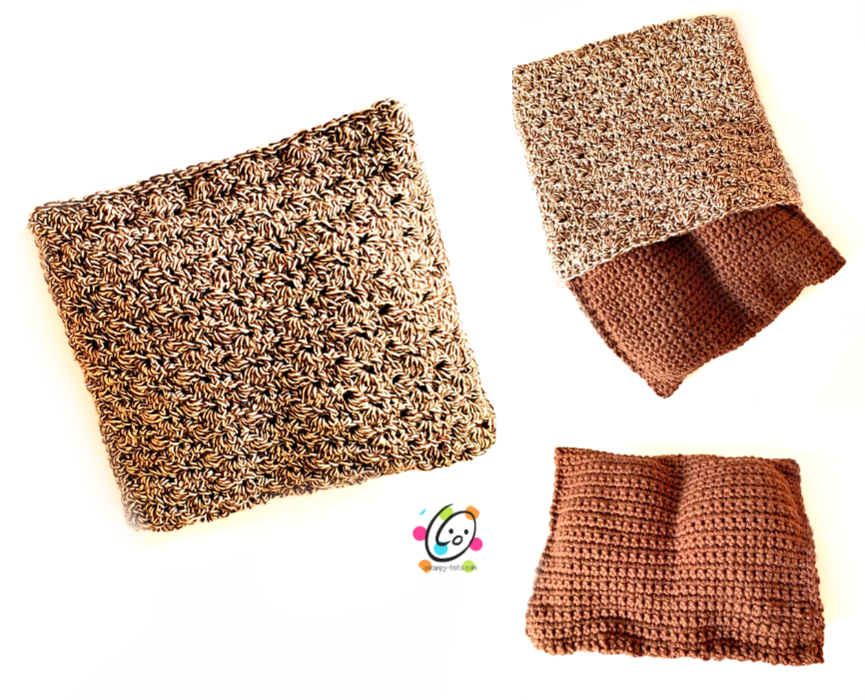
If you would prefer to make some heat packs (or one larger one) to put inside the bunny pocket, here is a quick project I designed. I have made these in a variety of sizes by alternating the amount of starting chains and rows.
For the bunny pouch you would only need to make the inner pouch.
Materials
- Yarn: 250 yards ww cotton
Sample Yarn: 150 yards I Love This Cotton Monkey Brown (outer pouch); 100 yards I Love This Cotton Brown (inner pouch)
- Crochet Hook: H (5mm)
- Miscellaneous Supplies: Yarn needle, measuring tape, scissors, 2 cups uncooked rice or flax seeds, 2 nylon knee high socks (or similar)
- Optional: Scented oil of choice, 3 – ½” buttons, scoop for filling pouches, sewing needle and matching thread
Details
- Measurements of completed project: 9” x 9”
- Gauge – not needed for this project
Tips
- First stitch of each row is worked into the same stitch as the turning chain.
- Numbers at the beginning of each line may refer to steps and not indicate number of rows.
- Stitch count remains the same unless noted at the end of the step.
Description
This project can be used two different ways. It can be a body warmer/cooler body pack and it can also be a trivet for hot dishes.
There are 2 “pouches”. The inner pouch holds two pouches of uncooked rice or flax seeds and an outer pouch which can be washed if needed.
Warnings
- Make sure items are microwave safe before using them in the microwave.
- Items heated in the microwave can get extremely hot so use caution.
- When using trivets under hot items, check first to make sure they will not harm furniture or dishes/pots.
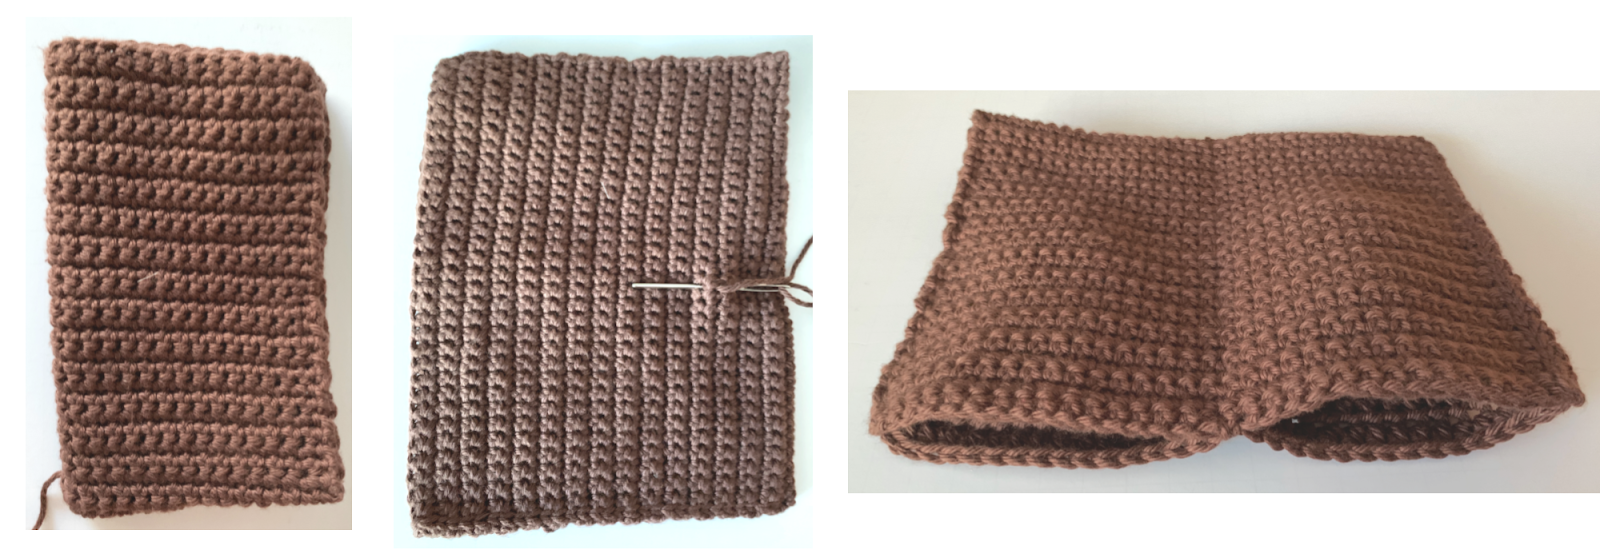
Directions: Inner Pouch
1. With an H hook and dark brown yarn (or yarn color of choice), ch 33, sc in 2nd ch from hook and in each ch across. (32sts)
2. Ch 1, turn, sc in the same st and in each st to end of row.
3. Repeat previous row until rectangle measures 12” from starting edge.
Finish off, leaving a long yarn tail for sewing edges.
Assembly
Fold the rectangle in half, matching the beginning and ending rows.
Use a yarn needle and the yarn tail to sew each side seam.
Fold the piece in half (side to side) to find the middle of the pouch (see photos below). Use a yarn needle and matching yarn to sew a seam down the middle of the pouch. This divides the main pouch into 2 smaller pouches.
Fillers: Choose from one of the following depending on final use of warming pack.
Uncooked Rice
Warming Pack Type: body wamer and trivets
Pros: Works great for a body warmer that can be heated in a microwave, inexpensive, small pieces to mold to a body.
Cons: Has a “smell” of its own when warmed.
Flax Seed
Warming Pack Type: body wamer and trivets
Pros: Very similar to rice but does not have a scent.
Cons: Can be harder to find and more expensive.
Natural Auguarium Rock
Warming Pack Type: trivets
Pros: No scent to detract from food dish.
Cons: Cannot be heated in the microwave.
Do NOT buy colored rocks that might bleed through cloth.
Scented Oils
Body Warmers: Choose soothing oils, such as lavender, to add to your filler. A few drops goes a long way.
Trivets: Oils that are pleasing with food items, such as cinnamon or vanilla, are preferred. Rose cented trivets might clash with dinner.
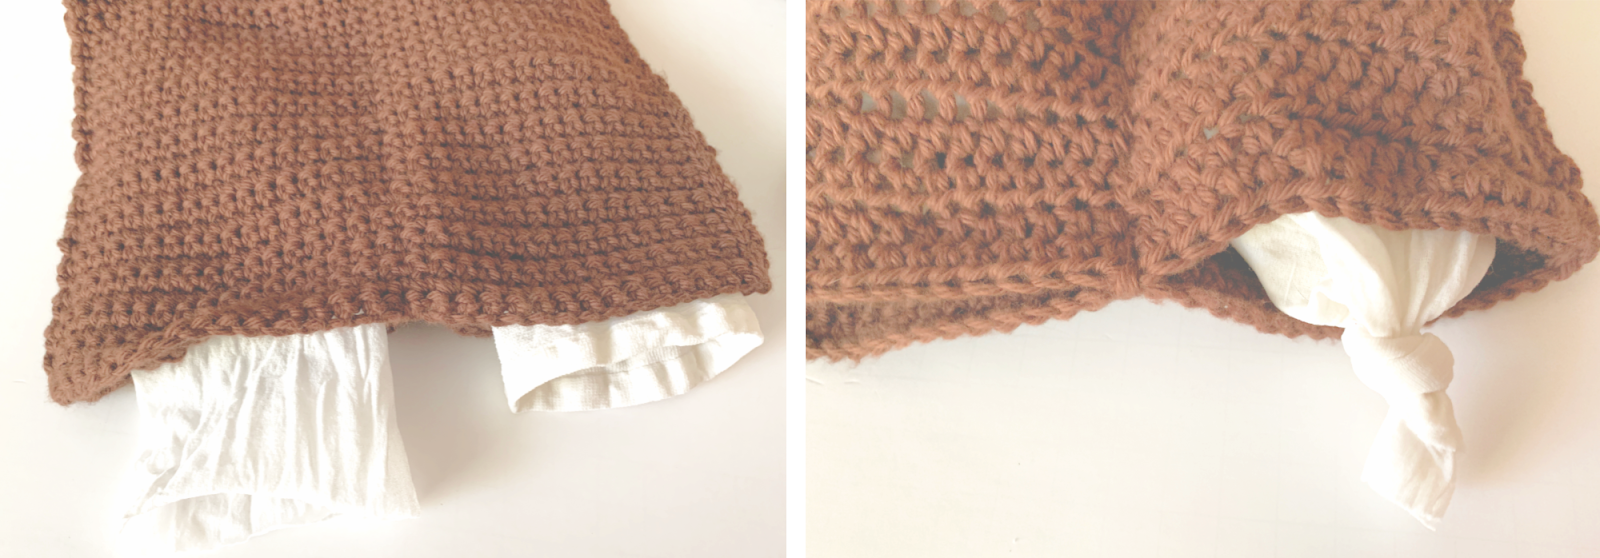
Place a nylon sock in each pouch, opening towards pouch opening. Choose one of the fillers listed on page 2 and fill each pouch until desired thickness. Approximately 1 cup in each pouch works well, but more can be added. Tie a knot in the end of each sock.
Use a yarn needle and matching yarn to sew the top edge of the inner pouch shut. Set aside.
Directions: Outer Pouch
1. With an H hook and variegated yarn (or yarn color of choice), ch 33, sc in 2nd ch from hook and in each ch across. (32sts)
2. Ch 1, turn, (2hdc, dc) in same st, sk 1, sc2tog, *(2hdc, dc) in next st, sk 1, sc2tog*, repeat to end of row.
3. Repeat previous row until rectangle measures 14” from starting edge.
4-7. Ch 1, turn, sc in same st and in each st to end of row.
8. Fold the rectangle in half, matching the beginning and ending rows. Ch 1, pivot piece to work across the side of the rectangle. Working through both layers, sc evenly down the side. Finish off and weave in end.
9. Attach yarn to opposite side. Working through both layers, sc evenly across the side. Finish off and weave in end.
Buttons (optional): for a button closure, the buttons will be sewn to the inner side of the edge which ended in sc rows. Position the buttons so they will slip through spaces at the opposite edge which were created by the clusters. With a sewing needle and thread, sew each button in place.
Place the inner pouch inside.
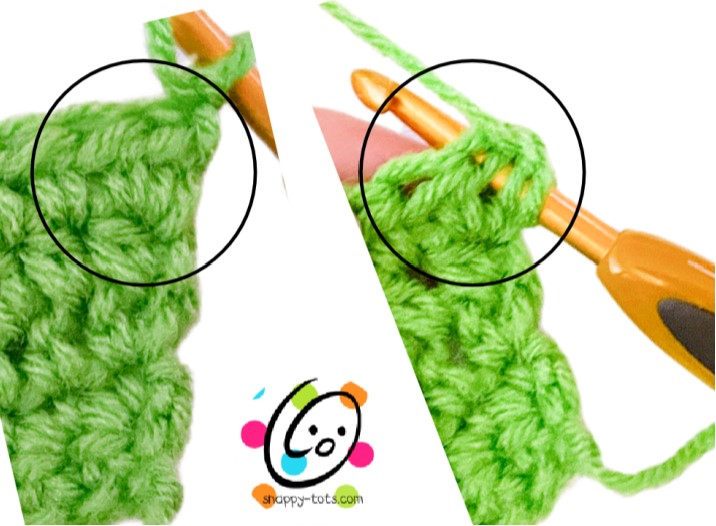
Flat Hdc
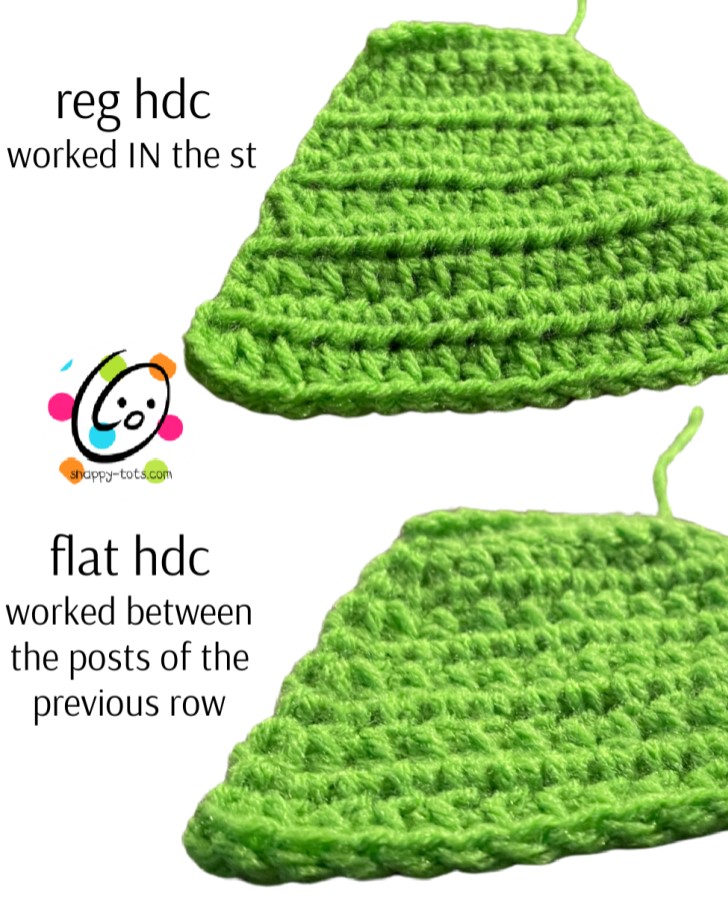
When working hdc back and forth in rows, I prefer to work the sts between the posts of the previous row instead of in the st as usual.
Why? It creates a flatter fabric, eliminating the ridges created when working regular rows. It also creates a denser fabric.
How? Instead of inserting the hook in the st as usual, insert the hook slightly lower, between the posts. I hope the photos below will help. I think you will enjoy the outcome.
Gauge: Working between the posts creates a slightly wider, shorter piece.
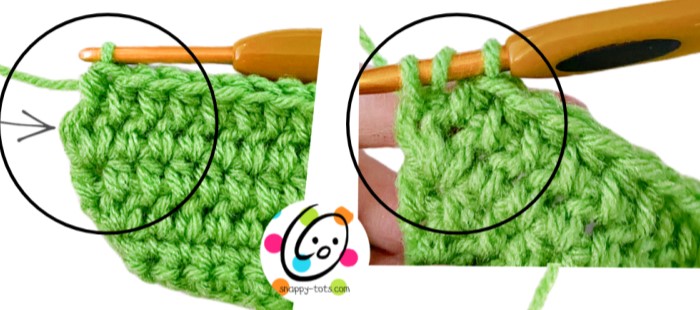
Stitch Placement
Sometimes it can be a little tricky to see where to insert the hook for working “between the posts”. In the beginning of the row, you might need to pull the sts apart slightly to find where to place the hook.
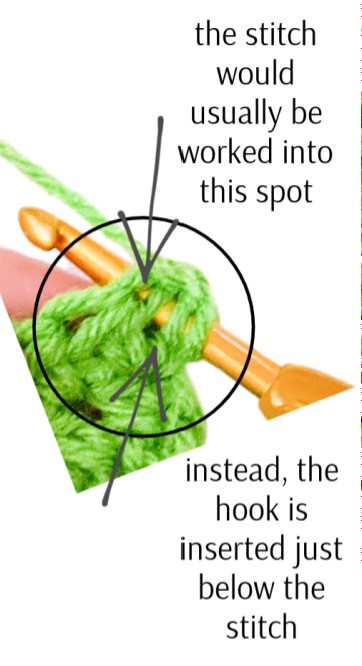
End of the row
Make sure your stitch count stays the same (unless doing an increase). It is common to miss the last st. It needs to be worked between the last post and the post from the turning chain.
Pin To Save For Later

So cute! You are a clever crochet creator.
This is so cute Heidi! I also can’t believe how grown Hayden is now! I’ve seen his pics since he was a little guy! Wow ❣️