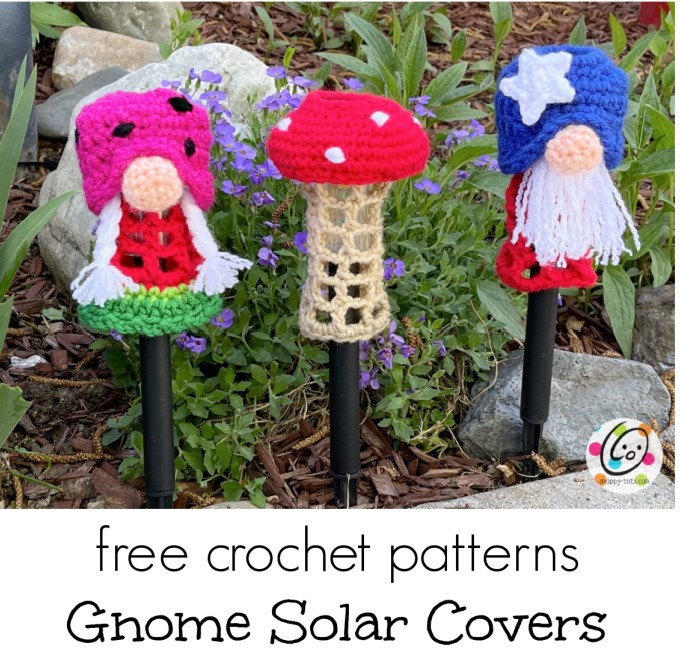
Free Pattern: Gnome Solar Cover Set
I’ve loved making covers for my solar lights in my yard. I thought some little gnomes would be cute to try and they needed a mushroom too. I hope you will enjoy making these.

More Solar Cover Patterns You Might Enjoy
- Original “Solar Fun Flowers” for round solar lamps.
- “Solar Minions” for tall, skinny solar lamps.
- Solar Pumpkins
- Firework Solar Covers
- Daisy Solar Covers
- BIG Solar Blooms
Gnome Solar Cover Set Crochet Patterns
The patterns for these three are available for free below. An ad-free, downloadable PDF of these patterns with all of the photos is available to purchase from my shops: Ravelry | Etsy
Materials
- Yarn: small amounts of acrylic worsted weight yarn choice of colors. Sample yarns: Red Heart Super Saver Cherry, Buff, White, Spring Green, Shocking Pink, Royal Blue, Paddy Green, Black: Caron Simply Soft Light Country Peach
- Crochet Hook: H
- Miscellaneous: yarn needle; tall, skinny solar lamp as shown below (top part of lamp is 6″ circumference and approximately 3.25″ tall). I buy mine in a six pack from walmart, but they are sold separately too (https://bit.ly/43kTA2v)
- Adjust pattern for larger, similar bulbs by using an I or J hook.
Tips
- The first stitch of each row is worked into the same stitch as the turning chain.
- Numbers at the beginning of each line may refer to steps and not indicate number of rows.
- Stitch count remains the same unless noted at end of row/round.
- If you have any questions about this pattern please contact [email protected].
Directions – Mushroom
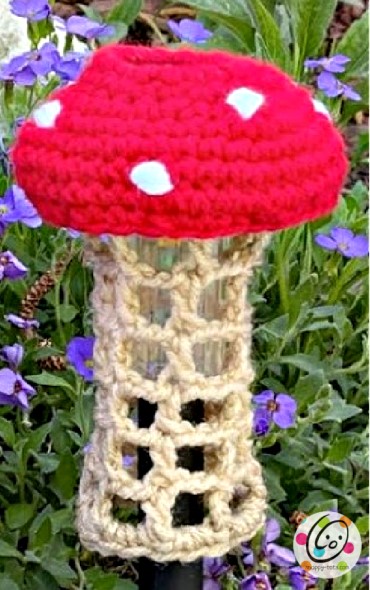
Base Piece: This part slips over the light and starts at the top.
1. With an H hook and worsted weight yarn (red in sample), ch 15, join with a sl st in the last ch to form a ring. Make sure ch is not twisted.
2. Ch 1, sc 18 around ch, sl st to join. (18sts)
3. Ch 1, *sc 2, 2sc in next st,* repeat to the end of the round, sl st to join. (24sts)
4. Ch 1, BPHDC around each post to end of round, sl st to join.
5. Ch 1, *hdc 6, hdc2tog*, repeat to end of the round, sl st to join. (21sts)
6. Finish off the current color and change to color for stem (tan in sample). Ch 1, hdc in the same st and in each st to end of round, sl st to join.
7. Ch 1, sc in each st to end of the round, sl st to join.
8. Ch 5, *sk 2, dc in the next st, ch 2*, repeat to the end of the round, sl st in the third chain in the beginning to join. (7 windows created)
9. Ch 5, dc in first dc, *ch 2, dc in next st*, repeat to the end of the round, sl st in the third chain in the beginning to join.
10-13. Repeat previous step.
14. Ch 1, 3sc in the first “window” (around ch 2 from previous round), 2sc in the next window, *3sc in the next window, 2sc in the next window*, repeat until 1 window remains, 2sc in the next window, sl st to join. (17sts) Finish off and weave in ends.
15. This step starts the top of the mushroom. With the beginning circle towards you, use an H hook and red yarn to sl st into a st on round 3 (where the ridge is created from working BPHDC on step 4). Ch 1, *sc 3, 2sc in the next st*, repeat to end of round, sl st to join. (30sts)
16. Ch 1, *sc 5, 2sc in the next st*, repeat to end of round, sl st to join. (35sts)
17. Ch 1, sc 2, *2sc in the next st, sc 6*, repeat until 5 sts remain, 2sc in the next st, sc 4, sl st to join. (40sts)
18. Ch 1, *sc 7, 2sc in the next st*, repeat to end of round, sl st to join. (45sts)
19. Ch 1, sc in each st to end of round, sl st to join.
20. Ch 1, *sc 2, sc2tog*, repeat to end of round, sl st to join. (30sts) Finish off and weave in ends.
Finger shape the mushroom, especially the beginning edge, so it has a nice rounded shape.
White Spots: With a yarn needle and worsted weight yarn (white in sample), create white spots by taking a few sts together for a rounded shape. Add 3-5 spots randomly placed around the mushroom top (or more if desired).
Directions – Patriotic Gnome

Base Piece: This part slips over the light and starts at the top.
1. With an H hook and worsted weight yarn (blue in sample), ch 15, join with a sl st in the last ch to form a ring. Make sure ch is not twisted.
2. Ch 1, sc 18 around ch, sl st to join. (18sts)
3. Ch 1, *sc 2, 2sc in next st,* repeat to the end of the round, sl st to join. (24sts)
4. Ch 1, BPHDC around each post to end of round, sl st to join.
5. Ch 1, *hdc 6, hdc2tog*, repeat to end of the round, sl st to join. (21sts)
6. Finish off the current color and change to color for “pants” (red in sample). Ch 1, hdc in the same st and in each st to end of round, sl st to join.
7. Ch 1, sc in each st to end of the round, sl st to join.
8. Ch 5, *sk 2, dc in the next st, ch 2*, repeat to the end of the round, sl st in the third chain in the beginning to join. (7 windows created)
9. Ch 5, dc in first dc, *ch 2, dc in next st*, repeat to the end of the round, sl st in the third chain in the beginning to join.
10-13. Repeat previous step.
14. Ch 1, 3sc in the first “window” (around ch 2 from previous round), 2sc in the next window, *3sc in the next window, 2sc in the next window*, repeat until 1 window remains, 2sc in the next window, sl st to join. (17sts) Finish off and weave in ends.
15. This step starts the top of the hat. With the beginning circle towards you, use an H hook and blue yarn to sl st into a st on round 3 (where the ridge is created from working BPHDC on step 4). Ch 1, sc in each st to end of round, sl st to join. (24sts)
16. Ch 1, sc 4, hdc, 2dc in next st, dc 15, 2dc in next st, hdc, sc, sl st to join. (26sts)
17. Ch 1, sc 4, hdc, dc 19, hdc, sc, sl st to join.
18. Ch 1, sc 4, hdc, 2dc in next st, dc 17, 2dc in next st, hdc, sc, sl st to join. (28sts)
19. Ch 1, TURN to work from wrong side of piece. Sc in the same st, hdc, 2dc in the next st, dc 17, 2dc in the next st, hdc, sc, sl st in the next st. Leave the last 3 sts unworked. This will be the area above the nose.
20. Ch 1, TURN, loosely sl st in the next st and in each st around including the 3 unworked sts from the previous round. Finish off and weave in ends.
Star (make 1)
1. With an H hook and white yarn, create a magic loop of 5 sc sts (or preferred method for creating a circle of 5 sc sts), pull to close and sl st to join. (5sts)
2. *ch 3, sl st in the 2nd ch from hook, hdc in the next ch, sl st in the next ch on circle*, repeat to end of round. Finish off, leaving a long tail for sewing in place.
With a yarn needle, use the yarn tail to sew the star to the hat section.
Nose (make 1)
1. With an H hook and worsted weight yarn for nose (light peach in sample), create a magic loop of 6 sc sts (or preferred method for creating a circle of 6 sc sts), pull to close and sl st to join. (6sts)
2. Ch 1, 2sc in each st to end of round, sl st to join. (12sts)
3. Ch 1, *sc2tog, sc 4*, repeat once, sl st to join. (10sts) Finish off, leaving a long tail for sewing in place.
Lightly stuff the nose. With a yarn needle, use the yarn tail to sew the nose to the pant section of the gnome so the indent section of the hat is on the top of the nose (see photo for placement).
Beard
Cut several strands of cream or white worsted weight yarn 10” long. Working with 2 strands of yarn at a time, fold in half and pull the center loops through sts on either side and below the nose. Pull the yarn tails through the loops until the loops are snug against the gnome.
Pull the strands of yarn apart to frizz the yarn and make it fuller.
Trim the ends of the beard.
Directions – Melon Girl Gnome
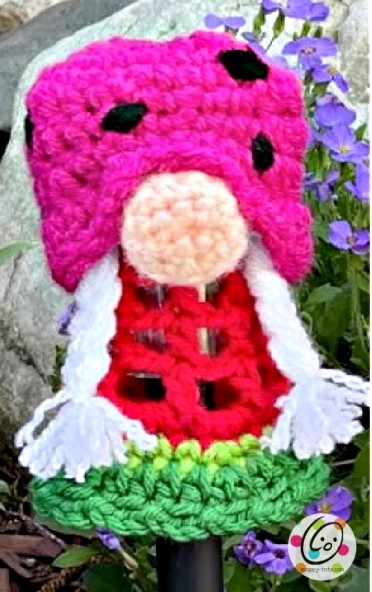
Base Piece: This part slips over the light and starts at the top.
1. With an H hook and worsted weight yarn (pink in sample), ch 15, join with a sl st in the last ch to form a ring. Make sure ch is not twisted.
2. Ch 1, sc 18 around ch, sl st to join. (18sts)
3. Ch 1, *sc 2, 2sc in next st,* repeat to the end of the round, sl st to join. (24sts)
4. Ch 1, BPHDC around each post to end of round, sl st to join.
5. Ch 1, *hdc 6, hdc2tog*, repeat to end of the round, sl st to join. (21sts)
6. Finish off the current color and change to color for the “dress” (red in sample). Ch 1, hdc in the same st and in each st to end of round, sl st to join.
7. Ch 1, sc in each st to end of the round, sl st to join.
8. Ch 5, *sk 2, dc in the next st, ch 2*, repeat to the end of the round, sl st in the third chain in the beginning to join. (7 windows created)
9. Ch 5, dc in first dc, *ch 2, dc in next st*, repeat to the end of the round, sl st in the third chain in the beginning to join.
10. Repeat previous step.
11. Ch 6, *sk 2, dc in the next st, ch 3*, repeat to the end of the round, sl st in the third chain in the beginning to join. (7 windows created)
12. Ch 1, 3sc in each “window” (around ch 2 from previous round), sl st to join. (21sts) Finish off and weave in ends.
13. Finish off the current yarn and change color (lime green in sample). Ch 1, *sc 6, 2sc in the next st*, repeat to end of round, sl st to join. (24sts)
14. Finish off the current yarn and change color (medium green in sample). Ch 1, *hdc 7, 2hdc in the next st*, repeat to end of round, sl st to join. (27sts)
15. *ch 3, sk 1, sl st in the next st*, repeat to end of round, sl st to join. Finish off and weave in ends.
This step starts the top of the hat. With the beginning circle towards you, use an H hook and pink yarn to sl st into a st on round 3 (where the ridge is created from working BPHDC on step 4). Ch 1, sc in each st to end of round, sl st to join. (24sts)
16. Ch 1, sc 4, hdc, 2dc in next st, dc 15, 2dc in next st, hdc, sc, sl st to join. (26sts)
17. Ch 1, sc 4, hdc, dc 19, hdc, sc, sl st to join.
18. Ch 1, sc 4, hdc, 2dc in next st, dc 17, 2dc in next st, hdc, sc, sl st to join. (28sts)
19. Ch 1, TURN to work from wrong side of piece. Sc in the same st, hdc, 2dc in the next st, dc 17, 2dc in the next st, hdc, sc, sl st in the next st. Leave the last 3 sts unworked. This will be the area above the nose.
20. Ch 1, TURN, loosely sl st in the next st and in each st around including the 3 unworked sts from the previous round. Finish off and weave in ends.
Nose (make 1)
1. With an H hook and worsted weight yarn for nose (light peach in sample), create a magic loop of 6 sc sts (or preferred method for creating a circle of 6 sc sts), pull to close and sl st to join. (6sts)
2. Ch 1, 2sc in each st to end of round, sl st to join. (12sts)
3. Ch 1, *sc2tog, sc 4*, repeat once, sl st to join. (10sts) Finish off, leaving a long tail for sewing in place.
Lightly stuff the nose. With a yarn needle, use the yarn tail to sew the nose to the pant section of the gnome so the indent section of the hat is on the top of the nose (see photo for placement).
Braids
Cut 24 strands of cream colored yarn 12” long. Working with 6 strands of yarn at a time, fold in half and pull the center loops through sts on either side of the nose. Pull the yarn tails through the loops until the loops are snug against the gnome.
Pull the strands of yarn apart to frizz the yarn and make it fuller (see top photo at right).
Cut a 6” piece of yarn and pull apart in half. These will be used to tie around the bottom of the braids.
Divide the strands in thirds and loosely braid. Tie the yarn around the bottom of the braid.
Trim ends if needed.
Repeat for the second braid.
Seeds: With a yarn needle and worsted weight yarn (black in sample), create “seeds” by taking a few sts together for an oval shape. Add 5-7 seeds randomly placed around the hat (more or less if desired).
Pin To Save For Later