April Crochet Pack

About the Patterns
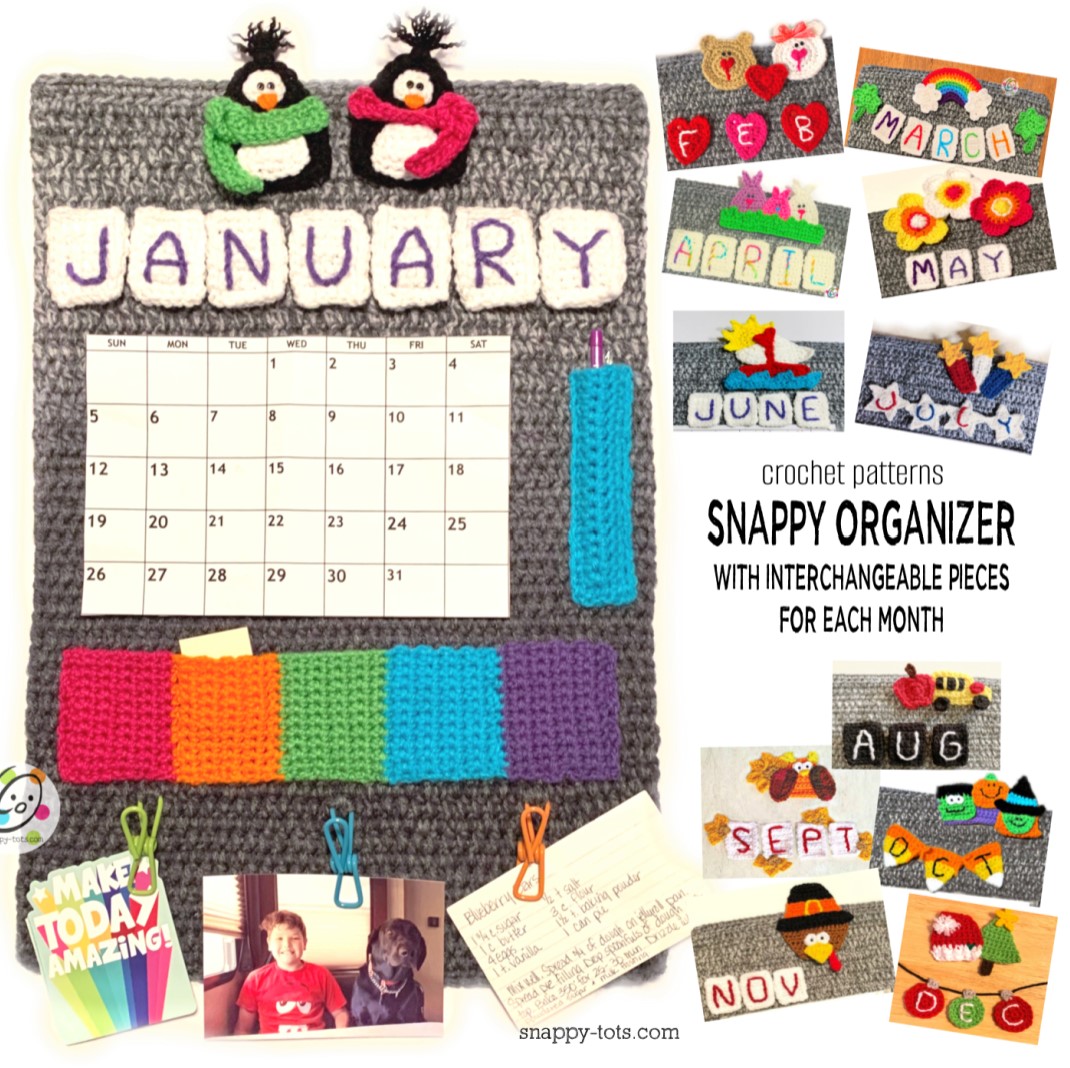
The pattern for the main “Snappy Organizer”, which includes January is available for free at this link, plus there are links to the monthly sets (posted on the 15th of each month for the next month). If you would like to work ahead, the packs of all of the monthly patterns are available to purchase.
All of these patterns are free to view and follow along here on my blog. Ad-free, downloadable pdfs of all of the patterns shown (divided into 4) are also available to purchase from my shops: Ravelry | Etsy
April Crochet Patterns
These are designed to be used with the “Snappy Organizer”.
Materials and Details
- Yarn: less than 50 yards of each of lime green, lavender, turquoise, bright pink, dark pink, white, off white, variegated
- Crochet Hook: H (5mm)
- Miscellaneous: Yarn needle, 2 large snaps to match the calendar, 4 tiny black buttons for eyes (optional), sewing needle, black thread.
Tips
- Numbers at the beginning of each line may refer to steps and not indicate number of rows.
- Stitch count remains the same unless noted at end of row.
- If you have any questions about this pattern please contact [email protected].
Large Bunnies (make 2)
1. With an H hook and yarn, ch 7, 2sc in the 2nd ch from hook, sc 4, 2sc in the last ch from hook. (8sts)
2-3. Ch 1, turn, sc in the same st and in each st across.
4. Ch 1, turn, sc2tog, sc 6. (7sts)
5. Ch 1, turn, sc2tog, sc 5. (6sts)
6. Ch 1, turn, sc2tog, sc 4. (5sts)
7. Ch 1, turn, sc2tog, sc 3. (4sts)
8. Ch 1, turn, sc2tog, sc 2. (3sts)
9. Ch 1, turn, sc2tog, sc. (2sts)
10. This step is worked around the outer edge of the bunny. Ch 1, sc evenly down the side of the bunny, working 2sc in the widest part, sc in each st across the bottom edge. Sc evenly up the side of the bunny, working 2sc in the widest part. Sl st in the first st at the top of the bunny.
11. This step creates the bunny ears. *Ch 5, sl st in the 2nd ch from hook, sc in the next ch, hdc in each of the next 2 chs, sl st in the same st on the bunny*, sl st in the next st, repeat. Finish off and weave in ends.
Face: With a sewing needle and black thread, sew two tiny black buttons near the top of the bunny. With a yarn needle and contrasting yarn, stitch a triangle shape for a nose and a short line down from the point.
Small Bunny (make 1)
1. With an H hook and yarn, ch 5, 2sc in the 2nd ch from hook, sc 2, 2sc in the last ch from hook. (6sts)
2-3. Ch 1, turn, sc in the same st and in each st across.
4. Ch 1, turn, sc2tog, sc 4. (5sts)
5. Ch 1, turn, sc2tog, sc 3. (4sts)
6. Ch 1, turn, sc2tog, sc 2. (3sts)
7. Ch 1, turn, sc2tog, sc. (2sts)
8. This step is worked around the outer edge of the bunny. Ch 1, sc evenly down the side of the bunny, working 2sc in the widest part, sc in each st across the bottom edge. Sc evenly up the side of the bunny, working 2sc in the widest part. Sl st in the first st at the top of the bunny.
9. This step creates the bunny ears. *Ch 4, sl st in the 2nd ch from hook, sc in the next ch, hdc in the next st, sl st in the same st on the bunny*, sl st in the next st, repeat. Finish off and weave in ends.
Face: With a yarn needle and black yarn, stitch two eyes near the top of the bunny. With a yarn needle and contrasting yarn, stitch a triangle shape for a nose and a short line down from the point.
Grass
1. With an H hook and lime green yarn, ch 29, sc in the 2nd ch from hook and in each ch across. (28sts)
2. Ch 1, turn, sc in the same st and in each st across.
3. Work this row in FLO. Ch 4, turn, piece, sl st in the same st, sl st in the next st, *ch 6, sl st in the next 2 sts, ch 4, sl st in the next 2 sts*, repeat until 1 st remains, ch 6, sl st in the last st.
4. Ch 1, turn. Working in the remaining loops from the previous row, sl st in each st to end of row. Finish off, leaving a long tail for sewing pieces together.
Assembly: With a yarn needle, use the green yarn tail to sew the bottom edges of the bunnies behind the grass. The bunnies overlap each other in the middle.
Tip: keep checking the pieces to make sure the bottom edge of the grass stays straight.
With a yarn needle and yarn to match the middle bunny, sew the edges of the middle bunny to the outer bunnies. This will help the piece stay straight.
“APRIL” Tiles
Follow instructions from the main “snappy organizer” pattern to make the tiles for this month.
Assembly
- Attach the tiles to the calendar with brads or desired items.
- Snaps: Center the bunnies over the snaps already sewn to the organizer to find placement. Sew two coordinating snap pieces to the back of the bunnies so they line up with the snaps on the organizer.