
Free Pattern: Nap Monster Pillow
Nap Monster Pillow Pack
A monster-sized pillow, treasure keeper and backpack all rolled into one.
I originally designed this silly monster pillow for my grandson. I wanted something soft enough for him to curl up with, but also something he could tote around and use to carry some of his favorite treasures.
That is how the Nap Monster Pillow Pack was born: take a nap and let your monster hold your stuff, then slip his arms over your shoulders and take him along on your next adventure.
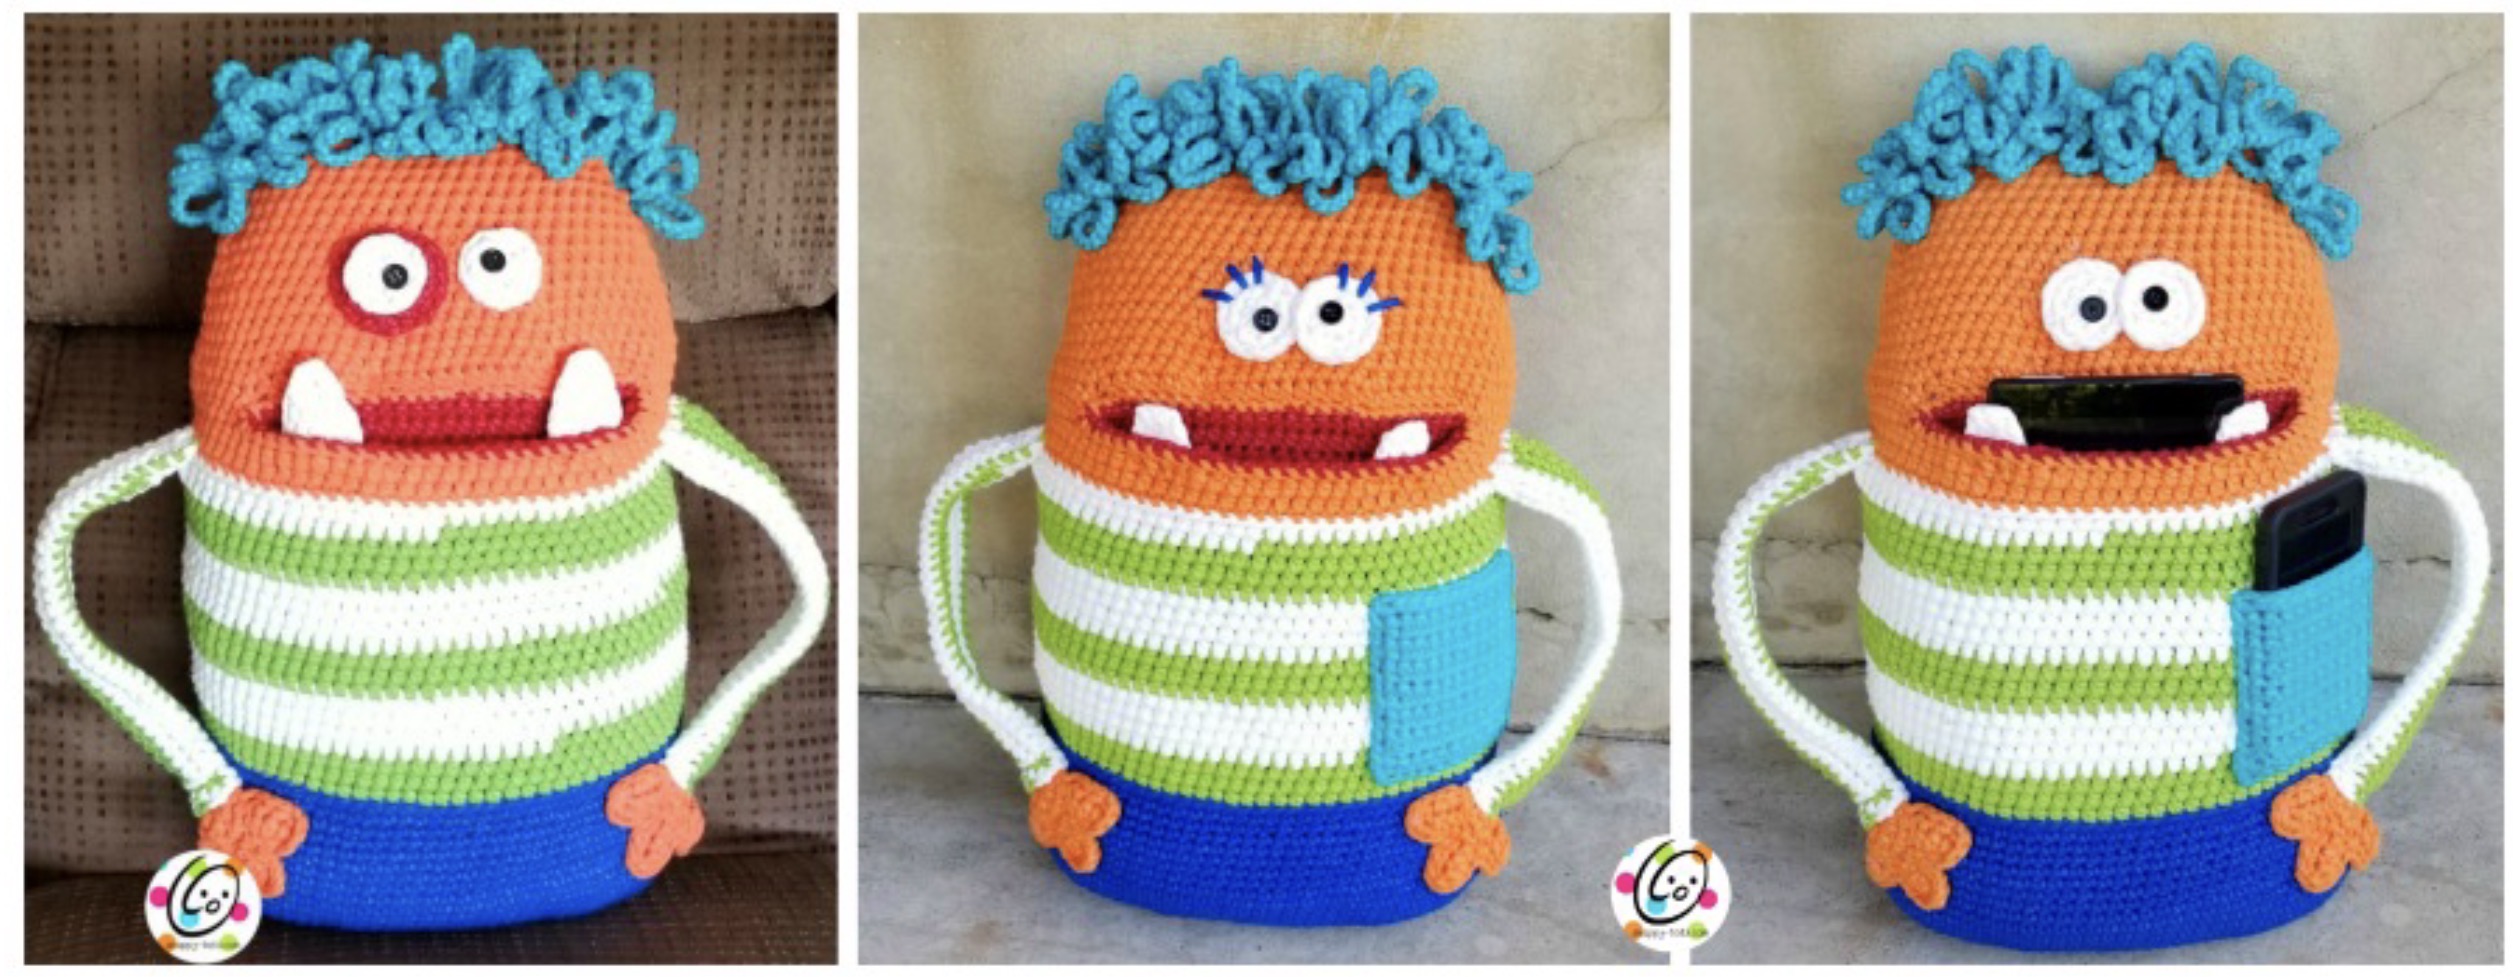
The pattern is easy to customize too. The original large version was made with Bernat Maker Outdoor yarn in solids and stripes, but another super bulky yarn could be substituted. You can also use worsted weight yarn and a smaller hook to make a smaller Nap Monster.
Instructions are included for the large pillow as well as information for making the smaller version. The pockets are perfect for treasures such as a cell phone, book, pajamas or other little necessities, and the larger monster can even hold a tablet. The arms can be made long enough to wear as a backpack or shorter if you would rather use them as handles.
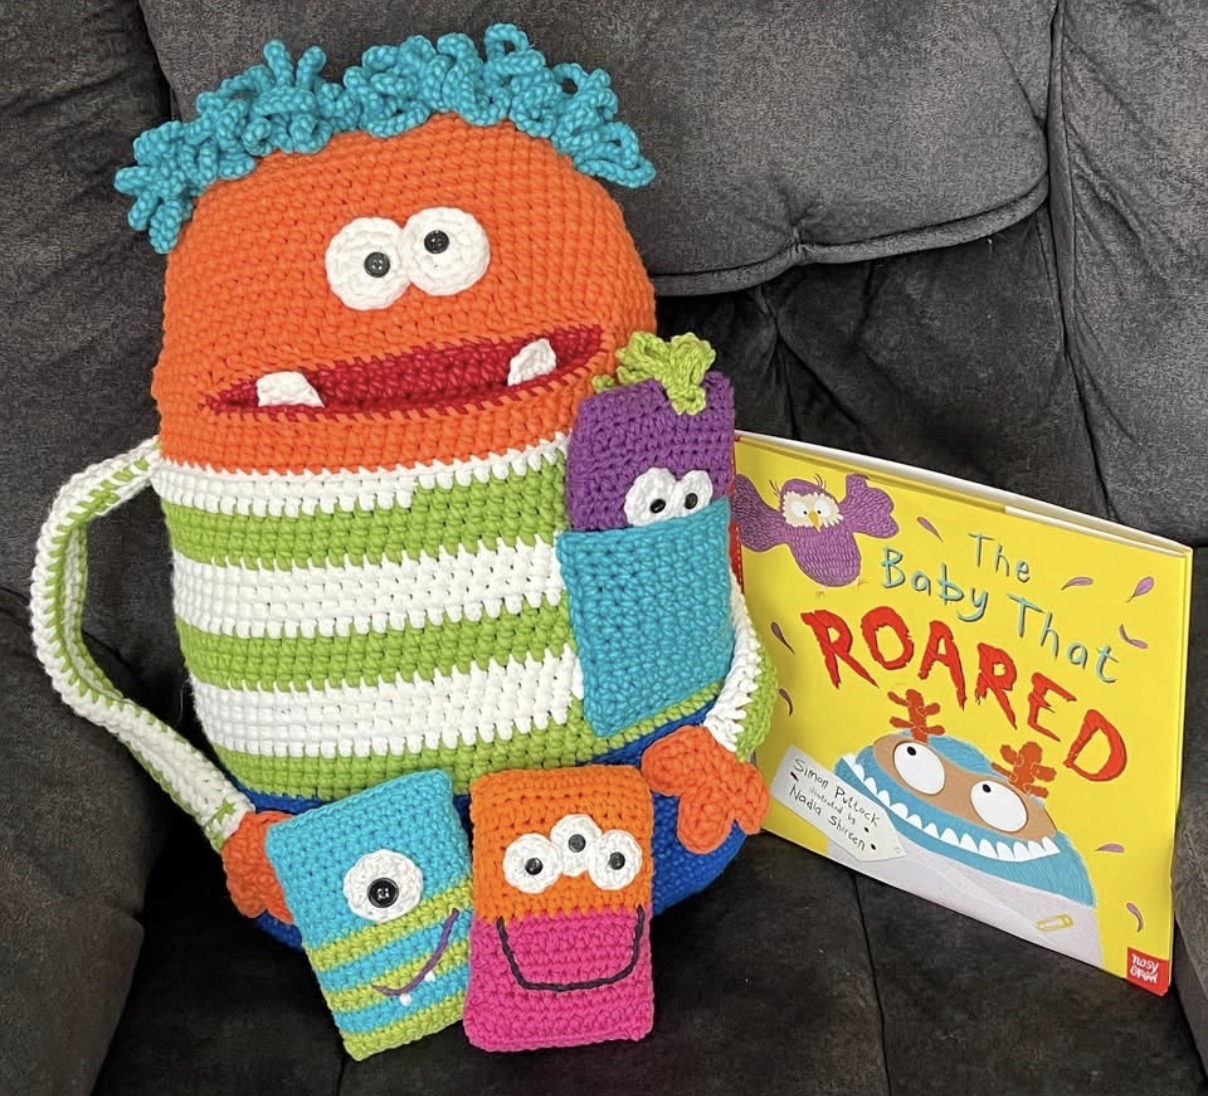
I even found a fun book with a similar little monster on the cover to go along with the pillow. I wanted a few small things he could tuck into the pockets too, so I included some of my monster scrubbies .
Free on the Blog or Printable PDF
This crochet pattern is available to view for free right here on the Snappy Tots blog. Prefer a clean, printer-friendly copy? An ad-free downloadable PDF with the complete pattern and photos is also available for a small fee.
Materials & Details
- Yarn: Bernat Maker Outdoor Yarn. 200 yards of each of the following colors: Deep Sea Teal, Oranges, Navy Ink, Beach Red, Fresh Citrus Stripe Note: the white for the eyes and teeth is from the fresh citrus stripe yarn.
- Crochet Hooks: J
- Miscellaneous Supplies: Yarn needle, Sewing needle, black thread, 2 small black buttons, stuffing
- Gauge: Not important for this project
- Finished Measurements: 18.75” long x 14” wide
Tips
- First stitch of each row is worked into the same stitch as the turning chain.
- Numbers at the beginning of each line may refer to steps and not indicate number of rows.
- Instructions are written with color changes as shown in sample. Substitute colors as desired.
Variations
- Use an H hook and one strand ww yarn for a smaller version. See info at end of pattern.
- Change colors as desired. This could be made all one color instead of dividing for pants, shirt and head.
- Different options available for the eyes and teeth.
- The “arms” are designed so the pillow can be worn as a backpack on younger children. These can be made shorter for a handle or longer for larger people to wear on their back.
Body
This project starts at the base (blue).
1. With a J hook and dark blue yarn, ch 21, sc in 2nd ch from hook and in each ch until 1 ch remains, work 5sc in last st. Pivot piece to work back across the chain in the unused loops. Sc in each ch across, working 4sc in the last st. Place a marker for working in the round. (46sts)
2. 2sc in the next st, sc 18, 2sc in the next st, sc, 2sc in the next st, sc, 2sc in the next st, sc 18, 2sc in the next st, sc, 2sc in the next st, sc. (52sts)
3. 2sc in the next st, sc 21, 2sc in the next st, sc, 2sc in the next st, sc, 2sc in the next st, sc 21, 2sc in the next st, sc, 2sc in the next st, sc. (58sts)
4. Sc, 2sc in next st, sc 22, 2sc in next st, sc, 2sc in next st, sc, 2sc in next st, sc, 2sc in next st, sc 22, 2sc in next st, sc, 2sc in next st, sc, 2sc in next st. (66sts)
5. Sc 2, 2sc in next st, sc 21, 2sc in next st, sc 2, 2sc in next st, sc 4, 2sc in next st, sc 2, 2sc in next st, sc 21, 2sc in next st, sc 2, 2sc in next st, sc 4, 2sc in next st. (74sts)
6. Sc, 2sc in the next st, sc 26, 2sc in the next st, sc 4, 2sc in the next st, sc 4, 2sc in the next st, sc 26, 2sc in the next st, sc 4, 2sc in the next st, sc3. (80sts)
7. Sc in each st to end of round.
8. Repeat previous round 13 more times.
9. Sl st in next st. Change yarn color to start the shirt section. For the sample, I used self-striping yarn. You could change colors every 3-4 rounds for stripes if using solid colored yarns. Work this round in BLO. Ch 2, hdc in same st and in each st to end of round, sl st to join.
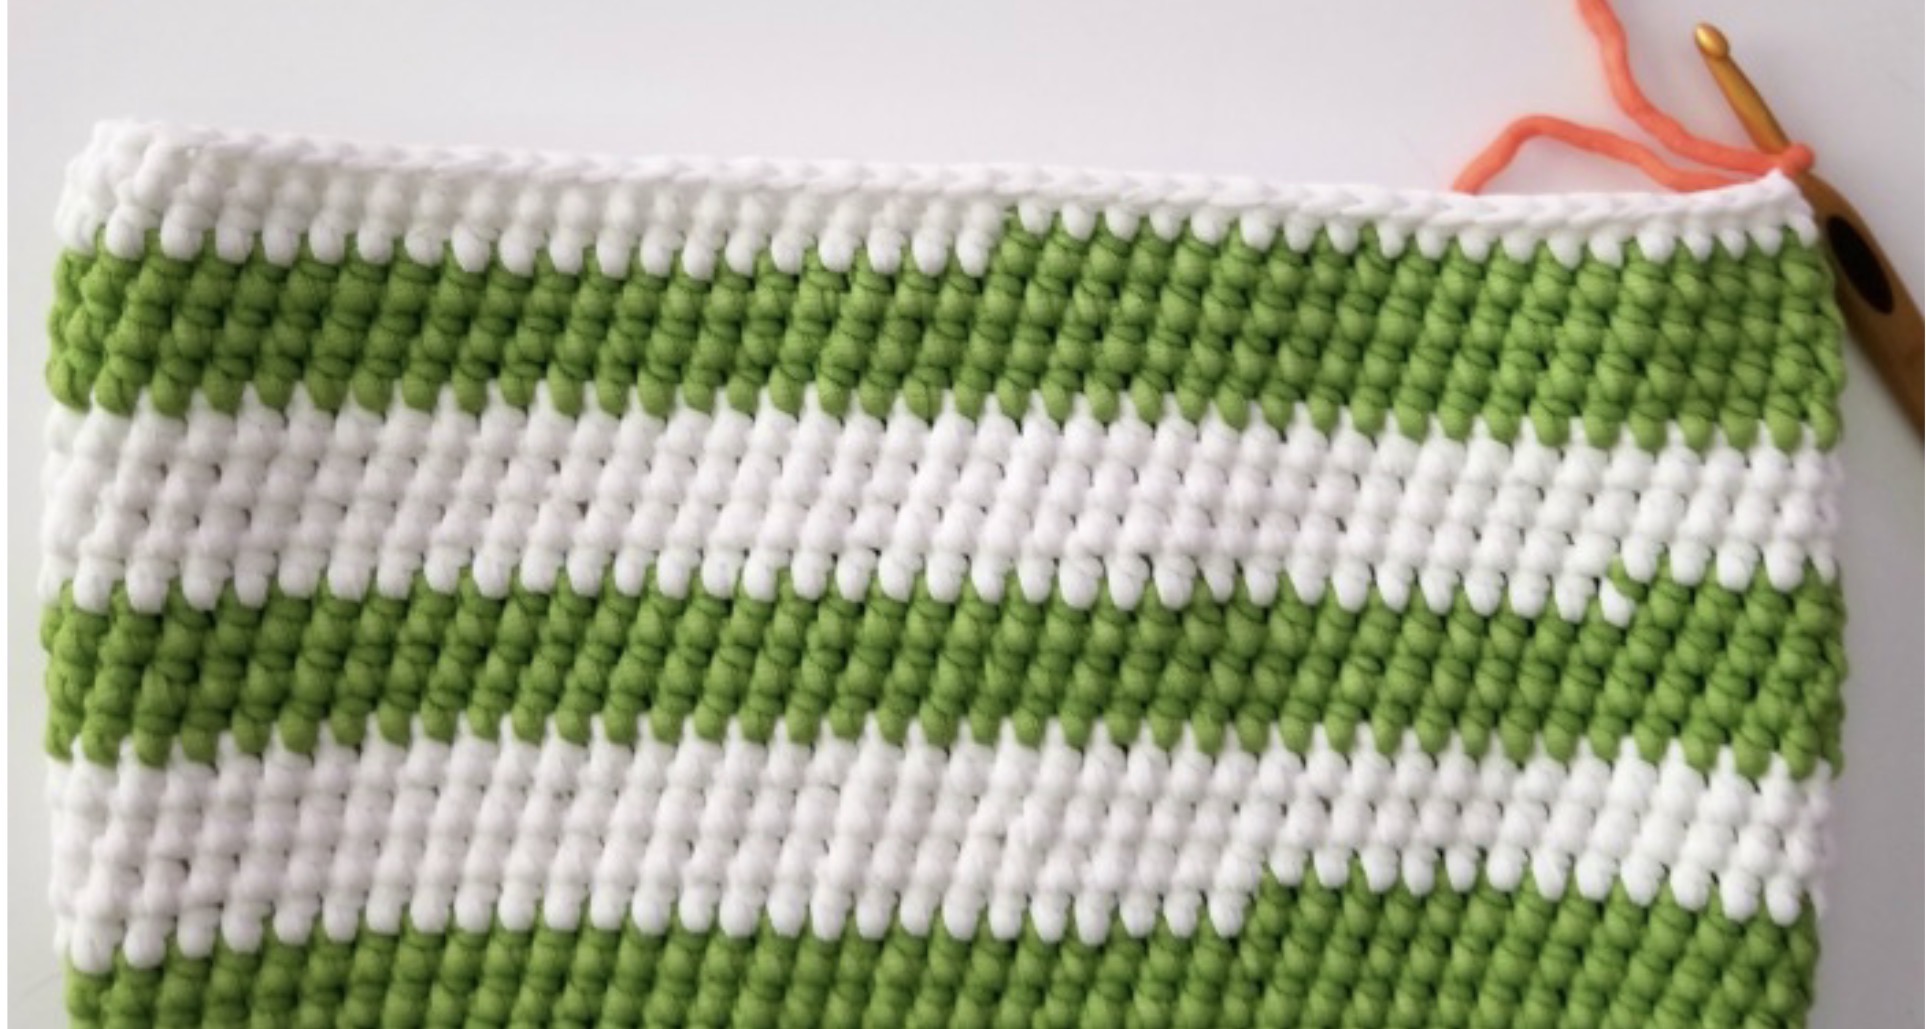
10. For this section you can either place a marker to work in continuous rounds or join at the end of each round. Choose from one of the following:
Continuous rounds: Place a marker. Sc in next st, hdc in each st to end of round.
Hdc between posts of previous round for an additional 17 rounds.
Sc in next st, sl st in next st. Finish off and weave in ends.
Join each round: Ch 2, hdc between posts of previous round, sl st to join.
Repeat previous round for an additional 17 rounds.
Finish off and weave in ends.
11. This step starts the head section. Place pillow on a flat surface and flatten to find the sides. Tip: check the bottom row to make sure it is centered.
This round is worked in BLO. Attach orange yarn to a back loop at the right edge of the top round. Ch 1, sc in each st to end of round, sl st to join.
12-13. Ch 2, hdc between posts of previous round, sl st to join.
14. This step creates the mouth opening. Stitches are worked between the posts of the previous round. Ch 2, hdc in same, hdc 6, sc, ch 26, sk 26, sc, hdc between posts to end of round, sl st to join.
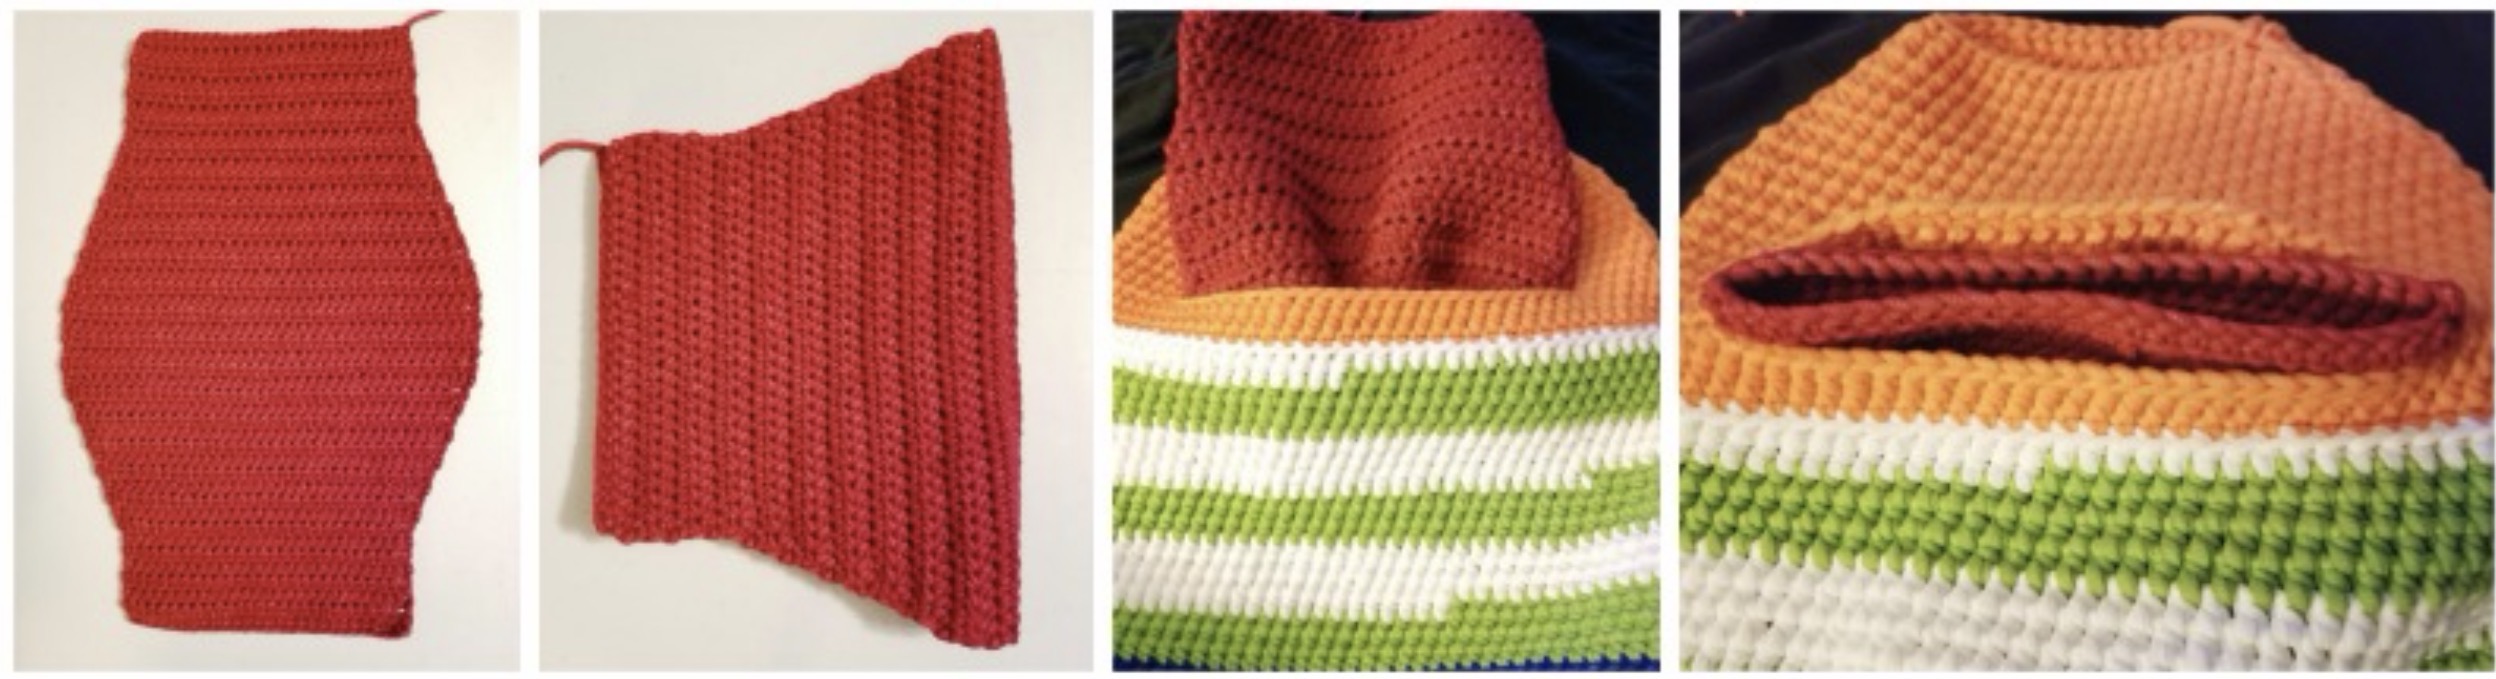
15. Ch 2, hdc between posts and in each ch to end of round, sl st to join.
16. Ch 2, hdc2tog, hdc 12, hdc2tog, hdc 9, hdc2tog, hdc 12, hdc2tog, hdc between posts to end of round, sl st to join. (76sts)
17. Ch 2, hdc between posts and in each ch to end of round, sl st to join.
18. Ch 2, hdc2tog, hdc 34, hdc2tog, hdc2tog, hdc 34, hdc2tog, sl st to join. (72sts)
19. Ch 2, hdc 12, hdc2tog, hdc 8, hdc2tog, hdc between posts to end of round, sl st to join. (70sts)
20. Ch 2, hdc between posts to end of round, sl st to join.
21. Ch 2, hdc2tog, hdc 10, hdc2tog, hdc 5, hdc2tog, hdc 10, hdc2tog, hdc2tog, hdc between posts until 2 sts remain, hdc2tog, sl st to join. (64sts)
22. Ch 2, hdc between posts to end of round, sl st to join.
23. Ch 2, hdc2tog, hdc 28, hdc2tog, hdc2tog, hdc 28, hdc2tog, sl st to join. (60sts)
24. Ch 2, hdc2tog, hdc 26, hdc2tog, hdc2tog, hdc 26, hdc2tog, sl st to join. (56sts)
25. Ch 2, hdc2tog, hdc 24, hdc2tog, hdc2tog, hdc 24, hdc2tog, sl st to join. (52sts)
26. Ch 2, hdc2tog, hdc 22, hdc2tog, hdc2tog, hdc 22, hdc2tog, sl st to join. (48sts)
27. Ch 2, hdc2tog, hdc 20, hdc2tog, hdc2tog, hdc 20, hdc2tog, sl st to join. (44sts)
28. Ch 2, hdc2tog, hdc 18, hdc2tog, hdc2tog, hdc 18, hdc2tog, sl st to join. (40sts)
29. Ch 2, hdc2tog, hdc 16, hdc2tog, hdc2tog, hdc 16, hdc2tog, sl st to join. (36sts)
Finish off, leaving a yarn tail for sewing the last round closed. Do not close yet. Set aside.
Mouth Insert/Pocket
1. With red yarn and a J hook, ch 27, sc in 2nd ch from hook and in each ch across. (26sts)
2. Ch 2, turn, hdc in same st and in each st to end of row.
3. Repeat previous row 5 more times.
4. Ch 2, turn, 2hdc in same st, hdc in each st to end of row. (27sts)
5. Repeat previous row until there are 38 sts.
6. Ch 2, turn, hdc in each st to end of row. (38sts)
7. Repeat previous row 5 more times.
8. Ch 2, turn, hdc2tog, hdc in each st to end of row. (37sts)
9. Repeat previous row until there are 26sts.
10. Ch 2, turn, hdc in each st to end of row. (26sts)
11. Repeat previous row 5 more times.
12. Ch 1, turn, sc in each st to end of row. Finish off, leaving a long yarn tail for sewing edge seams.
Fold insert in half. With a yarn needle and the yarn tail, sew the side edges together. Leave the top edge unsewn.
Place the insert pocket inside the mouth with the open end lined up with the mouth. Pin in place if needed. With orange yarn (or yarn to match the head section) and a yarn needle, sew the top edge of the insert to the mouth opening.
FACE
Eyes With Patch
Large Base of Eye (make one)
1. With red yarn and a J hook, create a magic circle of 8 sc sts (or preferred method for starting a circle of 8 sc sts), pull closed and place a marker for working in the round. (8sts)
2. 2sc in each st to end of round. (16sts)
3. *sc, 2sc in next st*, repeat to end of round. (24sts)
Sl st in next st, finish off, leaving a long tail for sewing to pillow.
White Part of Eye (make two)
1. With white yarn and a J hook, create a magic circle of 8 sc sts (or preferred method for starting a circle of 8 sc sts), pull closed and place a marker for working in the round. (8sts)
2. 2sc in each st to end of round. (16sts)
Sl st in next st, finish off, leaving a long tail for sewing to base eye.
Place the white piece on top of the red piece. With a yarn needle and yarn tail from one white piece, sew the pieces together.
With a sewing needle and black thread, sew a black button on top of each white eye piece.
With a yarn needle and yarn tails, sew the two eyes (one large with red base and one white) to the pillow. See main photo for placement.
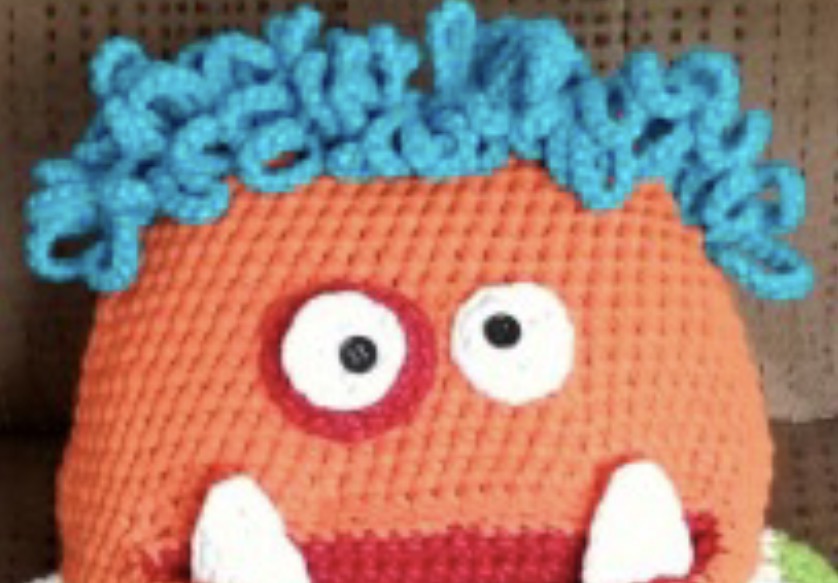
Big White Eyes (make two)
1. With white yarn and a J hook, create a magic circle of 8 sc sts (or preferred method for starting a circle of 8 sc sts), pull closed and place a marker for working in the round. (8sts)
2. 2sc in each st to end of round. (16sts)
Sl st in next st, finish off, leaving a long tail for sewing to base eye.
With a sewing needle and black thread, sew a black button on top of each white eye piece.
With a yarn needle and yarn tails, sew the two eyes to the pillow. See main photo for placement.
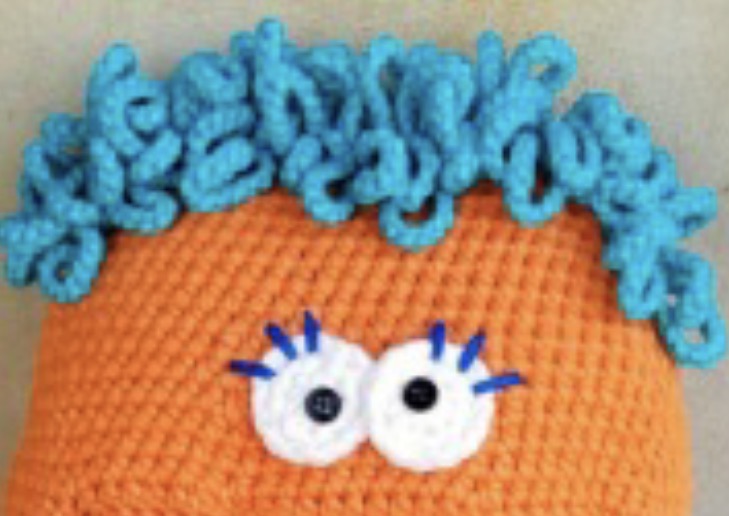
Eyelashes (optional): With a yarn needle and contrasting yarn, stitch the eyelashes in place.
Teeth
Pointed Teeth (make 2)
1. With white yarn and a J hook, ch 5, sc in 2nd ch from hook and in each ch across. (4sts)
2. Ch 1, turn, sc in each st to end of row.
3. Ch 1, turn, sc2tog, sc 2. (3sts)
4. Ch 1, turn, sc2tog, sc. (2sts)
5. Ch 1, turn, sc2tog. (1st)
6. Do not turn. Ch 1, sc 4 sts down the side of the tooth, working 2sc in the corner. Sc 2 across beginning edge, 2sc in last st. Sc 4 sts up side of tooth. (sc, hdc, sc) in st at top/point of tooth. Finish off and weave in ends.
Place each tooth just inside the mouth insert. With a yarn needle and orange yarn, sew the bottom edge of each tooth to the front/bottom part of the mouth.
Square Teeth (make 2)
1. With white yarn and a J hook, ch 4, sc in 2nd ch from hook, sc 2. (3sts)
2-3. Ch 1, turn, sc in each st to end of row.
Finish off and weave in ends.
Place each tooth just inside the mouth insert. With a yarn needle and orange yarn, sew the bottom edge of each tooth to the front/bottom part of the mouth.
Arms
Hands (make 2)
1. With orange yarn and a J hook, create a magic circle of 6 sc sts (or preferred method for starting a circle of 6 sc sts), pull closed and sl st to join. (6sts)
2. Ch 1, 2sc in each st to end of round, sl st to join. (12sts)
3. *Ch 4, sc in 2nd ch from hook, hdc 2, sl st in each of the next 2 sts on circle*, repeat to end of round. Last sl st will be in the base of the beginning peak. (6 peaks)
4. Ch 1. Fold piece in half, matching up the “peaks” to create 3 “fingers”. *Working through both layers, sc evenly up the side of the first “finger”, work 3sc in the tip, sc evenly down the side of the “finger”*. Repeat across each “finger”. Sc 6 across bottom edge.
5. Ch 1, turn (to work across bottom edge), sc2tog, sc 2, sc2tog. (4sts)
6. Ch 1, turn, sc2tog, sc2tog. (2sts)
7-9. Ch 1, turn, sc 2.
Finish off and weave in ends. Set aside.
Arm Section – Choose desired length
The only difference in the following options is the length of the arms.
Choice #1 (as shown in samples): Backpack length for child (make 2)
1. With a J hook and yarn to match the shirt, ch 35, sc in 2nd ch from hook and in each ch across. (34sts)
2-9. Ch 2, turn, hdc in each st to end of row.
Finish off, leaving a long tail for sewing long edges of each sleeve together. Continue to “assembly” on the next page.
Choice #2 (not shown): Backpack length for teens/adults (make 2)
1. With a J hook and yarn to match the shirt, ch 45, sc in 2nd ch from hook and in each ch across. (44sts)
2-9. Ch 2, turn, hdc in each st to end of row.
Finish off, leaving a long tail for sewing long edges of each sleeve together. Continue to “assembly” on the next page.
Choice #3 (not shown): Handles (make 2)
1. With a J hook and yarn to match the shirt, ch 25, sc in 2nd ch from hook and in each ch across. (24sts)
2-9. Ch 2, turn, hdc in each st to end of row.
Finish off, leaving a long tail for sewing long edges of each sleeve together. Continue to “assembly” on the next page.
Arm Assembly
Fold one arm so long edges are together. With a yarn needle and the yarn tail, sew the two edges together. Insert a hand between the layers and sew across the short end of the sleeve.
With a yarn needle and matching yarn, sew each end of the arm to the pillow. See main photos for placement. Make sure these are attached securely because they will be used as handles.
The hands can be sewn down if desired. Use a yarn needle and matching yarn.
Pocket (optional)
1. With turquoise yarn and a J hook, ch 14, sc in 2nd ch from hook and in each ch across. (13sts)
2. Ch 1, turn, sc in each st to end of row.
3. Repeat step 2 until pocket is desired length.
4. This step is worked around the outer edge of the pocket. Ch 1, pivot to work across the side of the pocket. Sc evenly across edge, working 3sc in corner, sc in each st across bottom edge, working 3sc in corner, sc evenly across edge, sl st in first st on last row (from step #3) to finish off. Leave a long tail for sewing pocket in place.
With a yarn needle and yarn tail, sew the sides and bottom edge of the pocket to the shirt area.
Assembly
Stuff the pillow from the top, working around the insert. Do not stuff too firmly or nothing will fit in the pocket.
Line up the top opening, creating two layers. With a yarn needle and orange yarn tail, sew the top opening closed.
Hair
With a J hook and yarn color of choice (turquoise in sample), attach the yarn around a post on the side of the head. *Ch 16, sl st around same post on head, ch 16, sl st around a post next to the previous post*, repeat across the top of the head and down the other side until it is even with the starting point. Finish off and weave in ends.
Smaller Pillows
These samples were made by two of my testers, Shaunna Hallon (top) and JoAnne Thompson (bottom).
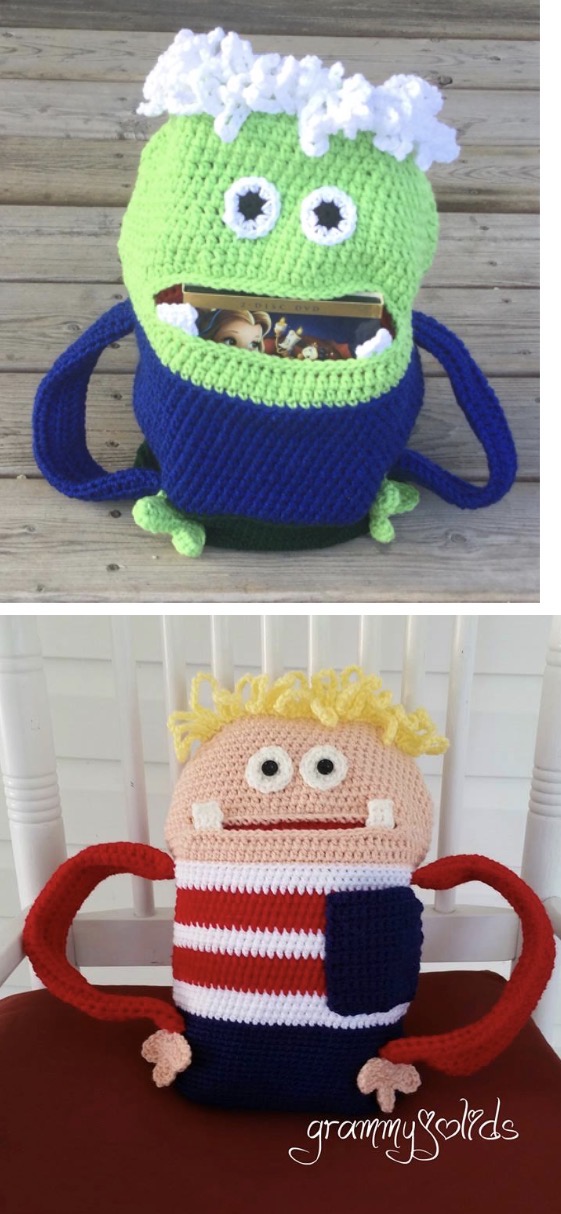
They followed the main pattern, using one strand worsted weight yarn and an H hook.
Before stuffed, these measured: Base 8″ long, top to bottom 12″, arms 11 1/2″ long.
The “arms” as shown will slip over one shoulder but will not work as a backpack. You would want to use the “longer arms” pattern.
🖨️ Want a Printer-Friendly Copy?
For a small fee from my shop, the ad-free downloadable PDF includes the complete Nap Monster Pillow Pack pattern and photos.
Get the Nap Monster PDFShow Me Your Nap Monster!
I love seeing what you make from my patterns! Share your finished project on social media and tag #snappytots so I can see your creation.
Pin to Save for Later
Come Hang Out With Snappy Tots
Find more crochet patterns, new releases, freebies, events and plenty of colorful Snappy fun.
Questions about this pattern? Email [email protected]
Thank you for crocheting with Snappy Tots. I hope you have a wonderful day!