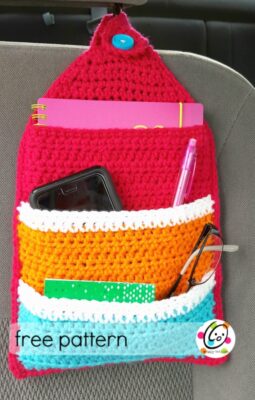
Free Pattern: Keep It Handy Organizer
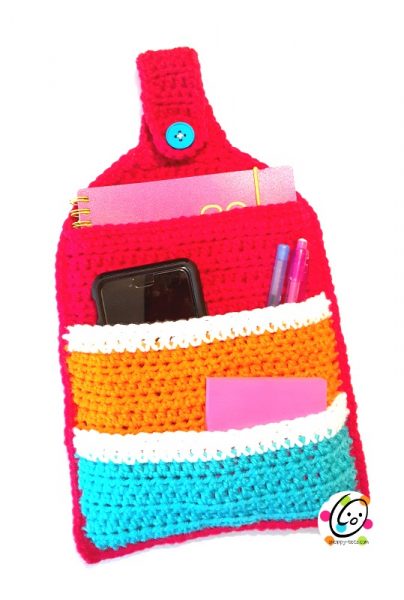
I always seem to need pockets in different places to keep me from losing things; in the car, bathroom, kitchen, etc. I came up with this little pocket organizer, based on a hanging kitchen towel. If we can hang those where a towel is needed, why not pockets where they are needed too?
Looking for something similar?
Want to save this for later?
- CLICK HERE to add it to your favorites on Ravelry.
Keep It Handy Organizer
Project Info
- Project Description: Pockets to hang wherever you need to keep items handy.
- Skill Level: Basic crochet skills are needed and must be able to read a crochet pattern.
- Completion Time (how long it takes the designer to make one): 1.5 hours
Materials and Details
- Yarn: worsted weight yarn in choice of colors Sample: Red Heart Super Saver Rouge, Pumpkin, Turqua, White
- Crochet Hook: H
- Miscellaneous: yarn needle, 1 large button for closure, pins
- Gauge: not needed for this project
- Measurements: 8” wide x 12.5” tall
- Note: Instructions are written for colors of sample and may be substituted as desired.
Instructions
Base (pink in sample)
- With H hook and pink yarn, ch 26, sc in 2nd ch from hook and in each ch across. (25sts)
- Ch 2, turn, hdc in each st to end of row.
- Repeat row #2 until piece measures 16” from beginning edge. Add or subtract length to this section if desired.
- Ch 2, turn, hdc2tog, hdc 23. (24sts) Place a marker on this row for later use.
- Ch 1, turn, *sc2tog, sc 4*, repeat to end of row. (20sts)
- Ch 1, turn, *sc2tog, sc 3*, repeat to end of row. (16sts)
- Ch 1, sc in each st to end of row.
- Ch 1, turn, *sc2tog, sc 6*, repeat once. (14sts)
- Ch 1, turn, *sc2tog, sc 5*, repeat once. (12sts)
- Ch 1, turn, sc in each st to end of row.
- Ch 1, turn, *sc2tog, sc 4*, repeat once. (10sts)
- Ch 1, turn, sc in each st to end of row.
- Ch 1, turn, *sc2tog, sc 3*, repeat to end of row. (8sts)
- Ch 1, turn, *sc2tog, sc 2*, repeat to end of row. (6sts)
15-24. Ch 2, turn, hdc in each st to end of row.
Note: If a longer strap is needed, add rows to this section.
- Ch 1, turn, sc 2, ch 3, sk 2, sc 2.
- Ch 1, turn, sc2tog, sc 2 in space, sc2tog. Finish off and weave in end. Set aside.
Short Pocket (turquoise in sample)
- With H hook and turquoise yarn, ch 26, sc in 2nd ch from hook and in each ch across. (25sts)
2 – 7. Ch 2, turn, hdc in each st to end of row.
- Change to white yarn. Ch 1, turn, sc in each st to end of row.
- Ch 1, turn, sc in each st to end of row. This side is the right side. Finish off and weave in end.
Medium Pocket (orange in sample)
- With H hook and orange yarn, ch 26, sc in 2nd ch from hook and in each ch across. (25sts)
2 – 13. Ch 2, turn, hdc in each st to end of row.
- Change to white yarn. Ch 1, turn, sc in each st to end of row.
- Ch 1, turn, sc in each st to end of row. This side is the right side. Finish off and weave in end.
Assembly
Lay base piece on a flat surface. Fold piece so starting edge lines up with the row with the marker from step 4. Pin edges to hold in place.
Next, place orange piece (medium pocket) on top of base, with white edge towards the top and bottom edge lined up with folded edge of base. Pin edges to hold in place.
Next, place turquoise piece (small pocket) on top of base, with white edge towards the top and bottom edge lined up with folded edge of base. Pin edges to hold in place.
For this next part, take your time and be patient. We will be crocheting through several layers at once to sew our pieces together.
With H hook, attach yarn to base of top strap (see point C in photo). Sc evenly along edge of piece, working through all pocket layers. (2sc, ch 1, 2sc) in corner. Sc evenly across folded edge of piece, working through all layers. (2sc, ch 1, 2sc) in corner. Sc evenly across last side of piece, working through all pocket layers and ending at base of strap (see point D in photo).
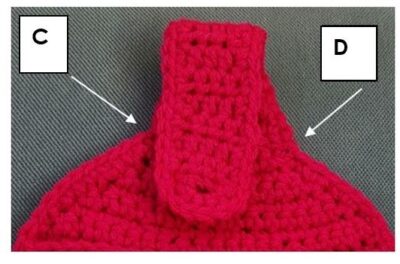
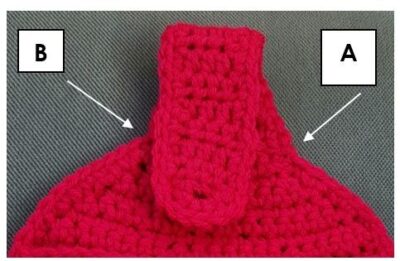
Flip piece over (opposite side of button).
With H hook, attach yarn to a st on outer edge where strap begins (see arrow b in photo). Sc evenly along edge of strap to point across from starting point (arrow b in photo).
Button: with yarn needle and matching yarn, sew button to top of bag before the skinny section begins.
I hope you enjoyed making this quick and easy project. I would love to see your creations. Please add your project to Ravelry and/or share online and include #snappytots.
Thanks for crocheting with me!
~ Heidi