

Crochet Pattern: Pottery Tote and Bonus
I LOVE bags and I think small ones like this are a great addition to a gift stash. As a container to hold additional gifts or by itself, almost anyone can find a use for this creation. It is fun and quick to make. If you need a last minute gift this is great by itself or as a “gift bag”. It isn’t too small to use or too big to find enough to fill it.
How It Came To Be
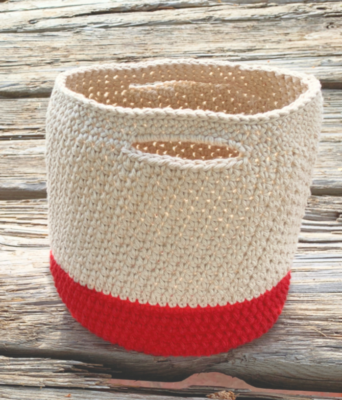
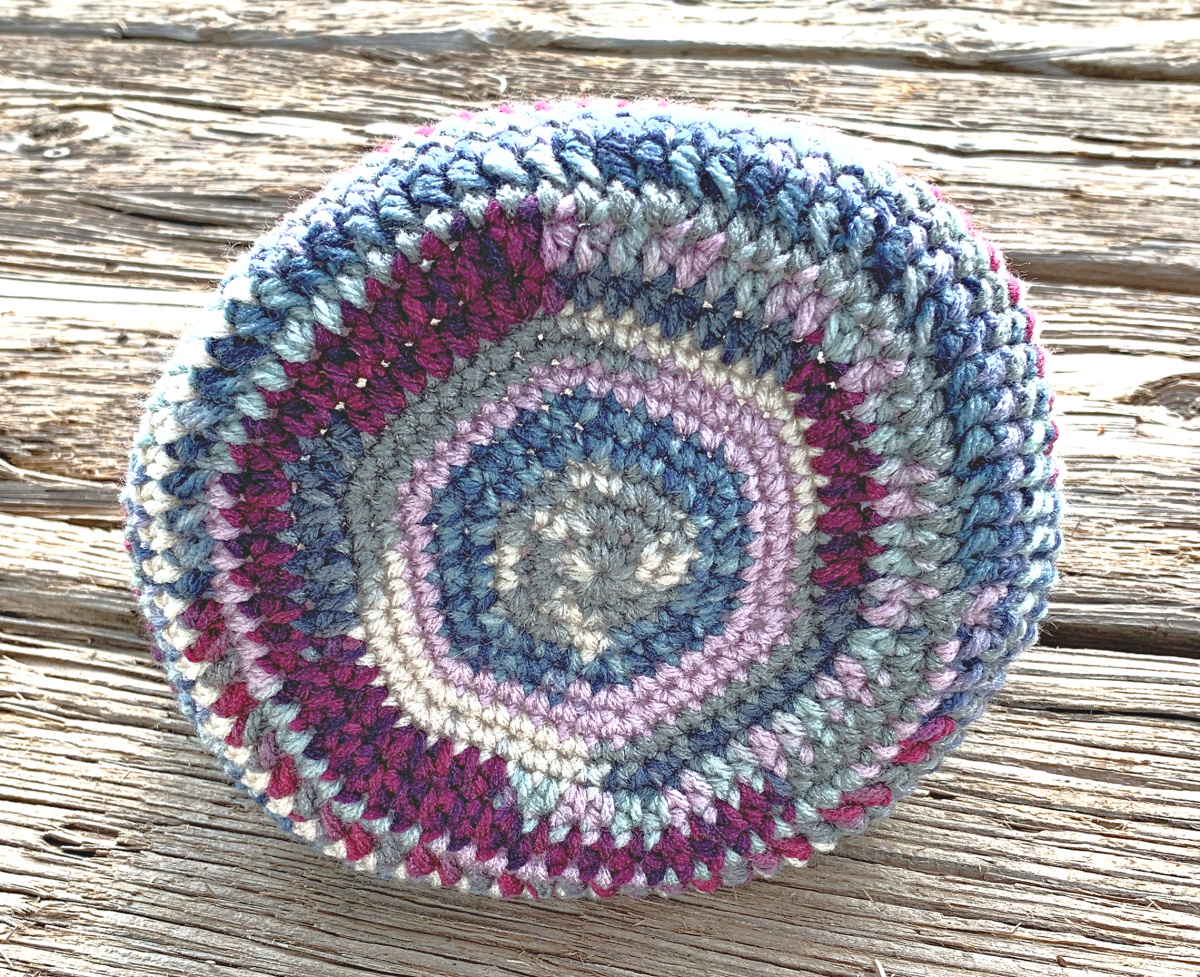
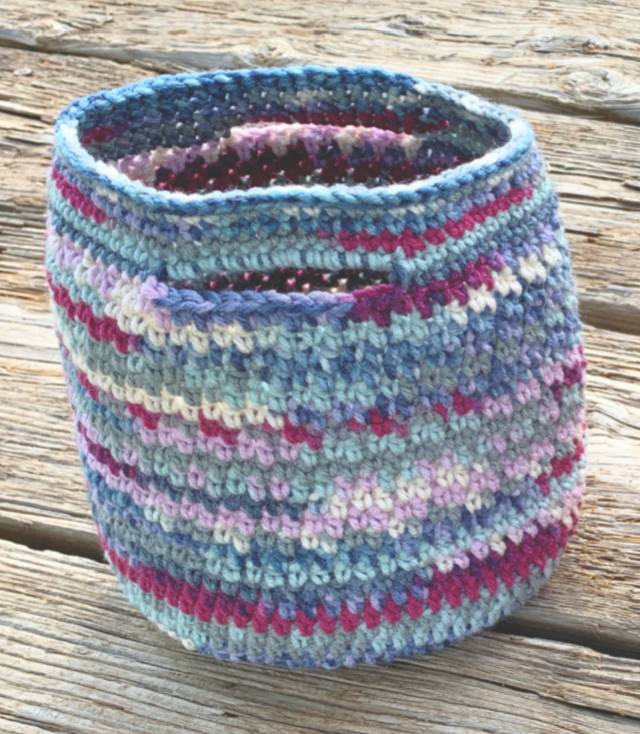
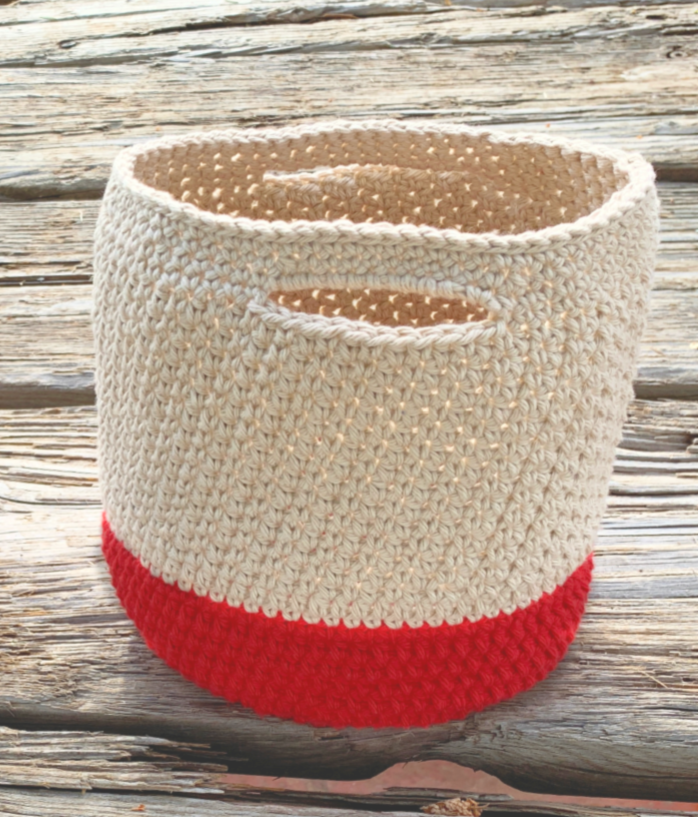
This little tote, at 10” wide x 8” tall, is a great size for many things. I have made several of these to hold miscellaneous items around my house, for kids to carry things on car rides and for many gifts.
It is named “pottery tote” because it reminds me of a pot my mom once made in a pottery class.
A Bit About The Project
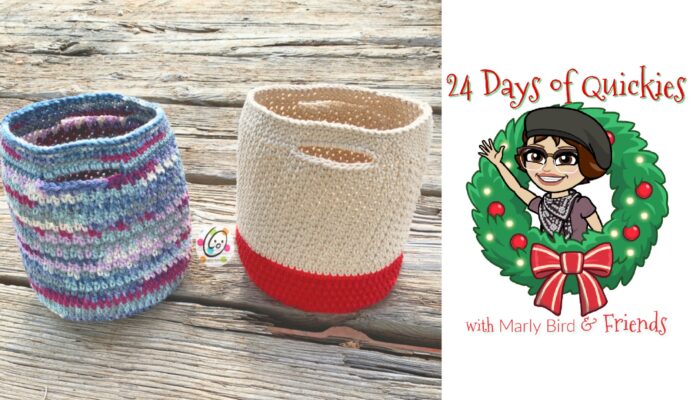
This little guy has a round base which gives it a nice platform to hold its shape. The handles are simple slits so it can be carried, but they won’t get in the way. The tan tote shown is made from 100% cotton yarn and the variegated version is acrylic. Both are sturdy and hold their shape so I suggest using whichever one you prefer.
How It Can Be Used
- Small crochet projects
- Lunch Bag
- Car trash bin (with a plastic bag liner)
- Organizing:
- Toys such as legos, small cars, army men
- Socks
- Hair supplies
- Remote controls
- Gifts:
- Treats
- Spa set
- Teacher supplies
Featured in “24 Days of Quickies” with Marly Bird & Friends
The crochet pattern for this project is available here on my blog for free below. A downloadable, ad-free pdf file of the pattern that includes the instructions and all pictures will also be available to purchase from my pattern shops soon.
Pottery Tote Crochet Pattern
Details
- Completion Time: approximately 3 hours
- Skill Level: Beginner with basic crochet skills
Materials
- Yarn: 175-200 yards worsted weight yarn in choice of colors
- Crochet Hook: H (5mm)
- Notions: Yarn needle for weaving in ends, stitch marker
Measurements
- 10” across x 8” tall (measured flat)
- Gauge: 4″ with an H hook = 14hdc
Tips
- Numbers at the beginning of each line may refer to steps and not indicate number of rows.
- Stitch count remains the same unless noted at end of row/round.
- If you have any questions about this pattern please contact [email protected].
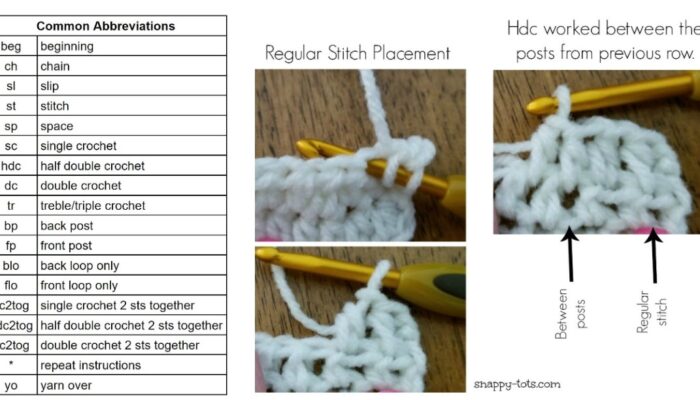
Common Crochet Stitches
Directions
Two-Toned Bag (tan and red sample) Project starts at the base
1. With an H hook and worsted weight yarn (red in main sample), start with a magic circle of 8 sc sts (or preferred method for starting a circle of 8 sc sts), pull closed and place marker for working in the round. (8sts)
2. 2sc in each st to end of round. (16sts)
3. *sc in next st, 2sc in next st*, repeat to end of round. (24sts)
4. *sc 3, 2sc in next st*, repeat to end of round. (30sts)
5. *sc 4, 2sc in next st*, repeat to end of round. (36sts)
6. *sc 5, 2sc in next st*, repeat to end of round. (42sts)
7. *sc 6, 2sc in next st*, repeat to end of round. (48sts)
8. 2sc in next st, sc 3, *2sc in next st, sc 7*, repeat until 4 sts remain, sc 4. (54sts)
9. Note the change in stitch this round. *2hdc in next st, hdc 8*, repeat to end of round. (60sts)
10. *2hdc in next st, hdc 9*, repeat to end of round. (66sts)
11. Sc in next st, sl st in next st. This is to lower the round height. This is the new beginning of the round. Ch 2, hdc in same st, hdc 4, 2hdc in next st, *hdc 10, 2hdc in next st*, repeat until 5 sts remain, hdc 5, sl st in first st to join. (72sts)
12. Ch 2, FPHDC around each post from previous round, sl st in first st to join.
13. From this point on, sts will be worked between the posts from the previous round. See the st placement graphic on page 2 of this pattern. Ch 2, hdc between each post from previous round, sl st in first st to join.
14. Repeat previous round for an additional 4 rounds.
15. Ch 1, sc between each post from previous round, sl st in first st to join. Finish off yarn.
16. Change to tan yarn (or color of choice). Ch 1, sc IN each st to end of round. Do NOT join.
17. From this point on, work in continuous rounds to avoid the appearance of a seam up the side. *sc in next st, hdc in next st*, repeat to end of round.
18. Repeat previous round for an additional 14 rounds.
19. This step starts the handles and can be worked between posts or in the stitch. *sc 23, sl st in next st, ch 12, sk 12*, repeat once.
20. *Sc 24, sc 12 around the chain from previous round*, repeat once.
21. Sc in each st to end of round.
22. *sc 10, sc2tog*, repeat to end of round. (66sts)
23-24. Sc in each st to end of round.
25. Sl st in each st to end of round. Finish off and weave in ends. Tip: Make sure to not pull the sl sts too snug.
One Yarn Sample (Variegated Sample) Project starts at the base
1. With an H hook and worsted weight yarn (variegated in main sample), start with a magic circle of 8 sc sts (or preferred method for starting a circle of 8 sc sts), pull closed and place marker for working in the round. (8sts)
2. 2sc in each st to end of round. (16sts)
3. *sc in next st, 2sc in next st*, repeat to end of round. (24sts)
4. *sc 3, 2sc in next st*, repeat to end of round. (30sts)
5. *sc 4, 2sc in next st*, repeat to end of round. (36sts)
6. *sc 5, 2sc in next st*, repeat to end of round. (42sts)
7. *sc 6, 2sc in next st*, repeat to end of round. (48sts)
8. 2sc in next st, sc 3, *2sc in next st, sc 7*, repeat until 4 sts remain, sc 4. (54sts)
9. Note the change in stitch this round. *2hdc in next st, hdc 8*, repeat to end of round. (60sts)
10. *2hdc in next st, hdc 9*, repeat to end of round. (66sts)
11. Sc in next st, sl st in next st. This is to lower the round height. This is the new beginning of the round. Ch 2, hdc in same st, hdc 4, 2hdc in next st, *hdc 10, 2hdc in next st*, repeat until 5 sts remain, hdc 5, sl st in first st to join. (72sts)
12. Ch 2, FPHDC around each post from previous round, sl st in first st to join.
13. From this point on, sts will be worked between the posts from the previous round. See the st placement graphic on page 2 of this pattern. Ch 2, hdc between each post from previous round, sl st in first st to join.
14. Repeat previous round for an additional 4 rounds. Note: Do NOT join at the end of the last round.
15. From this point on, work in continuous rounds to avoid the appearance of a seam up the side. *sc in space before next post, hdc in space before next post*, repeat to end of round.
16. Repeat previous round for an additional 14 rounds.
17. This step starts the handles and can be worked between posts or in the stitch. *sc 23, sl st in next st, ch 12, sk 12*, repeat once.
18. *Sc 24, sc 12 around the chain from previous round*, repeat once.
19. Sc in each st to end of round.
20. *sc 10, sc2tog*, repeat to end of round. (66sts)
21-22. Sc in each st to end of round.
23. Sl st in each st to end of round. Finish off and weave in ends. Tip: Make sure to not pull the sl sts too snug.
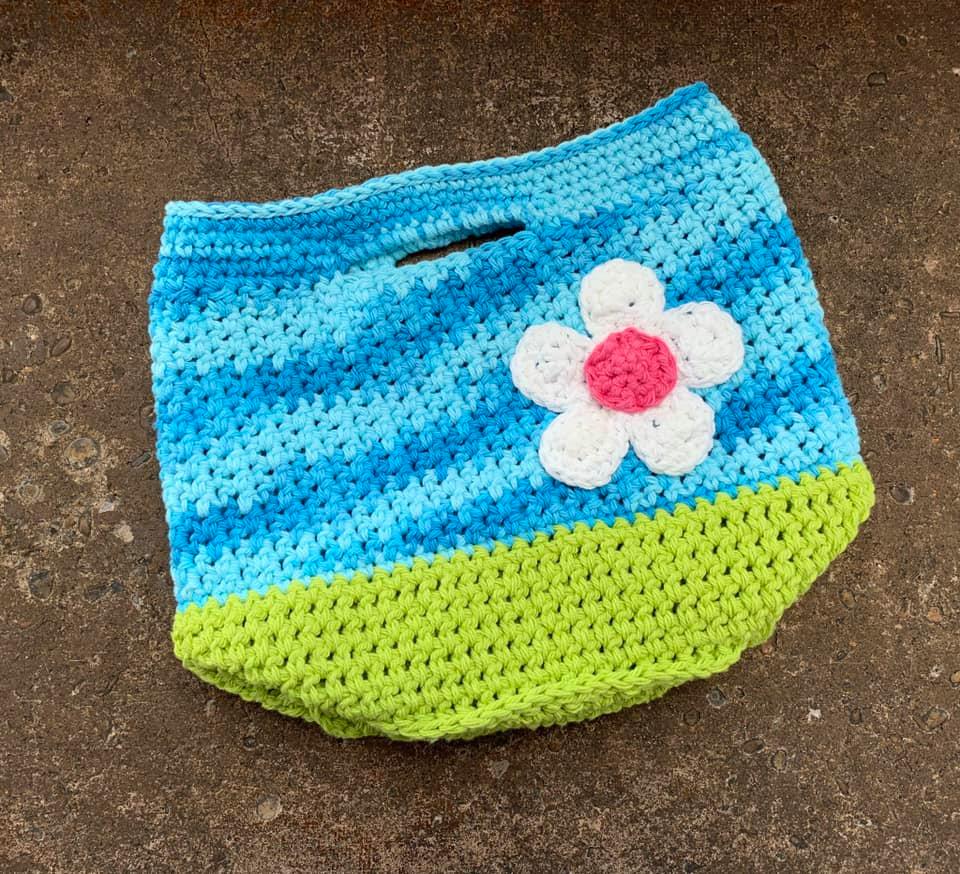
Additions The following are some things I have added in the past: Buttons Crocheted hearts, stars, flowers Weave a strand of narrow ribbon between two rounds and tie in a bow. Add some clear nail polish to the cut ribbon ends to avoid fraying.
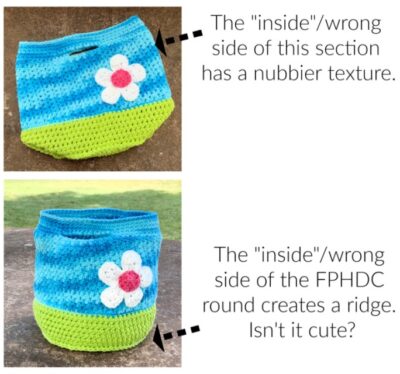
Extra Variation: Flipped Out
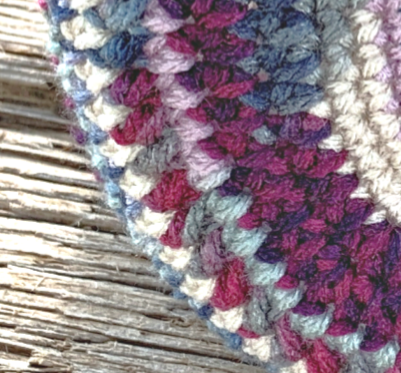
The “inside”/WS of the body of this bag has a nubbier texture that I really like so I decided to make one bag with this section on the “outside”/RS. When I flipped it inside out I realized the FPHDC round created a cute ridge too.
Here’s what I did: Work the bag as written until you get to the first round of the handles at the top of the bag. At this point, remove your hook and flip the bag inside out. This is now the RS (right side) of the bag. Insert your hook to finish the bag and continue as written. Make sure you are still working from the outside of the bag.
Partially Flipped Out If you like the nubby section but don’t want the bottom ridge, work as written until the “sc, hdc” section. At that point, ch 1, TURN and work from the “inside” of the bag. When you reach the handle section, ch 1, TURN and work from the “outside” of the bag again.
Flower
1. With an H hook and yarn color of choice, start with a magic circle of 5 sts (or preferred method for starting a circle of 5 sc sts), join and pull closed. (5sts)
2. *Ch 5, 3dc in 3rd ch from hook, hdc, sc, sl st in next st on circle*, repeat to end of round.
3. Working up side of pedal, *sc 3, 3sc in next st, 3sc in next st, sc 3, sl st between petalsrepeat for each petal. Finish off, leaving a long tail for sewing flower in place. With yarn needle and yarn tail, sew the flower to the bag.
Flower Center
1. With an H hook and yarn color of choice, start with a magic circle of 6 sts (or preferred method for starting a circle of 6 sc sts), join and pull closed. (6sts)
2. Ch 2, 2hdc in each stitch to end of round, sl st to join. (12sts) Finish off, leaving a long tail for attaching center to flower. Place flower center on top of middle of flower and sew in place with yarn needle and yarn tail.
Pin To Save For Later


Similar Snappiness You Might Like
Before You Go…
Sign up for my mailing list and get a free crochet pattern of your choice on your birthday.


