Free Pattern: Spike the Dino Hat
When my youngest son was three he loved hats with long tails. He had a lot of fun weaving this hat (the purple and green one). Over the years, it has been a lot of fun seeing all of the wonderful creations people have made from this pattern. I recently updated the pattern to include more pictures and make it a little easier to follow. I thought a red, white, and pink one would be cute for Valentine’s Day.

This pattern is part of my “Make Ahead Mondays” event for 2023. A different pattern is added each monday: https://snappy-tots.com/happy-new-year-lets-rock-2023/
Spike the Dino Hat Crochet Pattern
The pattern is available to view below. A downloadable, ad-free PDF of this pattern with all of the photos is available to purchase for a small fee: Ravelry | Etsy
Materials & Details
- Yarn: 200 yards ww yarn for main, 100 yards of 1-2 different contrasting colors.
Sample yarns for purple and green sample: RHSS Purple, Orchid, Spring Green - Crochet Hook: H (5mm), I (5.5mm)
- Notions: Yarn needle for weaving in ends, fabric marker or piece of chalk, pins to help with assembly
- Sizes: Toddler to Adult
- Gauge: 4” with an I hook = 13 hdc sts, 9 rounds
Tips
- Numbers at the beginning of each line may refer to steps and not indicate the number of rows.
- The stitch count remains the same unless noted otherwise.
- If you have any questions about this pattern please contact [email protected].
Description
The hat is made in pieces and sewn together: The base hat, the tail, spikes, spots/hearts
Directions – All Sizes
1. With an I hook and ww yarn, start with a magic circle of 8 sc sts (or preferred method of starting a circle of 8 sc sts), pull closed and place a marker for working in the round. (8sts)
2. 2sc in each st to end of round. (16sts)
3. *hdc, 2hdc in the next st*, repeat to end of round. (24sts) almost 2.5”
4. *hdc 3, 2hdc in the next st*, repeat to end of round. (30sts) 3”
5. *hdc 4, 2hdc in the next st*, repeat to end of round. (36sts) 3.75”
6. *hdc 5, 2hdc in the next st*, repeat to end of round. (42sts) 4.5”
7. *hdc 6, 2hdc in the next st*, repeat to end of round. (48sts) 5.25” For toddler size, skip to step 11.
8. *hdc 7, 2hdc in the next st*, repeat to end of round. (54sts) 6” For child size, skip to step 11.
9. *hdc 8, 2hdc in the next st*, repeat to end of round. (60sts) 6.75” For child large/small teen size, skip to step 11.
10. *hdc 9, 2hdc in the next st*, repeat to end of round. (66sts) 7.5” For adult size, continue to step 11.
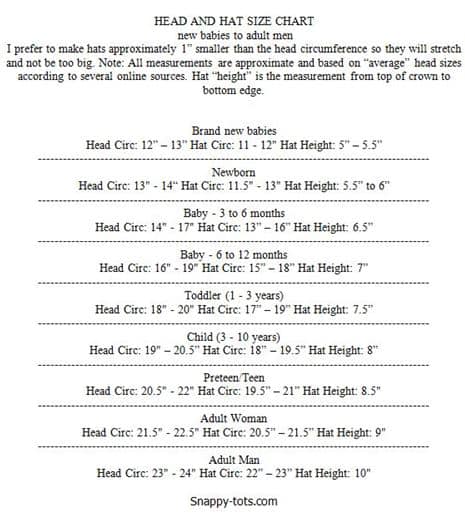
11. Hdc in each st around until hat measures desired length (see chart at the end of pattern).
12. When the hat is the desired length, sc in next st, sl st. This is the new beginning of th round. Ch 1, sc in each stitch to end of round, finish off, and weave in ends.
Earflaps
1. With the right side of the hat facing towards you and upside down, attach yarn with a sl st to a st on the last round. Ch 1, sc in the same st, sc 11 for toddler-child sizes (13 for teen, 15 for adult). Leave remaining sts unworked. (12, 14, 16sts)
2. Ch 1, turn, sc in the same stitch and in each st to end of row.
3. Ch 1, turn, sc2tog, sc in each st until 2 sts remain, sc2tog. (10, 12, 14sts)
4. Ch 1, turn, sc in the same st and in each st to end of row.
5. Ch 1, turn, sc2tog, sc in each st until 2 sts remain, sc2tog. (8, 10, 12sts)
6. Ch 1, turn, sc in the same st and in each st to end of row.
7. Ch 1, turn, sc2tog, sc in each st until 2 sts remain, sc2tog. (6, 8, 10sts)
8. Ch 1, turn, sc in the same st and in each st to end of row.
9. Ch 1, turn, sc2tog, sc in each st until 2 sts remain, sc2tog. (4, 6, 8sts)
Finishing The Earflaps By Size
Toddler-Child Large
After step 9, you can either finish off the earflap for a regular earflap or add the long strand shown in the samples. Choose one of the options below:
Regular Earflap: Ch 1, turn, sc2tog, sc2tog. (2sts) Finish off and weave in ends.
Long Strand:
Ch 1, turn, sc in the same st, sc 3.
Repeat the previous row for 10 inches or desired length.
Finish off and weave in ends. Because these were worked in short rows of sc sts, the strands will naturally twist on their own (as shown in the main sample).
2nd Earflap: Fold the hat in half to find placement for the 2nd earflap. It should start exactly across from the first flap. Starting on the RS of the hat, attach yarn and follow the same directions for the earflap above.
Teen
After step 9, you can either finish off the earflap for a regular earflap or add the long strand shown in the samples. Choose one of the options below:
Regular Earflap:
Ch 1, turn, sc2tog, sc 2, sc2tog. (4sts)
Ch 1, turn, sc2tog, sc2tog. (2sts)
Finish off and weave in ends.
Long Strand:
Ch 1, turn, sc2tog, sc 2, sc2tog. (4sts)
Ch 1, turn, sc in the same st, sc 3.
Repeat the previous row for 12 inches or desired length.
Finish off and weave in ends. Because these were worked in short rows of sc sts, the strands will naturally twist on their own (as shown in the main sample).
2nd Earflap: Fold the hat in half to find placement for the 2nd earflap. It should start exactly across from the first flap. Starting on the RS of the hat, attach yarn and follow the same directions for the earflap above.
Adult
After step 9, you can either finish off the earflap for a regular earflap or add the long strand shown in the samples. Choose one of the options below:
Regular Earflap:
Ch 1, turn, sc2tog, sc 4, sc2tog. (6sts)
Ch 1, turn, sc2tog, sc 2, sc2tog. (4sts)
Ch 1, turn, sc2tog, sc2tog. (2sts)
Finish off and weave in ends.
Long Strand:
Ch 1, turn, sc2tog, sc 4, sc2tog. (6sts)
Ch 1, turn, sc in the same st, sc 5.
Repeat the previous row for 14 inches or desired length.
Finish off and weave in ends. Because these were worked in short rows of sc sts, the strands will naturally twist on their own (as shown in the main sample).
2nd Earflap: Fold the hat in half to find placement for the 2nd earflap. It should start exactly across from the first flap. Starting on the RS of the hat, attach yarn and follow the same directions for the earflap above.
Pompoms
Hold one strand of worsted weight yarn (green in the main sample), and wrap 340+ times around the palm of your hand (wrap more times for a thicker pom).
Carefully slide the yarn off your hand and wrap an 8” length of yarn around the center, pulling tight, and knotting to hold in place. Do NOT cut this piece of yarn.
Cut the loops of pompom and trim as desired.
Thread the end of the yarn you tied around the pom through a yarn needle. Use the yarn needle to pull the strands through the tip of one earflap or through the end of the strands. Firmly tie a knot. Repeat for the second earflap/strand.
Tail – All Sizes
1. With an I hook and worsted weight yarn (purple in main sample), ch 20 for toddler-child small; ch 24 for all other sizes, sc in first ch from hook and in each ch across. (19, 23sts)
2. Ch 1, turn. *Hdc2tog, hdc in each st until 2 sts remain, hdc2tog. (17, 21sts)
3. Ch 1, turn, hdc in the same st and in each st to end of row*.
4. Repeat from * to * until 12sts remain.
5. Ch 1, turn, hdc2tog, hdc in each st until 2 sts remain, hdc2tog. (10sts)
6-7. Ch 1, turn, hdc in the same st and in each st to end of row.
8. Ch 1, turn, hdc2tog, hdc in each st until 2 sts remain, hdc2tog. (8sts)
8-9. Ch 1, turn, hdc in the same st and in each st to end of row.
10. Ch 1, turn, hdc2tog, hdc in each st until 2 sts remain, hdc2tog. (6sts)
11-13. Ch 1, turn, hdc in the same st and in each st to end of row.
14. Ch 1, turn, hdc2tog, hdc in each st until 2 sts remain, hdc2tog. (4sts)
15-17. Ch 1, turn, hdc in the same st and in each st to end of row.
18. Ch 1, turn, hdc2tog, hdc2tog. (2sts) Finish off and weave in ends.
The tail is sewn to the back of the hat, approximately 2” from the bottom edge (of the hat). Use a yarn needle and matching yarn to sew the beginning flat edge of the tail to the hat.
Spikes – All Sizes
Hook Size: Toddler, Child sizes – H hook; Teen/Adult – I hook
These are made individually and then sewn to the hat in pairs, overlapping rows to help keep the spikes standing (more information below)
Small spikes – make 2 spikes (4 triangles)
1. With an I hook and contrasting worsted weight yarn, ch 7, sc in the 2nd ch from hook and in each ch across.
(6sts)
2. Ch 1, turn, sc2tog, sc 2, sc2tog. (4sts)
3. Ch 1, turn, sc in the same st, sc 3.
4. Ch 1, turn, sc2tog, sc 2tog. (2sts)
5. Ch 1, sl st around the outer edge of the triangle, working (sl st, ch 1, sl st) in each corner. Finish off and weave in ends. Set aside.
Medium spikes – make 4 spikes (8 triangles)
1. With an I hook and contrasting worsted weight yarn, ch 11, sc in the 2nd ch from hook and in each ch across.
(10sts)
2. Ch 1, turn, sc2tog, sc in each st until 2 sts remain, sc2tog. (8sts)
3. Ch 1, turn, sc in the same st and in each st to end of row.
4. Ch 1, turn, sc2tog, sc in each st until 2 sts remain, sc2tog. (6sts)
5. Ch 1, turn, sc in the same st and in each st to end of row.
6. Ch 1, turn, sc2tog, sc in each st until 2 sts remain, sc2tog. (4sts)
7. Ch 1, turn, sc in the same st and in each st to end of row.
8. Ch 1, turn, sc2tog, sc2tog. (2sts)
9. Ch 1, sl st around the outer edge of the triangle, working (sl st, ch 1, sl st) in each corner. Finish off and weave in ends. Set aside.
Large spikes – make 3 spikes (6 triangles)
1. With an I hook and contrasting worsted weight yarn, ch 13, sc in the 2nd ch from hook and in each ch across.
(12sts)
2. Ch 1, turn, sc2tog, sc in each st until 2 sts remain, sc2tog. (10sts)
3. Ch 1, turn, sc in the same st and in each st to end of row.
4. Ch 1, turn, sc2tog, sc in each st until 2 sts remain, sc2tog. (8sts)
5. Ch 1, turn, sc in the same st and in each st to end of row.
6. Ch 1, turn, sc2tog, sc in each st until 2 sts remain, sc2tog. (6sts)
7. Ch 1, turn, sc in the same st and in each st to end of row.
8. Ch 1, turn, sc2tog, sc in each st until 2 sts remain, sc2tog. (4sts)
9. Ch 1, turn, sc in the same st and in each st to end of row.
10. Ch 1, turn, sc2tog, sc2tog. (2sts)
11. Ch 1, sl st around the outer edge of the triangle, working (sl st, ch 1, sl st) in each corner. Finish off and weave in ends. Set aside.
Spike Assembly
Fold the hat so it is divided in half, down the tail. Mark the fold with a piece of chalk or fabric marker. See photo.
After the line is drawn, flatten the hat again so the line is along the side.
Lay all of the triangles out and decide where you want them. Use a yarn needle and matching yarn to sew the triangles in place.
Tip: To help them stand, stitch the triangles together where they overlap as well. Just a few sts through both layers will be enough.
Polka Dots
Small Polka Dots (make 2 or more)
1. With an I hook and worsted weight yarn, create a magic circle of 4 sc sts (or preferred method for creating a circle of 4 sc sts), pull closed and sl st to join. (4sts)
2. Ch 1, 2sc in each st to end of round, sl st to join. (8sts) Finish off, leaving a long tail for attaching to hat.
Medium Polka Dots (make 1 or more)
1. With an I hook and worsted weight yarn, create a magic circle of 6 sts (or preferred method for creating a circle of 6 sc sts), pull closed and sl st to join. (6sts)
2. Ch 1, 2sc in each st to end of round, sl st to join. (12sts) Finish off, leaving a long tail for attaching to hat.
Large Polka Dots (make 1 or more)
1. With an I hook and worsted weight yarn, create a magic circle of 6 sts (or preferred method for creating a circle of 6 sc sts), pull closed and sl st to join. (6sts)
2. Ch 1, 2sc in each st to end of round, sl st to join. (12sts)
3. Ch 1, *sc in the next st, 2sc in the next st*, repeat to end of round, sl st to join. (18sts) Finish off, leaving a long tail for attaching to hat.
Heart
1. With an I hook and worsted weight yarn, start with a magic circle of 8 sts (or preferred method for starting a circle of 8 sc sts), sl st to join. (8sts)
2. Sl st in next st, (sc, hdc, dc 2, hdc) in next st, hdc 2, (hdc, ch 2, sl st in 2nd ch from hook, hdc) in next st, hdc 2, (hdc, dc 2, hdc, sc) in next st, sl st in next sp (between posts) to join. Finish off, leaving a tail for sewing in place.
With a yarn needle, use the yarn tail to sew the heart to the hat.
