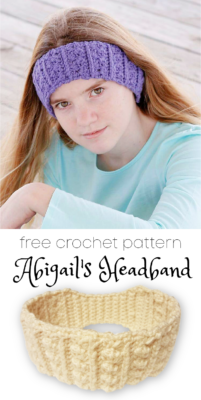
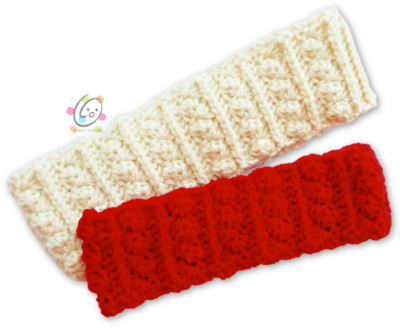
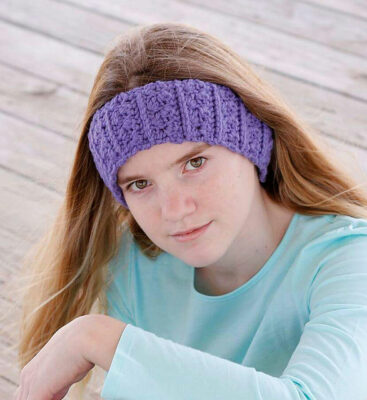
Free Pattern: Abigail’s Headband
Headbands and ear warmers are one of my most favorite accessories! I especially like ones that are easy to create and even easier to wear. One fall when we were in Yellowstone I wanted a new headband. I had recently made my Abigail Beanie and LOVED that texture so I decided to try a headband to match. Only one problem… I didn’t have a button or snap with me for the closure. It ended up being a blessing in disguise! I created a full circle band instead and I LOVE IT!
This band is so easy to make and wear. I have included several sizes, plus you can create any circumference needed.
Matching patterns you might enjoy
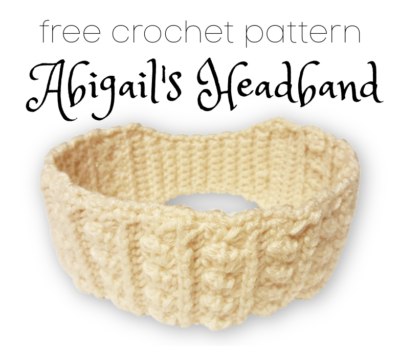
Abigail’s Headband Pattern
The pattern is available for free below. An ad-free, downloadable pdf is available for a small fee from my shops: Ravelry | Etsy
Materials and Details
- Yarn: worsted weight in choice of color. All samples used for measurements in this pattern were made from Red Heart Super Saver yarn. Using different yarns may affect the finished size. Please check measurements and adjust as needed.
- Crochet Hook: I (5.5mm)
- Miscellaneous: Yarn needle for weaving in ends
- Sizes: Child (2.75” tall x 18” circ.), Teen/Adult (3” tall x 21” circ.)
- Three widths are included and each can be made for any size, from toddler to adult.
Special Stitch: FPSC – front post single crochet
Directions: Narrow Width (2.75” tall)
The pattern begins at the back/narrow section and is worked in one piece.
1. With an I hook and yarn color of choice, ch 12, sc in 2nd ch from hook and in each ch across. (11sts)
For steps 2-19, the first and last stitches are worked as a regular st (through both loops). The rest are worked into BLO. Ch 1, turn, sc2tog, sc 7 in BLO, sc2tog. (9sts)
2. Ch 1, turn, sc2tog, sc 5 in BLO, sc2tog. (7sts)
3-12. Ch 1, turn, sc in same st, sc 5 in BLO, sc in last st.
13. Ch 1, turn, 2sc in same st, sc 5 in BLO, 2sc in last st. (9sts)
14. Ch 1, turn, 2sc in same st, sc 7 in BLO, 2sc in last st. (11sts)
From this point to the end, each row has 11sts. Check stitch count occasionally to make sure you keep the correct amount.
15-16. Ch 1, turn, sc in same st, FPSC around each post to end of row.
17-18. Ch 2, turn, hdc in same st, *sk 2, (sc, hdc, dc) in next st*, repeat until 1 st remains, hdc in the last st.
19-20. Ch 1, turn, sc in same st, FPSC around each post to end of row.
Keep repeating steps 17-20. Create 9 sections for toddler, 10 sections for child, 12 sections for adult. Adjust the amount of sections for smaller or larger bands. Make sure to finish a full repeat, ending after step 20, so the sections will be complete.
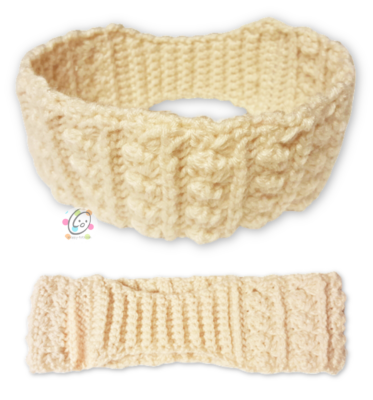
Finish off, leaving a long tail for sewing edges together.
Fold strip with right sides together. The right side has more pronounced vertical ridges and clusters.
Line up short edges. With yarn needle and yarn tail sew edges together.
Directions: Medium Width (3.25” tall)
The pattern begins at the back/narrow section and is worked in one piece.
1. With an I hook and yarn color of choice, ch 15, sc in 2nd ch from hook and in each ch across. (14sts)
For steps 2-18, the first and last stitches are worked as a regular st (through both loops). The rest are worked into BLO. Ch 1, turn, sc2tog, sc 10 in BLO, sc2tog, (12sts)
2. Ch 1, turn, sc2tog, sc 8 in BLO, sc2tog. (10sts)
3. Ch 1, turn, sc in same st, sc 8 in BLO, sc in last st.
4. Ch 1, turn, sc2tog, sc 6 in BLO, sc2tog. (8sts)
5-14. Ch 1, turn, sc in same st, sc 6 in BLO, sc in last st.
15. Ch 1, turn, 2sc in same st, sc 6 in BLO, 2sc in last st. (10sts)
16. Ch 1, turn, sc in same st, sc 8 in BLO, sc in last st.
17. Ch 1, turn, 2sc in same st, sc 8 in BLO, 2sc in last st. (12sts)
18. Ch 1, turn, 2sc in same st, sc 10 in BLO, 2sc in last st. (14sts)
From this point to the end, each row has 14sts. Check stitch count occasionally to make sure you keep the correct amount.
19-20. Ch 1, turn, sc in same st, FPSC around each post to end of row.
21-22. Ch 2, turn, hdc in same st, *sk 2, (sc, hdc, dc) in next st*, repeat until 1 st remains, hdc in last st.
23-24. Ch 1, turn, sc in same st, FPSC around each post to end of row.
Keep repeating steps 19-24. Create 9 sections for toddler, 10 sections for child, 12 sections for adult. Adjust amount of sections for smaller or larger bands. Make sure to finish a full repeat, ending after step 24, so the sections will be complete.
Finish off, leaving a long tail for sewing edges together.
Fold strip with right sides together. The right side has more pronounced vertical ridges and clusters.
Line up short edges. With yarn needle and yarn tail sew edges together.
Directions: Wide Width (4” tall)
The pattern begins at the back/narrow section and is worked in one piece.
1. With I hook and yarn color of choice, ch 18, sc in 2nd ch from hook and in each ch across. (17sts)
For steps 2-18, the first and last stitches are worked as a regular st (through both loops). The rest are worked into BLO. Ch 1, turn, sc2tog, sc 10 in BLO, sc2tog, (15sts)
2. Ch 1, turn, sc2tog, sc 11 in BLO, sc2tog. (13sts)
3. Ch 1, turn, sc2tog, sc 9 in BLO, sc2tog. (11sts)
4. Ch 1, turn, sc2tog, sc 7 in BLO, sc2tog. (9sts)
5-14. Ch 1, turn, sc in same st, sc 7 in BLO, sc in last st.
15. Ch 1, turn, 2sc in same st, sc 7 in BLO, 2sc in last st. (11sts)
16. Ch 1, turn, 2sc in same st, sc 9 in BLO, 2sc in last st. (13sts)
17. Ch 1, turn, 2sc in same st, sc 11 in BLO, 2sc in last st. (15sts)
18. Ch 1, turn, 2sc in same st, sc 13 in BLO, 2sc in last st. (17sts)
From this point to the end, each row has 17sts. Check stitch count occasionally to make sure you keep the correct amount.
19-20. Ch 1, turn, sc in same st, FPSC around each post to end of row.
21-22. Ch 2, turn, hdc in same st, *sk 2, (sc, hdc, dc) in next st*, repeat until 1 st remains, hdc in last st.
23-24. Ch 1, turn, sc in same st, FPSC around each post to end of row.
Keep repeating steps 21-24. Create 9 sections for toddler, 10 sections for child, 12 sections for adult. Adjust amount of sections for smaller or larger bands. Make sure to finish a full repeat, ending after step 24, so the sections will be complete.
Finish off, leaving a long tail for sewing edges together.
Fold strip with right sides together. The right side has more pronounced vertical ridges and clusters.
Line up short edges. With yarn needle and yarn tail sew edges together.
Abigail’s Bow

DirectionsWith I hook and yarn color of choice, ch 15, sc in 2nd ch from hook and in each ch across. (14sts)
2. Ch 1, turn, sc in same st, FPSC around each post to end of row.
3-4. Ch 2, turn, hdc in same st, *sk 2, (sc, hdc, dc) in next st*, repeat until 1 st remains, hdc in last st.
5-6. Ch 1, turn, sc in same st, FPSC around each post to end of row.
7-8. Ch 2, turn, hdc in same st, *sk 2, (sc, hdc, dc) in next st*, repeat until 1 st remains, hdc in last st.
9-10. Ch 1, turn, sc in same st, FPSC around each post to end of row.
Finish off, leaving a long tail for wrapping around center of bow.
Wrap yarn tail around center of bow several times. Secure tail at back of bow. Use remaining yarn tail, or matching yarn if necessary, to attach the bow to the band.
Pin To Save For Later