Crochet Pattern: What a Bummer
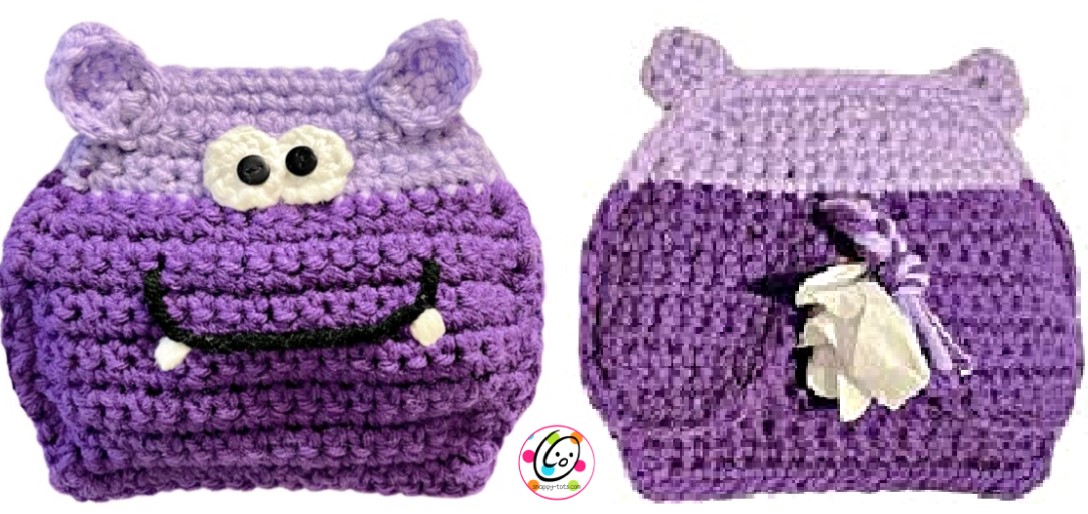
What a Bummer! …to be sick. I like making pocket tissue holders for gifts. Everyone can use them, plus they are quick and easy to make. I thought it would be fun to have the tissues in a cute little friend that could be made into almost any animal. The main sample is ready to shout a big “Hip Hippo-ray” to celebrate someone feeling better, a treasured friendship, or for a boost.
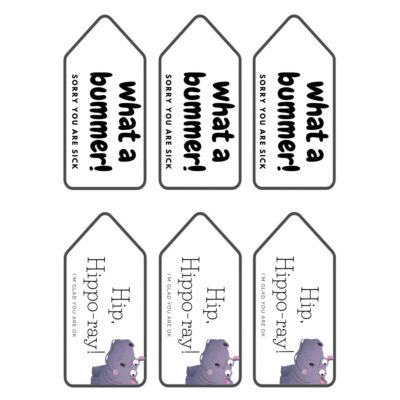
Gift Tags
I thought it would be fun to add some funny gift tags to go with this tissue holder. Click the following links to download the file. I suggest printing the tags on cardstock. PDF of Tags | JPG of Tags
Giftstravaganza Blog Hop
This crochet pattern was designed for the Giftstravaganza Blog Hop hosted Underground Crafter. I think it makes a great gift for several people on your list and craft fairs too.

This crochet along is the perfect chance to whip up gifts with a new pattern each day. Visit the Giftstravaganza page for all the details and the schedule!
What a Bummer Crochet Pattern
This crochet pattern is available for free below.
A downloadable file of this pattern is available to purchase from my Ravelry Shop:
The downloadable pdf of this pattern is FREE until 12/3/24 as part of the Giftstravaganza event.
Visit the pattern page: https://www.ravelry.com/patterns/library/what-a-bummer-tissue-holder
Add the pattern to your cart and make sure the coupon is applied.
Coupon code: gifts24
Materials
- Yarn: 100 yards worsted weight yarn. Sample yarns: Bernat Super Value Lilac, Mainstays Purple, White, Black
- Crochet Hooks: H (5mm), I (5.5mm)
- Notions: Yarn needle for weaving in ends, 2 small black buttons, black thread, sewing needle
- Optional: Measuring tape, scissors, pack of pocket tissues
Measurements
- Finished Measurements: 6” wide x 5” tall
- Gauge: not needed for this project.
Tips
- First stitch of each row is worked into the same stitch as the turning chain.
- Numbers at the beginning of each line may refer to steps and not indicate number of rows.
- Stitch count remains the same unless noted at end of row/round.
- If you have any questions about this pattern please contact [email protected].
Directions
This project is made with 3 parts. Each starts at the top and worked back and forth in rows to the bottom edge.
Change colors as desired.
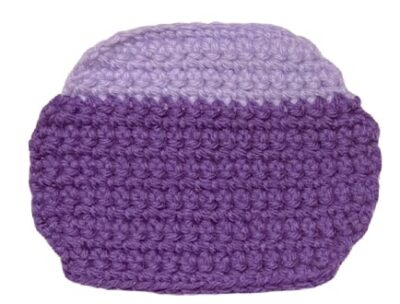
Piece #1 – The Front
1. With an H hook and worsted weight yarn (Lilac in sample), ch 11, 2sc in the 2nd ch from hook, sc in each ch until 1 ch remains, 2sc in the last ch. (12sts)
2. Ch 1, turn, 2sc in the same st, sc 10, 2sc in the last st. (14sts)
3. Ch 1, turn, 2sc in the same st, sc 12, 2sc in the last st. (16sts)
4-5. Ch 1, turn, sc in the same st and in each st to end of row.
6. Finish off the current yarn and change to a darker color (Purple in sample). Ch 1, turn, 2sc in the same st, sc 14, 2sc in the last st. (18sts)
7. Ch 1, turn, 2sc in the same st, sc 16, 2sc in the last st. (20sts)
8. Ch 1, turn, sc in the same st and in each st to end of row.
9. Repeat the previous row for an additional 5 rows.
10. Ch 1, turn, sc2tog, sc 16, sc2tog. (18sts)
11. Ch 1, turn, sc2tog, sc 14, sc2tog. (16sts)
12-13. Ch 1, turn, sc in the same st and in each st to end of row.
Finish off and weave in ends.
Face
Eyes (make 2): With an H hook and white ww yarn, create a magic circle of 6 sc sts (or preferred method for creating a circle of 6 sc sts), pull closed and sl st to join. (6sts) Finish off, leaving a long tail for sewing eyes in place.
Use a yarn needle and the yarn tails to sew the eyes next to the color change. See main photo for placement.
With a sewing needle and black thread, sew a small black button on top of each eye piece.
Mouth: With a yarn needle and black yarn, stitch the mouth in place.
Teeth: With a yarn needle and white yarn, stitch 2 little squares next to the mouth.
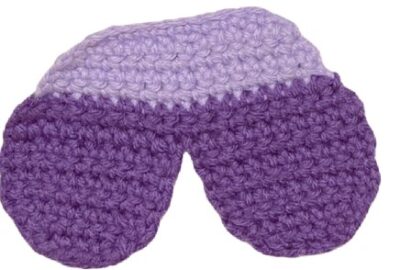
Piece #2 – The Back
1. With an H hook and worsted weight yarn (Lilac in sample), ch 11, 2sc in the 2nd ch from hook, sc in each ch until 1 ch remains, 2sc in the last ch. (12sts)
2. Ch 1, turn, 2sc in the same st, sc 10, 2sc in the last st. (14sts)
3. Ch 1, turn, 2sc in the same st, sc 12, 2sc in the last st. (16sts)
4-5. Ch 1, turn, sc in the same st and in each st to end of row.
6. Finish off the current yarn and change to a darker color (Purple in sample). Ch 1, turn, 2sc in the same st, sc 14, 2sc in the last st. (18sts)
7. Ch 1, turn, 2sc in the same st, sc 16, 2sc in the last st. (20sts)
8. This step is worked across half of the sts. Ch 1, turn, sc in the same st, sc 9. (10sts).
9. Repeat the previous row for an additional 4 rows.
10. Ch 1, turn, sc2tog, sc 6, sc2tog. (8sts)
11. Ch 1, turn, sc2tog, sc 4, sc2tog. (6sts)
12. Ch 1, turn, sc2tog, hdc 2, sc2tog. (4sts)
Finish off and weave in ends.
13. Turn the piece so the previous section is at the left. Attach matching yarn to the first st at the right. See photo.
Repeat steps 8-12.
Piece #3 – The Bottom Flap
1. With an H hook and worsted weight yarn (Purple in sample), ch 21, sc in the 2nd ch from hook and in each ch across. (20sts)
2-3. Ch 1, turn, sc in the same st and in each st to end of row.
4. Ch 1, turn, sc2tog, sc 16, sc2tog. (18sts)
5. Ch 1, turn, sc2tog, sc 14, sc2tog. (16sts)
6-7. Ch 1, turn, sc in the same st and in each st to end of row.
Finish off and weave in ends.
Assembly
- Lay the front piece right side down on a flat surface.
- Place the flap (piece #3) on top of the front piece, lining up the bottom edges.
- Pin in place if needed.
- With an I hook and matching yarn (Purple in sample), starting at the right edge sc through both layers. Sc evenly to the first corner (sc, ch 1, sc) in the first st on the bottom edge, sc in each st across until 1 st remains, (sc, ch 1, sc) in the last st, sc evenly up the side of the two layers. Do NOT sc around the rest of the front piece.
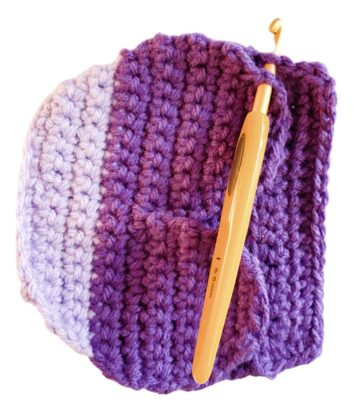
- Place the back piece, right side up, on top, lining up the front and back pieces.
- Pin together if needed.
- With an I hook and matching yarn (Purple in sample), starting near the bottom of the back piece (see bottom photo at right), sl st into both layers. Sc evenly up the side of the pieces, changing colors for the lighter section. 2sc in the first st of the top row, sc in each across until 1 st remains, 2sc in the last st, sc evenly down the side of the pieces, changing colors back for the bottom section. End directly across from the starting point.
- Finger shape the corners as needed.
Tail: Cut 8 pieces of yarn, 8” long. Pull the ends through sts right above the top of the tissue opening. Divide into thirds and braid. Tie a knot where you want the end to be. Trim ends as desired.
Ears (make 2)
1. With an H hook and worsted weight yarn (Lilac in sample), ch 4, sc in the 2nd ch from hook and in each ch across. (3sts)
2-3. Ch 1, turn, sc in the same st, sc 2.
4. Ch 1, turn, sc2tog, sc.
5. This step is worked around the outer edge of the ear. Sc 3 up the side of the ear, sc2tog, ch 1, sc, sc 3 down the side of the ear, sl st. Finish off, leaving a long tail for sewing in place.
With a yarn needle, use the yarn tails to sew the bottom ½ of each ear in place. See main photo for placement.
Pin To Save For Later

