

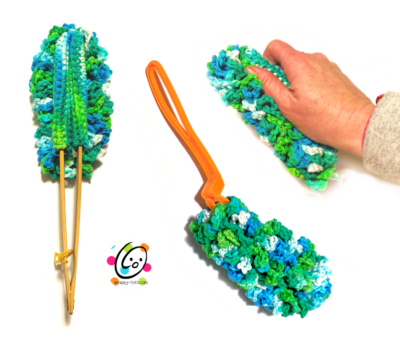
Free Crochet: Scrubby Duster
Since we live in a desert and have gravel pits in town (where they mine away the mountain and turn it into gravel, sand, etc), dusting is an ongoing project in my house. I go through these duster things like crazy.

So this past weekend, when I noticed I had tons of the handles that come with the duster sheets, but no sheets, I decided it was time for a change. Yes, I know a cloth works too, but these are a great shape for fitting on shelfs, plus your hands stay cleaner and my youngest child loves using them.
Hence, my latest crochet project was born!

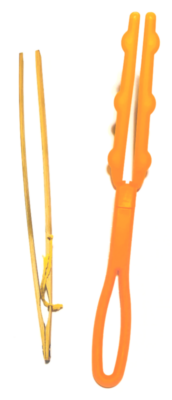
What if you don’t have the duster handles? Other things, like toaster tongs will work, but you can just hold it too.
Scrubby Duster Pattern
This crochet pattern is available for free below. A downloadable file of this pattern is available to purchase from my shops: Ravelry. | Etsy
Materials and Details
- Yarn: 200 yards ww cotton
- Crochet Hook: H (5mm)
- Notions: Yarn needle for weaving in ends
- Optional: duster handle or toaster tongs
- Measurement: 6” long x 2.5” high x 3” across
Tips
- Numbers at the beginning of each line may refer to steps and might not indicate the number of rows.
- If you have any questions about this pattern please contact [email protected].
Special Stitch
FPSLST: Front Post Slip Stitch
Insert hook around the next post from the front of the piece, pull up a loop and through the loop on the hook.

Directions
This project starts at the bottom, flat edge and is worked back and forth in rows.
1. With an H hook, ch 39, sc in the 2nd ch from hook and in each ch across. (38sts)
2. Ch 1, turn, sc in the same st and in each st across.
3. Repeat previous row for an additional 6 rows.
4. Fold the piece in half lengthwise (bottom photo below). Ch 1, turn, working through both layers, sc in each st across. (38sts)

5. This is the first row of loops. Ch 1, turn, *FPSLST around the next post (see “special stitch”), ch 10*, repeat until 2 sts remain, FPSLST around each of the next 2 sts.
6. Ch 1, turn, sc in each st to end of row. Note: This row is worked into the sts at the top of the posts from the previous row/step.
7. This is the second row of loops. Ch 1, turn, *FPSLST around the next post), ch 10*, repeat until 2 sts remain, FPSLST around each of the next 2 sts.
8. This is the third row of loops and these sts are worked IN the stitch and not as post sts. Ch 1, turn, sl st in the same st, sl st in the next st, *ch 8, sl st in the next st*, repeat until 2 sts remain, sl st in each of the next 2 sts.
Extra row
This step is optional. Continue to step 9 if you choose to skip this row.
Ch 1, turn. Fold back the last two rows of loops. This step is worked between these two layers to add fullness.
Sl st in the first st, *ch 8, sl st in the st at the base of the loop*, repeat until last loop. Ch 8, sl st in the st at the base of the last loop, ch 8, sl st in the st after the last loop, sl st in the last st.


9. Finish off, leaving approximately 18” of yarn. Fold the piece to match the short ends. With a yarn needle, use the yarn tail to sew the layers together next to the first row of loops for approximately 2” (see photo below right). This keeps the ends together and will help keep the duster from slipping off of the handle.

Pin To Save For Later


