

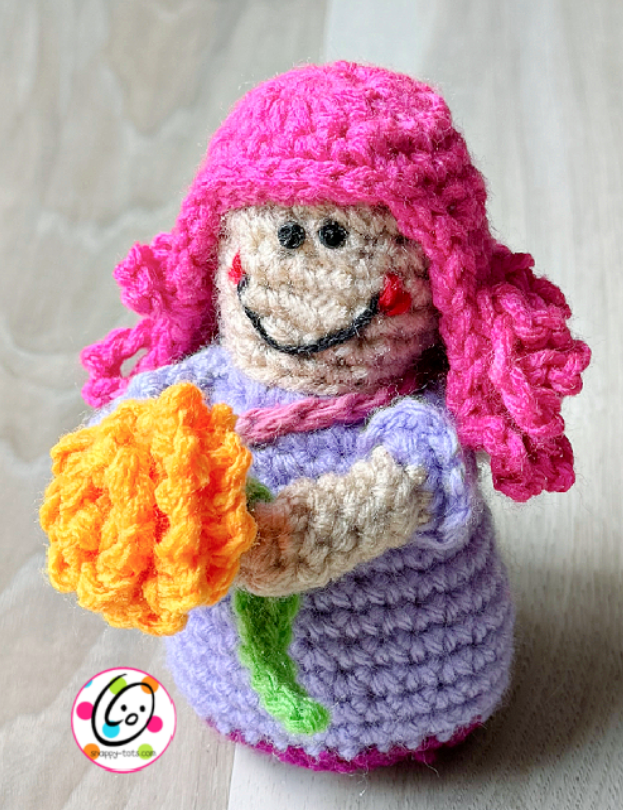
Free Pattern: Hillary Beans
My daughter, Hillary recently asked me to help make some handouts to go along with a presentation she was giving to teachers. The presentation included a story about “be the marigold”. I had never heard of this before. It is wonderful!
I made these items for her (in the school colors like, turquoise, and orang) to handout which include: a magnet with the saying, 3 marigold stickers, and a little shrinky dink charm (which was supposed to be much bigger as a keychain but I couldn’t get enough of the sheets in time so they ended up small).
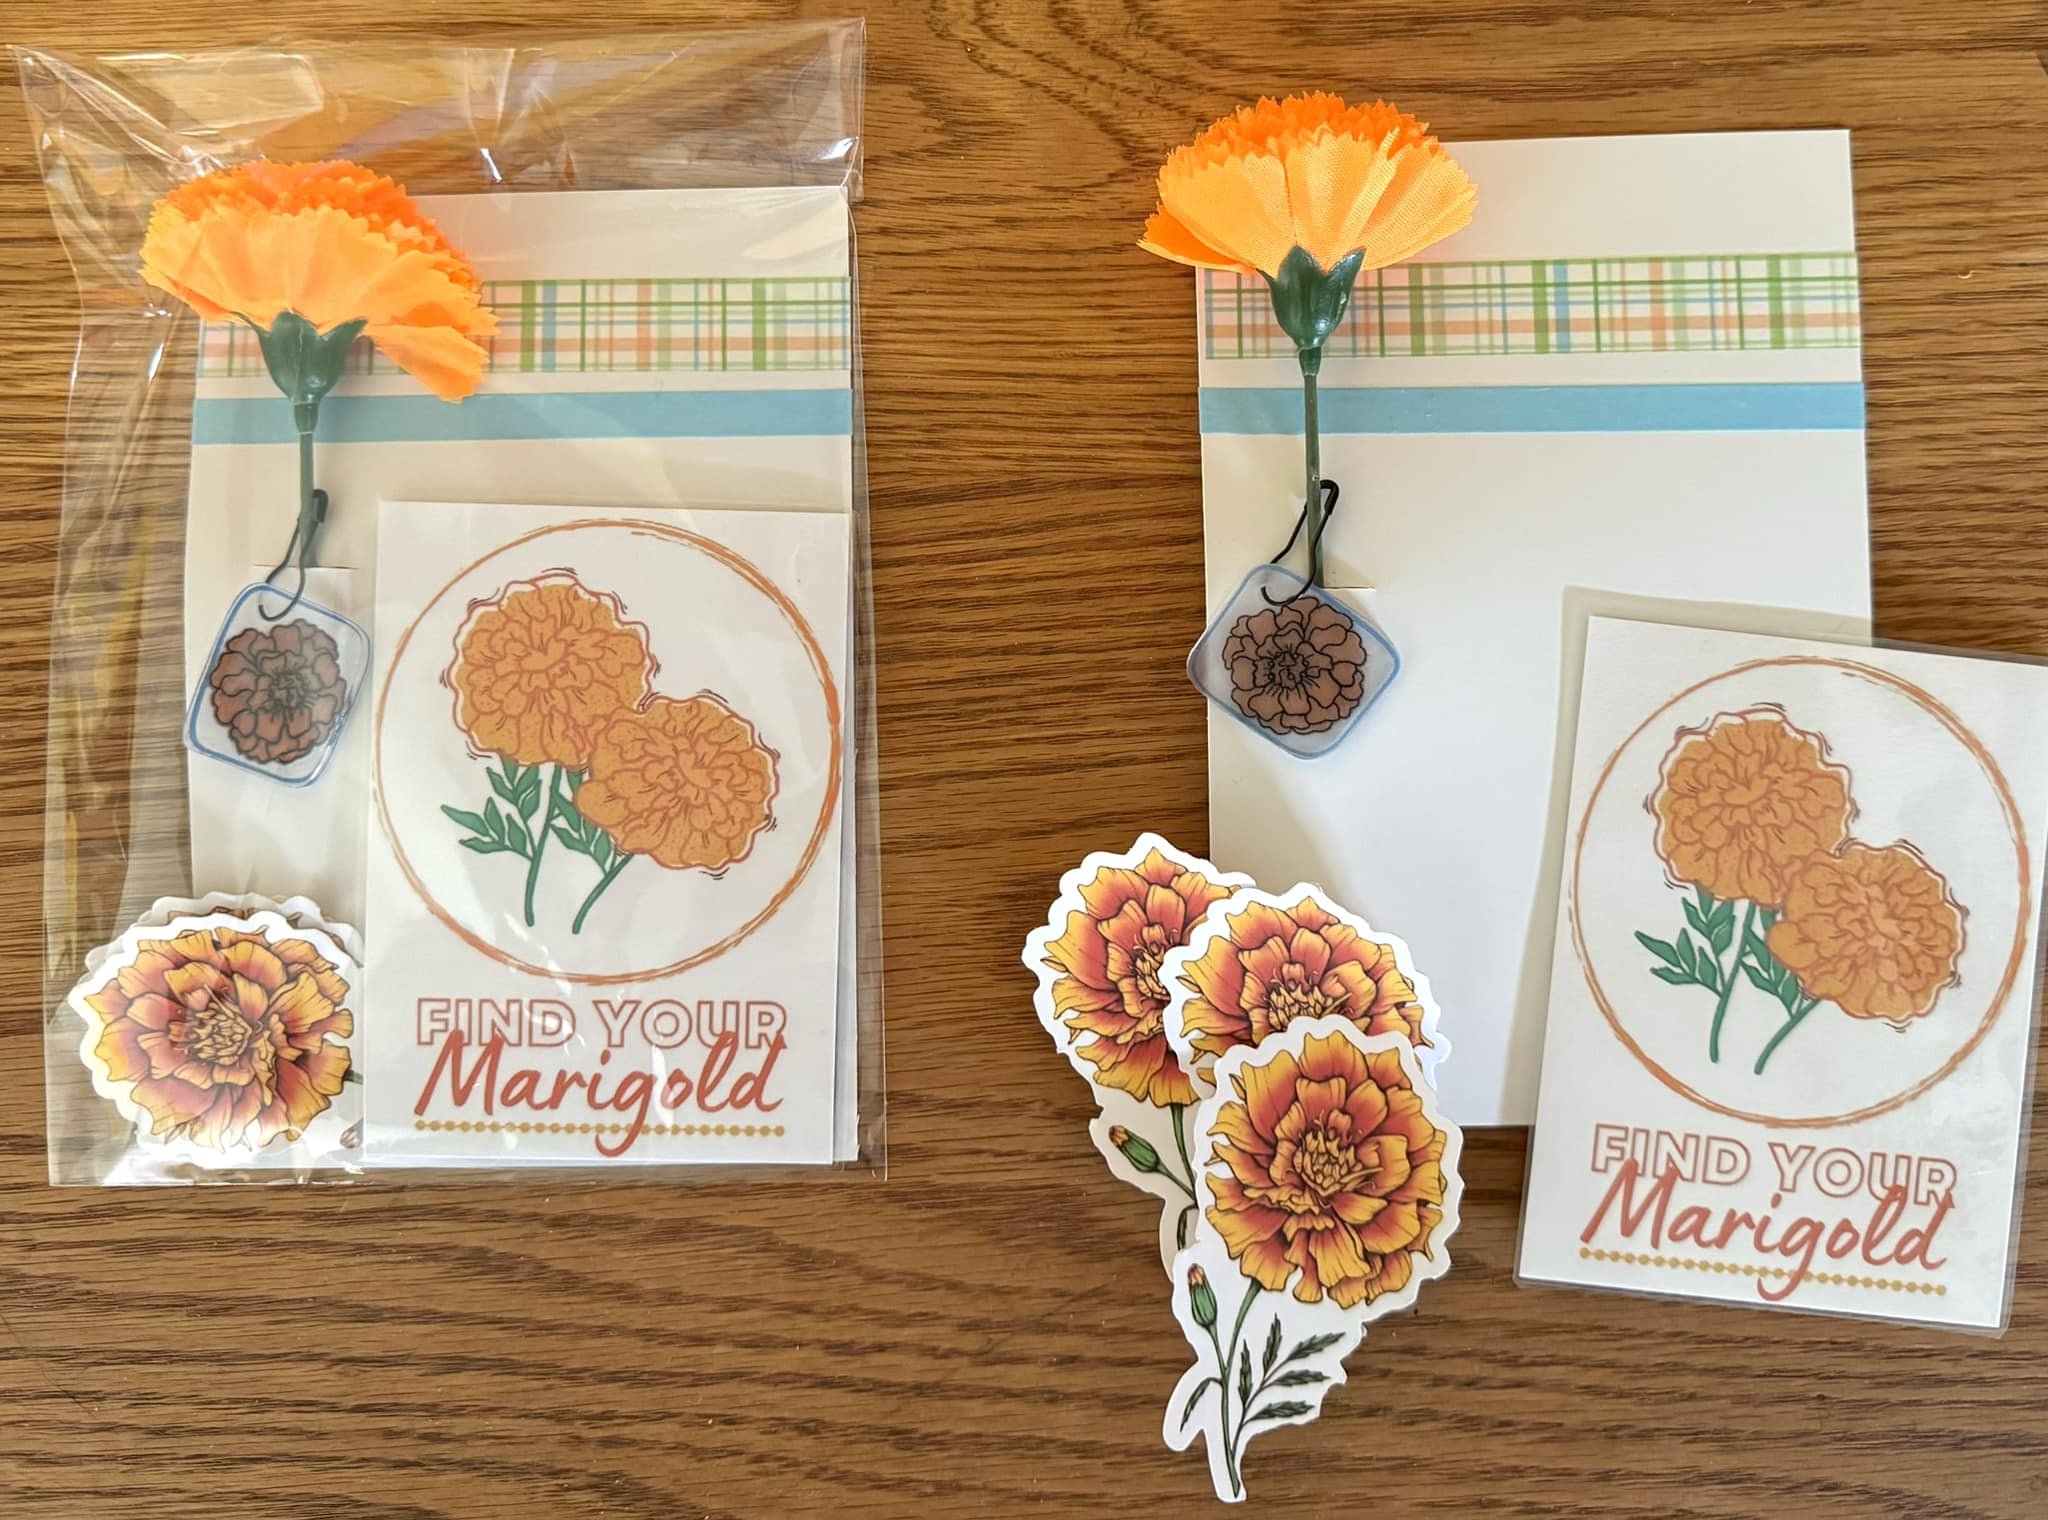
You can read more about my marigold project at the end of this post if you would like. Click Here to get there without scrolling.
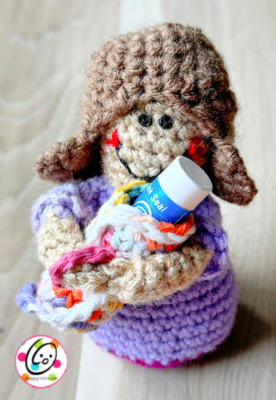
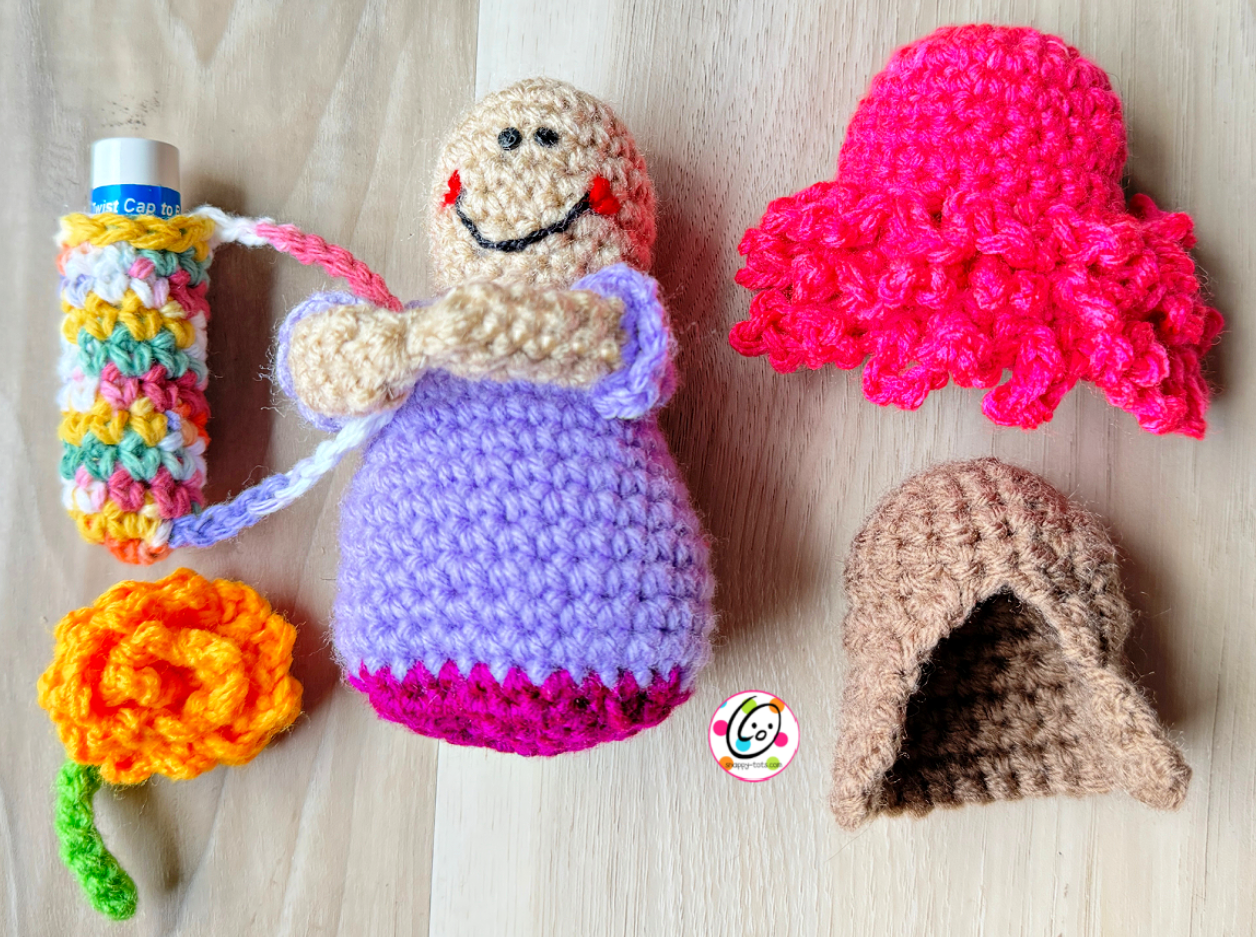
At the same time, I was designing a project for our gift event (summer 2024). I knew I wanted to make something with marigolds. When my daughter was little my mom called her “Hillary Beans” after a favorite baby doll. It seemed like the perfect thing to make, a little Hillary Beans holding a marigold. She is designed to hold a lip balm in a little bag or in her arms. She has some wig options too.


Hillary Beans Crochet Pattern
The pattern is available to view below. An ad-free, downloadable pattern is available to purchase for a small fee from my shops.
Hillary Beans Crochet Pattern
Project Description
- About the project: This includes instructions for making a little doll with interchangeable hair, a bag to hold the lip balm, and a magnolia.
- Skill Level: Easy. Basic crochet skills are needed and must be able to read a crochet pattern.
- Completion Time (how long it takes the designer to make one): 1.5 hours Of course this time will vary, but hopefully gives an idea. I always like to know approximately how long to plan for a project.
Materials
- Yarn: Small amounts of worsted weight yarn in a variety of colors
- Yarns used in samples: Red Heart Super Saver Buff, Burgundy, Cafe Late, Spring green, Fruity Stripe; Bernat Super Value lavender Flesh tone suggestions: RHSS Buff, Cafe Late, Coffee; I Love This Yarn Light Taupe, Toasted Almond. More suggestions can be found in a chart available online: https://bit.ly/3qwTLFV
- Crochet Hooks: G (4-4.5mm)
- Supplies: Yarn needle for weaving in ends, embroidery needle, black crochet cotton or embroidery floss, scissors, stuffing, 2 tiny black buttons for eyes, sewing needle and thread. Optional: approximately ⅛ cup of stones or beads for weight, sock/nylon to hold beads if needed to prevent pushing through stitches.
Measurements
- Finished Measurements: 4.5” tall x 7.5” around the widest part
- Gauge – not needed for this project.
Tips
- The first stitch of each row is worked into the same stitch as the turning chain unless noted.
- Numbers at the beginning of each line may refer to steps and not indicate the number of rows.
- Stitch count remains the same unless noted at end of row/round.
- If you have any questions about this pattern please contact [email protected].
Doll
Arms (make 2)
This project starts at the hands and works towards the top of the arm. The arms are not stuffed.
1. With a G hook and worsted weight yarn (Sample: Buff), start with a magic circle of 6 sc sts (or preferred method for creating a circle of 6 sc sts), pull closed and sl st to join. (6sts)
2. Ch 1, sc in each st to end of the round, sl st to join.
3. Repeat the previous round 3 more times.
4. Finish off the current yarn and change to yarn for the sleeves (Sample: Lavender). Ch 1, *sc 2, 2sc in the next st*, repeat once, sl st to join. (8sts)
5. Work this round in BLO. Ch 1, *sc 2, sc2tog*, repeat once, sl st to join. (6sts)
6. Ch 1, sc2tog, sc 4, sl st to join. (5sts)
7. Ch 1, sc2tog, sc 3, sl st to join. (4sts) Finish off and pull the yarn tail to close the end. Leave a long yarn tail for sewing the arms to the body.
Optional Cuff: Use the same hook and yarn to sl st into one of the remaining loops on the bottom edge of the sleeve. *ch 1, sl st in the next st*, repeat to end of round. Finish off and weave in ends.
Repeat for the second arm. Set aside.
Body
This project starts at the top of the head and is worked towards the feet.
1. With a G hook and worsted weight yarn (Sample: Buff), start with a magic circle of 8 sc sts (or the preferred method for creating a circle of 8 sc sts), pull closed and place a marker for working in the round. (8sts)
2. *sc, 2sc in the next st*, repeat to end of round. (12sts)
3. *sc 2, 2sc in the next st*, repeat to end of round. (16sts)
4. *sc 7, 2sc in the next st*, repeat once. (18sts)
5. *sc 8, 2sc in the next st*, repeat once. (20sts)
6. *sc 8, sc2tog*, repeat once. (18sts)
7. Sl st in the next st. For the next few rounds, join at the end of each round. Ch 1, sc in the same st and in each st to end of the round, sl st to join.
8. Ch 1, *sc 4, sc2tog*, repeat to end of the round, sl st to join. (15sts)
9. Ch 1, sc2tog, sc in each st to end of the round, sl st to join. (14sts)
10. Finish off the current yarn and flatten the head. With a needle and black embroidery floss, stitch the mouth in place, making sure it is not too high on the head.
Note: Make sure to leave room for the hairpieces.
Eyes: Use a sewing needle and thread to sew the buttons in place.
Heart cheeks: With a needle and red yarn, stitch a small V at each corner of the mouth.
11. With a G hook, attach yarn for the body (Sample: Bernat Super Value Lavender) to the BLO of any st on the last round. Work this round in the BLO. Ch 1, loosely sl st in the BLO of each st to end of round.
12. Ch 1, sc in the same st, sc, *2sc in the next st, sc 2*, repeat to end of round, sl st to join. (18sts)
13. Ch 1, *sc 5, 2sc in the next st*, repeat to end of round, sl st to join. (21sts)
14. Ch 1, sc in each st to end of round, sl st to join.
15. Ch 1, *sc 6, 2sc in the next st*, repeat to end of round, sl st to join. (24sts)
16. Ch 1, sc in each st to end of round, sl st to join.
17. Ch 1, *sc 7, 2sc in the next st*, repeat to end of round, sl st to join. (27sts)
18. Ch 1, sc in each st to end of round, sl st to join.
19. Ch 1, *sc 8, 2sc in the next st*, repeat to end of round, sl st to join. (30sts)
20. Ch 1, sc in each st to end of the round, sl st to join.
21. Repeat the previous round 4 more times. Stop and stuff the head and body to this point.
Note: My sample has a deep burgundy base because I ran out of the lavender yarn. I changed in the middle of these 4 rounds and ended up liking how it turned out. Feel free to change yarns or keep the same one.
22. Ch 1, *sc 8, sc2tog*, repeat to end of round, sl st to join. (27sts)
23. Ch 1, *sc 7, sc2tog*, repeat to end of round, sl st to join. (24sts) Add weight and finish stuffing.
24. Ch 1, *sc, sc2tog*, repeat to end of round, sl st to join. (16sts)
25. Ch 1, *sc2tog*, repeat to end of round, sl st to join. (8sts) Finish off, leaving a long tail for sewing.
With yarn needle, use the yarn tails from the arms to sew the shoulders to the body right below the neckline. I like to angle the arms in towards the stomach.
If you will be sewing the hands together, wait until the backpack is in place.
Backpack
This is designed to hold a chapstick, but works great to hold yarn needles too.
1. With a G hook and worsted weight yarn, start with a magic circle of 6 sc sts (or the preferred method for creating a circle of 6 sc sts), pull closed and place a marker for working in the round. (6sts)
2. *sc, 2sc in the next st*, repeat to end of round. (10sts)
3. Sc in each st around for 8 rounds.
4. Loosely sl st in each st to end of round.
5. This step creates the strap. Ch 18, sl st near the bottom of the bag. Finish off and weave in ends.
Place the backpack over the head to be worn crossbody with the pouch in the back.
With a yarn needle and yarn to match the hands, sew the tips of the hands together.
Marigold Flower
Stem: With a G hook and worsted weight yarn (Sample: Spring Green), ch 11, sl st in the 2nd ch from hook and in the next 2 chs, sc 6, hdc, (hdc, ch 1, sl st) in the last ch. Finish off and weave in ends. Set aside.
Flower
1. With a G hook and worsted weight yarn (Sample: yellowish orange section of Fruity Stripe yarn), start with a magic circle of 5 sc sts (or the preferred method for creating a circle of 5 sc sts), pull closed and place a marker for working in the round. (5sts)
2. 2sc in the BLO of each st to end of round. (10sts)
3. Sl st in the BLO of the next st. *ch 3, sl st in the next st*, repeat to end of round.
4. Continue to follow the spiral created from working in BLO. *ch 3, sl st in the next st*, repeat until you reach the center of the flower. Ch 3. Finish off, leaving a long tail for sewing.
Use a yarn needle to pull the end through the middle of the flower. Sew the middle of the flower to the wide end of the stem.
Hairpiece Options
Option 1: Pink with ruffles
1. With a G hook and worsted weight yarn (Sample: Pink part of Fruity Stripe yarn), start with a magic circle of 8 sc sts (or preferred method for creating a circle of 8 sc sts), pull closed sl st to join. (8sts)
2. Ch 1, 2hdc in each st to end of the round, sl st to join. (16sts)
3. Ch 1, *sc, 2sc in the next st*, repeat to end of the round, sl st to join.(24sts)
4. Ch 1, sc in the same st and in each of the next 17 sts. Leave remaining sts unworked. (18sts)
5. Ch 1, turn, *sc 4, sc2tog*, repeat two more times. (15sts)
6. Ch 1, turn, sc in the same st and in each st to end of row.
7. Repeat the previous round 3 more times.
8. Ch 1, *sc 2, 2sc in the next st*, repeat to end of row. (20sts)
9. Ch 1, sc in the same st and in each st to end of row.
10. Ch 1, turn, sl st in each st across the bottom edge of the hairpiece.
11. Ch 1. This step is worked across the U shape of the face opening. Sl st 8 sts evenly up the side, sl st 6 across the top, sl st 8 sts down the side, sl st in the first st at the bottom edge.
12. This step starts the curls. Ch 7, turn piece. Working around the posts of the last row of sts on the hair, sl st around each of the next 2 posts, *ch 7, sl st around each of the next 2 posts*, repeat to end of row. Ch 7, sl st in the edge of the hair.
13-14. Ch 6, turn. Working around the posts of the last row of sts on the hair, sl st around each of the next 2 posts, *ch 6, sl st around each of the next 2 posts*, repeat to end of row. Ch 6, sl st in the edge of the hair. Finish off and weave in ends.
Option 2: Brown Hair
1. With a G hook and worsted weight yarn (Sample: Cafe Late), start with a magic circle of 8 sc sts (or preferred method for creating a circle of 8 sc sts), pull closed and sl st to join. (8sts)
2. Ch 1, *sc, 2sc in the next st*, repeat to end of round, sl st to join. (12sts)
3. Ch 1, *sc 2, 2sc in the next st*, repeat to end of round, sl st to join. (16sts)
4. Ch 1, *sc 7, 2sc in the next st*, repeat once, sl st to join. (18sts)
5. Ch 1, *sc 8, 2sc in the next st*, repeat once, sl st to join. (20sts)
6. Sl st in the next st. Ch 1, TURN, sc2tog (same st and next), sc 16, sc2tog. Do not join (18sts)
7. Ch 1, turn, sc2tog, sc 14, sc2tog. (16sts)
8. Ch 1, turn, sc2tog, sc 12, sc2tog. (14sts)
9. Ch 1, turn, 2sc in the same st, sc 4, 2sc in the next st, sc 2, 2sc in the next st, sc 4, 2sc in the last st. (18sts)
10. Ch 1, turn, 2sc in the same st, sc 16, 2sc in the last st. (20sts)
11. Ch 1, turn, sc in the same st and in each st to end of row. Finish off and weave in ends.
I hope you enjoyed making this quick and easy project. I would love to see your creations. Please add your project to Ravelry and/or share online and include #snappytots.
More About The Marigold Project
Before I started making the items, I thought I better do some research about this saying to make sure the handout fit… This saying is guidance for new teachers… but WOW! I think it is advice everyone, especially me, could use in our daily lives.
Basically, marigolds are companion plants that are planted next to other plants to help them grow. In this case, marigold teachers are teachers who spread positive energy and support. Walnut trees are those that are firmly rooted in unchanging, more negative thoughts.
There are many articles on this if you want to read more. This is one that is to the point and I like how she presents it: https://youtu.be/Z-YojXOt9xU?si=KdojitB0nnMu4FSw
I instantly thought of a job change I made several years ago. I was in my most favorite “job” (I considered a privilege) working in an elementary school resource classroom. I loved the students and was surrounded by teachers who loved being there. Due to some life events I found myself needing insurance and more hours to support my kids. I got a job in an office with some very unhappy people(ugh it’s painful and draining just thinking about it). I was thankful for the job and money and insurance, but it put me in the darkest mindset of my life. I am sure it didn’t help that I had to give up a job I loved.
Anyway… as I listened to several different talks about “finding your marigold” I kept thinking of the past 14 years with so many of you. I’ve been extremely lucky to have met many people who spread joy and boost me up to keep going:
-Every time a package arrives for our soldiers. -The numerous emails of encouragement. -Comments on my posts. -The way many of you remember my family and have become part of our lives. – The strength, positive attitude, and endurance many of you have show as you battle your own challenges.
Thank you for being marigolds in my life. I have a goal to try harder to be more like the marigolds than walnut trees.
Thanks for visiting and I hope you will come back soon.
~ Heidi


