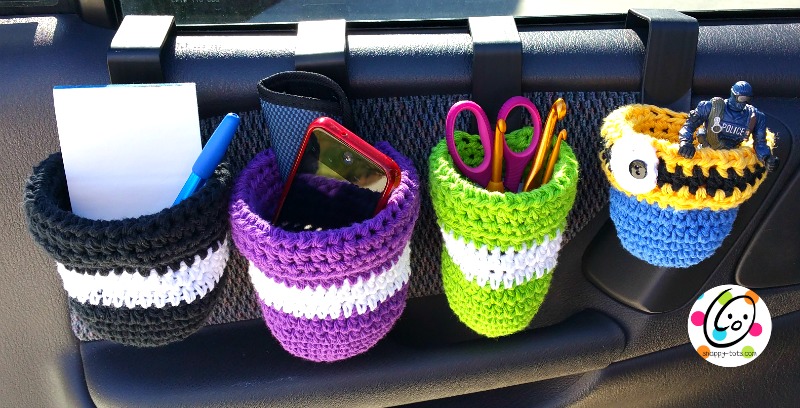
Free Pattern: Auto Caddy Bags
I like my car to stay organized, especially while on road trips. When I crochet, I am always misplacing my hooks and supplies because there is never a good place for them. A couple years ago I decided I needed a little pouch hanging from the car door. I remembered these cup holders from when I was growing up. I knew they would be the perfect hanger for a little bag and I was right!
After looking in every gas station and auto parts store (including the big box stores), I finally ordered them from Amazon (order info below). Then, of course, we found some at a truck stop.
Materials
Cup holder (large or small)
Yarn: small amounts of ww yarn (acrylic or cotton)
Hook: H
Misc: Cup holder (large or small), yarn needle, sewing needle and black button for minion option, Strong scissors (EMT/trauma shears work great!)
Directions:
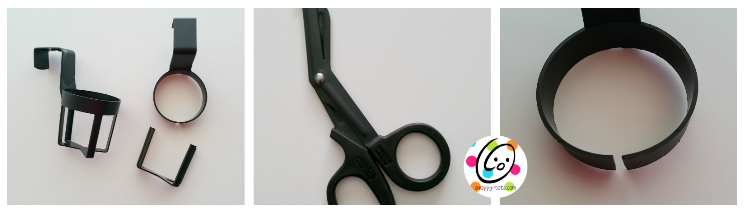
First I cut the bottom “cage” off of the cup holder. I used my husband’s trauma shears and they were perfect. Make sure you cut it as close to the top ring as possible. Lightly sand the cut area with a fingernail file if necessary. This will make it easier to slide the crochet piece in place. On some of the holders the top ring didn’t have an opening. If so, cut a 1/2″ section out of the middle (as shown in photo below). Set aside
I found a few different sizes of holders. I have written patterns for a small and large. I have been told there are even jumbo holders.
~ Please click HERE to add this to your Ravelry favorites. ~
Large Holder
Measures 4″ across ring.
- With H hook and worsted weight yarn, start with a magic circle of 8 sts (or preferred method for starting a circle of 8 sc sts), join and pull closed. (8sts)
- Ch 1, 2sc in each st to end of round, sl st to join. (16sts)
- Ch 1, *sc, 2sc in next st*, repeat to end of round, sl st to join. (24sts)
4.Ch 1, *sc 2, 2sc in next st*, repeat to end of round, sl st to join. (32sts)
- Ch 1, *sc 7, 2sc in next st*, repeat to end of round, sl st to join. (36sts)
6-7. Ch 1, sc in each st to end of round, sl st to join.
8-9. Ch 1, hdc in same st and in each st to end of round, sl st to join.
- Change yarn color if desired. Ch 1, hdc in same st and in each st to end of round, sl st to join.
- Ch 1, hdc in same st and in each st to end of round, sl st to join.
- Change yarn color if desired. Ch 1, hdc in same st and in each st to end of round, sl st to join.
13-14. Ch 1, hdc in same st and in each st to end of round, sl st to join.
- This step starts rows (worked back and forth) to create the casing. Ch 1, hdc in same st and in next 31 sts (leaves 4 sts unworked). (32sts)
16-17. Ch 1, turn, hdc in same st and in next 31 sts. (32sts)
Finish off, leaving a long tail for sew casing.
Fold down the last 3 rounds. With yarn needle and yarn tail, stitch last edge to first round of color (step #12).
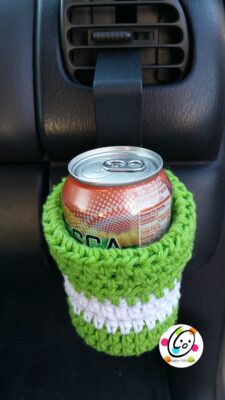
The caddy is now ready to slide onto the holder. See photos below. Slide one end onto the holder as far as possible, then slide the other side on.

Small Holder
Measures 3″ across ring.
- With H hook and worsted weight yarn, start with a magic circle of 8 sts (or preferred method for starting a circle of 8 sc sts), join and pull closed. (8sts)
- Ch 1, 2sc in each st to end of round, sl st to join. (16sts)
- Ch 1, *sc, 2sc in next st*, repeat to end of round, sl st to join. (24sts)
- Ch 1, *sc 5, 2sc in next st*, repeat to end of round, sl st to join. (28sts)
5-6. Ch 1, sc in each st to end of round, sl st to join.
7-8. Ch 1, hdc in same st and in each st to end of round, sl st to join.
- Change yarn color if desired. Ch 1, hdc in same st and in each st to end of round, sl st to join.
- Ch 1, hdc in same st and in each st to end of round, sl st to join.
- Change yarn color if desired. Ch 1, hdc in same st and in each st to end of round, sl st to join.
12-13. Ch 1, hdc in same st and in each st to end of round, sl st to join.
- This step starts rows (worked back and forth) to create the casing. Ch 1, hdc in same st and in next 23 sts (leaves 4 sts unworked). (24sts)
15-16. Ch 1, turn, hdc in same st and in next 23 sts. (24sts)
Finish off, leaving a long tail for sew casing.
Fold down the last 3 rounds. With yarn needle and yarn tail, stitch last edge to first round of color (step #13).
The caddy is now ready to slide onto the holder. See photos above. Slide one end onto the holder as far as possible, then slide the other side on.
Small Minion Holder
Measures 3″ across ring.
- With H hook and blue worsted weight yarn, start with a magic circle of 8 sts (or preferred method for starting a circle of 8 sc sts), join and pull closed. (8sts)
- Ch 1, 2sc in each st to end of round, sl st to join. (16sts)
- Ch 1, *sc, 2sc in next st*, repeat to end of round, sl st to join. (24sts)
- Ch 1, *sc 5, 2sc in next st*, repeat to end of round, sl st to join. (28sts)
5-6. Ch 1, sc in each st to end of round, sl st to join.
7-8. Ch 1, hdc in same st and in each st to end of round, sl st to join.
- Change to yellow. Ch 1, hdc in same st and in each st to end of round, sl st to join.
10-11. Ch 1, hdc in same st and in each st to end of round, sl st to join.
- This step starts rows (worked back and forth) to create the casing. Ch 1, hdc in same st and in next 23 sts (leaves 4 sts unworked). (24sts)
- Change to black yarn. In the sample I did one row of hdc. It created a rick rack look. I think I would prefer working 2 rounds of sc. So… *ch 1, sc in each st to end of round, sl st to join*, repeat once.
- Change to yellow yarn. Ch 1, turn, hdc in same st and in next 23 sts. (24sts)
Finish off, leaving a long tail for sew casing. Set caddy aside.
Eye:
- With H hook and white yarn, start with a magic circle of 6sts (or preferred method for starting a circle of 6 sc sts), join and pull closed. (6sts)
- Ch 1, 2sc in each st to end of round, sl st to join. (12sts) Finish off, leaving a tail for sewing in place.
Eye is sewn on the inside of the cup, overlapping the black band so it will be on the right side when folded over. With yarn needle and yarn tail, sew eye in place. With sewing needle and thread, sew button to eye.
Fold down the last 3 rounds. With yarn needle and yarn tail, stitch last edge to first round of color (step #11).
The caddy is now ready to slide onto the holder. See photos above. Slide one end onto the holder as far as possible, then slide the other side on.
Variations
These make great gifts for mom and dad, teachers, neighbors and AWESOME craft fair items!
Unfortunately, these holders will not fit on the door panels of all vehicles. Try hanging the holder on a fence or rail with a potted plant.
Holder Sources
Check auto part stores, gas stations and truck stops. Also, some dollar stores carry them. If not, try online.
Amazon
Right now the following are an add-on purchase only: