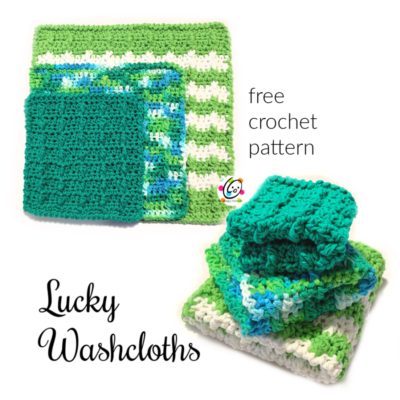
Free Pattern: Lucky Washcloths
There are lots of crochet patterns for washcloth/dishcloths. My favorites are ones that whip up quickly, can be made on a road trip without a lot of concentration and are thick and strong.
I got lucky (hence the name… plus St. Patrick’s Day is on my mind lately) and these turned out to fit all of those things. The ridges are easy to create, add some thickness and help scrub.

The variegated middle size is the first one I made. It is 9″ square. I wanted a smaller size because I want some to try for washing my face. It is about 6.5″ square. Then I wanted to see what stripes would look like so I made the large size. It is a big 11.5″ square.

Lucky Washcloths Pattern
The crochet patterns to make all 3 sizes are available for free below.
A downloadable, ad-free pattern is also available to purchase from my Ravelry Shop.
Materials and Details
- Yarn: 120-150 yards ww cotton
- Crochet Hook: I (5.5mm)
- Notions: Yarn needle for weaving in ends
- Sizes: Small – 6.5” square, Medium – 9” square, Large – 11.5” square
Tips
- Numbers at the beginning of each line may refer to steps and not indicate number of rows.
- Stitch count remains the same (22/30/38sts) for entire cloth.
- If you have any questions about this pattern please contact [email protected].
Special Stitch: FPDC Cluster
YO, insert hook around the next post, YO and pull up a loop, YO and pull through 2 loops on hook. YO, insert hook around the same post, YO and pull up a loop, YO and pull through 2 loops on hook, YO and pull through all 3 loops on hook.
See help photos at the end of this pattern if needed.
Stripes
If you would like your cloth to be striped, here are some suggestions:
- Change colors after the hdc rows. This way the different color will emphasize the post cluster sts.
- Change colors every two rows and carry the unused yarn up the side of the cloth. You won’t have to weave in a bunch of tails and the border from step 6 will cover the yarns running up the side.
- To get the beginning and ending stripes close to the same width, I started with green and changed to white for the second row of cluster stitch. After the last white stripe, I worked one cluster row, one hdc row, one cluster row, one sc row. I then added the border.

Small Cloth – 6.5” square
1. With an I hook, ch 23, sc in the 2nd ch from hook and in each ch across. (22sts)
2. Ch 2, turn, hdc in the same st and in each st across.
3. Ch 2, turn, hdc in the same st, hdc in the next st, *sk 1, FPDC cluster (see “special stitch” above), hdc in same st as cluster, hdc 2*, repeat to end of row. (22sts)
Tip: you will not be working into the skipped st. Leave it empty.
4. Repeat steps 2-3 until cloth is square. Make sure to end with a cluster row (step #3).
5. Ch 1, turn, sc in the same st and in each st across.
6. This step is worked around the outer edge of the cloth.
Ch 1, turn, sl st in same st, *ch 1, sl st in next st*, repeat across all 4 sides of the cloth, evenly spacing the sts when working across the edges. Finish off and weave in ends.
Medium Cloth – 9” square
1. With an I hook, ch 31, sc in the 2nd ch from hook and in each ch across. (30sts)
2. Ch 2, turn, hdc in the same st and in each st across.
3. Ch 2, turn, hdc in the same st, hdc in the next st, *sk 1, FPDC cluster (see “special stitch” above), hdc in same st as cluster, hdc 2*, repeat to end of row. (30sts)
Tip: you will not be working into the skipped st. Leave it empty.
4. Repeat steps 2-3 until cloth is square. Make sure to end with a cluster row (step #3).
5. Ch 1, turn, sc in the same st and in each st across.
6. This step is worked around the outer edge of the cloth.
Ch 1, turn, sl st in same st, *ch 1, sl st in next st*, repeat across all 4 sides of the cloth, evenly spacing the sts when working across the edges. Finish off and weave in ends.
Large Cloth – 11.5” square
1. With an I hook, ch 39, sc in the 2nd ch from hook and in each ch across. (38sts)
2. Ch 2, turn, hdc in the same st and in each st across.
3. Ch 2, turn, hdc in the same st, hdc in the next st, *sk 1, FPDC cluster (see “special stitch” above), hdc in same st as cluster, hdc 2*, repeat to end of row. (38sts)
Tip: you will not be working into the skipped st. Leave it empty.
4. Repeat steps 2-3 until cloth is square. Make sure to end with a cluster row (step #3).
5. Ch 1, turn, sc in the same st and in each st across.
6. This step is worked around the outer edge of the cloth.
Ch 1, turn, sl st in same st, *ch 1, sl st in next st*, repeat across all 4 sides of the cloth, evenly spacing the sts when working across the edges. Finish off and weave in ends.
Help Photos
FPDC Cluster


Pin To Save For Later