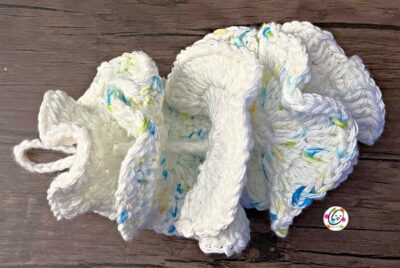
Free Pattern: Snowball Bath Pouf
I love poufs and would really like some crocheted ones my family will use. I have tried a few over the years, but wow, they can be a lot of work to make and several end up pretty heavy.
After seeing a cute pumpkin made from paper circles, I decided to give it a try for a simple pouf.

Isn’t it cute?! Plus it is easy enough for beginners. It is a great way to practice basic stitches and have a fun project when it is done.
Snowball Bath Pouf Crochet Pattern
The instructions for this pattern are available for free below.
Materials
- Yarn: 200 yards white cotton Sample yarns: I used plain white and a variegated yarn with small flecks of color.
- Crochet Hook: I (5.5mm)
- Notions: Yarn needle for weaving in ends, scissors
Measurements
- Finished Measurement: 4.5-5” across, 3-3.5” tall
- Gauge: not needed for this project.
Tips
- The first stitch of each row is worked into the same stitch as the turning chain.
- Stitch count remains the same unless noted at end of row/round.
- If you have any questions about this pattern please contact [email protected].
Directions
- This project is created by making several circles in different sizes and then connecting them with a hanger.
- Colors: The sample was made with two different yarns, plain white and a white with small flecks of color. Here is how I did my colors: White – two circle A and one circle B; White variegated – two circle B. See the stacking order in the “Assembly” section at the end of the pattern.

Circle A (make 2)
1. Leave at least an 8” yarn tail in the beginning. With an I hook and ww cotton yarn, ch 5, sl st in the last ch to create a circle. Ch 1, 12 hdc in the circle (around the chain and beginning yarn tail), sl st in the first st to join. (12sts) Note: By crocheting over the beginning yarn tail, it will allow us to close the center circle a little when this piece is complete.
2. Ch 2, 3dc in the same st and in each st to end of round, sl st in the first st to join. (36sts)
3. Ch 2, 2hdc in the same st and in each st to end of round, sl st in the first st to join. (72sts) Finish off, leaving at least 8” of yarn. Set aside.
Circle B (make 3)
If using two colors of yarn, make 2 of the white variegated and one white.
1. Leave at least an 8” yarn tail in the beginning. With an hook and ww cotton yarn, ch 5, sl st in the last ch to create a circle. Ch 1, 12 hdc in the circle (around the chain and beginning yarn tail), sl st in the first st to join. (12sts) Note: By crocheting over the beginning yarn tail, it will allow us to close the center circle a little when this piece is complete.
2. Ch 2, 3dc in the same st and in each st to end of round, sl st in the first st to join. (36sts)
3. Ch 3, 2tr in the same st, 3tr in the next st, *2tr in the next st, 3tr in the next st*, repeat to end of round, sl st in the first st to join. (90sts) Finish off, leaving at least 8” of yarn. Set aside.
Hanger: With an I hook and ww cotton yarn, ch 50, sl st in the 30th ch and in each ch to end. Finish off and weave in ends.
Assembly
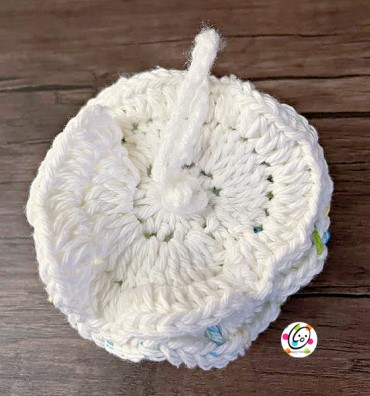
First, weave in all ends, following these tips:
- Use a yarn needle to weave the end yarn tail towards the middle of the circle (photo below left).
- Pull the beginning yarn tail until the center hole is about ¼” wide. Do NOT pull it completely closed. Our hanger needs to slip through the hole.
- Carefully tie the two yarn tails together, securing the center circle. BE CAREFUL the end yarn tail doesn’t cinch in the outer edge.
- Weave in the yarn tails.
- Repeat for all circles.

Adding the hanger
Tie a knot in the end of the hanger. This will be at the bottom of the pouf.
1. Starting with a smaller circle (circle A) for the bottom, use a crochet hook inserted from the back/wrong side of the circle, pull the loop end of the hanger through the circle.
Repeat for each circle, following this stacking order:
- Variegated Circle B.
- White Circle B.
- Variegated Circle B.
- White Circle A.
Hanger stem: Tie two loose knots at the top of the pouf, below the loop. The more you squish down the circles, the shorter your pouf will be.