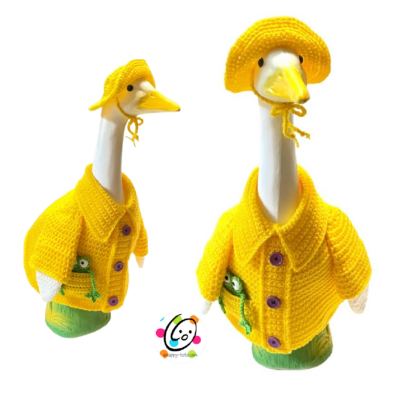
Free Pattern: Rainy Day Goose
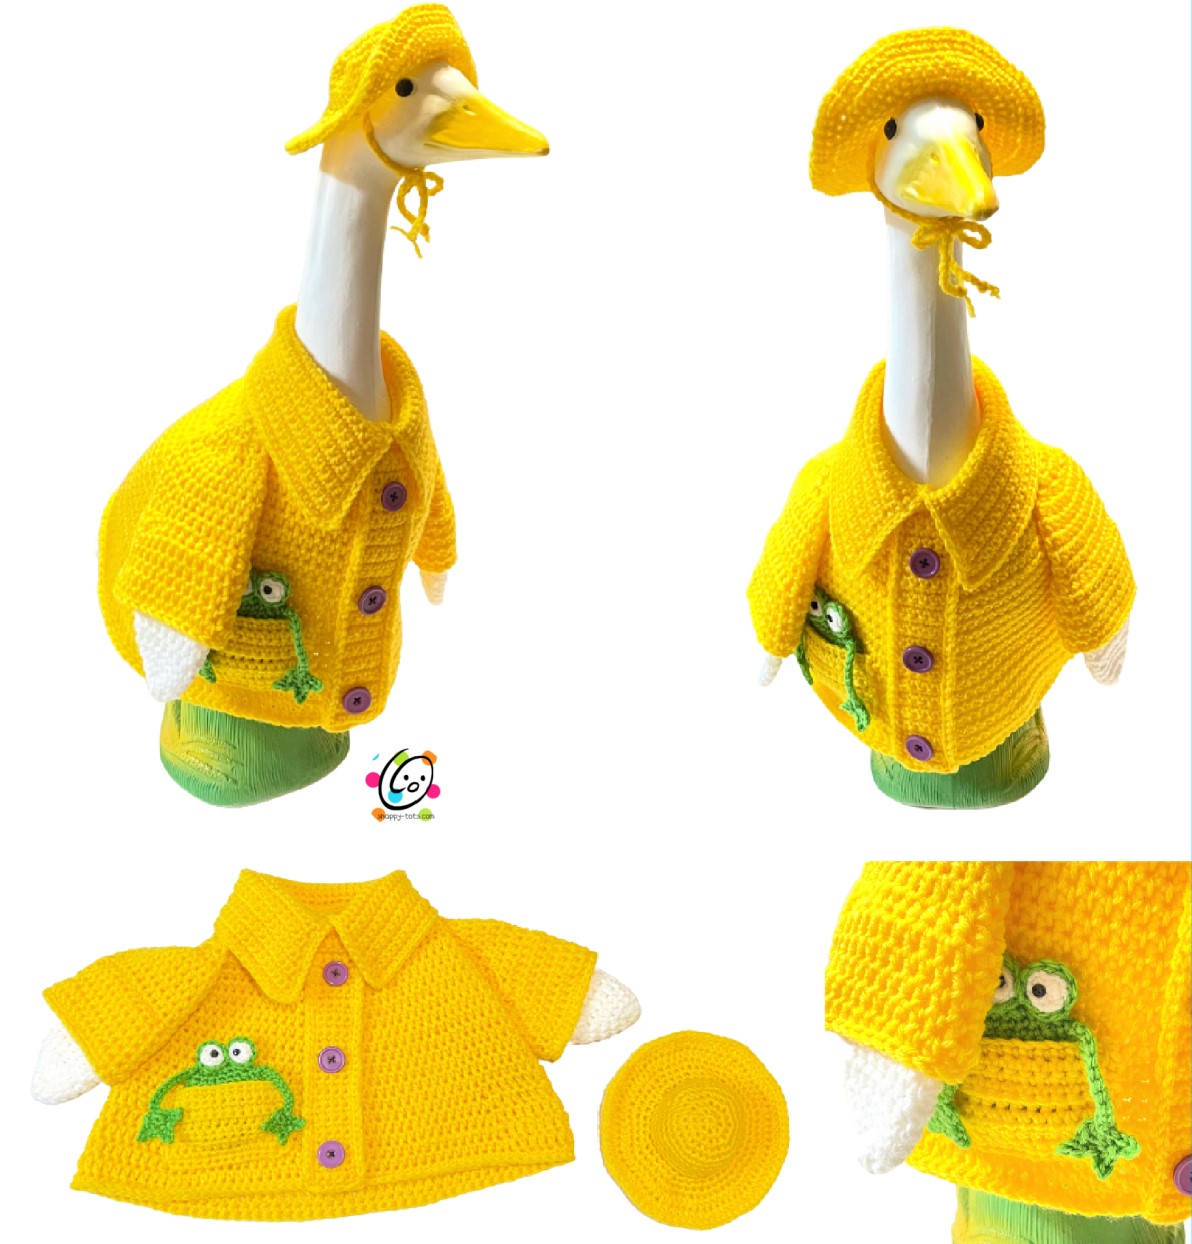
In March we drove to Washington state to see our oldest grandchild for his birthday. It was SO FUN to visit them and we had a great time! We actually had lots of sunny weather which is surprising for that area. I got thinking that Goose (my parent’s goose) could use a raincoat for rainy days. Maybe that way my dad would let him go outside in stormy weather.
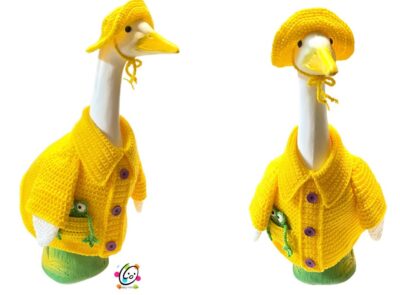
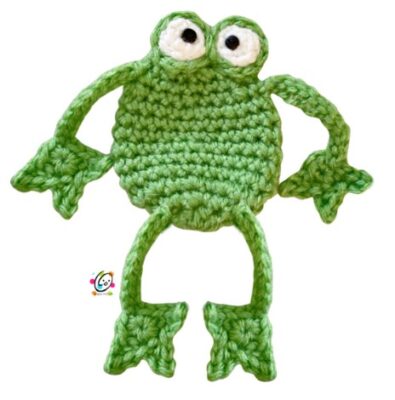
He has a little froggy friend in his pocket that hopped in to keep dry.
More Goose Clothes
Watch for more fancy outfits to come each month. You can find the latest “Ducke and Goose” patterns at THIS LINK and find more goose outfits and accessories at THIS LINK.
Where To Get The Goose
This is designed for a 23” goose statue like the one sold by Miles Kimball: https://www.mileskimball.com/buy-large-white-goose-23-h-310493
It is also available from Amazon: https://amzn.to/3AdRWSP
Rainy Day Goose Outfit Crochet Patterns
The pattern is available to view here on the blog. An ad-free, downloadable pdf is available to purchase for a small fee from Ravelry | Etsy
Materials
- Yarn: worsted weight in the following colors – 400 yards yellow, 40 yards white, 20 yards green
- Crochet Hook: H (5mm), I (5.5mm)
- Supplies: Yarn needle for weaving in ends, 3 large buttons for coat (⅞” on sample), sewing needle, matching thread, 2 tiny black buttons (frog eyes)
- Optional: Measuring tape, scissors, pins for holding pieces together during assembly.
Measurements
- Finished Measurements:
Jacket (measured flat) – 9” tall (at front) x 16” across widest part
frog – 3.5” tall x 2.5” across (body only)
hatbrim – 6.25” across - Gauge – 4” with an I hook = 14 hdc sts and 9.5 hdc rounds
Tips
- The first stitch of each row is worked into the same stitch as the turning chain unless noted.
- Numbers at the beginning of each line may refer to steps and not indicate number of rows.
- Stitch count remains the same unless noted at end of row/round.
- If you have any questions about this pattern please contact [email protected].
This is designed for a 23” goose statue like the one sold by Miles Kimball.
Jacket
This starts at the neck edge and is worked in rounds to the bottom edge. The collar and front button piece are added after main jacket piece is complete. The sample was worked in continuous rounds to avoid the appearance of a seam.
1. With an I hook and worsted weight yarn (yellow in sample), ch 44, sl st in the last ch from hook to form a circle. Make sure the chain is not twisted. Sc in each ch to end of round, do not join. Place marker for working in the round. (44sts)
2. *hdc 10, 2hdc in the next st*, repeat to end of round. (48sts)
3. *hdc 11, 2hdc in the next st*, repeat to end of round. (52sts)
4. *hdc 12, 2hdc in the next st*, repeat to end of round. (56sts)
5. *hdc 13, 2hdc in the next st*, repeat to end of round. (60sts)
6. *hdc 14, 2hdc in the next st*, repeat to end of round. (64sts)
7. *hdc 15, 2hdc in the next st*, repeat to end of round. (68sts)
8. *hdc 16, 2hdc in the next st*, repeat to end of round. (72sts)
9. *hdc 17, 2hdc in the next st*, repeat to end of round. (76sts)
10-11. Hdc in each st to end of round.
12. *hdc 18, 2hdc in the next st*, repeat to end of round. (80sts)
13. *hdc 19, 2hdc in the next st*, repeat to end of round. (84sts)
14. *hdc 20, 2hdc in the next st*, repeat to end of round. (88sts)
15. Hdc in each st to end of round.
16. *hdc 21, 2hdc in the next st*, repeat to end of round. (92sts)
17. *hdc 22, 2hdc in the next st*, repeat to end of round. (96sts)
18. *hdc 23, 2hdc in the next st*, repeat to end of round. (100sts)
Note: From this point on, the beginning and ending of each round will be hdc and the middle will be dc. This is to create a longer back. The beginning of each round will be the “front/middle” of the jacket where the “center strip” will be sewn.
19. Hdc 16, dc 68, hdc 16.
20. Hdc 15, 2hdc in the next st, dc 68, 2hdc in the next st, hdc 15. (102sts)
21. Hdc 16, 2hdc in the next st, dc 68, 2hdc in the next st, hdc 16. (104sts)
22. Hdc 18, dc 68, hdc 18.
23. Hdc 17, 2hdc in the next st, dc 68, 2hdc in the next st, hdc 17. (106sts)
24. Sc in each st to end of round.
25. Loosely sl st in each st to end of round. Finish off and weave in ends. Set aside.
Center Strip – 2” wide x 9” tall
1. With an I hook and worsted weight yarn to match the jacket (yellow in sample), ch 7, sc in the 2nd ch from hook and in each ch across. (6sts)
2. Ch 1, turn, sc in the same st and in each st to end of row.
3. Repeat the previous row until the piece is the same length and the front/middle of the jacket, approximately 9” Long.
4. This step is worked around the outer edge of the rectangle. Sl st evenly down the side of the piece, (sl st, ch 1, sl st) in the first st of the bottom row, sl st in each st across until 1 st remains, (sl st, ch 1, sl st) in the last st, sl st evenly up the side of the piece, (sl st, ch 1, sl st) in the first st of the top row, sl st in each st across.
Finish off, leaving a long yarn tail for sewing. Set aside.
Collar
1. With an I hook and worsted weight yarn to match the jacket (yellow in sample), ch 47, sc in the 2nd ch from
hook and in each ch across. (46sts)
2. Ch 1, turn, 2sc in the same st, sc in each st until 1 st remains, 2sc in the last st. (48sts)
3. Ch 1, turn, sc in the same st and in each st to end of row.
4. Ch 1, turn, 2sc in the same st, sc in each st until 1 st remains, 2sc in the last st. (50sts)
5. Ch 1, turn, sc in the same st and in each st to end of row.
6. Ch 1, turn, 2sc in the same st, sc in each st until 1 st remains, 2sc in the last st. (52sts)
7. Ch 1, turn, sc in the same st and in each st to end of row.
8. Ch 1, turn, 2sc in the same st, sc in each st until 1 st remains, 2sc in the last st. (54sts)
9. Ch 1, turn, sc in the same st and in each st to end of row.
10. Ch 1, turn, 2sc in the same st, sc in each st until 1 st remains, 2sc in the last st. (56sts)
11. This step is worked around the outer edge of the collar. Do not turn. Ch 1, sc in the same st, sc 9 sts evenly
down the side/edge of the collar, (sc, ch 1, sc) in the first st of the beginning row, sc in each st across the row until 1 st remains, (sc, ch 1, sc) in the last st, sc 9 sts evenly up the side/edge of the collar, ch 1, sc in each st across the last row.
Ch 1, loosely sl st in each st up the side/edge of the collar. Take the loop off the hook. At this point, pin the short edge of the collar to the top edge of the jacket. The collar will be a little longer. The ends should overlap in the middle.
Slip the loop back on the hook. Working through both layers, loosely sl st in each st to end of round, sewing the collar to the jacket.
Sl st in each st across the last side/edge of the collar. Finish off and weave in ends.
Place the center strip on top of the jacket, centered under the middle opening of the collar. With a sewing needle, use the yarn tail to sew each edge to the jacket.
With a sewing needle and matching thread, sew 3 large buttons, evenly spaced, down the center strip. See main photos for placement.
Pocket – 4” wide x 2.5” tall
1. With an I hook and worsted weight yarn to match the jacket (yellow in sample), ch 15, sc in the 2nd ch from hook and in each ch across. (14sts)
2-4. Ch 1, turn, sc in the same st and in each st to end of row.
5. Ch 1, turn, hdc in the BLO of each st to end of row.
6-8. Ch 1, turn, hdc in the same st and in each st to end of row.
Finish off and weave in ends.
Place the pocket on the jacket, next to the center strip. With a yarn needle and matching yarn, sew the sides and bottom edge to the jacket.
Sleeves (make 2)
The sleeve starts at the top/shoulder.
Leave a long tail in the beginning for attaching sleeve to suit when complete.
1. With an I hook and worsted weight yarn to match the jacket (yellow in sample), start with a magic circle of 8 sc sts (or preferred method for starting a circle of 8 sc sts), pull to close and place a marker for working in the round. (8sts)
2. 2hdc in each st to end of round. (16sts)
3. *2hdc in the next st, hdc 3*, repeat to end of round. (20sts)
4. Hdc in each st to end of round.
5. *2hdc in the next st, hdc 4*, repeat to end of round. (24sts)
6-7. Hdc in each st to end of round.
8. *2hdc in the next st, hdc 11*, repeat once. (26sts)
9. Hdc in each st to end of round.
10. Sc, sl st. This is the new beginning of the round. Ch 1, hdc in the same st and in each st to end of round, sl st to join.
11. Ch 1, FPHDC around each post from the previous round, sl st to join. Slip the loop off the hook. This part will be finished after the white part of the wing is complete.
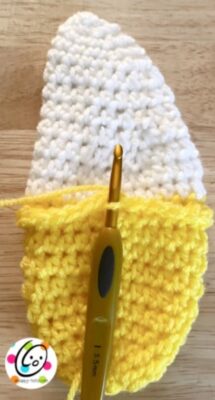
12. The white yarn for the remaining part of the wing will be attached to the inner ridge created from step 11. Pull the top edge back and use an I hook to attach white yarn to a st.

Ch 1, hdc in the same st and in each st to end of round, sl st to join. (26sts)
14. Ch 1, *hdc2tog, hdc 11*, repeat once, sl st to join. (24sts)
15. Ch 1, hdc2tog, hdc in each st until 2 sts remain, hdc2tog, sl st to join. (22sts)
16. Ch 1, hdc2tog, hdc in each st until 2 sts remain, hdc2tog, sl st to join. (20sts)
17. Ch 1, hdc2tog, hdc in each st until 2 sts remain, hdc2tog, sl st to join. (18sts)
18. Ch 1, hdc in each st to end of round, sl st to join.
19. Ch 1, hdc2tog, hdc in each st until 2 sts remain, hdc2tog, sl st to join. (16sts)
20. Ch 1, sc2tog, sc in each st until 2 sts remain, sc2tog, sl st to join. (14sts)
21. Ch 1, sc2tog, sc in each st until 2 sts remain, sc2tog, sl st to join. (12sts)
22. Ch 1, sc2tog, sc in each st until 2 sts remain, sc2tog, sl st to join. (10sts)
23. Ch 1, *sc2tog*, repeat to end of round, sl st to join. (5sts) Finish off, leaving a long tail for sewing the end.
With a yarn needle, use the yarn tail to weave in and out of the remaining sts. Pull closed and secure the end.
Finishing the sleeve:
1. Slip the yellow loop back on the hook. Ch 1, *hdc 12, 2hdc in the next st*, repeat once, sl st to join. (28sts)
2-3. Ch 1, hdc in each st to end of round, sl st to join.
4. Ch 1, 2hdc in the same st, hdc in each st to end of round, sl st to join. (29sts)
5. Ch 1, 2hdc in the same st, hdc in each st to end of round, sl st to join. (30sts)
6. Loosely sl st in each st to end of round. Finish off and weave in ends.
Notice in the main photo above that one edge of the white wing part tapers towards the end tip and the other stays more straight. Adjust your wing and flatten it to resemble the photo.
Use the beginning yarn tail to sew the top 1” of the shoulder part of each wing to the body suit. This is easiest when the suit is on the goose. Remember you will want to be able to see at least part of the frog. See main photos for placement.
Tip: I like to put the jacket on the goose, pin the sleeves in place, and set the goose across the room. Look at it from different angles and adjust if needed.
Rain Hat
1. With an H hook and worsted weight yarn to match the jacket (yellow in sample), start with a magic circle of 8 sc sts (or preferred method for creating a circle of 8 sc sts), pull closed and sl st to join. (8sts)
2. Ch 1, 2sc in each st to end of round, sl st to join. (16sts)
3. Ch 1, *sc, 2sc in the next st*, repeat to end of round, sl st to join. (24sts)
4. Ch 1, *sc 2, 2sc in the next st*, repeat to end of round, sl st to join. (32sts)
5. Ch 1, *sc 7, 2sc in the next st*, repeat to end of round, sl st to join. (36sts)
6. Ch 1, sc in each st to end of round, sl st to join.
7. Repeat the previous round for an additional 4 rounds.
8. Work this round in FLO. Ch 1, *sc 5, 2sc in the next st*, repeat to end of round, sl st to join. (42sts)
9. Ch 1, sc 2, *2sc in the next st, sc 4*, repeat to end of round, sl st to join. (50sts)
10. Ch 1, *sc 4, 2sc in the next st*, repeat to end of round, sl st to join. (60sts)
11. Ch 1, hdc 3, *2hdc in the next st, hdc 5*, repeat until 3 sts remain, 2hdc in the next st, hdc 2, sl st to join. (70sts)
12. Ch 1, *hdc 6, 2hdc in the next st*, repeat to end of round, sl st to join. (80sts)
13. Loosely sl st in each st to end of round. Finish off and weave in ends.
Use your fingers to smooth out the edge of the brim.
Ties: Fold the hat in half to find the placement for the ties. With an H hook and ww yarn (yellow to match the hat), attach the yarn to an inside loop (so it doesn’t show on the outside of the hat). Ch 40. Finish off and tie a knot in the end of the chain. Repeat for the opposite side.
Frog

1. With an H hook and worsted weight yarn (green in sample), create a magic loop of 8 hdc sts (or preferred
method for starting a circle of 8 hdc sts), pull closed and place marker for working in the round. (8sts)
2. 2sc in each st to end of round. (16sts)
3. *sc, 2sc in next st*, repeat to end of round. (24sts)
4-6. Sc in each st to end of round.
7. Sl st in next st. Work this round in BLO. Ch 1, sc in same st and in each st to end of round, sl st to join.
8-9. Ch 1, sc in each st to end of round, sl st to join.
10. Ch 1, *sc 2, sc2tog*, repeat to end of round, sl st to join. (18sts)
11. Ch 1, sc in each st to end of round, sl st to join.
12. Ch 1, *sc, sc2tog*, repeat to end of round, sl st to join. (12sts)
13. Flatten the bottom edge. Ch 1. Working through bother layers, sc2tog, sc, sc2tog. Finish off and weave in ends. This will be the top edge of the frog.
Back part of eyes (green) – Make 2.
1. With an H hook and worsted weight yarn (green in sample), create a magic loop of 5 sc sts (or preferred
method for starting a circle of 5 sc sts), pull closed and place marker for working in the round. (5sts)
2. 2sc in each st to end of round. (10sts) Finish off, leaving a yarn tail for sewing to the frog. Set aside.
Front of eyes (white) – Make 2.
With an H hook and worsted weight yarn (white in sample), create a magic loop of 5 sc sts (or preferred
method for starting a circle of 5 sc sts), pull closed and sl st to join. (5sts)
Finish off, leaving a yarn tail for sewing to the green pieces.
Place a white piece on top of a green piece. Use a yarn needle and the white yarn tail to sew the white piece to the green piece.
With a sewing needle and black thread, sew a small black button to the eye piece for the pupil.
Repeat for the second eye.
Use a yarn needle and the green yarn tail to sew the bottom ⅓ of the eye to the top of the frog body.
Legs – make 2-4
1. With an H hook and worsted weight yarn (green in sample), create a magic loop of 5 sc sts (or preferred method for starting a circle of 5 sc sts), pull closed and sl st to join. (5sts)
2. *ch 3, sl st in the 2nd ch from hook, sc in the next ch, sl st in the next st on the circle*, repeat 2 more times. Sl st in the next st. Ch 10, sl st in the 2nd ch from hook and in each ch back to the foot, sl st in the next st. Finish off and weave in ends.
With a yarn needle and matching yarn, sew the end of each leg to the sides of the body, 2 near the eyes and 2 at the bottom (optional).
Pin To Save For Later