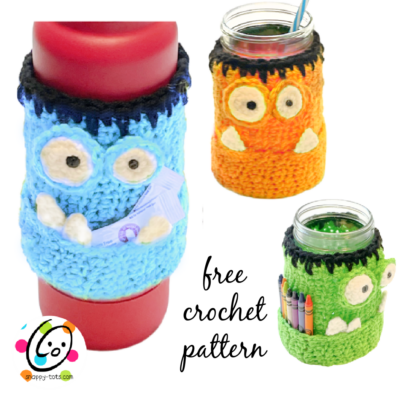
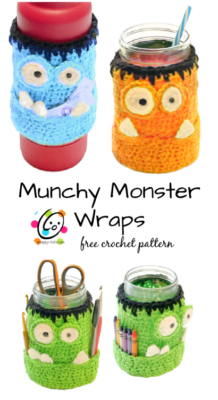
Free Pattern: Munchy Monster Wrap
Halloween is one of my favorite holidays and fall is by far my favorite time of the year. I love coming up with quick things you can whip up for gifts or to add a whimsical touch to your desk for the seasons.

- These “Munchy Monster Wraps” will slip over a large water bottle to help you crunch that work out. He will even hold some flavor mix ins for your refill.
- They can turn ordinary mason jars into a fun party glass. A different color for each guest so you can tell them apart.
- How about storing your crochet or art supplies in one? No one is going to still from a monster on guard.
About The Pattern
This big guy will wrap around a full size mason jar, large water bottles, make it into a treat pouch, or a base can be added so it can be it’s own container. This would be cute to hold your supplies throughout the fall too.
Munchy Monster Wrap Crochet Pattern
The pattern for this project is available to follow along below. An ad-free, downloadable pdf is also available to purchase: Ravelry | Etsy
Materials & Details
- Yarn: Less than 100 yards worsted weight. Sample colors: Red Heart Super Saver Spring Green, White, Black, Pumpkin, Turqua
- Crochet hooks: H (5mm), I (5.5mm)
- Miscellaneous: 2 black buttons (Sample: 6mm and 9mm), sewing needle and black thread (or color), yarn needle.
- Optional: Mason jar, large bottle
- Measurements: 5.75” tall x 5.25” across (measured flat)
- Gauge: 4” with an I hook = 12 rows of pattern repeat, 13 sts
Tips
- The first stitch of each row is worked into the same stitch as the turning chain unless noted.
- Numbers at the beginning of each line may refer to steps and not indicate the number of rows/rounds.
- Stitch count remains the same unless noted at end of row/round.
- If you have any questions about this pattern please contact [email protected].
Directions
The main wrap is made from 2 large pieces that can be customized to fit your container. As written, this will wrap around a full size mason jar, large water bottles, or a base can be added so it can be it’s own container.
Tall Piece
1. With an I hook and worsted weight yarn for the large, main piece (green in sample), ch 19, sc in the 2nd ch from hook and in each ch across. (18sts)
2. Ch 1, turn, sc in the same st, sc, *hdc 2, sc 2*, repeat to end of row.
3. Ch 1, turn, hdc in the same st, hdc, *sc 2, hdc 2*, repeat to end of row.
4. Repeat steps 2-3 until there are 30 rows total (including steps #2-3)
5. Ch 1, turn, sc in the same st, sc, *hdc 2, sc 2*, repeat to end of row.
6. Fold the piece to line up the current and beginning rows. Ch 1. Working through both layers, loosely sl st to the end of the row. Finish off and weave in ends. Turn piece right side out. Set this piece aside.
Pocket Piece
1. With an I hook and worsted weight yarn for the large, main piece (green in sample), ch 9, sc in the 2nd ch from hook and in each ch across. (8sts)
2. Ch 1, turn, sc in the same st, sc, hdc 2, *sc 2, hdc 2*, repeat to end of row.
3. Repeat the previous row until there are 30 rows total (including step #2).
4. Ch 1, turn, sc in the same st, sc, hdc 2, *sc 2, hdc 2,*, repeat to end of row.
5. Fold the piece to line up the current and beginning rows. Ch 1. Working through both layers, loosely sl st to the end of the row. Finish off and weave in ends. Turn piece right side out.
Assembly: Slide the pocket piece over one end of the tall piece, matching the sts at one end. The next step will be easier if the layers are pinned together and the round divided into qtrs. Place the piece on a flat surface to find the edges. Place a marker at each side/half of round. Divide each of these sections in half and place another marker. See photo.

With an I hook and matching yarn, sl st into a st at one marker. Working through both layers, ch 1, sc 40 sts (10 sts per section), sl st to join. (40sts) Finish off and weave in ends. This is the bottom edge of the monster.

Hair
Rotate the piece to work on the opposite end.
The hair is created by working sts evenly spaced around the top edge. You can divide the top edge just like the bottom edge to make it easier if you would prefer. I did 40 sts, but if you do a few more or a few less that is ok.
Every other stitch is a “long double crochet” st. It is basically the same, you will just be pulling the loop up a little taller so it will be even with the top edge.
With an I hook and black yarn, sl st into the top edge. Ch 1, sc in the same spot. YO and insert your hook further down into the piece, approximately ¼-½” from the top edge, and work one long dc, *sc in the next st, YO and insert your hook further down into the piece, approximately ¼-½” from the top edge, and work one long dc*, repeat to end of round. Finish off and weave in ends.
Eyes
Large Eye – inside (make 1)
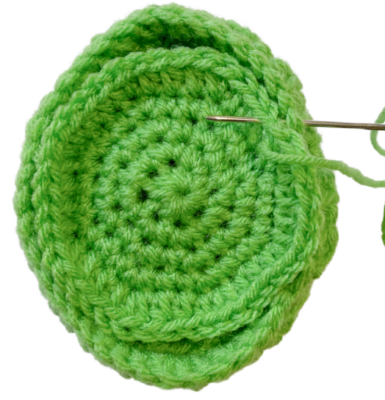
1. With an H hook and ww white yarn, create a magic circle of 6 sc sts (or preferred method for creating a circle of 6 sc sts), pull closed and place a marker for working in the round. (6sts)
2. 2sc in each st to end of round. (12sts)
3. Sc in each to to end of round. Finish off, leaving a long tail for sewing to outside of eye. Set aside.
Large Eye – outside (make 1)
1. With an H hook and ww yarn (green in sample to match the base piece), create a magic circle of 6 sc sts (or preferred method for creating a circle of 6 sc sts), pull closed and place a marker for working in the round. (6sts)
2. 2sc in each st to end of round. (12sts)
3. *sc, 2sc in next st*, repeat to end of round. (18sts)
4. Sc in next st, hdc2tog, hdc, hdc2tog, hdc, hdc2tog, hdc, sc, sl st. Leave remaining sts unworked. Finish off, leaving a long tail for sewing. Set pieces aside and make the smaller eye.
Small Eye – inside (make 1)
1. With an H hook and ww white yarn, create a magic circle of 5 sc sts (or preferred method for creating a circle of 5 sc sts), pull closed and place a marker for working in the round. (5sts)
2. 2sc in each st to end of round. (10sts)
3. *sc2tog, sc 3*, repeat once. (8sts) Finish off, leaving a long tail for sewing to outside of eye. Set aside.
Small Eye – outside (make 1)
1. With an H hook and ww yarn (green in sample to match the base piece), create a magic circle of 5 sc sts (or preferred method for creating a circle of 5 sc sts), pull closed and place a marker for working in the round. (5sts)
2. 2sc in each st to end of round. (10sts)
3. *sc, 2sc in next st*, repeat to end of round. (15sts)
4. Sc in next st, hdc2tog, hdc, sc, sl st. Leave remaining sts unworked. Finish off, leaving a long tail for sewing.
Eye Assembly
Place white eye pieces inside the matching outside eye pieces, allowing the top part of the outside eye to fold forward. Place a small amount of stuffing between the layers. Using the white yarn tail and yarn needle sew the layers together.
Place eyes on main piece. See sample photos for placement. With a yarn needle and the outside eye’s yarn tail, sew the eyes in place.
With a sewing needle and black thread, sew a button on top of each eye. Note: I like to sew the buttons on AFTER the eye has been sewn to the piece. This way the button will help pull the white part of the eye inward slightly.
Teeth
Add as many teeth as you would like to. I did 2 large and 1 small in my main, green sample.
Larger Tooth (make 2)
1. With an H hook and white yarn, ch 5, sc in 2nd ch from hook and in each ch across. (4sts)
2. Ch 1, turn, sc2tog, sc 2. (3sts)
3. Ch 1, turn, sc2tog, sc. (2sts)
4. Ch 1, turn, sc2tog.
5. Ch 1, turn, sl st in the same st. Finish off and weave in ends.
Smaller Tooth (make 1)
1. With an H hook and white yarn, ch 4, sc in 2nd ch from hook, sc. (3sts)
2. Ch 1, turn, sc2tog, sc. (2sts)
3. Ch 1, turn, sc2tog. (1st)
4. Ch 1, turn, sl st in the same st. Finish off and weave in ends.
Decide where you would like each tooth. Play with them a little and check placement in comparison with the eyes. The top edge of the pocket should overlap the bottom edge of the tooth approximately ¼”.
With a yarn needle and yarn to match the pocket (green in sample), sew the layers together. Make sure to NOT sew this to the main, tall piece.
Optional Finishes
Pouch: This could be made into a pouch by sewing the bottom edges together. Flatten the piece with the face center front. With a yarn needle and matching yarn, sew the bottom layers together. A wire, rope, or braided handle could also be added. (not shown)

Stand Alone Container: A round bottom could be added to create a full container.
Follow the main instructions until piece is complete and set it aside.
1. With an H hook and ww yarn (green in sample to match the base piece), create a magic circle of 8 sc sts (or preferred method for creating a circle of 8 sc sts), pull closed and place a marker for working in the round. (8sts)
2. 2sc in each st to end of round. (16sts)
3. *sc, 2sc in next st*, repeat to end of round. (24sts)
4. *sc 2, 2sc in next st*, repeat to end of round. (32sts)
5. *hdc 3, 2hdc in next st*, repeat to end of round. (40sts)
6. Sc in the next st, sl st in the next st. This lowers the height of the round. Finish off, leaving a long tail for sewing.
Place this piece next to the bottom of the monster, lining up the sts as shown in the photo. With a yarn needle, use the yarn tail from the base circle to sew the layers together.
Pin To Save For Later