

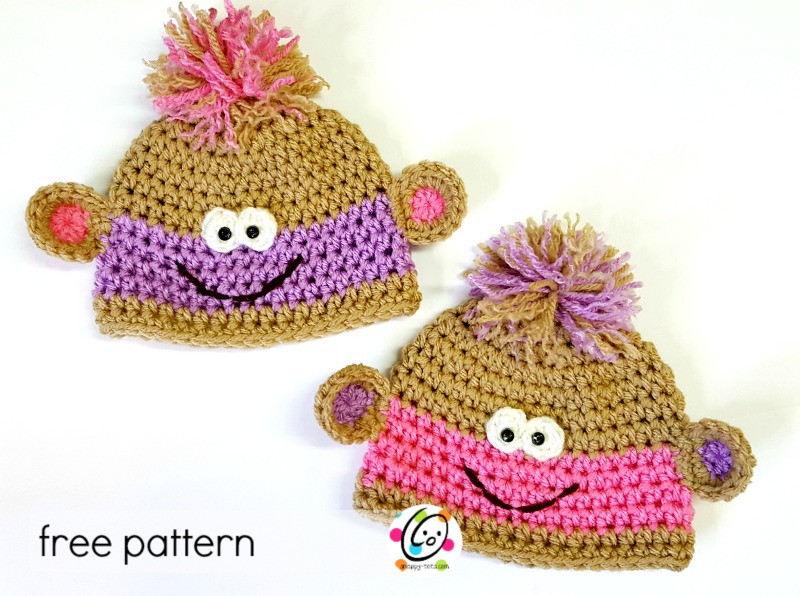
Free Pattern: Twin Baby Monkey Beanies
This past week, I made little monkey beanies for a friend’s newborn twin grandbabies. She wanted hats that match, but not identical. I think they turned out really cute and they loved them!
Twin Baby Monkey Beanies
Save this pattern for later by adding it to your Ravelry favorites: Click Here.
Project Info
- Project Description: A simple and sweet little beanie for newborn babies.
- Skill Level: Basic crochet skills are needed and must be able to read a crochet pattern.
- Completion Time (how long it takes the designer to make one): 1.5 hours
Materials and Details
- Worsted weight yarn: Samples were created with Red Heart Super Saver Perfect Pink, Orchid, White, Coffee and With Love Tan.
- Crochet Hooks: H, I
- Miscellaneous: 2 small black buttons for pupils, sewing needle, black thread, yarn needle
- Gauge: 4” = 11 sts and 7.5 rounds
- Finished size: 5″ tall x 6″ across (measured flat)
Instructions
- With an I hook and tan yarn, start with a magic circle of 8 sts (or preferred method for starting a circle of 8 sc sts), pull closed and sl st to join. (8sts)
- Ch 2, 2hdc in each st to end of round, sl st to join. (16sts) 1.5″ across
- Ch 2, hdc in same st, 2hdc in next st, *hdc, 2hdc in next st*, repeat to end of round, sl st to join. (24sts) 2.25″ across
-
Ch 2, hdc in same st, hdc, 2hdc in next st, *hdc 2, 2hdc in next st*, repeat to end of round, sl st to join. (32sts) almost 3″ across
5. Ch 2, hdc in same st, hdc 2, 2hdc in next st, *hdc 3, 2hdc in next st*, repeat to end of round, sl st to join. (40sts) almost 4″ across
6-8. Ch 2, hdc in each st to end of round, sl st to join.
- Change to color for wide stripe (pink or lavender in samples). Ch 2, hdc in each st to end of round, sl st to join.
10-12. Ch 2, hdc in each st to end of round, sl st to join.
- Change to tan yarn. Ch 2, hdc in each st to end of round, sl st to join.
-
Ch 1, sc in each st to end of round, sl st to join. Finish off and weave in ends.
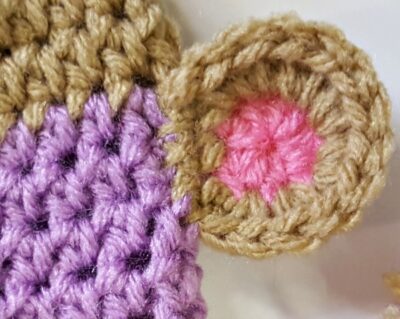
Ears (make 2)
- With an I hook and color for center of ear (pink or lavender), start with a magic circle of 8 hdc sts (or preferred method for starting a circle of 8 hdc sts), pull closed and sl st to join. (8sts)
-
Change to tan yarn. Ch 2, 2hdc in the same st, 2hdc in each of the next 5 sts, sc 2, sl st to join. (16sts) Finish off, leaving a tail for sewing to hat.
Lay hat on a flat surface to find placement for the ears. With yarn needle and yarn tail, sew one edge of the ear (the sc sts) to the hat as shown in the photo below.
Pompom/Hair: Hold one strand of tan yarn and one strand of contrasting yarn (pink or lavender in samples) and wrap around the palm of your hand 10 times, depending on desired thickness of pom. Carefully slide the yarn off your hand and wrap an 8” length of yarn around the center, pulling tight and knotting to hold in place. Do NOT cut this piece of yarn. Pull each end through two stitches at top of beanie. Firmly tie a knot next to the top of the beanie. Trim pompom as desired. A piece of cardboard or pompom maker may also be used.
Frizzy Hair: I like to pull apart a few of the strands of the pompom for a softer, frizzy look.

I think they look cute like this too! Either stop here or add a face.
Face
Eyes (make 2):
1. With an H hook and white yarn, start with a magic circle of 4 sts (or preferred method for creating a circle of 4 sc sts), pull closed and place a marker for working in the round. (4sts)
2. 2sc in each st to end of round. Finish off, leaving a tail for sewing in place. (8sts) With a yarn needle and yarn tails, sew eyes in place. With a sewing needle and thread, sew a black button to each white eye piece.
Smile: With a yarn needle and brown yarn stitch the smile in place.
I hope you enjoyed making this quick and easy project. I would love to see your creations. Please add your project to Ravelry and/or share online and include #snappytots.
Thanks for crocheting with me!
~ Heidi


