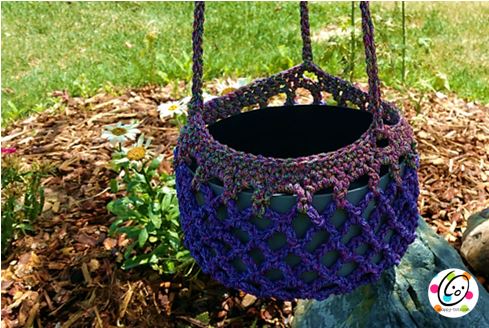
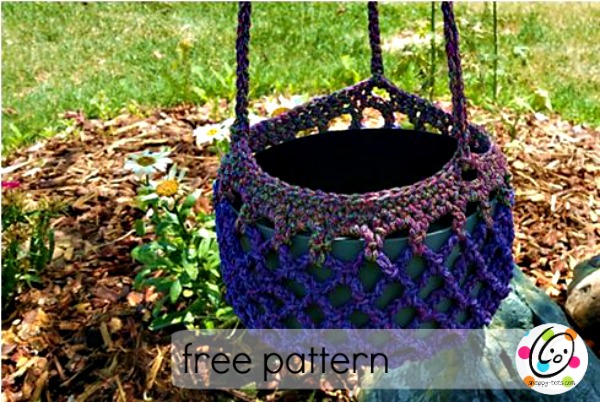
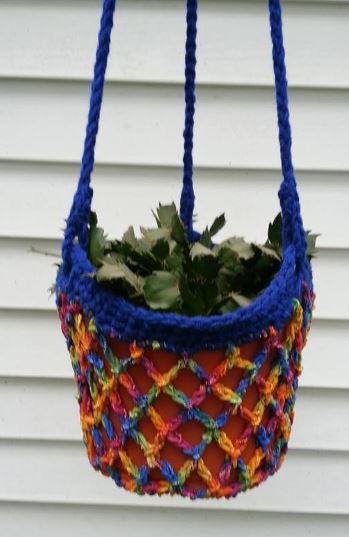
Free Pattern: Plant Holder
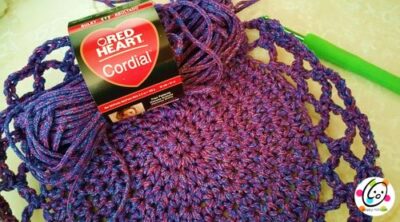
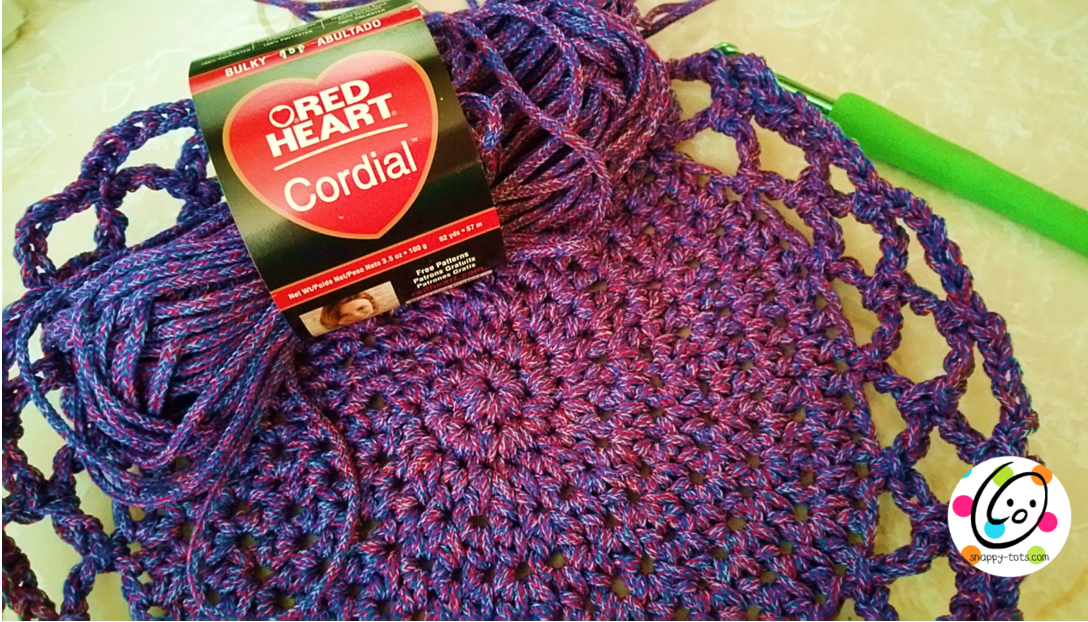
Red Heart sent me some of their new cordial yarn and I wanted to make something I could use in my yard. I decided on a pot hanger (hence the super original name of my pattern).
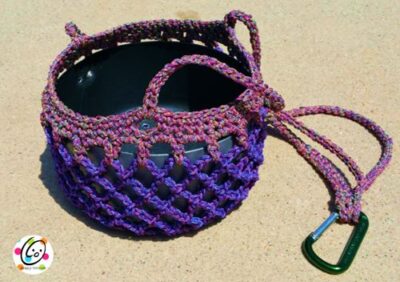
The hanger can slip over a carabiner (clip that opens) or something similar. I wanted to be able to clip it to things other than open hooks. I really enjoyed using the yarn. The pattern can also be made from other bulky weight yarns, light weight rope, jute. See sample made with Red Heart Reflective yarn below.

Unfortunately some of the yarns used in the samples are no longer available. Luckily, this could be made from almost any bulky weight yarn.
Similar Patterns You Might Enjoy
Pot Hanger Crochet Pattern
The crochet pattern is available for free. You can also purchase a downloadable, ad-free pdf for a small fee: Ravelry | Etsy
Materials Yarn: Bulky Weight Samples were made in the following yarns:
Purple – Red Heart Cordial yarn; Black – Red Heart Reflective yarn
Crochet Hook: K (6.5mm)
Miscellaneous: yarn needle, pot, carabiner (or similar item that opens), 40” of ribbon (optional for non-hanger variation)
Holder Section (similar to a mesh bag)
1. With k hook and yarn color of choice, start with a magic circle of 8 sts (or preferred method for starting a circle of 8 sc sts), pull closed and place marker for working in the round. (8sts)
2. 2sc in each st to end of round, sl st to join. (16sts)
3. *hdc, 2hdc in next st*, repeat to end of round. (24sts)
4. *hdc 2, 2hdc in next st*, repeat to end of round. (32sts)
5. *hdc 3, 2hdc in next st*, repeat to end of round. (40sts)
6. *hdc 4, 2hdc in next st*, repeat to end of round. (48sts)
7. *hdc 5, 2hdc in next st*, repeat to end of round. (56sts)
8. Be aware of amount of stitches in this repeat as it changes from 5 to 7. *hdc 7, 2hdc in next st*, repeat to end of round, sl st to join. (63sts)
9. Sc, sl st. This is new beginning of the round. *ch 5, sk 2, sl st in next st*, repeat to end of round, working last sl st in first space created.
10. *ch 5, sl st in next space*, repeat until sides (open weave) is one inch shorter than desired height. Depending on yarn, the sides might stretch slightly. (21 spaces/loops)
Notes about sample: I repeated round #10 four times, changed yarn color and worked one more round of #10. Follow directions below to finish.
11. Ch 1, 2sc in same loop, 3sc in each loop to end of round, sl st to join. (63sts)
12. This step creates the 3 openings for the hanger. Skip to “non hanger” variation on page 4 if desired. Ch 1, sc in same st and next 18 sts, ch 3, sk 2, *sc 19, ch 3, sk 2*, repeat to end of round, sl st to join.
13. Ch 1, sc in each st to end of round, working 3sc in each hanger opening, sl st to join. Finish off and weave in ends. Set aside.
Hanger
This is made with loops at the end of each of the three hanger straps to slip over a carabiner hook or something similar that opens.
With K hook and matching yarn, *ch 6, sl st in first ch to create a loop, ch 60, sl st in 2nd ch from hook and in each ch across*, repeat for a total of 3 straps. Finish off and weave in ends.
Lay hanger piece on a flat surface and make sure it is not twisted. Pull one end through a hanger opening on the top edge of the holder. Fold end of hanger piece back against itself. With matching yarn and yarn needle sew layers together, approximately 2” from end.
Repeat for all three hanger pieces, making sure straps are not twisted or hanging weird.

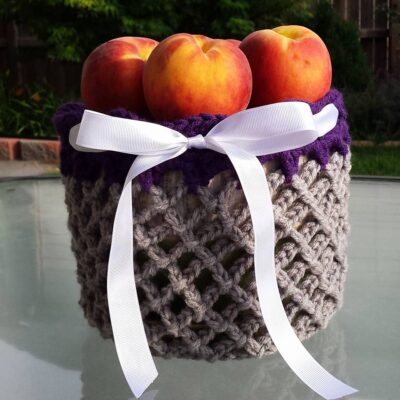
Basket/Non Hanger Variation
This is cute sitting on a table too. Follow steps 1-11 above and then finish below.
12. This step creates openings for a drawstring/ribbon around the brim to keep the holder in place around the pot. Ch 1, sc in same st and next 3 sts, ch 3, sk 2, *sc 4, ch 3, sk 2*, repeat to end of round, sl st to join.
13. Ch 1, sc in each st to end of round, working 3sc in each opening, sl st to join. Finish off and weave in ends. Put pot inside holder.
Thread a 40” piece of ribbon or similar item in and out of the openings. Pull snug to cinch holder around top edge of pot. Tie a bow. Cut ends if needed.
Thanks to Lisa of LMH Creates for sharing this photo of her non-hanging sample.

How to Turn a Cooking Pot Into a Plant Holder
I used an 8” saucepan! A larger pot would work too. Just make the sides of the holder longer.
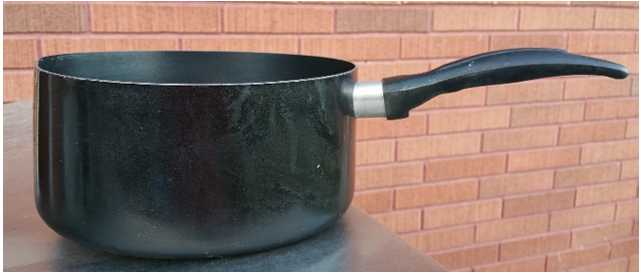
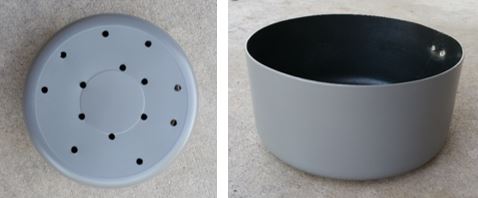
Find a saucepan (I had one I had dropped and dented…oops…or find one at a thrift store), approximately 8” across. Remove the handle. It’s ok if it leaves holes in the side. You won’t see them.
Drill 12-16, ¼” holes in the bottom. Be careful. The cut areas could be sharp. I then sprayed the outside of the pot with grey spray paint. Use any color. I chose grey to show off the open weave of the hanger.
Variations
PLEASE CLICK THE SHARE BUTTONS BELOW TO SPREAD THE WORD ABOUT THIS FREE PATTERN.
This pattern is copyrighted to snappytots and may not be copied for resale in part or whole. It is illegal to post this pattern online or share with others without written consent from Heidi Yates. Items created from this pattern MAY be sold. Please include a link to snappy-tots.com if selling online.
Visit Snappy Tots on facebook for giveaways, new release announcements, events and fun. If you enjoyed this pattern, please check out the complete line of Snappy patterns.