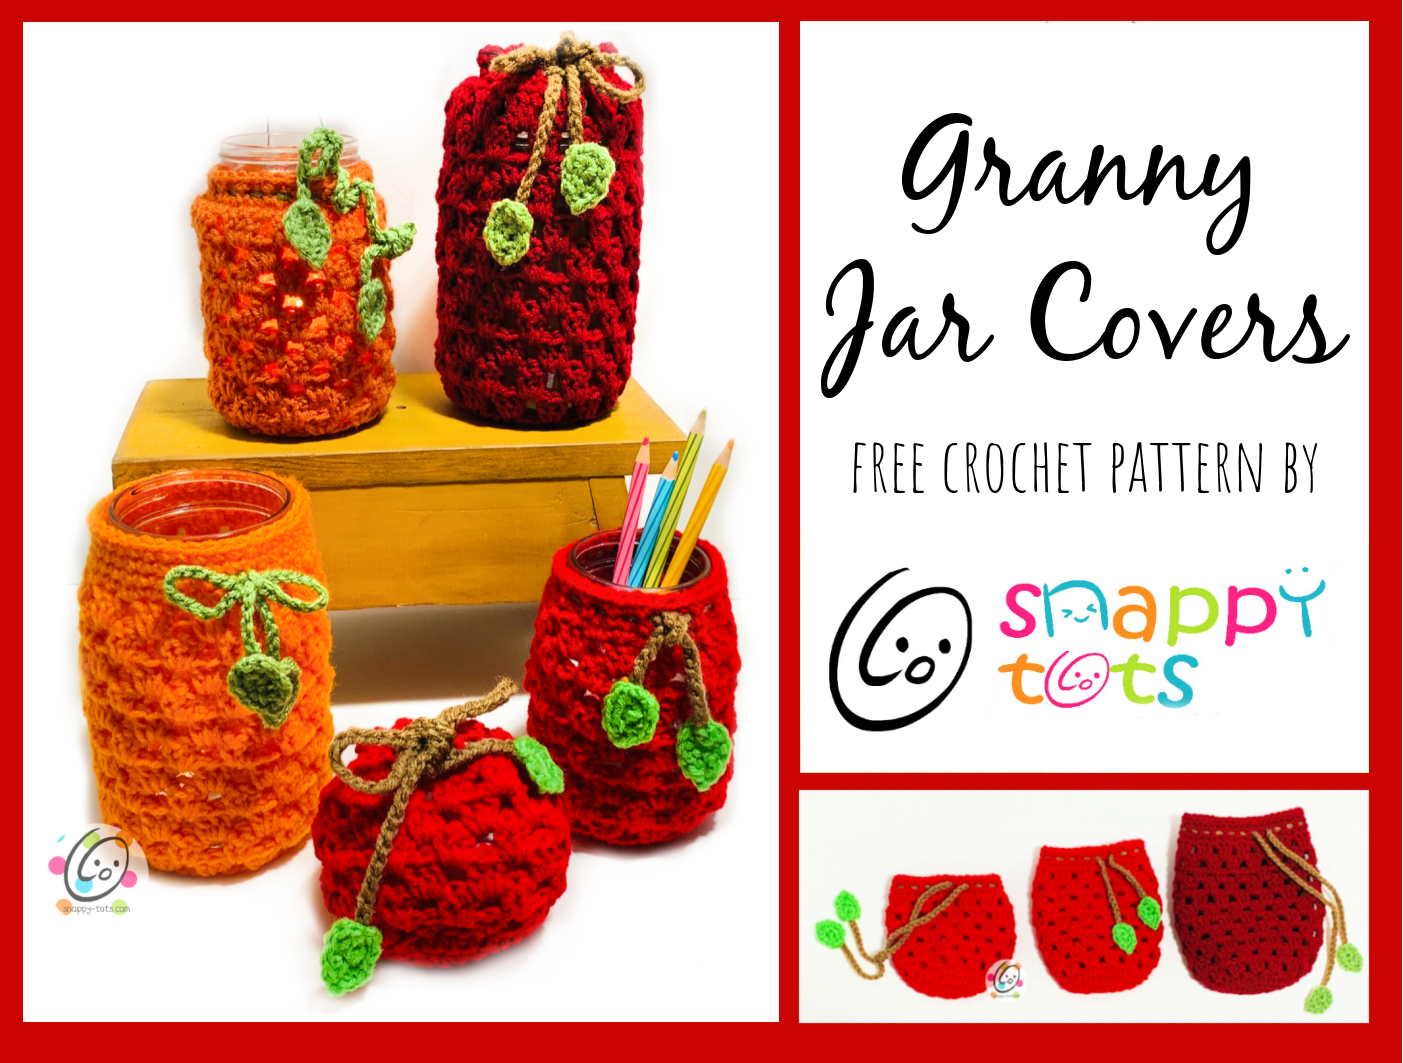
Free Pattern: Granny Jar Covers
So many things can fit in a jar and they make great containers. We did a bunch of these for a gift event and people really enjoyed them. They are cute for fall and could be for year round too. They also make great bags without the jar.
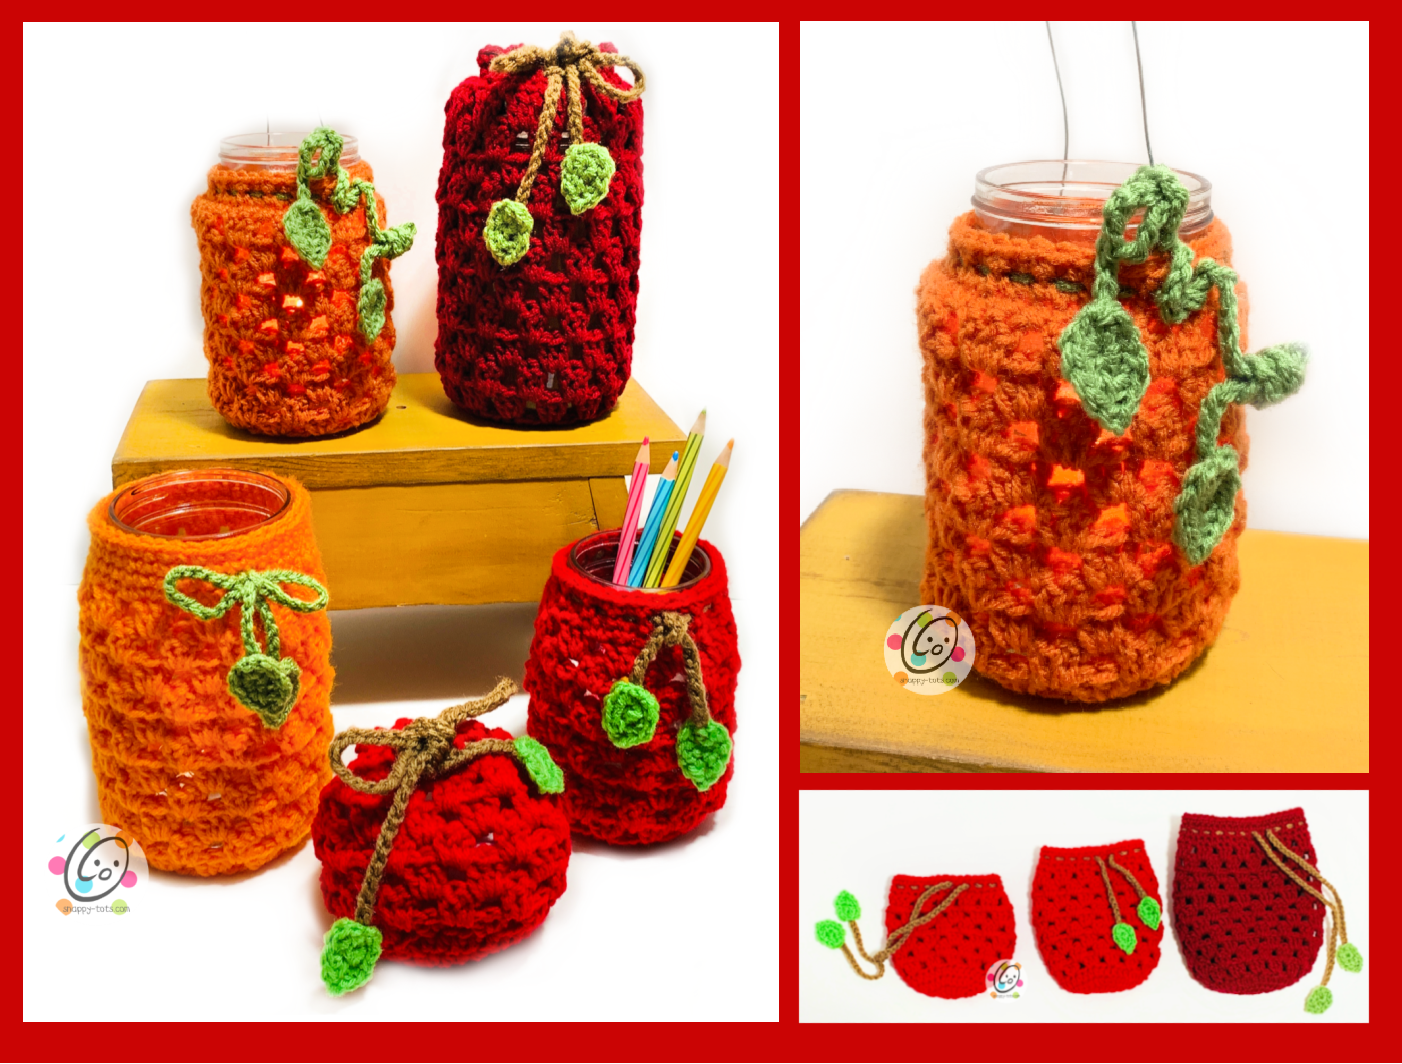
Granny Jar Covers Crochet Patterns
This pattern is available to view here on the blog. An ad-free, downloadable pdf is also available to purchase: Ravelry
Materials and Details
- Yarn: 75-100 yards worsted weight yarn in color(s) of choice
- Crochet Hook: H (5mm)
- Miscellaneous: yarn needle, glass jar
- Optional: Wire for hanger, scissors, tape measure
- Sizes: Pint, Quart, Custom
- Gauge: not needed for this project
Tips
- The number at the beginning of each line refers to the step and not the number of rows.
- Stitch counts remain the same unless noted at end of row.
- Substitute colors as desired.
Jar Size
I have included instructions for making a cover to fit pint jars, quart jars and how to customize those to fit any misfit, “cute” jars.
I have used the middle jar below for many luminary covers, always assuming it was a pint size.
I needed a few more jars for this project and picked some up at the store. When I got home, I was surprised to find out that “cute” jar has been tricking me all along!
Thanks to helpful friends, it was determined to probably be a mayo jar. Whatever it is, I really like that size. If you have an odd sized jar, use the pattern closest in size (pint or quart) and follow the instructions for customizing it to fit.

Pint
6.25” long x 5.5” across
1. With an H hook and ww yarn, start with a magic circle of 8 sc sts (or preferred method for creating a circle of 8 sc sts), pull closed and place a marker for working in the round. (8sts)
2. 2sc in each st to end of round. (16sts)
3. *hdc, 2hdc in next st*, repeat to end of round. (24sts)
4. *hdc 2, 2hdc in next st*, repeat to end of round. (32sts)
5. *hdc 7, 2hdc in next st*, repeat to end of round. (36sts)
6. Sc in next st, sl st in next st. This is to shorten the round height. This is now the beginning of the round. Ch 2 (counts as a st for the cluster rounds), 2dc in same st, sk 2, *3dc in next st, sk 2*, repeat to end of round, sl st in top of beginning ch to join.
Note: If you would prefer to start with a ch 3 please do so.
7. Ch 2, 2dc in the space below, 3dc in each space between clusters from previous round, sl st in top of beginning ch to join. (36sts)
8. Ch 2, TURN, 2dc in the space below, 3dc in each space between clusters from previous round, sl st in top of beginning ch to join.
9. Repeat previous round for an additional 6 rounds (9 cluster rounds in total).
Customization Options
- Cinched over top: As written, this will extend past the top of a pint size jar approximately 1”. This option is great if a drawstring at the top is desired to cinch in the cover.
- Even with top: If you would like the jar cover to be even with the top of the jar, eliminate one round of clusters, working 8 in total. A drawstring can still be added to this option for decoration.
- “Cute” jar: If your jar is not a true pint size, work 5 rounds (7 cluster rounds in total). Slip the cover over the jar and determine how many more cluster rounds are needed. There is a 1” band at the top after the cluster rounds.
10. This step starts a band of sc sts at the top of the cover. If you adjusted the amount of cluster rounds you might need to turn to work from the right side/outside of the piece again. As written you should not need to turn the piece.
Ch 1, *sc 2, sc in space between clusters*, repeat to end of round, sl st in first st to join.
11-12. Ch 1, sc in each st to end of round, sl st to join.
Finish off and weave in ends.
Drawstring/Bow and Leaves (optional)
Bow Only (tied to the cover, not threaded around): With an H hook and yarn (brown or green), ch 61. Finish off and secure yarn tails by weaving into the chain or tying a small knot in each end.
Drawstring: With an H hook and yarn (brown or green), ch 101. Finish off, leaving a short yarn tail in the end.
With a yarn needle, use the yarn tail from one end to weave the drawstring in and out of the stitches between two of the sc rounds at the top of the cover.
After drawstring has been threaded through the cover, secure yarn tails by weaving into the chain or tying a small knot in each end.
Leaves (make 2)
1. With an H hook and green yarn, start with a magic circle of 8 sc sts (or preferred method for creating a circle of 8 sc sts), pull closed and place a marker for working in the round. (8sts)
2. (sc, hdc) in next st, ch 2, sl st in 2nd ch from hook, (hdc, sc) in next st, sl st 4. Finish off, leaving a yarn tail for sewing leaf to drawstring.
With a yarn needle, use the yarn tail from one leaf to sew the rounded edge to one end of the drawstring. Repeat for second leaf and opposite end of drawstring.
Quart
7.5” long x 6.5” across
1. With an H hook and ww yarn, start with a magic circle of 8 sc sts (or preferred method for creating a circle of 8 sc sts), pull closed and place a marker for working in the round. (8sts)
2. 2sc in each st to end of round. (16sts)
3. *hdc, 2hdc in next st*, repeat to end of round. (24sts)
4. *hdc 2, 2hdc in next st*, repeat to end of round. (32sts)
5. Hdc 2, *2hdc in next st, hdc 2*, repeat to end of round. (42sts)
6. Sc in next st, sl st in next st. This is to shorten the round height. This is now the beginning of the round. Ch 2 (counts as a st for the cluster rounds), 2dc in same st, sk 2, *3dc in next st, sk 2*, repeat to end of round, sl st in top of beginning ch to join.
Note: If you would prefer to start with a ch 3 please do so.
7. Ch 2, 2dc in the space below, 3dc in each space between clusters from previous round, sl st in top of beginning ch to join. (42sts)
8. Ch 2, TURN, 2dc in the space below, 3dc in each space between clusters from previous round, sl st in top of beginning ch to join.
9. Repeat previous round for an additional 9 rounds (12 cluster rounds in total).
Customization Options
- Cinched over top: As written, this will extend past the top of a pint size jar approximately 1”. This option is great if a drawstring at the top is desired to cinch in the cover.
- Even with top: If you would like the jar cover to be even with the top of the jar, eliminate one round of clusters, working 8 in total. A drawstring can still be added to this option for decoration.
- “Cute” jar: If your jar is not a true pint size, work 5 rounds (7 cluster rounds in total). Slip the cover over the jar and determine how many more cluster rounds are needed. There is a 1” band at the top after the cluster rounds.
10. This step starts a band of sc sts at the top of the cover. If you adjusted the amount of cluster rounds you might need to turn to work from the right side/outside of the piece again. As written you should not need to turn the piece.
Ch 1, *sc 2, sc in space between clusters*, repeat to end of round, sl st in first st to join.
11-12. Ch 1, sc in each st to end of round, sl st to join.
Finish off and weave in ends.
Drawstring/Bow and Leaves (optional)
Bow Only (tied to the cover, not threaded around): With an H hook and yarn (brown or green), ch 61. Finish off and secure yarn tails by weaving into the chain or tying a small knot in each end.
Drawstring: With an H hook and yarn (brown or green), ch 111. Finish off, leaving a short yarn tail in the end.
With a yarn needle, use the yarn tail from one end to weave the drawstring in and out of the stitches between two of the sc rounds at the top of the cover.
After drawstring has been threaded through the cover, secure yarn tails by weaving into the chain or tying a small knot in each end.
Leaves (make 2)
1. With an H hook and green yarn, start with a magic circle of 8 sc sts (or preferred method for creating a circle of 8 sc sts), pull closed and place a marker for working in the round. (8sts)
2. (sc, hdc) in next st, ch 2, sl st in 2nd ch from hook, (hdc, sc) in next st, sl st 4. Finish off, leaving a yarn tail for sewing leaf to drawstring.
With a yarn needle, use the yarn tail from one leaf to sew the rounded edge to one end of the drawstring. Repeat for second leaf and opposite end of drawstring.
Pin To Save For Later