

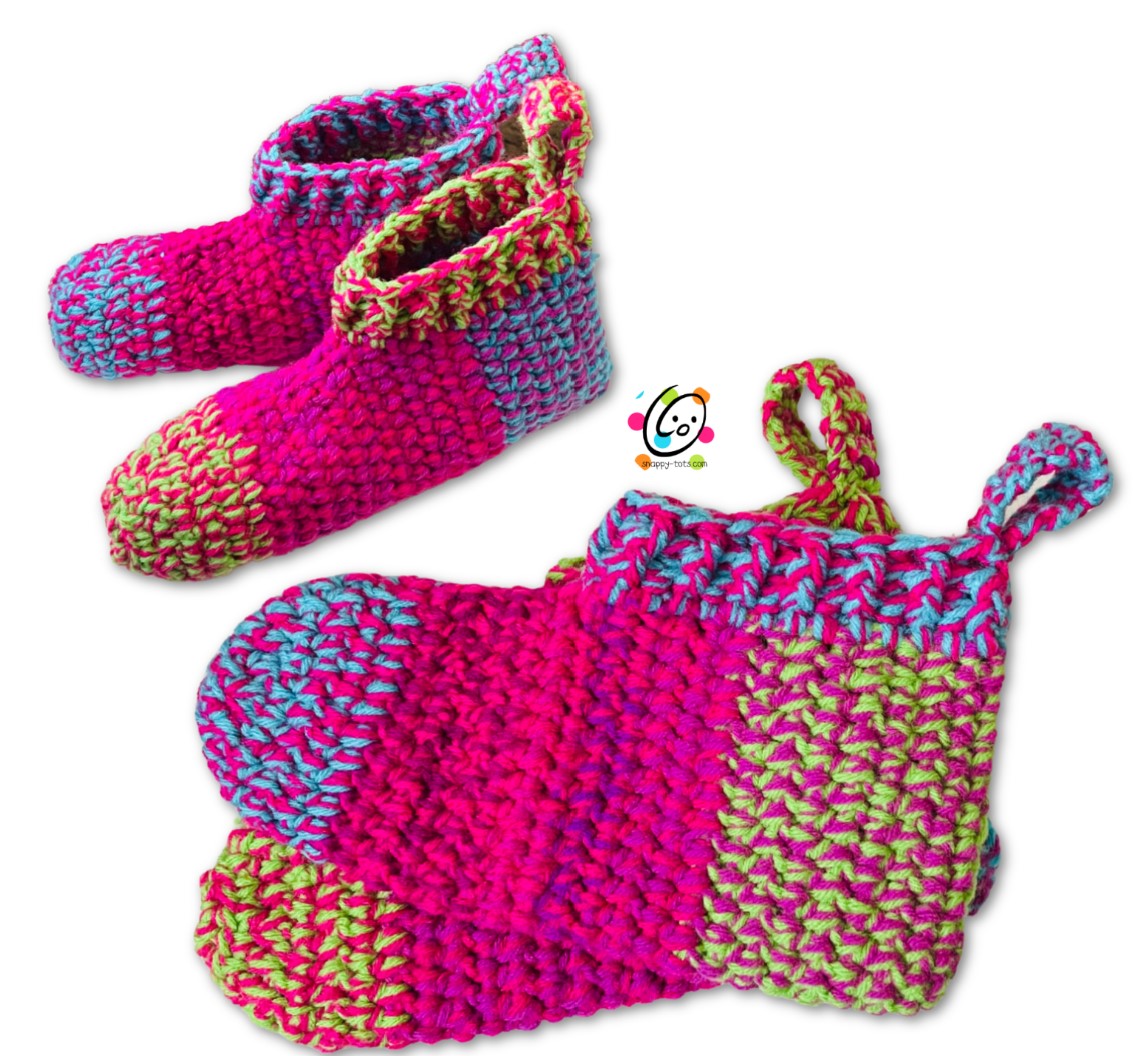
Free Pattern: Wild and Crazy Slipper Boots
Slippers make a great gift for so many occasions, especially ones that are quick and easy to whip up in many sizes. I designed these boots to fit a variety of people. I hope you will enjoy making them. They fit great in my gift bag too.
Wild & Crazy Slipper Boots Pattern
The pattern for this project is available for free below. An ad-free, downloadable PDF that includes all of the photos and instructions is available for in my Ravelry Shop: Click HERE
“Make Ahead Monday” project. Get this pattern FREE for a limited time: CLICK HERE to download the pdf of this pattern for free until 10/1/23 with coupon code: makeahead Make sure you enter the coupon code and it changes to free BEFORE checking out.
Materials
- Yarn: 220 yards worsted weight yarn
Sample Yarn: RHSS Shocking Pink, Turqua, Spring Green; Loops & Threads Impeccable Rich Orchid
- Miscellaneous: Yarn needle, measuring tape
- Crochet Hook: J (6mm)
Details
- Sizes: Child Large (Shoe sizes 1-4), Teen/Womens (Shoe sizes 4 and up), Mens (Shoe sizes 6 and up)/Women’s Large (Shoe Sizes 8 and up (use this size for women’s wide width)
- Gauge: 4 inches = 10 rows, 11.5 hdc sts
Tips
- First stitch of each row is worked into the same stitch as the turning chain unless noted.
- Numbers at the beginning of each line may refer to steps and not indicate number of rows.
- Pattern is worked from heel to toe. Change colors as desired.
- The slipper is worked FLAT and then edges sewn together to create the slipper.
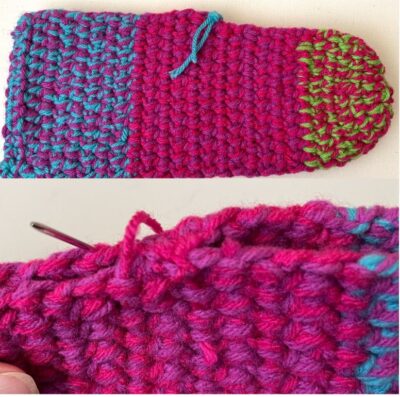
- Construction photos available at end of pattern.
- Colors: I carried one yarn throughout the entire slipper. I changed the second strand for the heel, middle, and toe sections.
Child Large
Shoe sizes 1- 4.
Make 2
1. Leave a yarn tail in the beginning for sewing heel when complete. With a J hook and two strands worsted weight yarn, ch 25, sc in 2nd ch from hook and in each ch across. (24sts) See note under “tips” on page 2 about yarn colors.
2. Ch 1, turn, hdc in the same st and in each st across.
3. From this point on, work each hdc between the posts of the previous row instead of in the stitch. This is done by inserting the hook just below the stitch. Make sure the st count remains the same unless noted at the end of the row.
Ch 1, turn, hdc between each post to the end of the row.
4. Repeat the previous row for an additional 3 rows.
5. Change one of the yarn strands to a different color for the middle section of the slipper. Ch 1, turn, hdc between each post to the end of the row.
6. Repeat the previous row for an additional 4 rows.
7. Ch 1, turn, hdc2tog, hdc between each post until 2 remain, hdc2tog. (22sts) Mark this row for reference when seaming the slipper.
8. Ch 1, turn, hdc between each post to end of row.
9. Repeat the previous row until the slipper measures 1.5” shorter than measurement for desired size (see chart at end of pattern). Keep track of the number of rows so the second slipper will be the same.
10. Change one of the yarn strands to a different color for the toe section of the slipper. Ch 1, turn, hdc between each post to the end of the row.
11. Repeat the previous row for an additional 2 rows.
12. Ch 1, turn, hdc2tog, hdc 18, hdc2tog.(20sts)
13. Ch 1, turn, *hdc2tog, hdc 3*, repeat to end of row. (16sts)
14. Ch 1, turn, *hdc2tog, hdc 2*, repeat to end of row. Sl st in the first st of the row to work in the round. (12sts)
15. Ch 1, *sc2tog*, repeat to end of round. (6sts) Finish off, leaving a long tail for closing the end.
With a yarn needle, use the yarn tail to weave in and out of the remaining sts. Pull to close the end. Secure the yarn. This is the wrong side of the slipper.
Continue to “finishing instructions”.
Teen/Womens
Shoe Sizes 4 and up.
Make 2
1. Leave a yarn tail in the beginning for sewing heel when complete. With a J hook and 2 strands worsted weight yarn, ch 27, sc in 2nd ch from hook and in each ch across. (26sts) See note under “tips” on page 2 about yarn colors.
2. Ch 1, turn, hdc in the same st and in each st across.
3. From this point on, work each hdc between the posts of the previous row instead of in the stitch. This is done by inserting the hook just below the stitch. Make sure the st count remains the same unless noted at the end of the row.
Ch 1, turn, hdc between each post to the end of the row.
4. Repeat the previous row for an additional 5 rows.
5. Change one of the yarn strands to a different color for the middle section of the slipper. Ch 1, turn, hdc between each post to the end of the row.
6. Repeat the previous row for an additional 5 rows.
7. Ch 1, turn, hdc2tog, hdc between each post until 2 remain, hdc2tog. (24sts) Mark this row for reference when seaming the slipper.
8. Ch 1, turn, hdc between each post to end of row.
9. Repeat the previous row until the slipper measures 1.5” shorter than measurement for desired size (see chart at end of pattern). Keep track of the number of rows so the second slipper will be the same.
10. Change one of the yarn strands to a different color for the toe section of the slipper. Ch 1, turn, hdc between each post to the end of the row.
11. Repeat the previous row for an additional 2 rows.
12. Ch 1, turn, *hdc2tog, hdc 4*, repeat to end of row. (20sts)
13. Ch 1, turn, *hdc2tog, hdc 3*, repeat to end of row. (16sts)
14. Ch 1, turn, hdc2tog, hdc 12, hdc2tog. Sl st in the first st of the row to work in the round. (14sts)
15. Ch 1, *sc2tog*, repeat to end of round. (7sts) Finish off, leaving a long tail for closing the end.
With a yarn needle, use the yarn tail to weave in and out of the remaining sts. Pull to close the end. Secure the yarn. This is the wrong side of the slipper.
Continue to “finishing instructions”.
Men/Women’s Large
Men’s Shoe Sizes 6 and up. Women’s Shoe Sizes 8 and up (use this size for women’s wide width).
Make 2
1. Leave a yarn tail in the beginning for sewing heel when complete. With a J hook and 2 strands worsted weight yarn, ch 29, sc in 2nd ch from hook and in each ch across. (28sts) See note under “tips” on page 2 about yarn colors.
2. Ch 1, turn, hdc in the same st and in each st across.
3. From this point on, work each hdc between the posts of the previous row instead of in the stitch. This is done by inserting the hook just below the stitch. Make sure the st count remains the same unless noted at the end of the row.
Ch 1, turn, hdc between each post to the end of the row.
4. Repeat the previous row for an additional 7 rows.
5. Change one of the yarn strands to a different color for the middle section of the slipper. Ch 1, turn, hdc between each post to the end of the row.
6. Repeat the previous row for an additional 6 rows.
7. Ch 1, turn, hdc2tog, hdc between each post until 2 remain, hdc2tog. (26sts) Mark this row for reference when seaming the slipper.
8. Ch 1, turn, hdc between each post to end of row.
9. Repeat the previous row until the slipper measures 1.5” shorter than measurement for desired size (see chart at end of pattern). Keep track of the number of rows so the second slipper will be the same.
10. Change one of the yarn strands to a different color for the toe section of the slipper. Ch 1, turn, hdc between each post to the end of the row.
11. Repeat the previous row for an additional 2 rows.
12. Ch 1, turn, hdc2tog, hdc 22, hdc2tog. (24sts)
13. Ch 1, turn, *hdc2tog, hdc 4*, repeat to end of row. (20sts)
14. Ch 1, turn, *hdc2tog, hdc 3*, repeat to end of row. Sl st in the first st of the row to work in the round. (16sts)
15. Ch 1, *sc2tog*, repeat to end of round. (8sts) Finish off, leaving a long tail for closing the end.
With a yarn needle, use the yarn tail to weave in and out of the remaining sts. Pull to close the end. Secure the yarn. This is the wrong side of the slipper.
Continue to “finishing instructions”.
Finishing
With the right sides together (after finishing the toe), fold the beginning edge in half to create the heel. With a yarn needle, use the beginning yarn tail to sew the layers of the heel edge together.
Beginning at the row where the marker was placed, use a yarn needle and matching yarn to sew the center seam together. Tip: The best way to keep this seam hidden is to pick up a small amount of yarn on the outer edges of the layers. Sew from the marker towards the toe. Weave in ends.
Turn slipper right side out and finger shape the toe.
Cuffs
All Sizes are created the same way, just with fewer stitches. Stitches are listed by slipper size: child
1. With a J hook, attach 2 strands yarn to the center back of the slipper. Ch 1, hdc 30/32/34 sts around the top edge of the slipper opening, sl st in the first st to join. (30/32/34sts)
2-3. Ch 1, *FPDC around the next post, BPDC around the next post*, repeat to end of round, sl st in the first st to join.
4. Add additional rounds for a taller cuff if desired.
5. This step creates the tab at the back of the heel. Ch 1, sc in the same st, sc 2.
6. Ch 1, turn, sc in the same st, sc 2.
7. Repeat the previous row for an additional 12 rows. Finish off, leaving one yarn strand at least 12” for sewing the tab.
Fold the tab in half, towards the inside of the slipper. With a yarn needle, use the yarn tail to sew the edge of the tab to the top edge of the slipper. Make sure this is secure. Finish off and weave in ends.


