

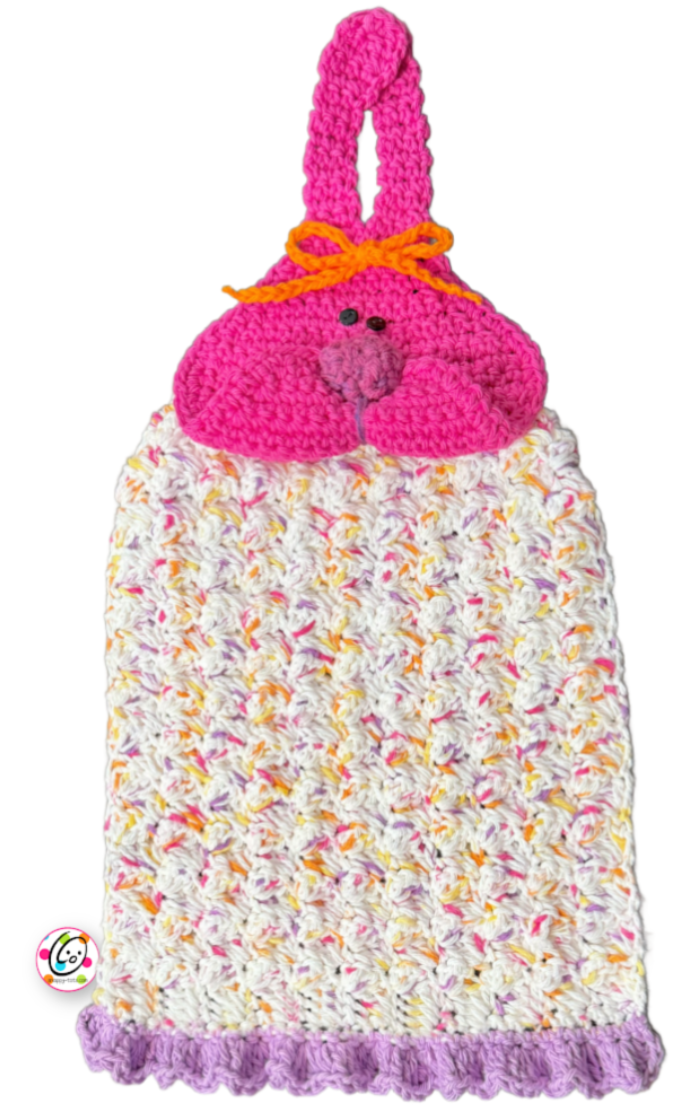
Free Pattern: Hoppy To Dry It Hanging Towel
Seasonal hanging towels have become one of my favorite gifts to make. It is fun seeing them hanging in the kitchens of my family and friends. It is a fun way to add a pop of color and the holidays throughout your home.
Hoppy To Dry It Hanging Towel Crochet Pattern
The pattern is free to follow along below. An ad-free, downloadable version is available to purchase for a small fee from my shops: Ravelry | Etsy
Materials
- Yarn: 100% cotton worsted weight yarn: Main towel color – Bernat Handicrafter Floral Prints 120 yards; Ruffle – Sugar N Cream Orchid 40 yards; Bunny Topper – Sugar N Cream Hot Pink 30 yards pink, small amounts of dark pink
- Crochet Hooks: H (5mm), I (5.5mm)
- Miscellaneous Supplies: Yarn needle, 2 small black buttons, sewing needle, black thread, 1 small sew on snap
Details
- Finished Measurements: 18.5” long x 9.5” wide
- Gauge: not needed for this project
Tips and Variations
- The first stitch of each row is worked into the same stitch as the turning chain.
- Numbers at the beginning of each line may refer to steps and might not indicate the number of rows.
- Instructions are written with color changes as shown in the main sample. Substitute colors as desired.
Towel
- 9.5” wide x desired length. As written, the towel is 18.5” long.
- If this will be used as a towel/cloth, use 100% cotton yarn so it is absorbent.
- This would make a fun lovey for little ones made from regular worsted weight yarn or bernat blanket yarn and a K hook.
- This starts at the bottom edge. The ruffle will be added after towel is complete.
1. With an I hook and worsted weight yarn (Sample: Floral Prints), ch 35, sc in the 2nd ch from hook and in each ch across. (34sts)
2. Ch 1, turn, 3dc in the same st, *sk 2, (sc, 2dc) in the next st*, repeat until 3 sts remain, sk 2, sc in the last st. (34sts)
3. Repeat the previous row until cloth is 11.5” long or desired length.
4. Ch 1, turn, *sc, sc2tog*, repeat until 1 st remains sc. (23sts).
5. Ch 1, turn, *sc, sc2tog*, repeat until 2 sts remain, sc 2. (17sts) Finish off, leaving a long tail.
With a yarn needle, weave the tail in and out of the remaining sts and pull to cinch in the top edge until approximately 6” across the top edge. Secure the yarn and weave in ends. Set aside.
Ruffle
1. This is attached to the beginning edge of the cloth. With an I hook, attach contrasting yarn (Sample: Orchid) to the first st on the bottom edge. Ch 1, sc in the same st and in each st to end of row. (34sts)
2. Ch 2, turn, hdc in the same st, *3dc in the next st, 2hdc in the next st*, repeat until 1 st remains, ch 1, sl st in the last st. Finish off and weave in ends.
Note the difference in the stitches in the repeated section. You should be alternating between dc and hdc sts.
Bunny Head
6.5” wide x 8” long (including ears)
This starts at the bottom edge which will be folded up onto the face when adding the nose.
1. With an H hook and worsted weight yarn (Sample: Pink), ch 11, 2sc in 2nd ch from hook and in each ch across until 1 ch remains, 2sc in the last ch. (12sts)
2. Ch 1, turn, sc in same st and in each st to end of row.
3. Ch 1, turn, 2sc in the same st, sc in each st until 1 st remains, 2sc in the last st. (14sts)
4. Repeat steps 2-3 until there are 22sts.
5. Ch 1, turn, sc in same st and in each st to end of row. (22sts)
6. Repeat previous row for an additional 2 rows.
7. Ch 1, turn, sc2tog, sc in each st until 2 sts remain, sc2tog. (20sts)
8. Repeat previous row until 10sts remain.
9. Ch 1, turn, sc2tog, sc, hdc 4, sc, sc2tog. (8sts)
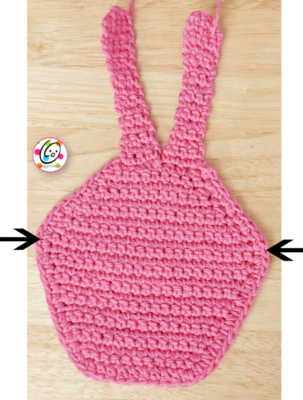
10. This step is worked around the outer edge. Ch 1, sc 8 sts evenly spaced down the side to the widest point (see arrow in photo), 2sc, 2sc, sc 11 sts evenly spaced down the side to the bottom edge. (sc, hdc) in the first st of the bottom edge, hdc 8, (hdc, sc) in the last st, sc 11 sts evenly spaced up the side to the widest point (see arrow in photo), 2sc, 2sc, sc 8 sts up the side to the top edge, sl st in the first st of the top row.
11. This step starts the first ear. Ch 1, sc in the same st, sc 3. Leave remaining sts unworked. Remember this row. The 2nd ear will start in the last empty st of this row. Optional: place a st marker or scrap of yarn in that st for later. (4sts)
12. Ch 1, turn, sc in each st across.
13. Ch 1, turn, sc2tog, sc 2. (3sts)
14. Ch 1, turn, sc 3.
15. Repeat the previous row for an additional 7 rows.
16. Ch 1, turn, 2sc in the same st, sc 2. (3sts)
17. Ch 1, turn, sc 4.
18. Ch 1, turn, 2sc in the same st, sc 3. (5sts)
19. Ch 1, turn, sc2tog, sc 3. (4sts)
20. Ch 1, turn, sc2tog, sc2tog. (2sts) Finish off, leave a long tail for sewing the snap.
21. Flip the head over and star in the first st at the edge of step 11. Ch 1, sc in the same st, sc 3. (4sts)
22. Repeat steps 12-20.
Snaps: Decide which ear will be on top of the other ear. Use an embroidery needle and yarn tail to sew each snap piece to the ears, one piece per ear. Make sure the right side of the snap is pointing up so the snaps will go together.
Nose
1. With an H hook and worsted weight yarn (Sample: Darker Pink), start with a magic circle of 5 hdc sts (or preferred method for creating a circle of 5 hdc sts), pull closed and place a marker for working in the round. (5sts)
2. 2sc in the next st, 3hdc in the next st, 2sc in the next st, 3hdc in the next st, sl st 2. Finish off, leaving a yarn tail for sewing nose to face and creating the mouth and cheeks.
With the right side of the face towards you, fold the bottom edge of the head up 2” to form the cheeks. Allow the “cheeks” to bulge. This piece shouldn’t lay flat against the head. Place the nose on the top, center of the cheeks, overlapping slightly onto the face. Use a yarn needle and the yarn tail from the nose to sew the nose in place. Use the remaining yarn to wrap around the bottom edge and back up through the bottom tip of the nose (see photo below). Pull the yarn snug to cinch the bottom edge up emphasizing two cheeks. Do this step a couple of times.

Eyes: With a sewing needle and black thread, sew two small buttons above the nose for eyes.
Assembly
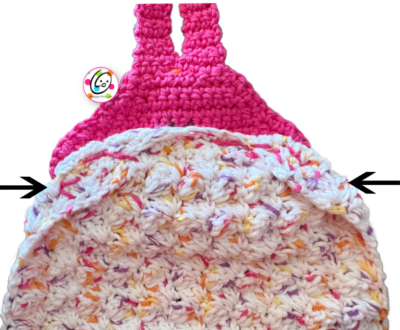
- Flip the towel over. The top corners of the towel have probably bend in as shown in the photo (see arrows). Use matching yarn to sew these corners in place or pin them in place and they will be sewn together when the head is attached.
- Place the towel right side up. Place the bunny head on the towel so the widest parts of the cheeks are even with the top of the towel. Use a yarn needle and yarn to match the head to sew the layers together.
Bow: With an H hook and worsted weight yarn (Sample: Orange) ch 45. Finish off. Tie a knot in each end and trim the ends.
Pull one end of the chain through a st at the bottom of the ears. Tie a bow.
- Shop: http://shop.snappy-tots.com
- Facebook: http://www.facebook.com/snappytots
- Pinterest: http://www.pinterest.com/snappytots
- Instagram: http://www.instagram.com/snappytots
- Twitter: http://www.twitter.com/snappytots
If you have any questions, comments or suggestions please email [email protected].
I hope you will enjoy this pattern and I would love to see what you make. Please share pix as a ravelry project or tag me in social media posts by adding #snappytots.
I hope you have a wonderful day!


