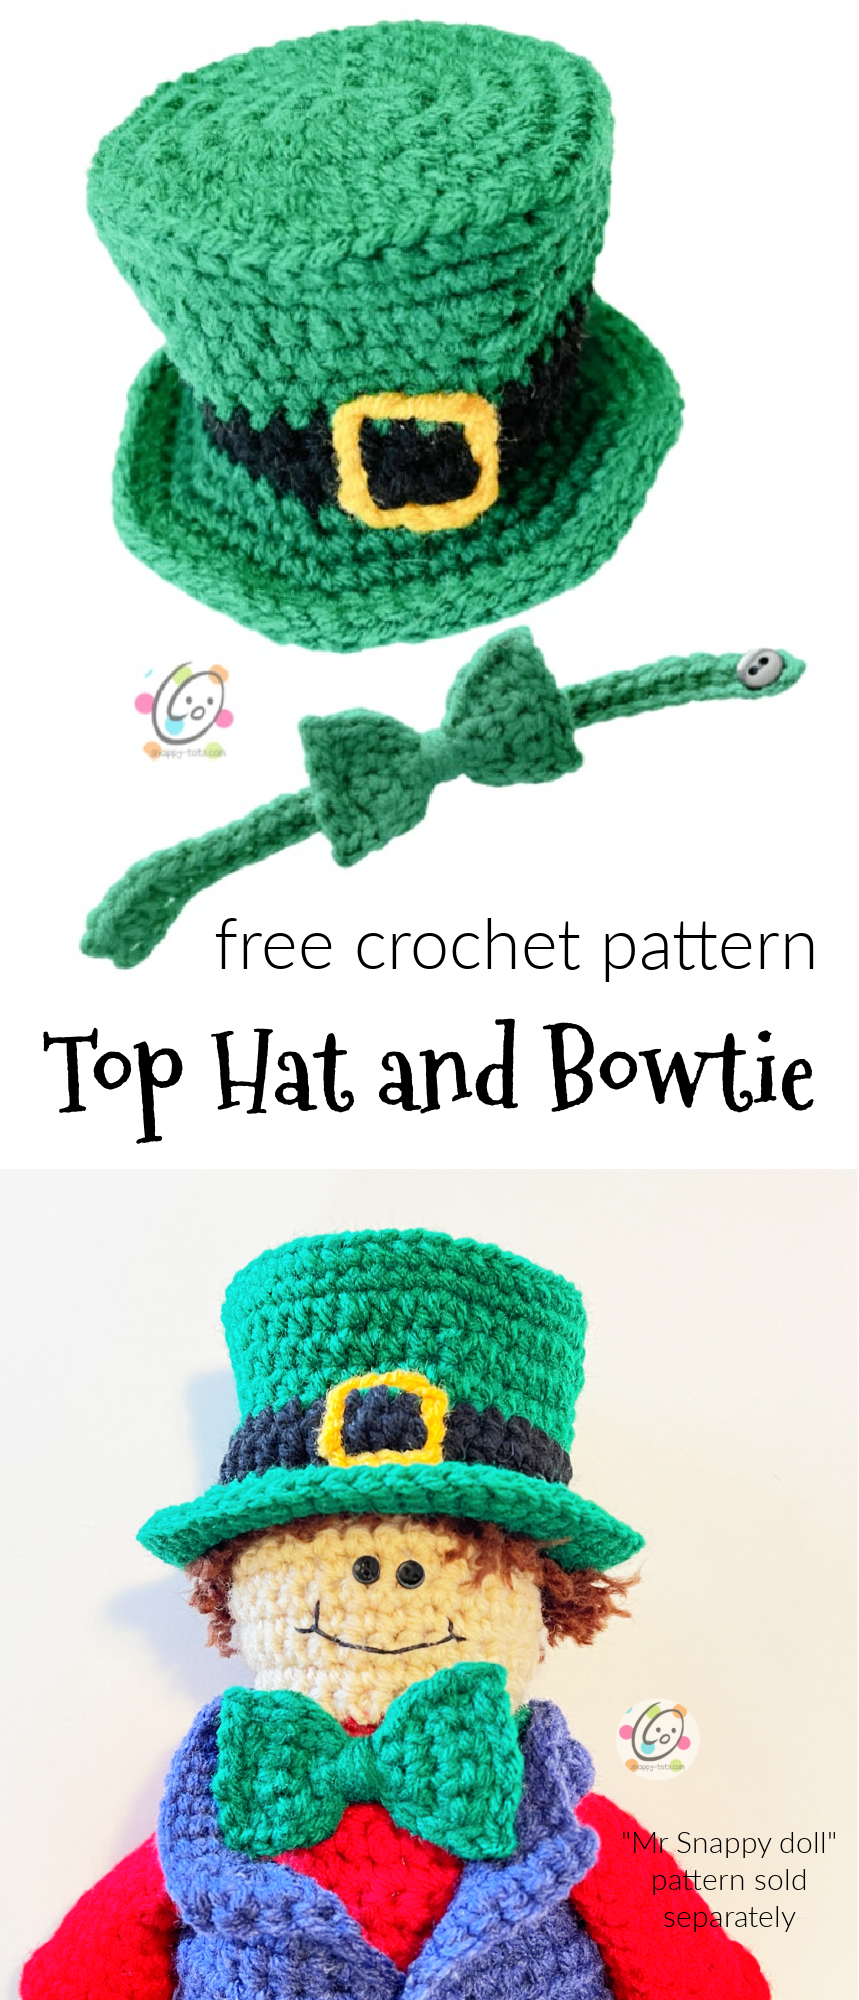
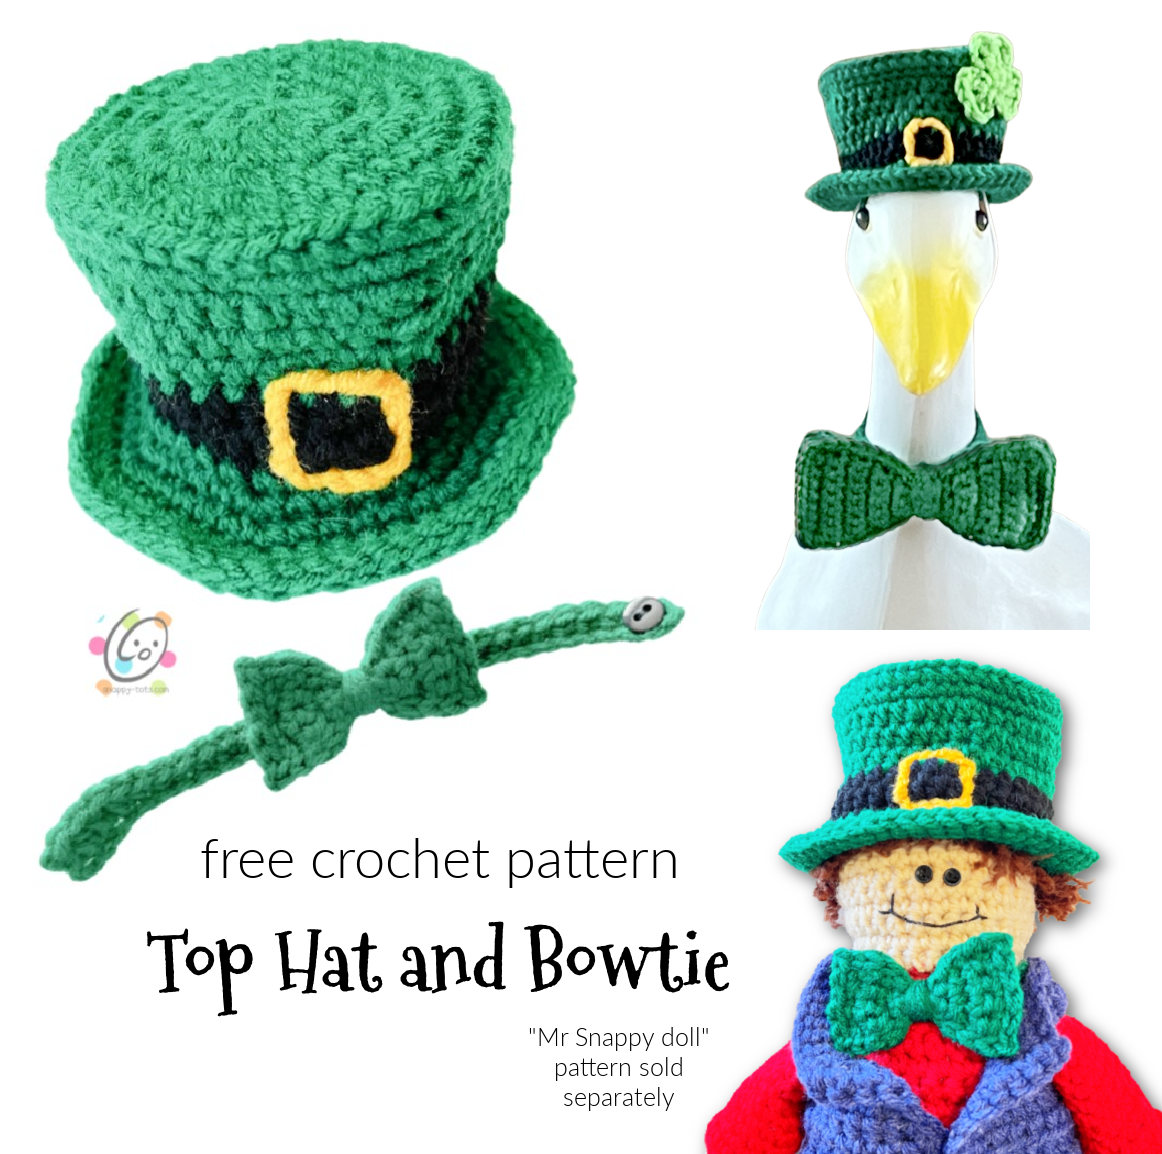
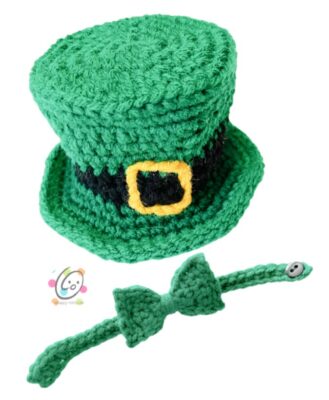
Free Pattern: Mini Top Hat and Bowties
For St. Patrick’s Day I wanted a little top hat and matching bowtie for a special little friend and decoration. I think these will be cute for other celebrations too.
The hat and larger bowtie are for my house goose, Ducke (pronounced Duke… I kept calling him a duck by mistake so my youngest son decided this was a good name for him) and for his cousin Goose (pronounced Goose) that lives at my mom’s house. Aren’t they adorable! I have wanted one to come live at my house since I first saw them years ago while in the midwest. I have never seen them in my area.
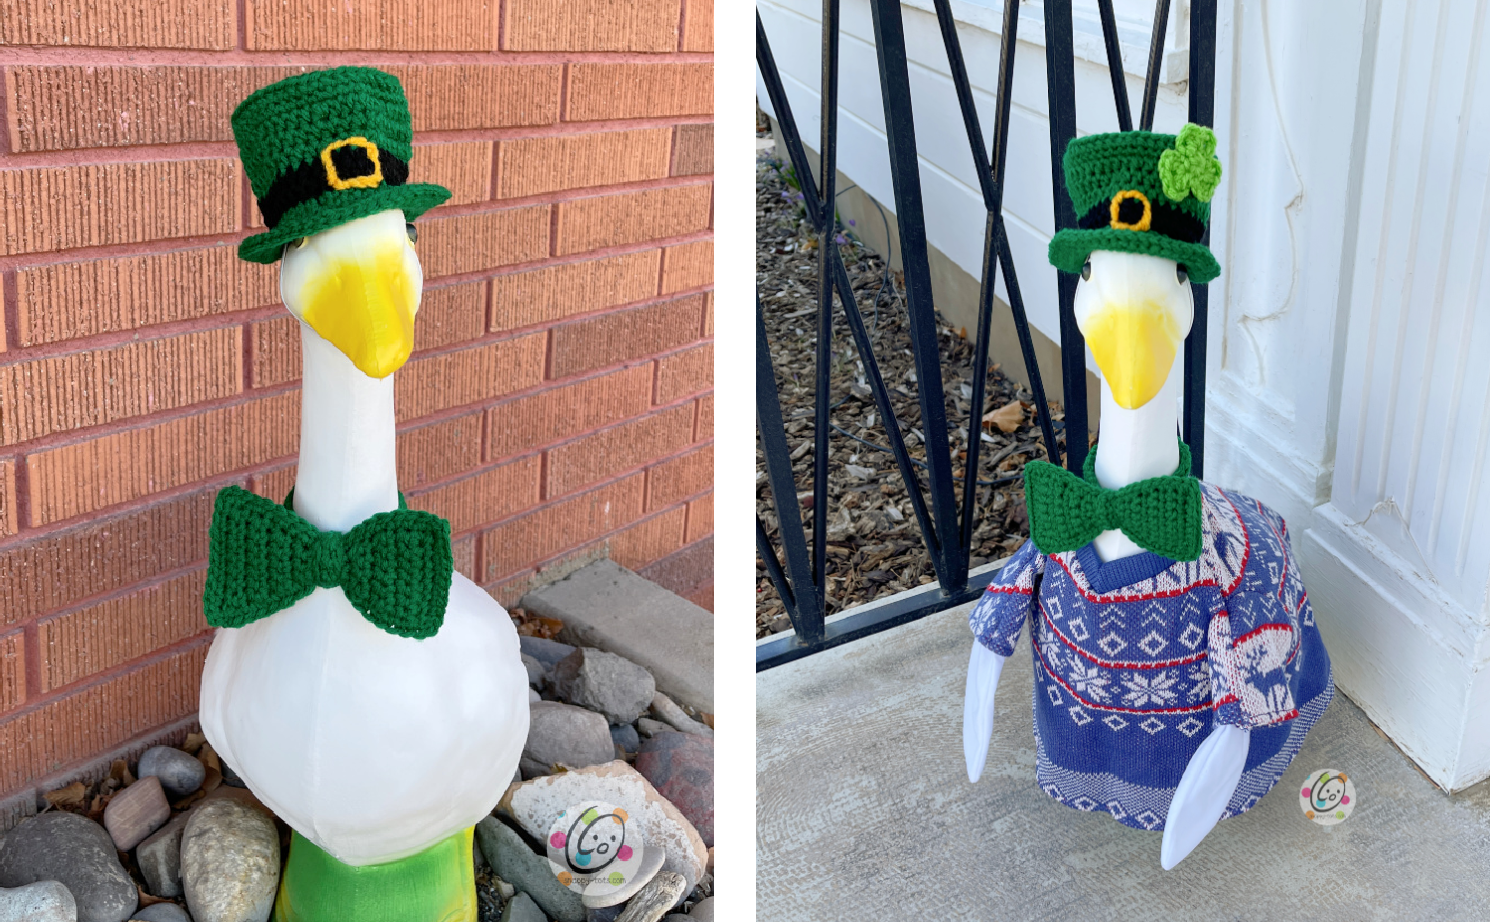
I did a lot of “goose searching” this last summer while traveling because I really hoped to find two cement goose statues. I never found them so I ordered them from Amazon. Since they are plastic (shh, told tell them that), I filled mine with gravel. There is a plug in the bottom.
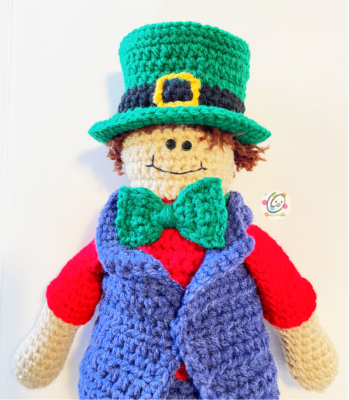
I was super happy to find out that the hat also fits my “Mr. Snappy Doll”! So of course I had to make a little bowtie too.
It is also cute on my stuffed animal.

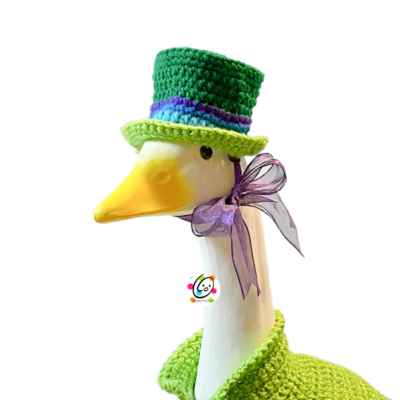
This year I made Ducke a new hat to match a new St. Patrick’s sweater I made him (sweater pattern to be released soon). Instead of the black band, I did a round of sc in Red Heart Super Saver Amethyst, a round of sc in Red Heart Super Saver Pool, and a round of hdc in Red Heart Super Saver Turqua. I thought it would be fun to tie it on with some organza ribbon. He is loving the big bow!
Top Hat and Bowtie Patterns
This crochet pattern is available for free below.
The hat and large bowtie were designed to fit large goose statues. The hat also fits my “Mr. Snappy” doll so I made him a little bow tie so he can have a set too.
These are also cute on store bought stuffed animals.
Materials & Details
- Yarn: Worsted weight. Less than 100 yards Red Heart Super Saver Paddy Green, Black, Spring Green
- Crochet Hook: H (5mm)
- Misc: one button per bowtie (⅜” for small bowtie, ⅝” for large bowtie)
- Measurements:
Hat – 3.5” across opening and top x 2.5” tall
Large Bowtie (fits an 8” neck) – 5. 25” wide x 3” tall
Small Bowtie (fits a 7” neck) – 2.75” wide x 1.5” tall
Tips – Please read before you begin the project.
- The first stitch of each row is worked into the same stitch as the turning chain.
- Numbers at the beginning of each line may refer to steps and not indicate the number of rows.
- Stitch count remains the same unless noted at end of row/round.
- If you have any questions about this pattern please contact [email protected].
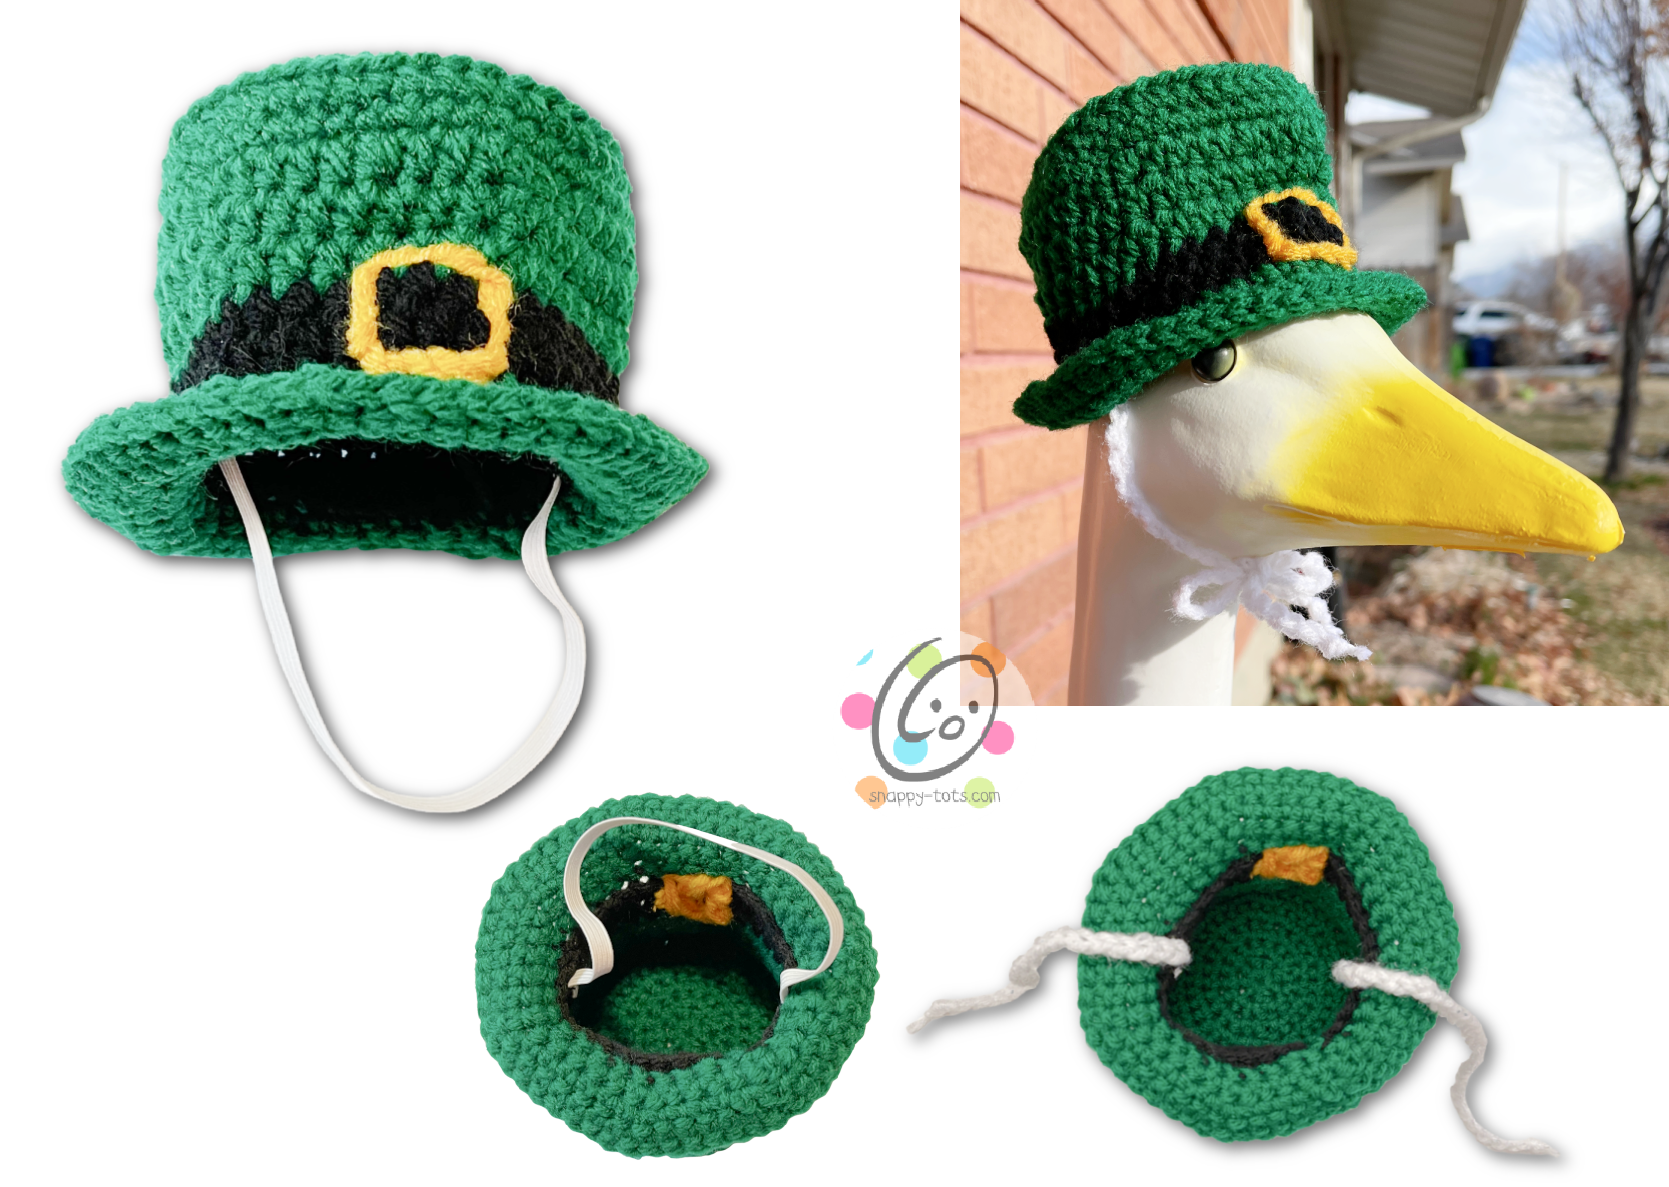
Top Hat
1. With an H hook and worsted weight yarn (Paddy Green in sample), start with a magic circle of 8 sc sts (or preferred method for creating a circle of 8 sc sts), pull closed and sl st in the first st to join. (8sts)
2. Ch 1, 2sc in each st to end of round, sl st in the first st to join. (16sts)
3. Ch 1, *sc, 2sc in the next st*, repeat to end of round, sl st in the first st to join. (24sts)
4. Ch 1, *sc, 2sc in the next st*, repeat to end of round, sl st in the first st to join. (36sts)
5. Ch 1, *sc 5, 2sc in the next st*, repeat to end of round, sl st in the first st to join. (42sts)
6. Ch 1, *sc 6, 2sc in the next st*, repeat to end of round, sl st in the first st to join. (48sts) 3.5” across
7. Work this round in BLO and a little more snug than the previous rounds. Ch 1, sc in each st to end of round, sl st in the first st to join.
8. Ch 1, sc in the same st and in each st to end of round, sl st in the first st to join.
9. Ch 1, *hdc 4, hdc2tog*, repeat to end of round, sl st in the first st to join. (40sts)
10. Ch 1, *hdc 6, hdc2tog*, repeat to end of round, sl st in the first st to join. (35sts)
11. Ch 1, hdc in the same st and in each st to end of round, sl st in the first st to join.
12. Do not cut the main yarn. Change yarn for the hat band (black in the sample). Ch 1, hdc in the same st and in each st to end of round, sl st in the first st to join.
13. Ch 1, hdc in the same st and in each st to end of round, sl st in the first st to join.
14. Finish off the current yarn and change back to the main color. Work this round in FLO. Ch 1, sc in the same st and in each st to end of round, sl st in the first st to join.
15. Ch 1, *sc 4, 2sc in the next st*, repeat to end of round, sl st to join. (42sts)
16. Ch 1, *sc 5, 2sc in the next st*, repeat to end of round, sl st to join. (49sts)
17. Ch 1, *sc 6, 2sc in the next st*, repeat to end of round, sl st to join. (56sts)
18. Make sure the sts of this round is the same tension as before. Do not ch 1. Sl st in each to to end of round. Finish off and weave in ends.
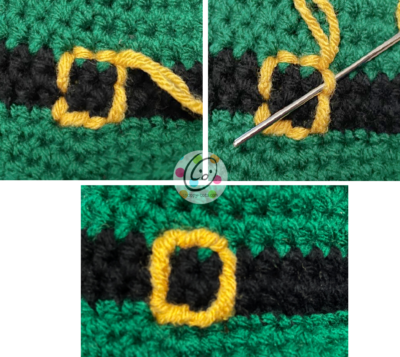
Buckle: Pull a long piece of golden yellow yarn through a yarn needle until the ends match up. Tie a knot.
- Stitch a square around the hatband to create the buckle with this double strand of yarn. Photo below, top left.
- After the square is complete, work on TOP of the hat (not up and down to the inside of the hat), slide the yarn needle under the next st. Photo below, top right.
- Pull the needle through until the yarn is snug. Repeat for each st working around the square. Photo below, bottom.
Shamrock: Measurement: 1.75” across
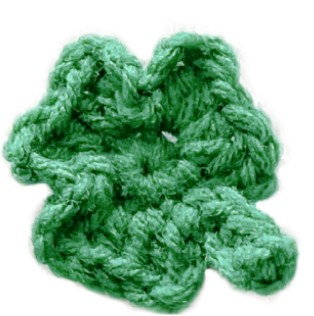
1. With an H hook and ww yarn, start with a magic circle of 6 sc sts (or preferred method for creating a circle of 6 sc sts), pull closed and sl st to join. (6sts)
2. This step creates the stem. Ch 6, sc in the 2nd ch from hook and in each ch across, sl st in same st on the circle.
3. Ch 3, (dc, hdc) in same st, (hdc, dc, ch 3, sl st) in next st, sl st in the next st, *(ch 3, dc, hdc) in the same st, (hdc, dc, ch 3, sl st) in next st*, repeat once. Finish off, leaving a long yarn tail for sewing in place.
Use a yarn needle and yarn tails to sew the center of the shamrock to the hat as desired.
Chin Strap and Tie
At first I attached a 7” long x ¼” piece of white elastic to the inside of the hat. This worked great…. For a short time. The hat kept sliding backwards and the elastic seemed to grow longer. I cut that off and made ties instead.
I have included photos of both options in case you prefer the elastic.
Ties: Fold the hat in half with the buckle in the middle to find the placement for the ties. With an H hook and ww yarn (white to match the duck), attach the yarn to an inside loop (so it doesn’t show on the outside of the hat). Ch 30. Finish off and tie a knot in the end of the chain. Repeat for the opposite side.
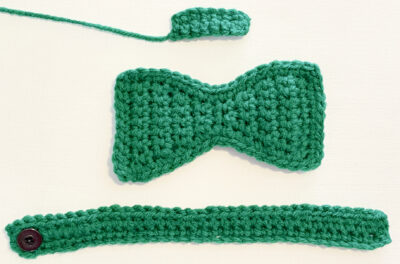
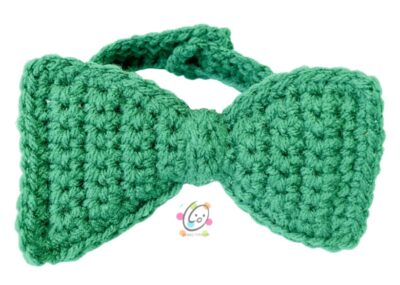
Large Bowtie
Main Bow Piece (make 2)
- With an H hook and ww yarn, ch 9, sc in the 2nd ch from hook and in each ch across. (8sts)
2-3. Ch 1, turn, sc in the same st and in each st across. - Ch 1, turn, sc2tog, sc in each st across. (7sts)
- Repeat previous step until 3 sts remain.
- Ch 1, turn, sc in the same st, sc 2.
- Ch 1, turn, 2sc in the same st, sc in each st across. (4sts)
- Repeat previous step until 8 sts remain.
9-11. Ch 1, turn, sc in the same st and in each st across.
Stack the 2 main bow pieces on top of each other. Work through the sts of both layers around the outer edge for this step.
With an H hook, attach matching yarn to a corner. Ch 1 (sc, hdc, sc) in the same st, sc evenly around the bow piece, working (sc, hdc, sc) in each corner. Sl st in the first st to join. Finish off and weave in ends. Set aside.
Center Piece (make 1)
- With an H hook and ww yarn, ch 8, sc in the 2nd ch from hook and in each ch across. (7sts)
- Ch 1, turn, sc in the same st and in each st across. Finish off, leaving a long tail for sewing the ends together. Set aside.
Neck Strap (make 1) This could be easily adjusted to fit a larger neck. As written, it will an 8” neck. Start with a longer chain if needed.
- With an H hook and ww yarn, ch 35 (or desired length), sc in the 2nd ch from hook and in each ch across. (34sts)
- Ch 2, turn, hdc in the same st, hdc 7, sc in each st to end of row.
- Ch 1, turn, sl st in the next st and in each st across. Finish off and weave in ends.
With a sewing needle and matching yarn, sew a ⅝” button to the end of the strap that does NOT have the hdc sts. The button will slip between the posts of the hdc sts.
Place the main bow upside down on a flat surface. Lay the neck strap on top of the main bow piece, lengthwise.
Wrap the centerpiece around the middle of the two pieces. Use a yarn needle and the yarn tail to sew the short ends of the centerpiece together.
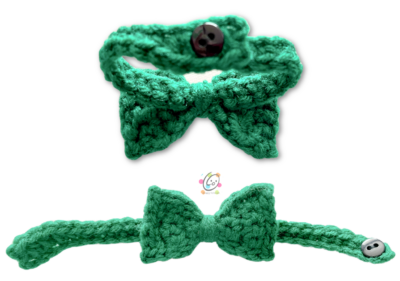
Small Bowtie
Main Bow Piece (make 1)
1. With an H hook and ww yarn, ch 6, sc in the 2nd ch from hook and in each ch across. (5sts)
2. Ch 1, turn, sc in the same st and in each st across.
3. Ch 1, turn, sc2tog, sc, sc2tog. (3sts)
4. Ch 1, turn, sc2tog, sc. (2sts)
5. Ch 1, turn, sc in the same st, sc.
6. Ch 1, turn, 2sc in the same st, sc. (3sts)
7. Ch 1, turn, 2sc in the same st, sc, 2sc in the last st. (5sts)
8-9. Ch 1, turn, sc in the same st and in each st across.
10. This step is worked around the outer edge of the bow. Ch 1, sl st in the same st. Sl st evenly down the long side of the bow. Ch 1, sl st in the first st of the beginning edge of the bow. Sl st in each st across. Ch 1. Sl st evenly down the next long side of the bow. Ch 1, sl st in each st across the last row of the bow. Finish off and weave in ends. Set aside.
Neck Strap (make 1)
1. With an H hook and ww yarn, ch 30 (or desired length), sc in the 2nd ch from hook and in each ch across until 4 chs remain, hdc in each of the 4 chs. (29sts)
Finish off and weave in ends.
With a sewing needle and matching yarn, sew a 3/8” button to the end of the strap that does NOT have the hdc sts. The button will slip between the posts of the hdc sts.
Place the main bow upside down on a flat surface. Lay the neck strap on top of the main bow piece, lengthwise.
Take a long piece of matching yarn and wrap it around the middle of the pieces several times, cinching in the center and attaching the two together. Finish off and secure the yarn.
Pin To Save For Later