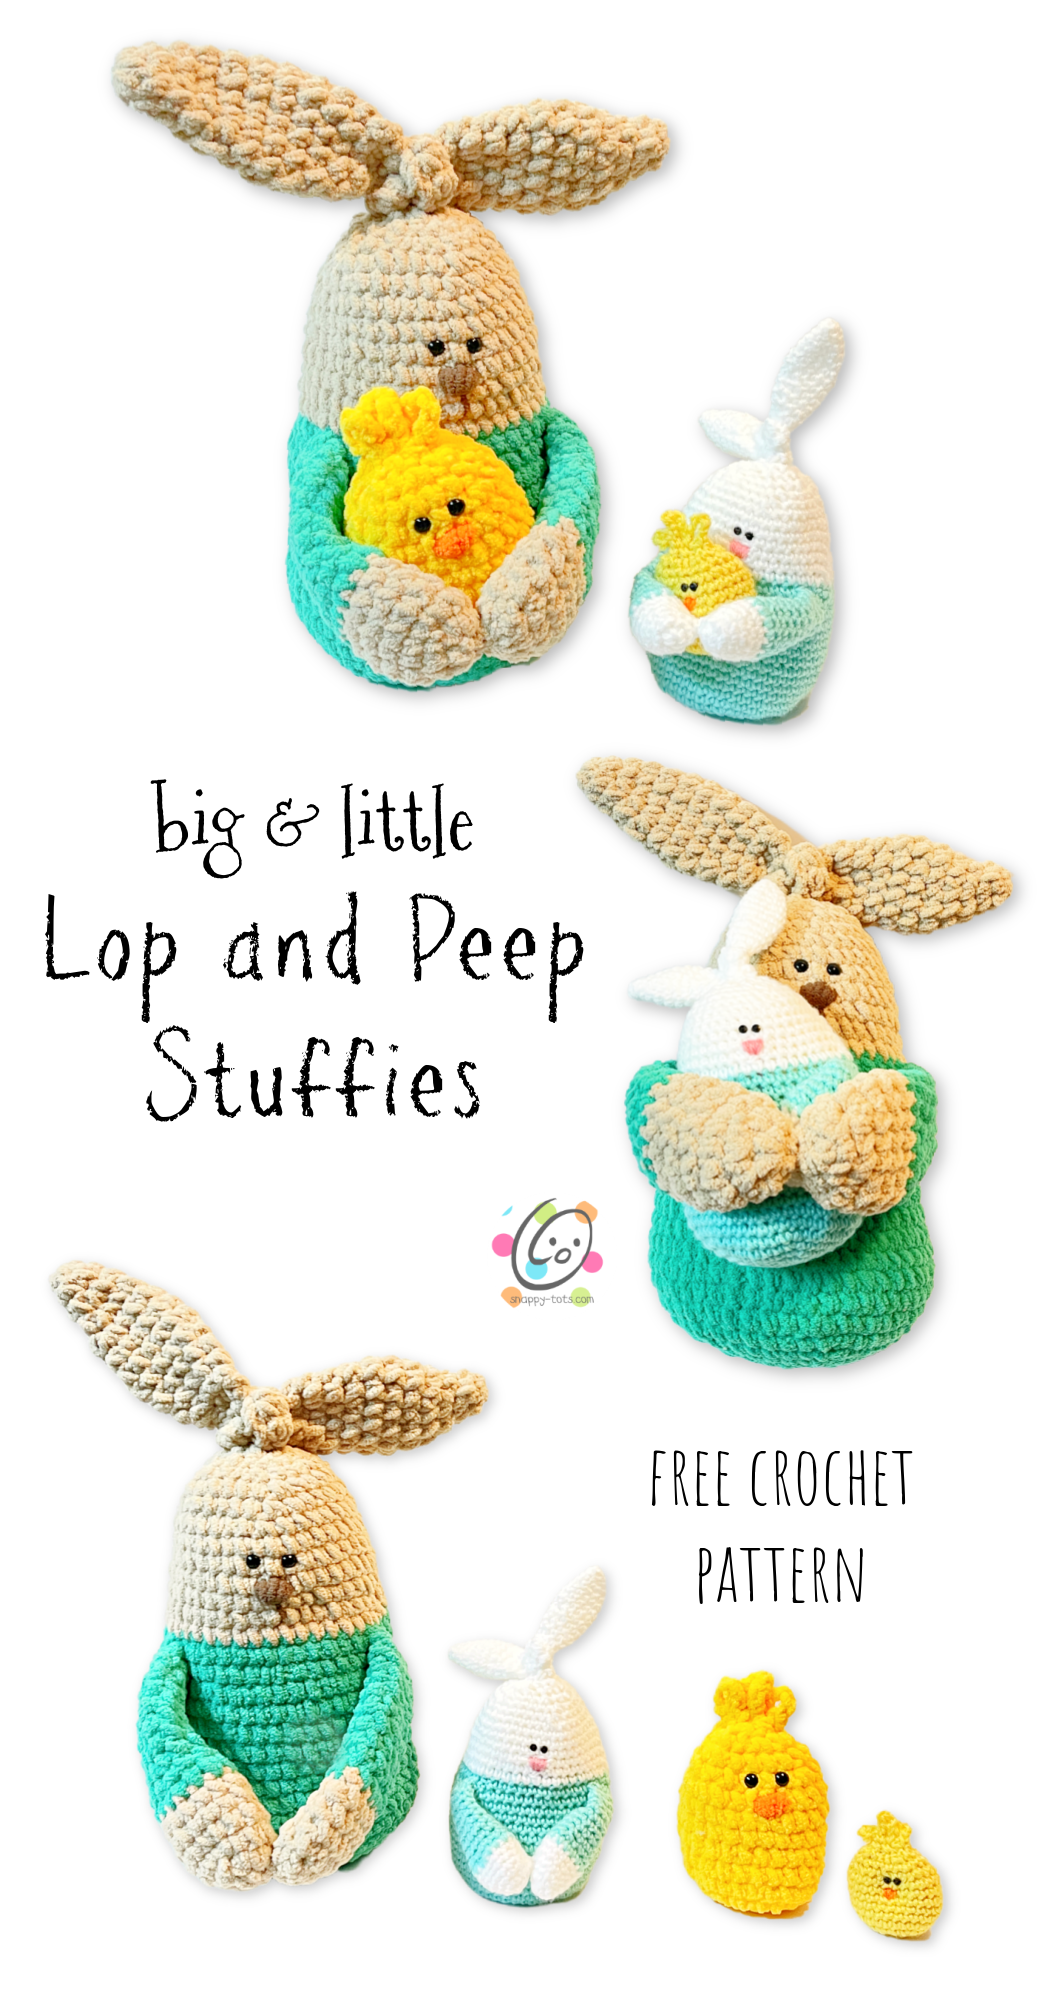
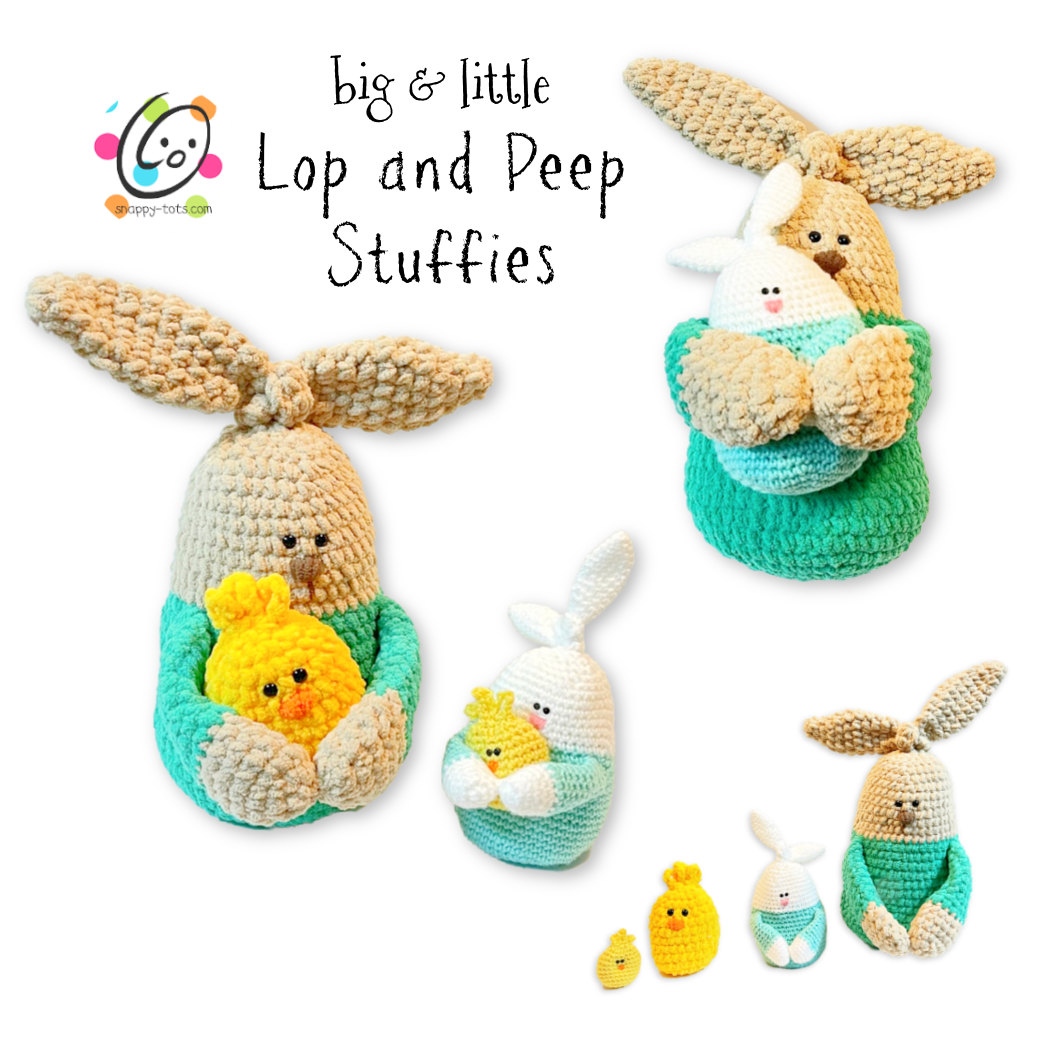
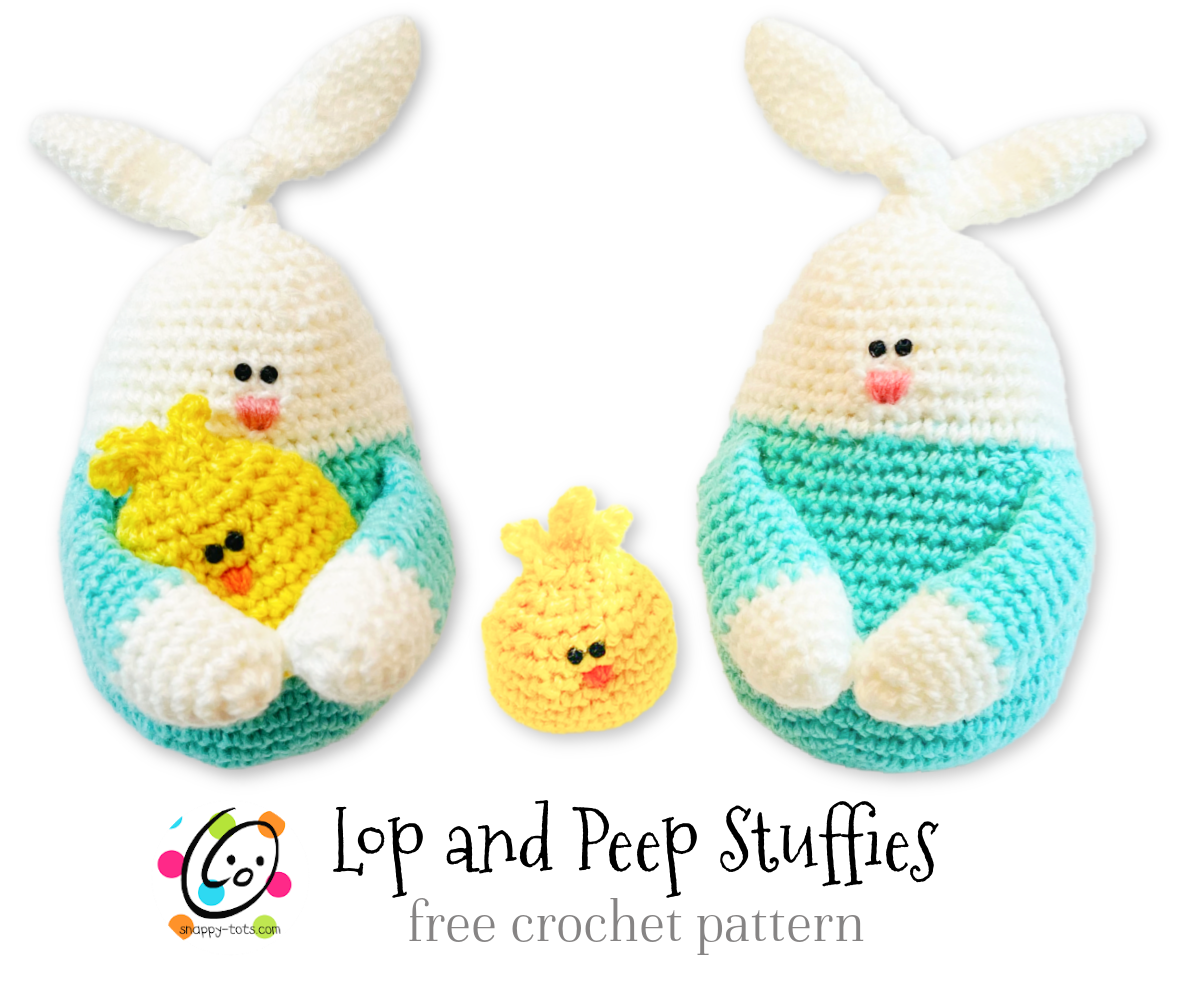
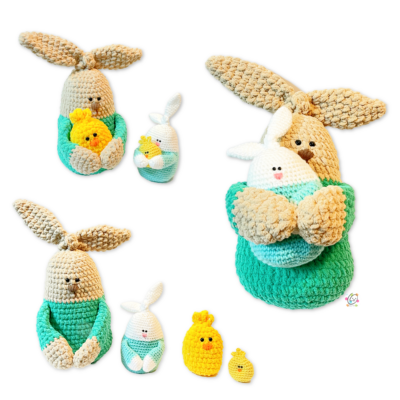
Free Pattern: Lop and Peep
It is fun to make little things to put in Easter baskets or to decorate at work or home. I made some cute little bunnies with baby chicks to hold.
I had so much fun making lop and peep that I decided to try BIG versions! I LOVE them all!
About The Yarn For The Worsted Weight Versions
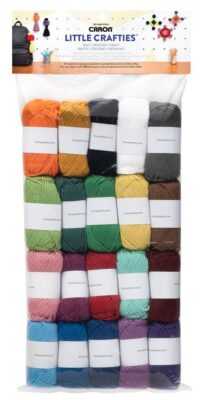
I was asked if I would be interested in trying a new set of yarn. Well, we always love new yarns, right? Of course, I said yes. I was so excited when this pack of “Caron Little Crafties” arrived because these little mini skeins are worsted weight! The little packs I have stumbled across in the past are light weight yarns with very little yardage. This assortment is perfect.
- Content: 100% Acrylic
- Ball Size: 20 g/0.7 oz, 58 m/63 yds
- Package Size: 400 g/14.1 oz, 1160 m/1260 yds
- Care: Machine wash and tumble dry
- Gauge: #4 Worsted (Medium)
Thanks to Caron and Yarnspirations for supplying this yarn.
The yarn pack sat in my office area, waiting to tell me what they wanted to be. They kept saying “we want to be BUNNIES”. Well, they were right! These cuties sit on my bookshelf and wish us a happy spring each day.

The yarn is a nice quality and very colorful. At 63 yards a piece, I had lots of the white yarn leftover and a small ball of turquoise after making “lop” the bunny.
Besides stuffies, these skeins are great for many things. In total, there are 1260 yards which is enough for a baby blanket. Think stripes and you could make hats, bags, slippers, placemats, and more.
Lop and Peep Crochet Pattern
The patterns for all of these cuties are available for free below. PLUS, an ad-free downloadable version is available from my shops for a small fee: Ravelry: https://www.ravelry.com/patterns/library/lop-and-peep | Etsy: Lop and Peep Crochet Pattern – Etsy
Materials
- Yarn: worsted weight. Sample: Caron Little Crafties in White, Turquoise, Yellow, Orange and Pink
- Crochet Hook: G (4.5mm)
- Notions: Yarn needle for weaving in ends, 2 small black buttons per item (4 total), black thread, sewing needle, stuffing
- Optional: Measuring tape, scissors, approximately ⅛ cup of stones or beads for weight
Note: If this will be used with small children, substitute small safety eyes instead of buttons.
Measurements
- Finished Measurements: Bunny – 5” tall (not including ears); Chick – 2-2.5” tall and across
- Gauge: not needed for this project.
Tips
- First stitch of each row is worked into the same stitch as the turning chain unless worked in the round.
- Numbers at the beginning of each line may refer to steps and not indicate number of rows.
- Stitch count remains the same unless noted at end of row/round.
- If you have any questions about this pattern please contact [email protected].
- I added 1/2 cup of popcorn kernels (because it is what I had on hand) to the base of the bunny to help her stand. Here is a great article with tips on adding weight: How to use Poly Pellets
- Other yarns, such as “Bernat Blanket Yarn” can be used to make an extra-large version. See notes at the end of this pattern.
Directions
Bunny: “Lop”
This starts at the bottom of the stuffie and worked in continuous rounds to the top.
1. With a G hook and ww yarn for the bottom part of body (mint in sample) start with a magic circle of 8 sc sts (or preferred method for creating a circle of 8 sc sts), pull closed and place a marker for working in the round. (8sts)
2. 2sc in each st to end of round. (16sts)
3. *sc, 2sc in next st*, repeat to end of round. (24sts)
4. *sc 3, 2sc in next st*, repeat to end of round. (30sts)
5. *sc 4, 2sc in next st*, repeat to end of round. (36sts)
6. *sc 5, 2sc in next st*, repeat to end of round. (42sts)
7. *sc 6, 2sc in next st*, repeat to end of round. (48sts)
8. Sc in each st to end of round.
9. Repeat previous round for an additional 9 rounds.
10. *sc 22, sc2tog*, repeat once. (46sts)
11. *sc 21, sc2tog*, repeat once. (44sts)
12. Sc in each st to end of round.
13. Sl st in the next st. Finish off the current yarn color and change to yarn for top of bunny (white in sample). Ch 1, sc in the same st, sc 19, sc2tog, sc 20, sc2tog, sl st in the first st of the round. (42sts)
14. Ch 1, *sc 19, sc2tog*, repeat once, sl st to join. (40sts)
15. Ch 1, sc in each st to end of round, sl st to join.
16. Ch 1, *sc 18, sc2tog*, repeat once, sl st to join. (38sts)
17. Ch 1, *sc 17, sc2tog*, repeat once, sl st to join. (36sts)
18. Ch 1, sc in each st to end of round, sl st to join.
19. Ch 1, *sc 7, sc2tog*, repeat to end of round, sl st to join. (32sts) Stop here and add the weight (optional). Stuff firmly to this position.
20. Ch 1, *sc 6, sc2tog*, repeat to end of round, sl st to join. (28sts)
21. Ch 1, *sc 5, sc2tog*, repeat to end of round, sl st to join. (24sts) Stop here and add the face.
Nose: With a yarn needle and pink or brown ww yarn, stitch a nose to the top, front of the body.
Eyes: With a sewing needle and black thread, sew 2 buttons in place above the nose OR insert safety eyes.
22. Ch 1, *sc 2, sc2tog*, repeat to end of round, sl st to join. (18sts) Add more stuffing.
23. Ch 1, *sc, sc2tog*, repeat to end of round, sl st to join. (12sts)
24. Ch 1, *sc, sc2tog*, repeat to end of round, sl st to join. (8sts) Finish off, leaving a yarn tail for finishing off the top.
With a yarn needle, use the yarn tail to weave in and out of remaining sts. Pull to cinch closed. Secure yarn tail.
Arms (make 2)
This starts at the “hand”.
1. With a G hook and yarn to match the top of the bunny (white in sample), start with a magic circle of 6 sc sts (or preferred method for creating a circle of 6 sc sts), pull closed and sl st to join. (6sts)
2. Ch 1, 2sc in each st to end of round, sl st to join. (12sts)
3. Ch 1, *sc 3, 2sc in next st*, repeat to end of round, sl st to join. (15sts)
4-6. Ch 1, sc in each st to end of round, sl st to join.
7. Finish off the current color and change to the same yarn as the body of the bunny. Ch 1, sc in each st to end of round, sl st to join.
8. Ch 1, *sc2tog, sc 3*, repeat to end of round, sl st to join. (12sts)
9-10. Ch 1, sc in each st to end of round, sl st to join.
11. Ch 1, *sc2tog, sc 4*, repeat once, sl st to join. (10sts)
12. Ch 1, sc in each st to end of round, sl st to join. Insert a small amount of stuffing in the bottom/hand.
13. Ch 1, *sc2tog, sc 3*, repeat once, sl st to join. (8sts)
14-15. Ch 1, sc in each st to end of round, sl st to join.
16. Flatten the top edge to create two layers, work this step through the sts of each layer. Ch 1, sc in the same st and in each st across. (4sts) Finish off, leaving a yarn tail for sewing to body.
With a yarn needle, use the yarn tail to sew the top edge of the arm to the body at a slight angle and in approximately 1” from each edge. Make sure they meet in the middle with enough room to hold the peep stuffie. See main photos for placement.
With a yarn needle and matching yarn, sew the tips of the hands together.
Pompom Tail: Cut a piece of yarn to match the bunny approximately 6” and set aside. Wrap a piece of the same color yarn around the palm of your hand 20 times. Carefully slide the loops off of your hand and use the 6” piece to wrap around the middle of the loops. Tie a knot. Wrapt the piece around again and tie another knot. Hold the yarn tail ends and trim the loops into a small pompom. Use the yarn tails to tie the pompom to the back of the bunny near the bottom edge.
Bunny Ears
1. With a G hook and ww yarn to match the bunny, create a magic loop of 5 sc sts (or preferred method for starting a circle of 5 sc sts), pull closed and place marker for working in the round. (5sts)
2. 2sc in the next st, sc 4. (6sts)
3. *2sc in the next st, sc 2*, repeat once. (8sts)
4. *2sc in the next st, sc 3*, repeat once. (10sts)
5. *2sc in the next st, sc 4*, repeat once. (12sts)
6-8. Sc in each st to end of round.
9. *sc2tog, sc 4*, repeat once. (10sts)
10. Sc in each st to end of round.
11. *sc2tog, sc 3*, repeat once. (8sts)
12. Sl st in the next st. Flatten the top edge. Flatten the remaining sts to create two layers. Work through both layers. Ch 1, sc in each st across. (4sts)
13. Ch 1, turn, sc2tog, sc2tog. (2sts)
14. Ch 1, turn, sc 2.
15. Repeat the previous row for an additional 11 rows. Finish off, leaving a 12” yarn tail.
Repeat steps 1-13 to create the 2nd half of the ear piece. Finish off and weave in the end.
With a yarn needle, use the yarn tail from the first ear piece to sew the short edge of each ear together. Do not finish off this yarn.
LOOSELY tie a knot in the middle of the ears. Depending on how you tie the knot and sew it to the head the ears will either stand or flop.
With a yarn needle, use the remaining yarn tail to sew the knot to the top of the bunny’s head.
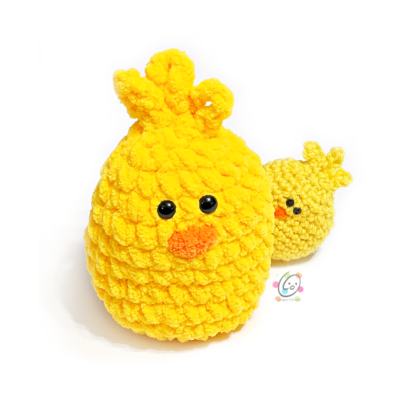
Chick: “Peep”
1. With a G hook and ww yarn (yellow in sample), create a magic loop of 8 sc sts (or preferred method for starting a circle of 8 sc sts), pull closed and place marker for working in the round. (8sts)
2. 2sc in each st to end of round. (16sts)
3. *sc, 2sc in next st*, repeat to end of round. (24sts)
4. Sc in each st to end of round.
5. Repeat previous round for an additional 5 rounds. It is easiest to add the face at this point.
With a yarn needle and orange yarn, stitch the beak in place.
With a sewing needle and thread, sew two small black buttons above beak for the eyes.
10. *sc 2, sc2tog*, repeat to end of round. (18sts)
11. Sc in each st to end of round.
12. *sc, sc2tog*, repeat to end of round. (12sts) Lightly stuff the chick at this point.
13. *sc2tog*, repeat to end of round. (6sts)
14. This step creates the loops at the top of the chick. Flatten the remaining sts to create two layers. Work through both layers. Ch 6, sl st in the next st, ch 8, sl st in the next st, ch 6, sl st in the next st. Finish off and weave in ends.
Extra Large Lop and Peep
I loved these little girls so much that I wanted to try BIG versions. I grabbed my K hook and some Bernat Blanket yarn.

I followed the instructions as written. I used a K hook for everything but the bunny ears. I used a M/N 9mm hook for those. To help this big gal stand I inserted a nylon sock full of 3/4 cup poly pellets in the bottom of the bunny and then stuffed her. If this will be used as a decoration, add 1-1.25 cups poly pellets to help it “stand” better. There is just a small amount of stuffing in the chick.
Materials & Details
- Yarn: Bunny – 70 yards each of 2 colors Bernat Blanket yarn, small amount of dark brown or pink blanket yarn for the nose; Chick – 30 yards yellow Bernat Blanket yarn, small amount of orange blanket yarn for the beak.
- Crochet Hook: K (6.5mm), M/N (9mm)
- Misc: yarn needle, 1/2-1 cup poly pellets (or similar for “weight”), stuffing, 9mm safety eyes, nylon sock
- Measurements: Bunny – 10″ tall (without ears) x 6″ across; Chick – 5″ tall x 3.5″ across
Pin To Save For Later