

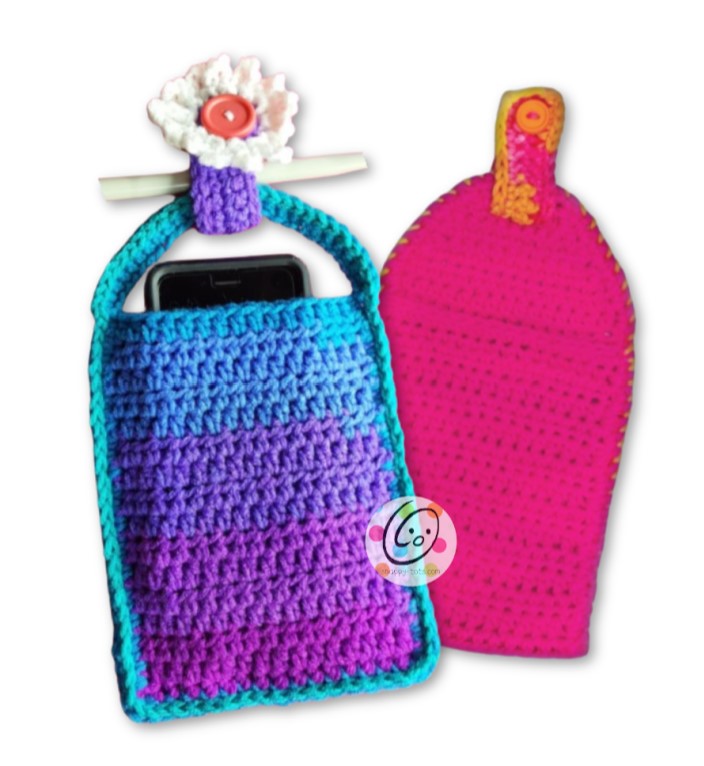
Free Pattern: Phone Pouch
I love little bags and pouches that help keep things organized. I created these little “Phone Pouches” to wrap around the door handle of our truck for when we go on road trips. I keep my crochet supplies in one and my phone in the other. These are so quick to whip up and are a great way to use up scraps.
This pattern is part of a fun event hosted by Sweet Potato 3, “60 Minutes or Less”. Each day is a different quick and easy project.
You can download an ad-free pdf version of this pattern for free as part of the 60 Minutes or Less Event by clicking the button below.


Phone Pouch Crochet Pattern
A downloadable, ad-free pattern that includes the instructions and all pictures is also available to purchase from my Ravelry Shop.
FREE until 4/26/24 as part of the 60 Minutes or Less Event. Click the download link above or THIS LINK to grab the pattern.
Materials
- Yarn: worsted weight yarn
- Crochet Hook: H (5mm)
- Notions: Yarn needle for weaving in ends, ½” button, sewing needle and matching thread
- Optional: Measuring tape, scissors
Measurements
- Finished Measurements:
Pouch with handle (variegated sample): 6.5” long x 5.25” wide
Pouch with tapered top (pink sample): 9” long x 5” wide
Tag: 5” long x 1” wide
- Gauge: not needed for this project.
Tips
- First stitch of each row is worked into the same stitch as the turning chain.
- Numbers at the beginning of each line may refer to steps and not indicate number of rows.
- Stitch count remains the same unless noted at end of row/round.
- If you have any questions about this pattern please contact [email protected].
Pouch With Handle (variegated sample)
1. With an H hook and yarn, ch 17, sc in 2nd ch from hook and in each ch across. (16sts)
2. Ch 2, turn, hdc in the same st and in each st to end of row.
3. Repeat row #2 for an additional 29 rows. Add or subtract length to this section if desired.
4. This step creates the pocket and is worked around the outer edge. Fold piece in half, matching short ends. Ch 1. Working through both layers, sc in last st made, sc 22 sts evenly down the side, 3sc in the corner, sc 14 sts evenly across the folded edge, 3sc in the corner, sc 22 sts evenly up the side.
5. This step creates the handle at the top. Ch 26, sl st in 2nd to last st at end of top row and in the last st, making sure chain is not twisted. Ch 1, turn, sc in each ch across, sl st in first st on pocket. Finish off and weave in the ends.
6. This step is worked around the outer edge of the entire piece. With an H hook, attach matching yarn to bottom corner of pocket. Sl st in each st around pocket and handle, sl st to join at end of round. Finish off and weave in ends.
Pouch With Tapered Top (pink sample)
1. With an H hook and yarn, ch 17, sc in 2nd ch from hook and in each ch across. (16sts)
2. Ch 2, turn, hdc in the same st and in each st to end of row.
3. Repeat row #2 for an additional 29 rows. Add or subtract length to this section if desired.
4. Ch 1, turn, sc2tog, sc 12, sc2tog. (14sts)
5. Ch 1, turn, sc2tog, sc 10, sc2tog. (12sts)
6. Ch 1, turn, sc in each st to end of row.
7. Ch 1, turn, sc2tog, sc 8, sc2tog. (10sts)
8. Ch 1, turn, sc in each st to end of row.
9. This step creates the button hole opening at the top. Ch 1, turn, sc2tog, sc, ch 4, sk 4, sc, sc2tog. (8sts)
10. Ch 1, turn, sc2tog, sc 4 around ch, sc2tog. (6sts)
11. This step is worked around the outer edge. Ch 1, sc in the same st and evenly down the side of the rectangle, (sc, ch 1, sc) in the first st of the bottom row, sc in each st until 1 st remains, (sc, ch 1, sc) in last st, sc evenly up the side of the rectangle, sl st in the first st to join. Finish off and weave in the ends.
12. Fold the piece so the bottom edge is even with the last full row before it starts to taper. With matching yarn and a yarn needle, start at the bottom corner and sew the layers together, wrap around the sts at the top and sew the layers together down the opposite edge.
Button Tab
1. With an H hook and worsted weight yarn, ch 21, sc in 2nd ch from hook and in each ch across. (20sts)
2. Ch 1, turn, sc in the same st, ch 2, sk 2, sc in each st to end of row.
3. Ch 1, turn, sc in the same st and in each st across, working 2sc around the ch from the previous row.
4. This step is worked around the outer edge of the tab. Ch 1, sl st in the same st, sl st in the end of the tab, (sl st, ch 1, sl st) in the corner, sl st down the side of the tab, (sl st, ch 1, sl st) in the corner, sl st in the end of the tab, (sl st, ch 1, sl st) in the corner, sl st up the side of the tab, sl st to join. Finish off and weave in ends.
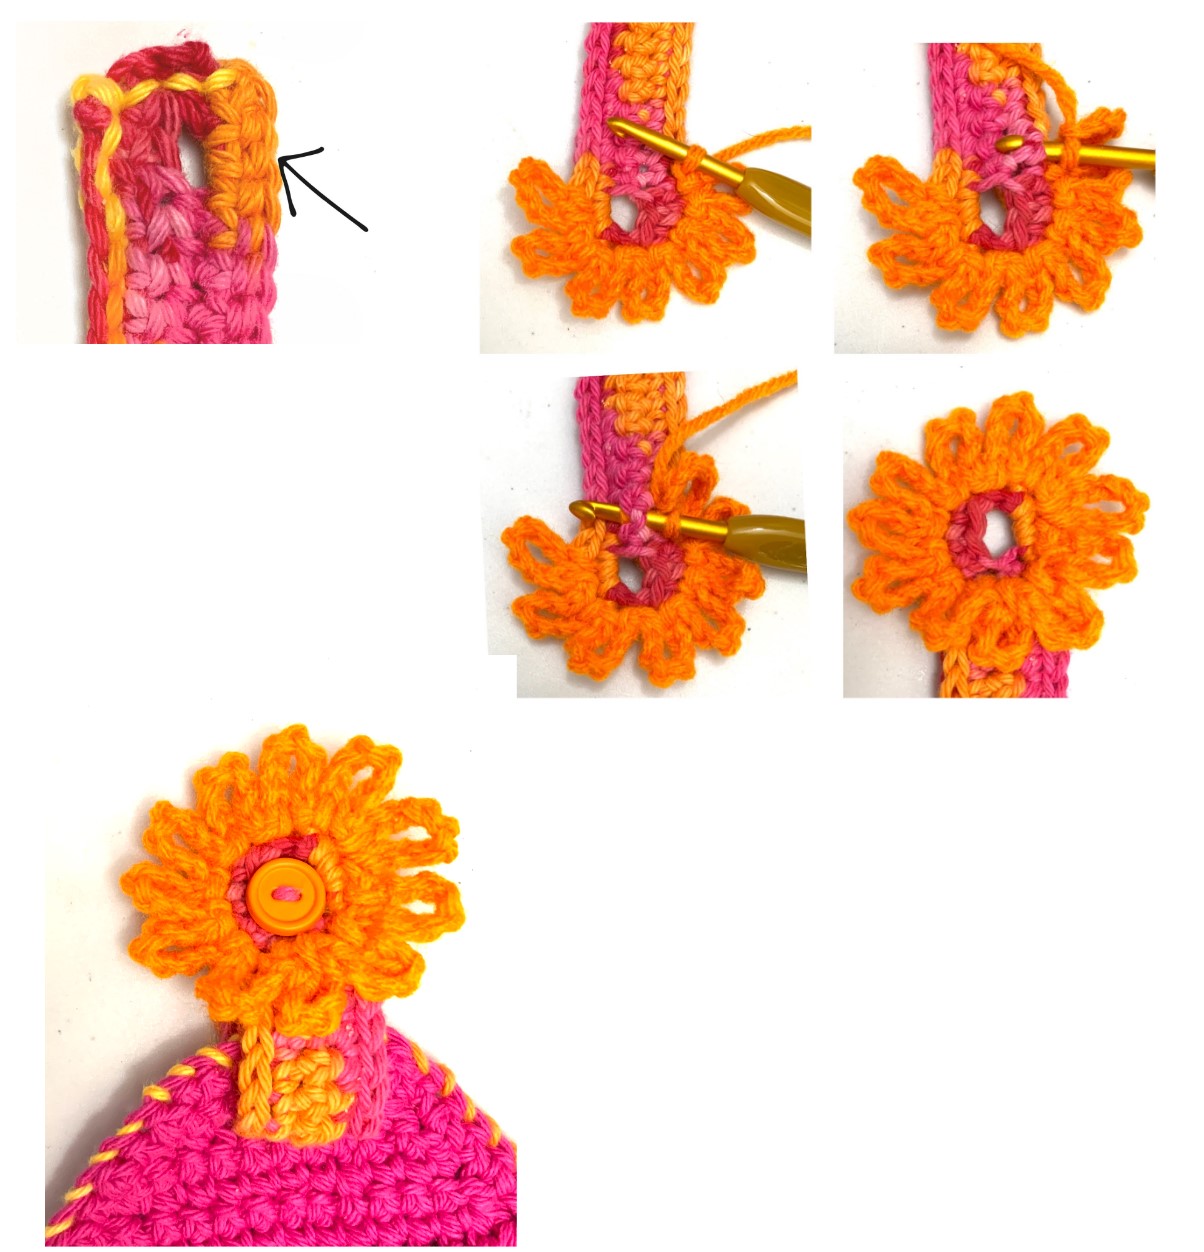
5. With a sewing needle and matching thread, sew a ½” button to the opposite end of the tab from the button hole.
Flower (optional): With an H hook and yarn color of choice, attach the yarn to a st next to the button hole on the opposite side of the tab. This is important so the button will come through the hole and have the flower around it. *Ch 7, sl st in same st, sl st in next st*, repeat, working around the outer edge of the tab and across the tab below the hole to form a circle. See photos below.


One Comment
Comments are closed.