

Free Pattern – Cooked Turkey Hat
One of my most favorite and most popular designs is a silly cooked turkey hat I made for my youngest son several years ago.
Have you made a hat from this pattern? If so, please scroll down and share a picture. I would love to see!


It turned out so much cuter than I had imagined and I haved LOVED seeing everyone’s creations. CLICK HERE to check out some of the many hats made from this pattern.
Cooked Turkey Beanie Pattern
I am now offering this pattern here for free, but you can also purchase an ad-free, downloadable file for a small fee from one of my shops: Ravelry | Etsy
Materials & Details
- Yarn: 150-175 yards worsted weight tan, 25 yards cream. Suggested yarn: My favorite “turkey” yarn is Red Heart Soft in Toast. It makes a nice golden brown bird. Note: some of the lighter samples were made with Red Heart Super Saver Warm Brown which is now discontinued.
- Hooks: H hook (5mm), I hook (5.5mm)
- Notions: Yarn needle, stuffing (lol) for the legs and wings
- Gauge: 4” = 13 hdc and 9 rows
- Sizes: Toddler, Child Small, Child/Preteen, Teen/Adult, Large Adult
Directions For All Sizes
- Follow increases until desired size, as listed at the end of the row, then skip to “for all sizes” and continue.
- Do not join at the end of each round, unless stated. This hat is worked in a continuous round to avoid a “seam” look.
- Instructions are included for sizes toddler-adult, however the turkey legs will be large for the toddler size. I would suggest trying an F hook for the legs and wings for the smallest sizes.
1. With an I hook and ww yarn, start with a magic circle of 6sts (or preferred method for starting a circle of 6 sc sts), pull closed and place a marker for working in the round. (6sts)
2. 2sc in each st to end of round. (12sts)
3. *sc 1, 2 sc in next st*, repeat to end of round. (18sts)
4. *sc 2, 2 sc in next st*, repeat to end of round. (24sts)
5. *hdc 3, 2 hdc in next st*, repeat to end of round. (30sts)
6. *hdc 4, 2 hdc in next st*, repeat to end of round. (36sts)
7. *hdc 5, 2 hdc in next st*, repeat to end of round. (42sts) Toddler
8. *hdc 6, 2 hdc in next st*, repeat to end of round. (48sts) Child Small
9. *hdc 7, 2 hdc in next st*, repeat to end of round. (54sts) Child/preteen
10. *hdc 8, 2 hdc in next st*, repeat to end of round. (60sts) Teen/Adult
11. *hdc 9, 2 hdc in next st*, repeat to end of round. (66sts) Large Adult
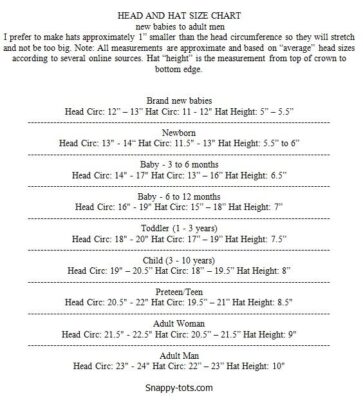
Body of hat: For all sizes: When increase rounds for desired size have been reached, do not join. Remove marker and hdc in each stitch until hat measures the length needed according to the chart below.
Sc in the next st and in each st to end of round, sl st in next st. Finish off and weave in ends.
Legs (make 2)
1. With an H hook and same yarn as hat, start with a magic circle of 6sts (or preferred method for starting a circle of 6 sc sts), pull closed and place a marker for working in the round. (6sts)
2. 2sc in each stitch around (12sts)
3. *sc 1, 2 sc in next st*, repeat to end of round. (18sts)
4. *sc 2, 2 sc in next st*, repeat to end of round. (24sts)
5. *sc 3, 2 sc in next st*, repeat to end of round. (30sts)
6-7. Sc in each stitch to end of round.
8. *sc 3, sc2tog*, repeat to end of round. (24sts)
9. Sc in each stitch to end of round.
10. Sc 2, sc2tog*, repeat to end of round. (18sts)
11. Sc in each stitch to end of round.
12. *sc 4, sc2tog*, repeat to end of round. (15sts)
13. Sc in each stitch to end of round.
14. *sc 3, sc2tog*, repeat to end of round. (12sts) Start stuffing the leg. If you wait until the end it will be hard to get the stuffing down to the largest part of the leg.
15. Sc in each stitch to end of round.
16. *sc 2, sc2tog*, repeat to end of round. (9sts)
17-19. Sc in each stitch to end of round.
20. Sc2tog, sc in each stitch to end of round. (8sts)
21. Sc in each stitch to end of round.
22. Sl st in the next st. This is the new start of the round. Change to white yarn. Ch 1. Working in FLO this round, sc in each st to end of round, sl st in first st to join.
23. Ch 1, sc in each stitch to end of round, sl st in first st to join.
24. Flatten tip and sc through both sides. This step creates the loops around the top edge of the white section. *Ch 5, sl st in st directly below current stitch*, repeat to end of round, sl st to join. Finish off and weave in all ends. For more loops, add another round,

Braids: Cut 6 strands of white, approximately 20”, for each braid. Use a yarn needle or crochet hook to pull ends through the flattened part of the leg tip (see photo). Pull through until even with other end and braid. Repeat for other side
Wings (make 2)
1. Leave a long tail in the beginning to use for attaching the wing to the hat later. With an H hook and yarn to match the hat, Ch 6 (or magic loop), join and pull closed
2. 2sc in each stitch around (12sts).
3. *Sc, 2sc in next st*, repeat to end of round. (18sts)
4-5. Sc in each st to end of round.
6. *Sc 7, sc2tog*, repeat to end of round. (16sts)
7. *Sc 6, sc2tog*, repeat to end of round. (14sts)
8-9. Sc in each st to end of round.
Place a marker. (Note: the following steps 10-14 are worked back and forth in rows)
10. Sc in next 13 st, ch 1, TURN.
11. Sc in same st and in next 5, sc2tog, sc 5, ch 1, turn.
12. Sc in next 4, sc2tog, sc 5, ch 1, turn.
13. Sc in next 3, sc2tog, sc 4, ch 1, turn.
14. Sc in next 2, sc2tog, sc 3, ch 1, turn.
15. Sc in next st, sc2tog, sc 2. Sl st to first st of row to join in round.
16. Sc 12 evenly around opening. (As if adding a cuff to a slipper)
17. Sc2tog, sc 10. (11sts) Lightly stuff wing if desired.
18. Sc2tog, sc 4, sc2tog, sc 3. (9sts)
19-20. Sc in each st to end of round.
21. Sc2tog, sc 3, sc2tog, sc 2. (7sts)
22. Sc in each st to end of round.
23. Sc2tog, sc 5. Finish off. Use yarn tail to close opening.

Assembly: First, give each piece (wings and legs) a few tugs and move the stuffing around until you like the shapes.
This can be assembled any way you would like. The legs could point up, completely on the hat, instead of forming ear flaps. Omit the braids if you choose this way. The legs and wings could swap places, with the legs at the top of the hat and the wings toward the bottom.
I suggest placing the hat over a mannequin head or similar sized item, such as a large vase. This makes it much easier to find placement for the pieces.
Use the yarn tail from each item and a yarn needle to sew the items in place. I hold the piece in place pull the yarn needle through the hat and into the side of the item. Continue to sew along the piece until you have as much sewn to the hat as desired. I like the wings sticking out so I only attached approximately 1.5” of the fattest end.
Note: Use the lines the rounds create to measure distance and placement of pieces so they are equal.
Remember, this is a turkey. I am sure their wings and legs aren’t perfectly placed so don’t stress this part.
Show Your Fresh Turkeys
Have you made a hat from this pattern? If so, please share a picture by 11/30/19 for a chance to win a new snappy pattern. Any photos that do not include this project will be deleted.
Pin To Save For Later


One Comment
Comments are closed.