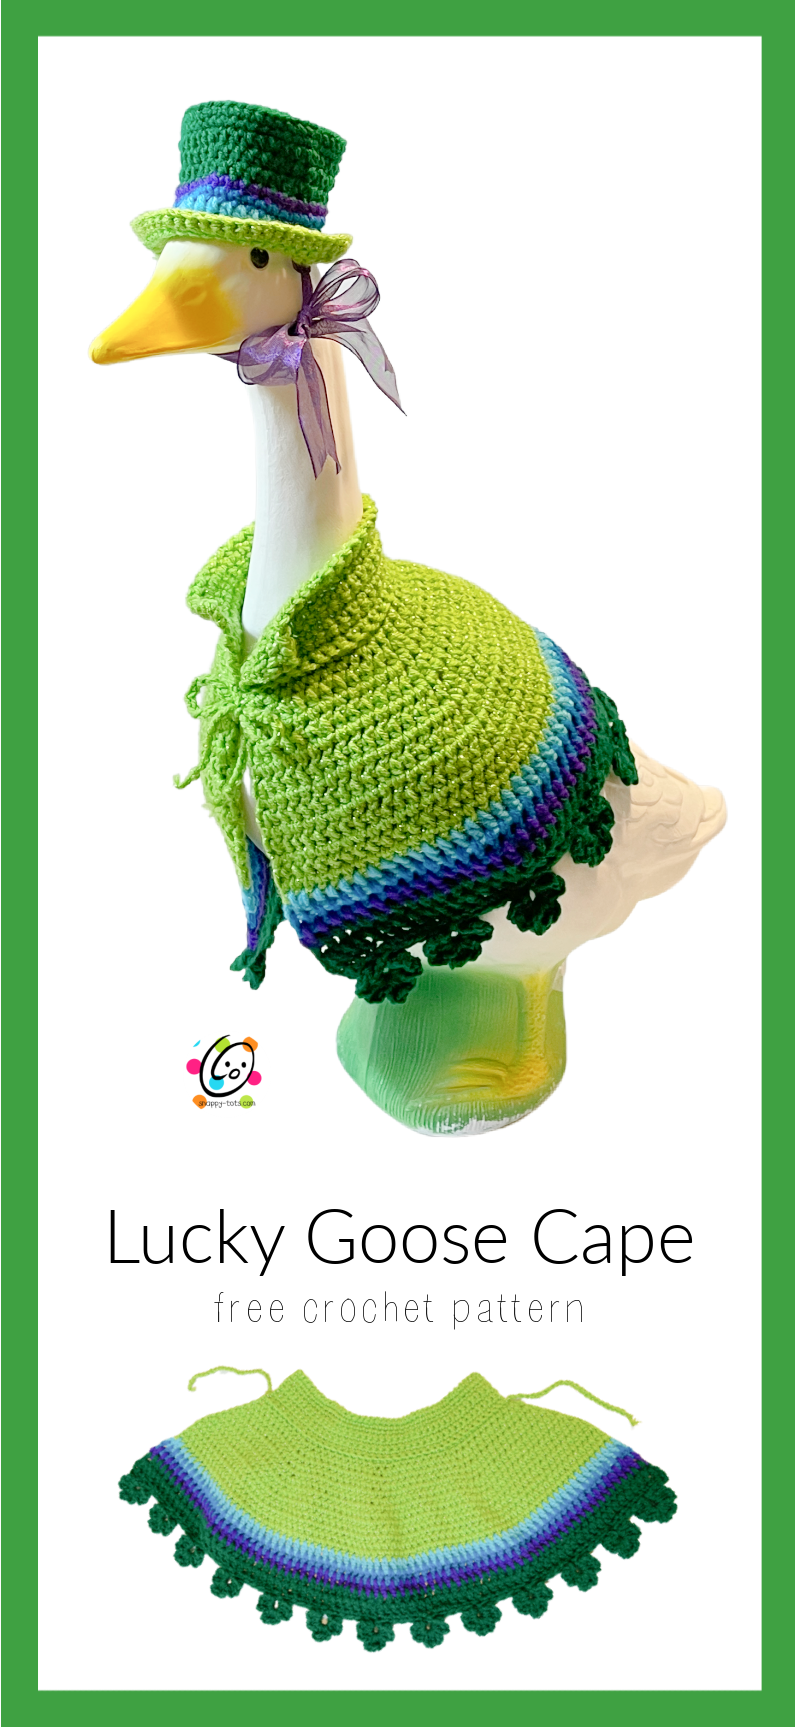
Free Pattern: Lucky Goose Cape
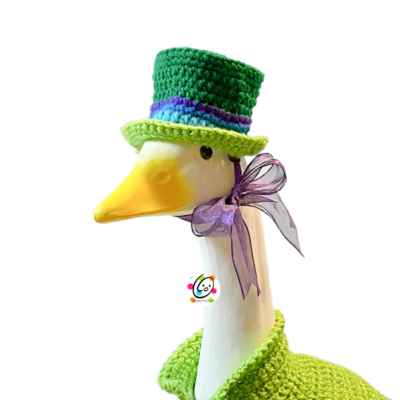
A couple of years ago I made a Mini Top Hat and Bow Tie for our geese. It is still pretty cold in northern Utah in March and they got a little chilly for St. Patrick’s Day so I wanted them to have a special outfit to match. I decided to create a cape. The shamrock edging is a cute touch, but could also be left for different times throughout the year.
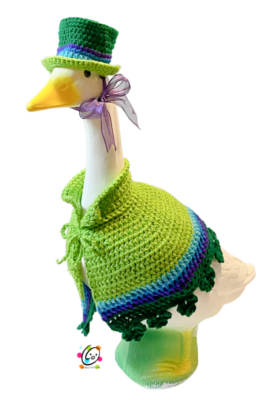
I used my Mini Top Hat pattern to make him a new hat to match.
Watch for more fancy outfits to come each month. You can find more “Ducke and Goose” patterns on their “goose dresses up” page.
Where To Get The Goose
This is designed for a 23” goose statue like the one sold by Miles Kimball: https://www.mileskimball.com/buy-large-white-goose-23-h-310493
It is also available from Amazon: https://amzn.to/3AdRWSP
Lucky Goose Cape Crochet Pattern
The pattern is available to view here on the blog. A downloadable, ad-free pdf is available for a small fee and includes the hat, cape, and 2 bowties. Ravelry | Etsy
Directions
Materials
- Yarn: Substitute with colors of choice.
- Yarns used in the sample: 150 yards Red Heart With Love Metallic Lime, 20 yards RHSS Turqua, 20 yards RHSS Pool, 20 yards RHSS Amethyst, 50 yards RHSS Paddy Green
- Crochet Hook: H (5mm), I (5.5mm)
- Supplies: Yarn needle for weaving in ends
- Optional: Measuring tape, scissors
Measurements
- Finished Measurements: From bottom tip of shamrocks to top of neck opening: 11” long; 14” wide across bottom edge (measured flat)/ 4.5” wide at top of neck opening
- Gauge – 4” with an I hook = 12 hdc sts and 12 hdc rows
Tips
- The first stitch of each row is worked into the same stitch as the turning chain unless noted.
- Numbers at the beginning of each line may refer to steps and not indicate number of rows.
- Stitch count remains the same unless noted at end of row/round.
- If you have any questions about this pattern please contact [email protected].
Cape
This starts at the neck edge and is worked back and forth in rows to the bottom edge.
Instructions are written for color changes/stripes as shown in the main sample. Substitute colors as desired.
As written, the cape is 8’5” long from the bottom edge of the collar. For a longer cape, add rows to step 15 or add more stripes.
1. With an I hook and lime green ww yarn, ch 41, sc in the 2nd ch from hook and in each ch across. (40sts)
2. Ch 1, turn, sc in the same st and in each st to end of row.
3. Repeat the previous step for an additional 5 rows.
4. This step is worked in BLO. Ch 1, turn, sc in the BLO of each st to end of row.
5. Ch 1, turn, 2hdc in the same st, hdc 9, *2hdc in the next st, hdc 9*, repeat to end of row. (44sts)
From this point on, work the sts between the posts of the previous row instead of in the st. This helps create a smoother fabric. To do this, insert the hook just below where you would for a regular st. Check your st count to make sure you are getting all of the sts, especially the very last one.
6. Ch 1, turn, 2hdc between the first two posts from the previous row, hdc 10, *2hdcbetween the next 2 posts, hdc 10*, repeat to end of row. (48sts)
7. Ch 1, turn, 2hdc between the first two posts from the previous row, hdc 11, *2hdcbetween the next 2 posts, hdc 11*, repeat to end of row. (52sts)
8. Ch 1, turn, 2hdc between the first two posts from the previous row, hdc 12, *2hdcbetween the next 2 posts, hdc 12*, repeat to end of row. (56sts)
9. Ch 1, turn, 2hdc between the first two posts from the previous row, hdc 13, *2hdcbetween the next 2 posts, hdc 13*, repeat to end of row. (60sts)
10. Ch 1, turn, 2hdc between the first two posts from the previous row, hdc 14, *2hdcbetween the next 2 posts, hdc 14*, repeat to end of row. (64sts)
11. Ch 1, turn, 2hdc between the first two posts from the previous row, hdc 15, *2hdcbetween the next 2 posts, hdc 15*, repeat to end of row. (68sts)
12. Ch 1, turn, 2hdc between the first two posts from the previous row, hdc 16, *2hdcbetween the next 2 posts, hdc 16*, repeat to end of row. (72sts)
13. Ch 1, turn, 2hdc between the first two posts from the previous row, hdc 17, *2hdcbetween the next 2 posts, hdc 17*, repeat to end of row. (76sts)
14. Ch 1, turn, hdc between the first 2 posts and between the posts to the end of the row.
15. Repeat the previous row for an additional 3 rows.
16. Finish off the current yarn and change to turqua. Ch 2, turn, dc between the first 2 posts and between the posts to the end of the row.
17. Finish off the current yarn and change to pool. Ch 2, turn, dc between the first 2 posts and between the posts to the end of the row.
18. Finish off the current yarn and change to amethyst. Ch 2, turn, dc between the first 2 posts and between the posts to the end of the row.
19. Finish off the current yarn and change to paddy green. Ch 2, turn, dc between the first 2 posts and between the posts to the end of the row.
20. Ch 1, turn, 2dc between the first 2 posts, dc 36, 2dc between the next 2 posts, dc 36, 2dc between the last 2 posts. (79sts)
21. This step starts the shamrock trim. Ch 1, turn, sc in the same st, sc 2, *sl st in the next st, ch 5, sl st in the same st, sc 5*, repeat until 4 sts remain, sl st in the next st, ch 5, sl st in the same st, sc 3.
22. Ch 1, turn, sk the first (same) st, sl st in each of the next 2, [*sl st in the next loop, (ch 2, dc, hdc, dc, ch 2, sl st) in the loop*, repeat 2 more times in the same loop, sl st 5], repeat from [ to ] until the last loop. *sl st in the next loop, (ch 2, dc, hdc, dc, ch 2, sl st) in the loop*, repeat 2 more times in the same loop, sl st 3. Finish off and weave in ends.
Finishing and Ties
Top Edge: With the right side of the cape towards you, attach matching yarn to the first st at the right edge of the collar. With an H hook, ch 1, sl st in the same st, *ch 1, sl st in the next st*, repeat in each st across the top edge. Finish off and weave in ends.

Ties (make 2)
With an H hook, attach matching yarn to the edge of the cape at the end of the ridge created by step #4. Ch 30. Finish off and tie a knot near the end of the chain. Weave in the beginning yarn tail.
Repeat for the opposite edge of the cape.
- Place the cape around the goose.
- The ties can be tied in a bow.
- If you would like the collar to sit up higher on his neck, cross the ties and thread through the opposite edge of the cape, 1” below the starting point of the opposite tie. Repeat for the second tie. Cinch these together and tie a bow. See photo.
Pin To Save For Later