

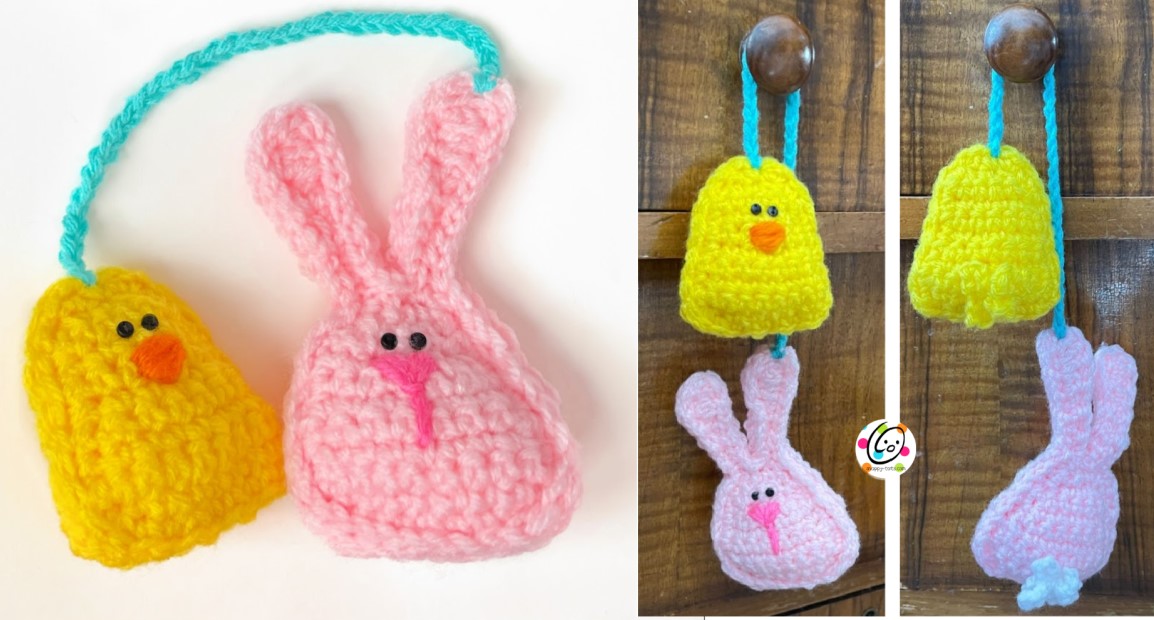
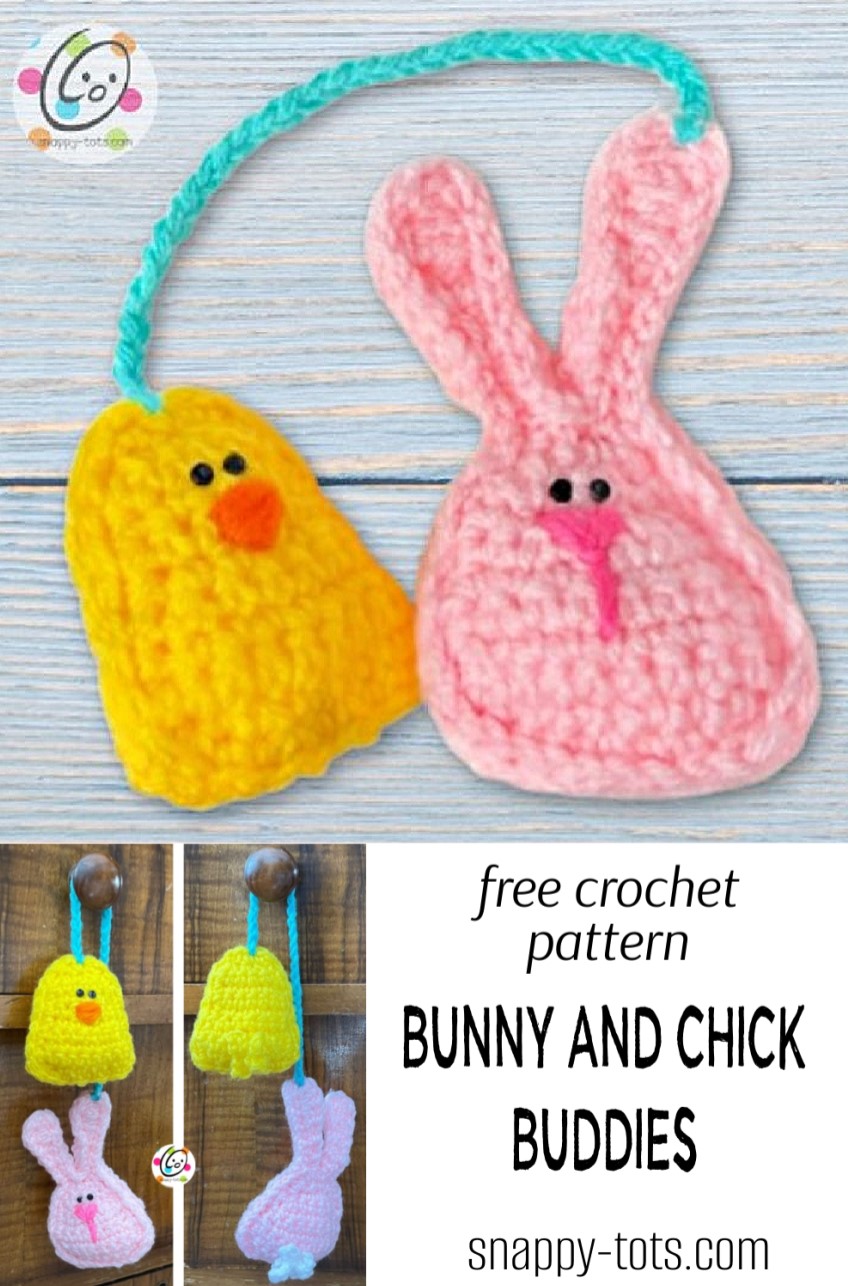
Free Pattern: Bunny and Chick Buddies
These little buddies are cute dangling from a basket, hook, or wreath. They could be made with safety eyes and hung from a stroller for little ones too.

Bunny and Chick Buddies Crochet Pattern
The full pattern is posted below to view here on my blog.
Materials
- Yarn: Red Heart Super Saver in small amounts of a variety of colors
- Crochet Hook: H (5mm)
- Miscellaneous Supplies: Yarn needle, stuffing, 2 small black buttons per buddy for eyes (smallest buddy – 4mm, largest buddy – 6mm), sewing needle, black thread
Bunny
(make 2 per hanger for front and back)
1. With an H hook and ww yarn, ch 10, sc in 2nd ch from hook and in each ch across. (9sts)
2-3. Ch 1, turn, sc in each st to end of row.
4. Ch 1, turn, sc2tog, sc 5, sc2tog. (7sts)
5-6. Ch 1, turn, sc in each st to end of row.
7. Ch 1, turn, sc2tog, sc 5. (6sts)
8. Ch 1, turn, sc 4, sc2tog. (5sts)
9. Ch 1, turn, sc2tog, sc, sc2tog. (3sts)
10. This step is worked around outer edge of bunny. Ch 1. Pivot piece to work along one long edge of bunny. Sc evenly down side, working 2sc in corner, sc in each st across, working 3sc in corner.
Sc evenly along edge of bunny, working 2sc in corner. 2sc in next st
(on top of bunny), *ch 11, (hdc, dc) in the 3rd ch from hook, dc in the next ch, hdc 2, sc 4, sl st 1, sc in the same st on the circle,*, sl st 2, repeat from * to *, loosely sl st in each st around the outer edge, including the ears. Finish off and weave in ends.
Nose: On the right side of one bunny piece and with a yarn needle and ww yarn, stitch a triangle or heart shape for the nose, with a straight line down from the nose.
Eyes: With a sewing needle and black thread, sew the two eyes above the nose.
Tail: On the wrong side of the other bunny piece, use an H hook and white yarn to sl st around a st near the center bottom of the bunny. *ch 6, sl st around the same st*, repeat for a total of 5 loops. Finish off and pull yarn tails to the opposite side of the piece.
Chick
(make 2 per hanger for front and back)
1. With an H hook and ww yarn, ch 10, sc in 2nd ch from hook and in each ch across. (9sts)
2-3. Ch 1, turn, sc in each st to end of row.
4. Ch 1, turn, sc2tog, sc 5, sc2tog. (7sts)
5-6. Ch 1, turn, sc in each st to end of row.
7. Ch 1, turn, sc2tog, sc 5. (6sts)
8. Ch 1, turn, sc 4, sc2tog. (5sts)
9. Ch 1, turn, sc2tog, sc, sc2tog. (3sts)
10. This step is worked around outer edge of the chick. Ch 1. Pivot piece to work along one long edge of the chick. Sc evenly down side, working 2sc in corner, sc in each st across, working 3sc in corner.
Sc evenly along edge of chick, working 2sc in corner. 2sc in next st
(on top of chick), sc2tog, sl st. Finish off and weve in ends.
Beak: On the right side of one chick piece and with a yarn needle and ww yarn, stitch a triangle for the beak.
Eyes: With a sewing needle and black thread, sew the two eyes above the nose.
Tail: On the wrong side of the other chick piece, use an H hook and yellow yarn to sl st around a st near the center bottom of the chick. *ch 6, sl st around the same st*, repeat for a total of 5 loops. Finish off and pull yarn tails to the opposite side of the piece.
Assembly
Place the two buddy pieces together. Note: The bunny and chick need to be sewn together so both “right sides” are facing up. This way the pieces will fit together and the face and tails will be on the outside.
With a yarn needle and matching yarn, sew the pieces together. For the samples, I sewed them together just inside the outer edge.
Lightly stuff each buddy before finishing the seam.
With an H hook and ww yarn, sl st into the buddy piece (center of head or tip of ear), ch 30, sl st into the other buddy piece. Finish off and weave in ends.
Pin To Save For Later


thank you for Lop and Peep