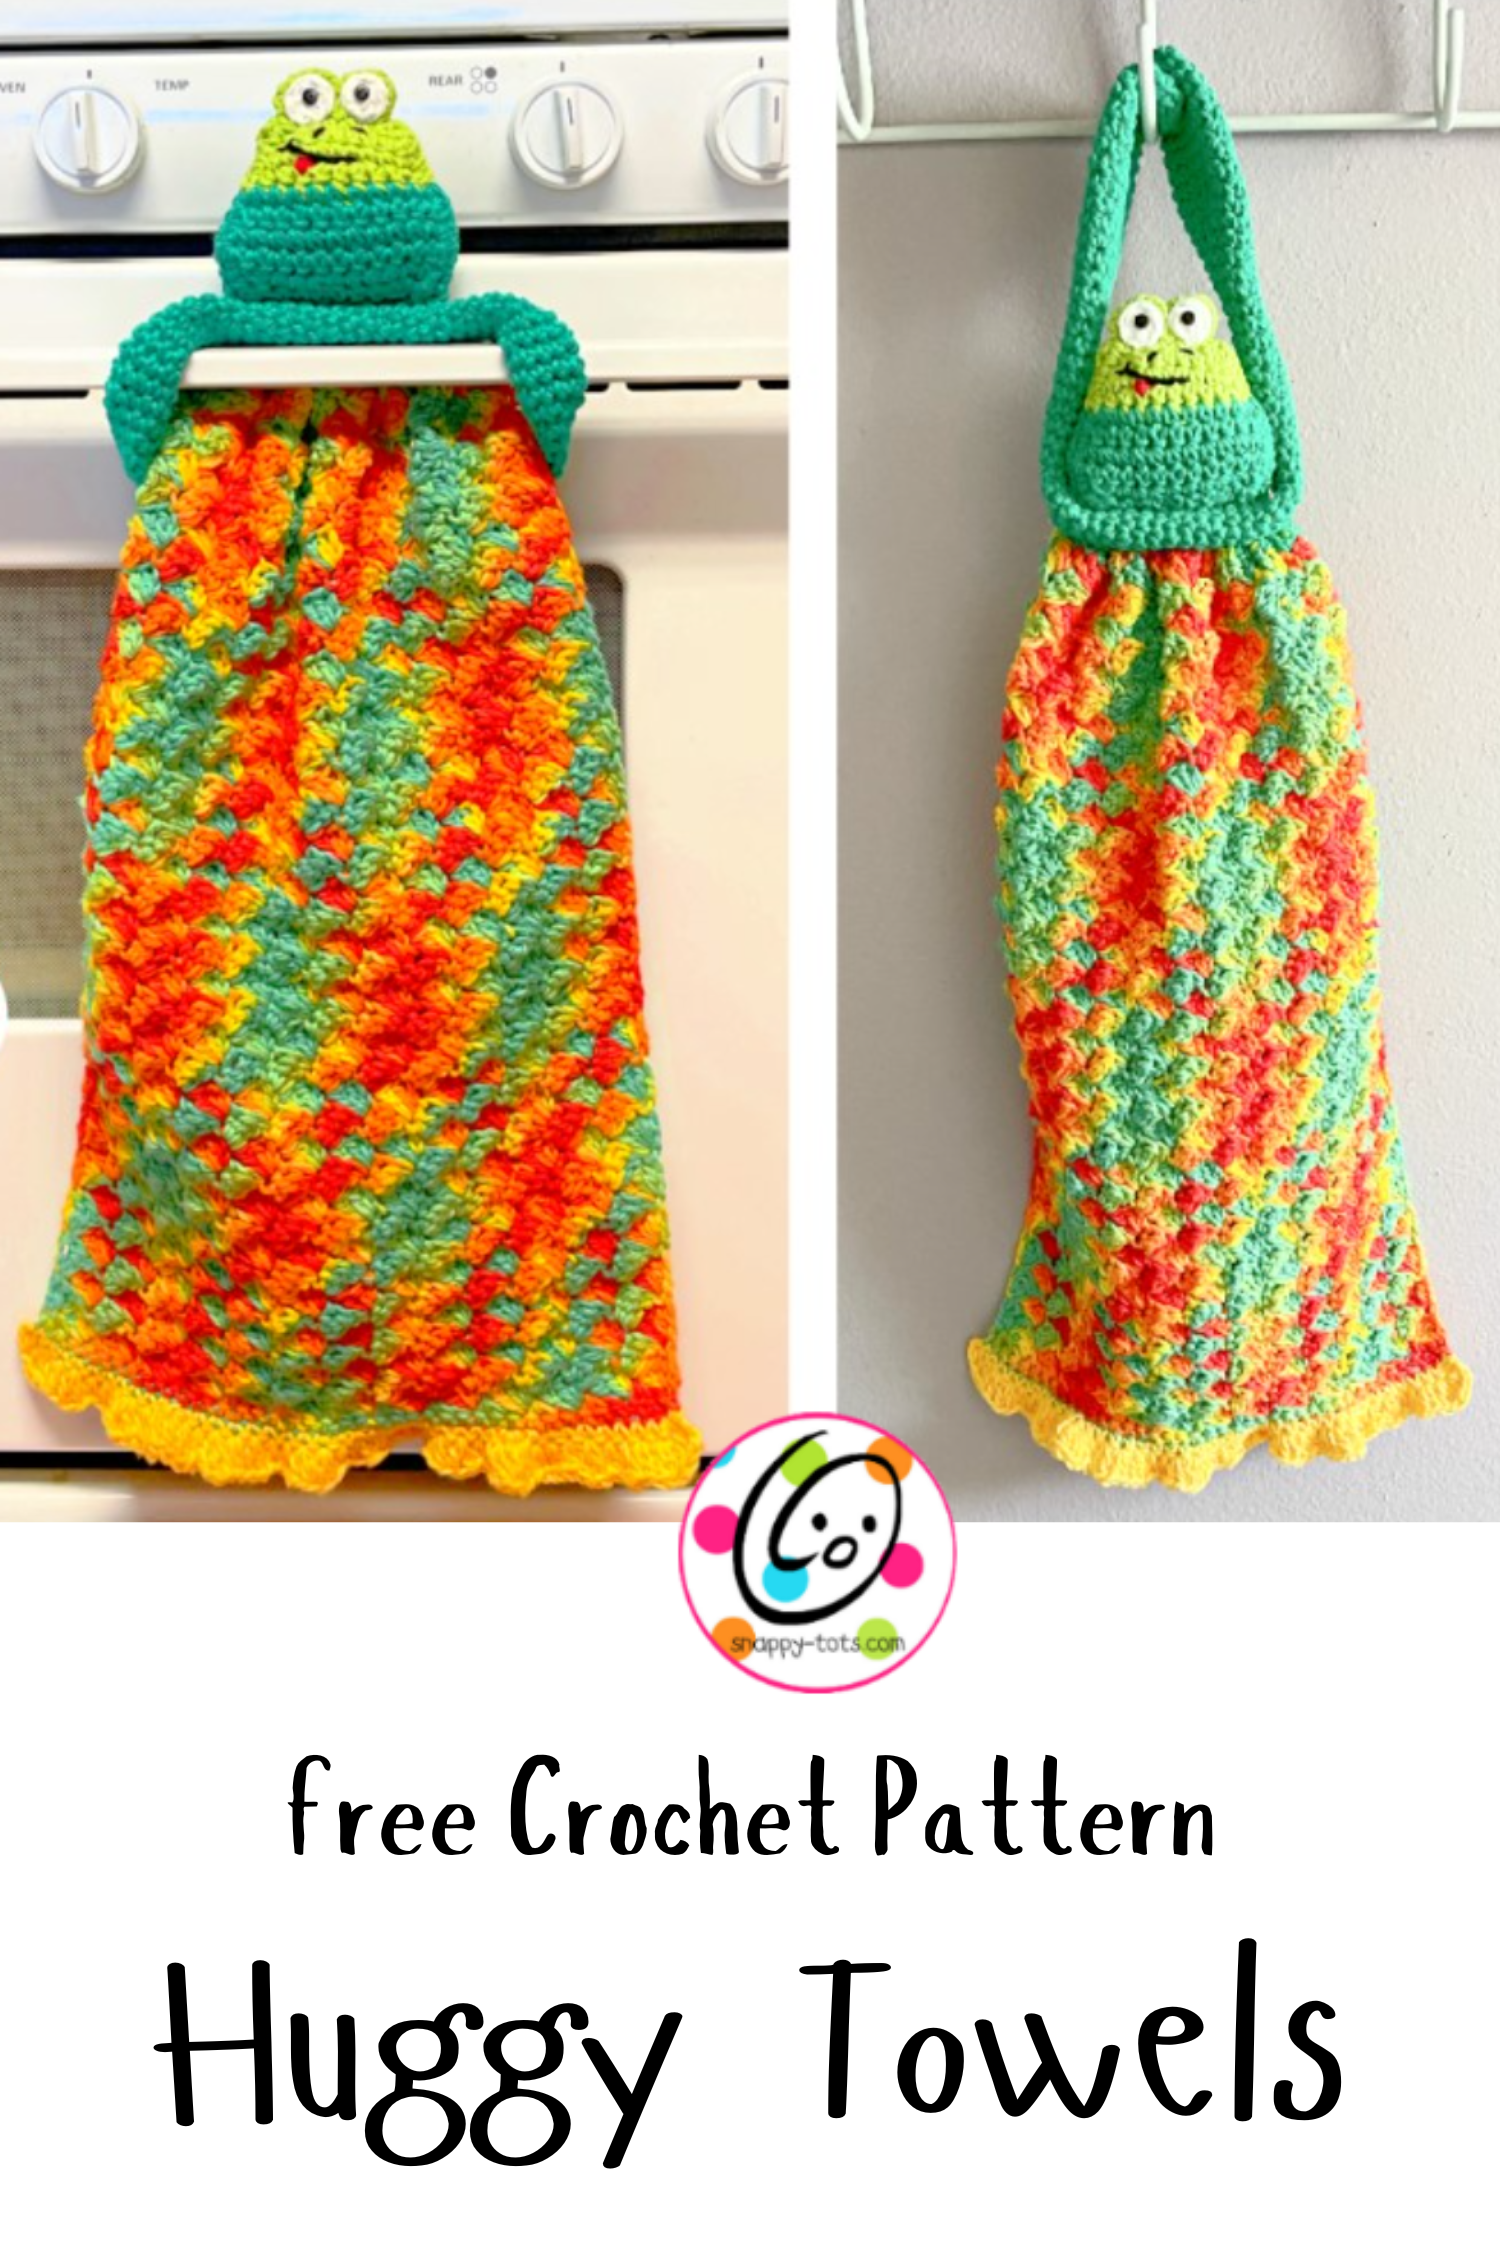
Free Pattern: Huggy Towels
Since my hanging towels have been popular, I thought it would be fun to design one geared towards kids. This can be made out of acrylic yarn or blanket yarn for a little lovey too.

This is part of my “Weekly Wash” for 2025. Each Wednesday from March – November a new crochet pattern for a dishcloth, scrubbie, towel, or similar will be released. I hope you will enjoy these patterns too. The patterns are free to follow along on my blog, plus several of them have a paid pdf for a small fee.
Similar Free Patterns You Might Enjoy
Huggy Towels Crochet Pattern
The pattern is available to follow along for free below.
Materials
- Yarn: 100% cotton worsted weight yarn for towel version. Main color: 200 yards; Ruffle: 20 yards; Frog: Small amounts of 2 shades of green, white, red
- Crochet Hook: I (5.5mm)
- Miscellaneous Supplies: Yarn needle, 2 small black buttons, sewing needle, black thread, stuffing, 1 small sew on snap
Details
- Finished Measurements: Towel – 10” across x 17” long; Frog – 4” x 4”; Arms – 18” long
- Gauge: not needed for this project
Tips and Variations
- The first stitch of each row is worked into the same stitch as the turning chain.
- Numbers at the beginning of each line may refer to steps and might not indicate the number of rows.
- Instructions are written with color changes as shown in the main sample. Substitute colors as desired.
- This could be made into other animals or a monster.
- For a “lovey” version, try using regular ww yarn. If this will be used with small children, please use safety eyes.
- Bernat Blanket yarn makes a cute, squishy soft version. Try using an M/N (9mm) hook for a larger one: Towel: 17” across; Frog: 6” across x 8” tall
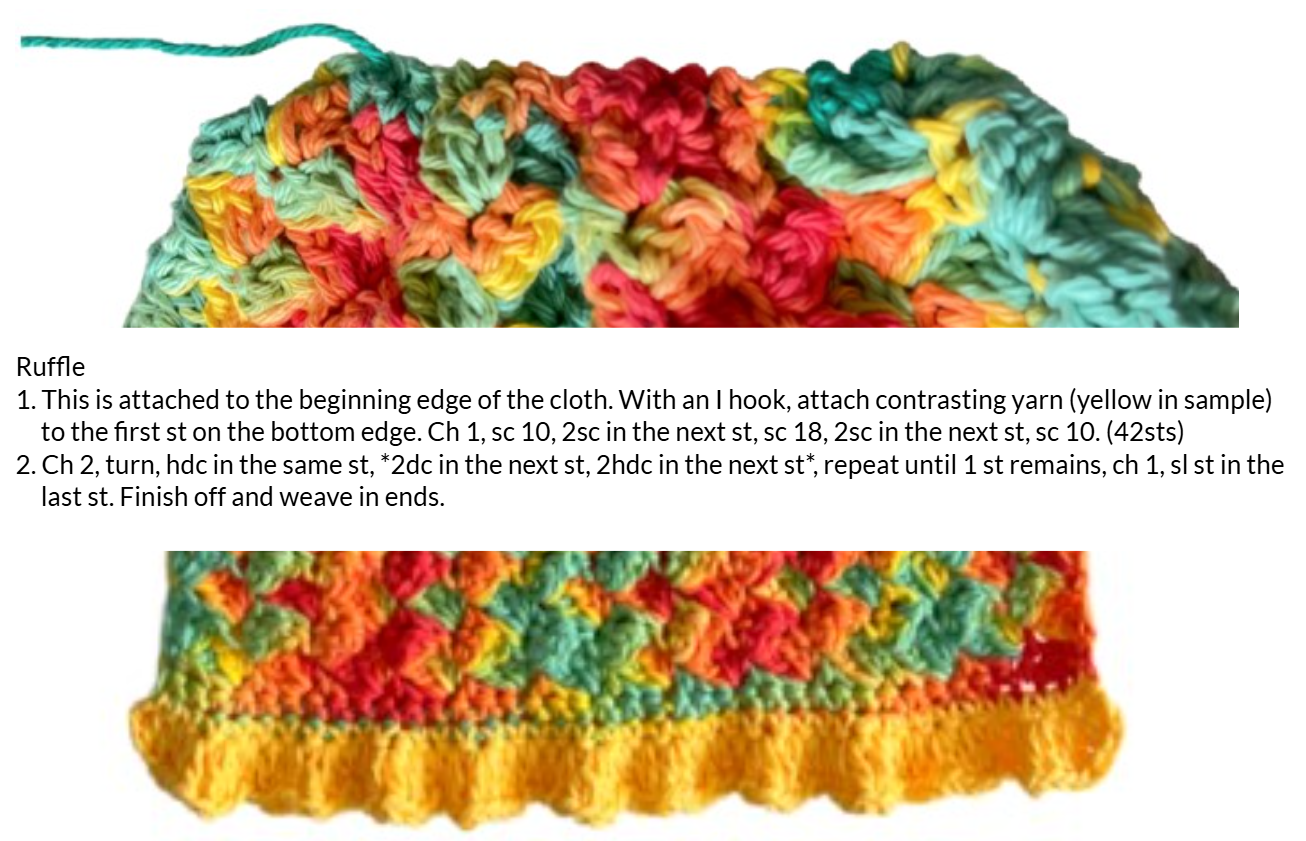
Towel
10” wide x desired length. As written, the towel is 17” long.
If this will be used as a towel/cloth, use 100% cotton yarn so it is absorbent.
This would make a fun lovey for little ones made from regular ww yarn or bernat blanket yarn.
1. With an I hook and ww yarn, ch 41, sc in the 2nd ch from hook and in each ch across. (40sts)
2. Ch 1, turn, 3dc in the same st, *sk 2, (sc, 2dc) in the next st*, repeat until 2 sts remain, sk 1, sc in the last st. (40sts)
3. Repeat the previous row until cloth is the desired length.
4. Ch 1, turn, sc in each st to end of row. Finish off, leaving a long tail.
With a yarn needle, weave the tail in and out of the remaining sts and pull to cinch in the top edge. Secure the yarn and weave in ends. Set aside.

Frog
1. With an I hook and lighter green yarn, ch 9, sc in the 2nd ch from hook and in each ch across. (8sts)
2. Ch 1, turn, 2sc in the same st, sc 6, 2sc in the last st. (10sts)
3-4. Ch 1, turn, sc in each st to end of row.
5. Finish off the current yarn and change to a darker green. Ch 1, turn, 2sc in the same st, sc 8, 2sc in the last st. (12sts)
6-8. Ch 1, turn, sc in each st to end of row.
9. Ch 1, turn, sc2tog, sc 8, sc2tog. (10sts)
10. Ch 1, turn, sc2tog, sc 6, sc2tog. (8sts)
11. Ch 1, turn, 2sc in the same st, sc 6, 2sc in the last st. (10sts)
12. Ch 1, turn, 2sc in the same st, sc 8, 2sc in the last st. (12sts)
13-15. Ch 1, turn, sc in each st to end of row.
16. Ch 1, turn, sc2tog, sc 8, sc2tog. (10sts)
17. Finish off the current yarn and change to the lighter green. Ch 1, turn, sc in each st to end of row.
18. Ch 1, turn, sc in each st to end of row.
19. Ch 1, turn, sc2tog, sc 6, sc2tog. (8sts)
20. Ch 1, turn, sc in each st to end of row.
21. Ch 1, turn, sc2tog, sc 4, sc2tog. (6sts)
22. This step is worked around the outer edge of the piece. Evenly space the stitches in the sections indicated.
- Do not turn. [Ch 1, sc in the same st, sc 3 sts down the side of the lighter green section.
- Finish off this color and change to the darker green. Work the following across the edge of the darker green section towards the center indent/1/2 way point: 2sc in the next spot, sc, 2sc in the next spot, sc 3.
- At this point you should be at the center indent. Sc 3, 2sc in the next spot, sc, 2sc in the next spot.
- Finish off this color and change to the lighter green. Sc 4. ]
- Work the following sts across the bottom edge. This will also create the base of the eyes. Ch 1, sc2tog, *(sl st, ch 2, 2dc) in the next st, (dc, ch 2, sl st) in the next st*, repeat once, sc2tog.
- Repeat the section between [ ] to work down the second long side of the piece
- This step is worked across the last row. Sc2tog, sc 4, sc2tog. Finish off, leaving a long tail for sewing the edges.
Face: With a yarn needle and black yarn, stitch two lines for the nose and the smile.
With a yarn needle and red yarn, stitch the tongue just below the mouth.
Eyes: With an I hook and white yarn, create a magic circle of 5 sc sts (or preferred method of creating a circle of 5 sc sts), pull closed and sl st to join. Finish off, leaving a yarn tail for sewing in place.
With a yarn needle, use the yarn tail from each eye piece to sew the eye circles on top of the area create for eyes from step #22. Leave a small amount of green yarn around the outer edge of the eyes.
With a sewing needle and black thread, sew the buttons on to for the pupils.
Fold the frog body in half, wrong sides together. With a yarn needle, use the yarn tail and matching yarn to sew the edges together, stuffing the piece as you go.
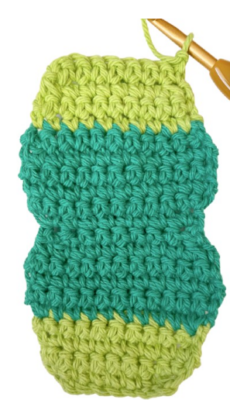
Arms
1. With an I hook and green yarn, create a magic circle of 6 sc sts (or preferred method of creating a circle of 6 sc sts), pull closed and place a marker for working in the round. (6sts)
2. 2sc in each st to end of round. (12sts)
3. Sc in each st to end of round.
4. *sc 2, 2sc in the next st*, repeat to end of round. (16sts)
5-9. Sc in each st to end of round.
10. *sc 6, sc2tog*, repeat once. (14sts)
11. Sc in each st to end of round.
12. *sc 5, sc2tog*, repeat once. (12sts)
13. Sc in each st to end of round.
14. *sc 4, sc2tog*, repeat once. (10sts)
15. Sc in each st to end of round.
16. *sc 3, sc2tog*, repeat once. (8sts)
17. Sc in each st to end of round.
18. Repeat the previous round for an additional 39 rounds.
19. *sc 3, 2sc in the next st*, repeat once. (10sts)
20. Sc in each st to end of round.
21. *sc 4, 2sc in the next st*, repeat once. (12sts)
22. Sc in each st to end of round.
23. *sc 5, 2sc in the next st*, repeat once. (14sts)
24. Sc in each st to end of round.
25. *sc 6, 2sc in the next st*, repeat once. (16sts)
26. Sc in each st to end of round.
27. Repeat the previous round for an additional 4 rounds.
28. *sc 2, sc2tog*, repeat once. (12sts)
29. Sc in each st to end of round.
30. *sc2tog*, repeat to end of round. (6sts) Finish off, leaving a long tail for finishing the end.
With a yarn needle, use the yarn tail to weave in and out of the remaining stitches. Pull to close and secure the yarn tail.
Flatten the armpiece and pin the middle of it to the middle of the top edge of the towel.

With a yarn needle and matching yarn, sew the top edge of the towel to the flat edge of the arm piece.

Flip the towel over and squish the center of the armpiece so it extends past the top edge of the towel instead of flat against it.
Sit the frog body on top of the armpiece. With a yarn needle and matching yarn, sew the bottom edge of the frog to the center of the arm piece.
Arm Closure
I chose to snap the arms together so they could wrap around a solid bar like on a fridge. If preferred, you could overlap the armpiece ends and sew the tips together.
Snaps: With a sewing needle and black thread, sew a piece of the snap to one end of the armpiece (see photo above for placement). Sew the opposite piece of the snap to the other end of the armpiece on the back side.
To place this on a bar like on an oven, slip the towel behind the bar with the arms together in the front. Pull the towel through the armpiece circle and towards the front.
- If you have any questions about this pattern please contact [email protected].
Pin To Save For Later