Got the first of the hopscotch pavers base coated Got the first of the hopscotch pavers base coated today and I’ll add the numbers tomorrow. Oila is doing a practice run through to the side. 

We want to make a long hopscotch but starting with a regular one for now until I can find more squares. 
.
.
.
.
#diyyard #hopscotch #summerfun #steppingstones #diysteppingstones
Free cupcakes! Come get the crochet pattern and wh Free cupcakes!
Come get the crochet pattern and whip up a batch 🥳 they are gluten, sugar, AND calorie free!

Click the link in my bio for the free pattern on my blog.  THANK YOU!

Made with @redheartyarns 
.
.
.
.
.

#creativelife  #livecreatively #bhooked #crochetcommunity #crochetedwithlove #crocheters #crochetersofinstagram #crocheteveryday #ilovecrochet #snappytots #makersgonnamake 
#freepattern #freecrochet #freecrochetpattern
#redheartyarns #joycreators #yarnspirations
#supportsmallbusiness #handmade
#handmadewithjoann #joanns
🤔 Do you like Mondays? It’s my favorite day 🤔 Do you like Mondays? 
It’s my favorite day of the week! Perfect time for a fresh start. Leave the past and should-haves behind and give yourself a break!

😛 LET’S DO THIS! Live today with purpose!

Made with @textart.app.
.
.
.
.
.

#mondayquotes #freshstartquotes #newdayquotes #findjoy #restart #stopProcrastinating #letsdothis #newday #freshstart #ilovemondays
#inspirationalmorning 
#whatareyouwaitingfor#resetday 
#PositiveEnergy 
#quotes #motivationalquotes #inspirationalquotes #mirrormessages
🥳 HAPPY BIRTHDAY to one of our favorite snappy 🥳 HAPPY BIRTHDAY to one of our favorite snappy friends, Jonathan Pereira!!! Please help me wish him the best year ever.

Jonathan's mom was one of my very first customers and he had a snappy tots birthday for his 11th birthday. Mr. Chesh even went to visit him!

Since then, every year, his mom gets out all of the snappy hats she made him and everyone that comes wears a hat!!! 

It's been TEN YEARS!! He is 21 today!
.
.
.
.
.

#creativelife  #livecreatively #bhooked #crochetcommunity #crochetedwithlove #crocheters #crochetersofinstagram #crocheteveryday #ilovecrochet #snappytots #makersgonnamake 
#redheartyarns #joycreators #yarnspirations
#supportsmallbusiness #handmade
I LOVE birthdays! When is yours? Please comment an I LOVE birthdays! When is yours? Please comment and let me know. 

My birthday is next week and my shop anniversary is this month. To celebrate I am giving away a different pattern each day, plus a grab bag of crochet goodies. 
Click the link in my bio for a quick link to the event page. 

The giveaway is open worldwide and closes Sunday, 5/22/22.
I ran upstairs for a sec and when I came back my a I ran upstairs for a sec and when I came back my assistant had taken over my blanket and computer. Check out that grumpy look for being interrupted! 
.
.
#yorkies #crochethelper #furbaby
Check out this awesome “flower vase flag” made Check out this awesome “flower vase flag” made by Heidi Higginbotham!

She made my day while she was testing this because she kept posting how much fun she was having as she made the different parts. I love that!! 

This is my latest design and the pattern is 30% off this weekend.
https://www.ravelry.com/patterns/library/flower-vase-flag 
.
.
.
.
.

#creativelife  #livecreatively #creativityeveryday #bhooked #craftastherapy #crochetcommunity #crochetedwithlove #crocheters #crochetersofinstagram #crocheteveryday #ilovecrochet #snappytots #makersgonnamake
My happy little snappyland 😁 where little peopl My happy little snappyland 😁 where little people can play dress up and make believe. 

If you signed up for my Snappyland Crochet Along all FIVE of the patterns are now available to download from the event page. The link is included in each of the emails I have sent.

If you haven’t signed up already, Wednesday, 5/4/22 is the LAST DAY to sign up for just $10 ($25 value). That includes all five patterns to make everything shown in the photos and more. 

https://snappy-tots-shop.myshopify.com/products/snappyland-crochet-along-preregister

Made with @redheartyarns.

These patterns will be sold separately at a later date.

*signed up and haven’t gotten a single email? My system obviously is playing hide and seek with you. 

1. Please make sure you are looking in the right email account… many forget their PayPal email is different.

2. Put heidi@snappy-tots.com in your email search bar so it will look in hidden folders too. Yep, even if you usually get my emails because these are sent in bulk and systems just don’t always like those.

3. Still nothin? Ok, send an email and we will send the info. Please make sure to tell us what you want. Blank emails get blank responses 🤪
.
.
.
.
.

#creativelife  #livecreatively #creativityeveryday #bhooked #craftastherapy #crochetcommunity #crochetedwithlove #crocheters #crochetersofinstagram #crocheteveryday #ilovecrochet #snappytots #makersgonnamake
It’s Friday and a great day to BEE HAPPY 😁 It’s Friday and a great day to BEE HAPPY 😁 

This little bee is a fun little project to make and leave for others to find with a happy wish… or add one to a flower for a gift (mother’s day, teacher gifts, just because 😊)

Made with @redheartyarns super saver.

The pattern is free: https://snappy-tots.com/freebie-bee-happy/

#creativelife  #livecreatively #bhooked #crochetcommunity #crochetedwithlove #crocheters #crochetersofinstagram #crocheteveryday #ilovecrochet #snappytots #makersgonnamake 
#freepattern #freecrochet #freecrochetpattern
#redheartyarns #joycreators #yarnspirations
#supportsmallbusiness #handmade
#handmadewithjoann #joanns
Vote: should I put two little libraries in my yard Vote: should I put two little libraries in my yard, one for books and one for crafts? 😁 please vote yes or no and help me decide.

I LOVE seeing my daughter and granddaughter visiting little libraries around the area. These are such a fun thing!

Huge thanks to @the.riveting.raven for encouraging me and everyone around her to read more 😁
.
.
.
.
.
#littlelibraries #littlelibrary #crochetaddict #craftsastherapy #creativelife  #livecreatively #creativityeveryday
Do you like my pillow so far? The colors make me h Do you like my pillow so far? The colors make me happy. 

I’m using Caron Chunky Cakes in Rainbow Jellys by @yarnspirations.

This pattern will be available free on my blog soon.
.
.
.
.
.

#creativelife  #livecreatively #bhooked #crochetcommunity #crochetedwithlove #crocheters #crochetersofinstagram #crocheteveryday #ilovecrochet #snappytots #makersgonnamake 
#freepattern #freecrochet #freecrochetpattern
#redheartyarns #joycreators #yarnspirations
#supportsmallbusiness #handmade
#handmadewithjoann #joanns
Making more bath buddies for my grandkids Easter b Making more bath buddies for my grandkids Easter baskets 😁 I think they will love these squishy soft little friends.

These are made from Bernat blanket yarn by @yarnspirations and are great stash busters. I’m using up little leftovers.

The pattern is really easy and quick to whip up. Free on my blog. 

https://snappy-tots.com/free-pattern-bath-buddies/

Instagram visitors: Click the link in my bio for the pattern.
.
.
.
.
.
#freecrochetpattern #freepattern #joycreators #eastercrochet #springcrochet #easycrochet #basketfillers
Once upon a time, there was a magical world known Once upon a time, there was a magical world known as Snappyland. 
Come, let’s imagine…

https://snappy-tots-shop.myshopify.com/products/snappyland-crochet-along-preregister
.
.
.
.
.
#crochetalong #mysterycal #crochetadventure
My grandkids LOVE bath time so I wanted to make th My grandkids LOVE bath time so I wanted to make them some little bunnies and chicks for their baskets. 

The pattern for these quick cuties is free on my blog. If you make some please tag me when you share pix so I can love them too. Please click the link in my bio for easy access.

Most are made from blanket yarn, but I did write a version for regular cotton too. They take less than 20 minutes each from start to finish and the pattern is so easy that you will have it memorized after the second bunny....so you can whip up a whole litter! (is that what you call a bunch of bunnies?? lol)
.
.
.
.
.
#freecrochetpattern #eastercrochet #yarnspirations #crochetbunny #crochetbath #crocheteaster #basketfillers #easycrochet #redheartyarns #freecrochet #bhooked 
#livecreatively #springcrochet #bunniesandchicks #yarnaddict
Big and little lop and peep are my favorites!! The Big and little lop and peep are my favorites!! They are super easy to make too.
The patterns are free on my blog: 
https://snappy-tots.com/free-pattern-lop-and-peep/

Instagram visitors please click the link in my bio for easy access to the link.
Made from @redheartyarns and others from @yarnspirations.
.
.
.
.
.
#freepattern #freecrochet #freecrochetpattern
#redheartyarns #joycreators #yarnspirations

#creativelife  #livecreatively #bhooked #crochetcommunity #crochetedwithlove #crocheters #crochetersofinstagram #crocheteveryday #ilovecrochet #snappytots #makersgonnamake 
#freepattern #freecrochet #freecrochetpattern
#redheartyarns #joycreators #yarnspirations
#supportsmallbusiness #handmade
#handmadewithjoann #joanns
We have a winner!! Congrats to @magpie_tea. Huge t We have a winner!! Congrats to @magpie_tea.
Huge thanks to everyone that entered. Watch for more fun giveaways to come.
What do you think about these colors? The colors What do you think about these colors?

The colors I’m using for the blocks I’ve made are to match someone’s house for a gift. 
They are not my usual palette (which is much brighter), but it’s fun seeing different combos for a change.

The “Rocky Mtn Spiral Square” is block #6 of the #mooglycal2022
Get the pattern and all the event info: https://www.mooglyblog.com/cal-2022-6/

It’s a fun and pretty quick project. 
The video will be ready so you can make one along with me this weekend if you want.

Watch for another 12” matching block coming next week.
.
.
.
.
.

#creativelife  #livecreatively #bhooked #crochetcommunity #crochetedwithlove #crocheters #crochetersofinstagram #crocheteveryday #ilovecrochet #snappytots #makersgonnamake 
#freepattern #freecrochet #freecrochetpattern
#redheartyarns #joycreators #yarnspirations
🎉🚨 GIVEAWAY 🚨🎉 ~ CLOSED… winner will 🎉🚨 GIVEAWAY 🚨🎉 ~ CLOSED… winner will be announced soon.

My morning commute sets the tone for my entire day. Lately, I have found such joy in my commute routine. Chai latte ✅ Audiobook ✅ and cozy scarfs for the winter weather here ✅

🎉🥳 
We are giving away the perfect commute experience! One winner will receive ALL of the following…

☕️ A $10 gift card to either Starbucks or Dutch Bros 
🎧 A $20 gift card to Audible
🧶 A handmaid infinity scarf (colors pictured) 
🧶 A coffee cozy to match your scarf

To enter:
	⁃	Follow @the.riveting.raven and @snappytots, and stick around! 😃
	⁃	Like and save this post 👍
	⁃	Tag two friends who you think will be interested 🏷

Bonus entries:
	⁃	Share this to your story and tag us! Drop a ☕️ when done so I can count your entry. 
	⁃	Tag up to 3 more friends! 🏷

This is US only. 18 and older. Not affiliated with anyone. Giveaway ends Monday, March 21 at noon MST. I will only contact you from this account. I will never ask for money. You must be comfortable sharing your address.
.
.
.
.
.

#giveaways #giveaway #giveawaycontest #giveawaytime #giveawayalert #contest #free #win #freebies #follow #contestalert #freegiveaway #freegiveaways #instagiveaway #contestgiveaway #giveawaywinner #gift #gifts #books #bookish #readingtime #commute #audibooks #audible #crochet #crochetpatterns #readinggiveaway #crochetgiveaway
Did you see the latest block for the #mooglycal202 Did you see the latest block for the #mooglycal2022 It’s by ME! 😁

This 12” square actually has a 6” one in the middle so you could use them together to make a fun pillow too.

Get the pattern for free and check out the crochet along on the Moogly blog: https://www.mooglyblog.com/cal-2022-6/

Instagram visitors click the link in my bio for easy access to the event.

Made with @redheartyarns with love.
.
.
.
.
.
#redheartyarns #yarnspiration #crochetalong #freecrochetpattern #freepattern
Lil' Petunia and Patrick would be super cute for E Lil' Petunia and Patrick would be super cute for Easter and to welcome spring. I love them for decorations and peeking out of gift baskets.⁣
This pattern is half price until 3/13/22 and includes instructions for making the lamb and bunny out of fur yarn or worsted weight yarn (worsted weight version will be smaller). Click the link in my bio to head over to the pattern. THANK YOU⁣
No coupon needed. Discount applied in cart.⁣
.⁣
.⁣
.⁣
.⁣
.⁣
#crochetbunny #crochetlamb #eastercrochet #easterdecor #springdecor #springcrochet #springphotoprops⁣
#crochetgirlgang #craftastherapy #lovecrochet #crochetersofinstagram #crochetgeek #crocheting #crochetconcupiscence
  • home
    • Blog
    • Contact
    • Subscribe
  • SPECIALS
    • Etsy Shop
    • Ravelry sale
    • Shopify Sale
  • Crochet Patterns
    • Ravelry Shop
    • Shopify Shop
    • Etsy Shop
    • Free Patterns (new to old)
    • Free Patterns (by Category)
  • Free Collections
    • Year Long Collections
    • Weekly Wash Patterns
  • DIY
    • Cricut
  • Community
  • Snappy 2022

snappy tots

  • home
  • Blog
  • Contact
    • Policies and Contact Info
    • Legal Stuff
  • Subscribe
  • Categories
  • Shop
    • Shopify
    • Etsy
    • Ravelry
  • Free Crochet

Free Pattern: Goose Bunny Costume

Our geese friends have needed a full-body suit for those times when they want to be in full costume. You just can’t pull off a bunny look with a goose tail sticking out the back! They are VERY excited to show off their new looks. Even after Easter is over, these body suits could be used for other costumes or every day outfits during the colder seasons.

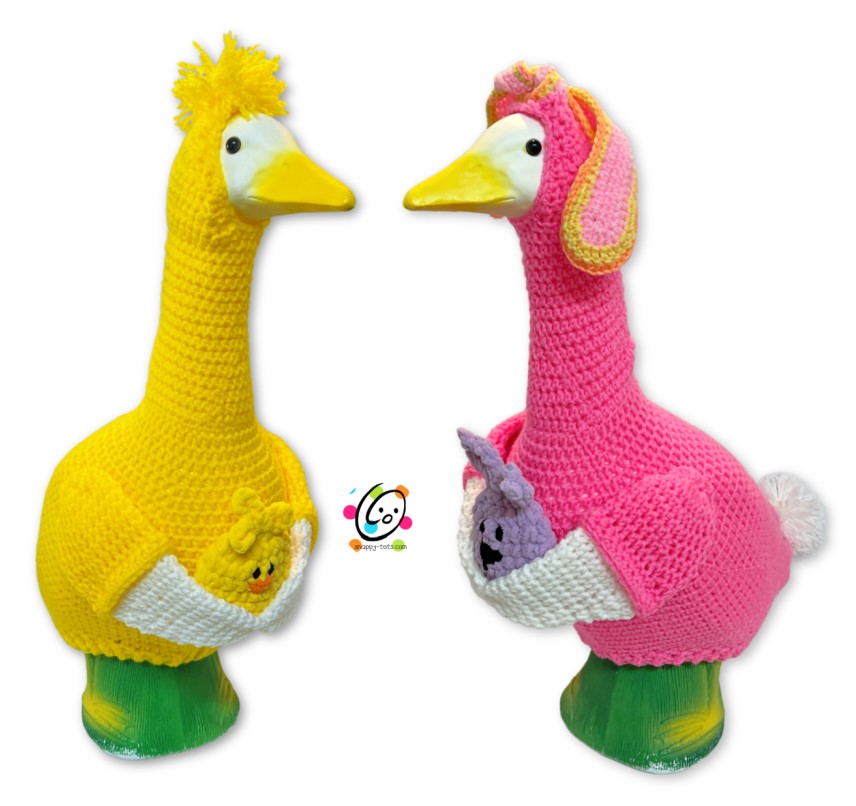
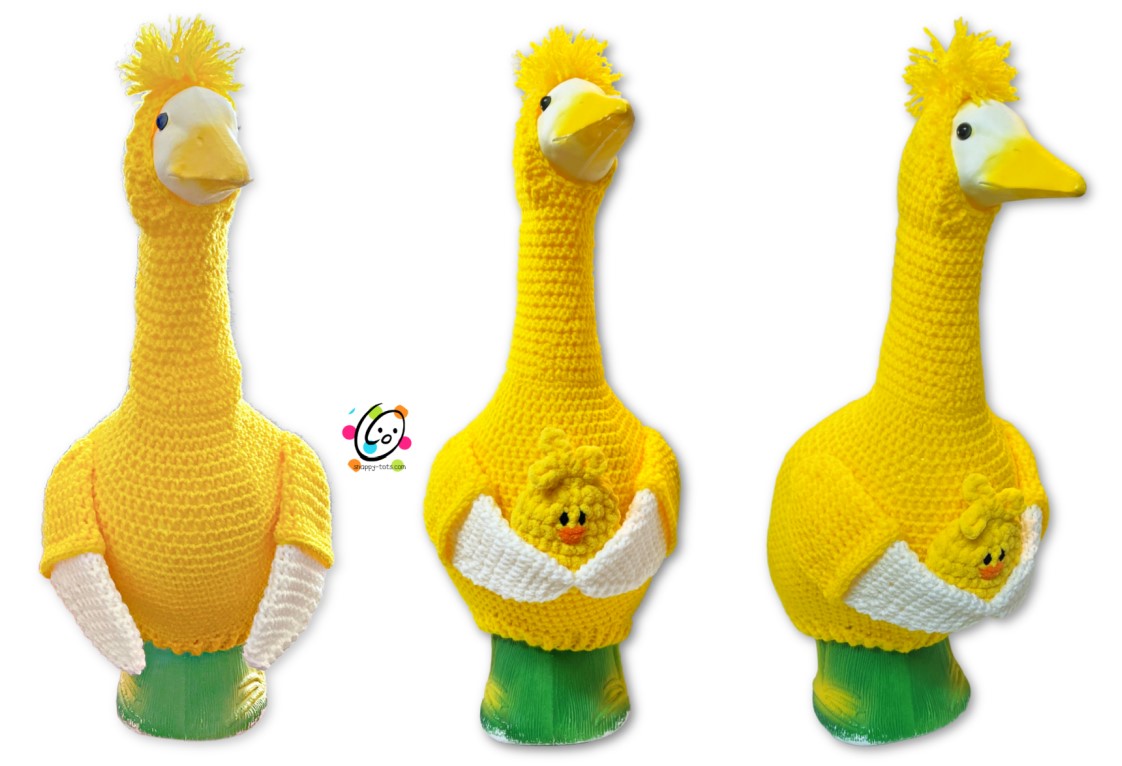
“Ducke” wanted a chick costume. I think he looks more like Big Bird, but as Sesame Street fans that’s ok too.

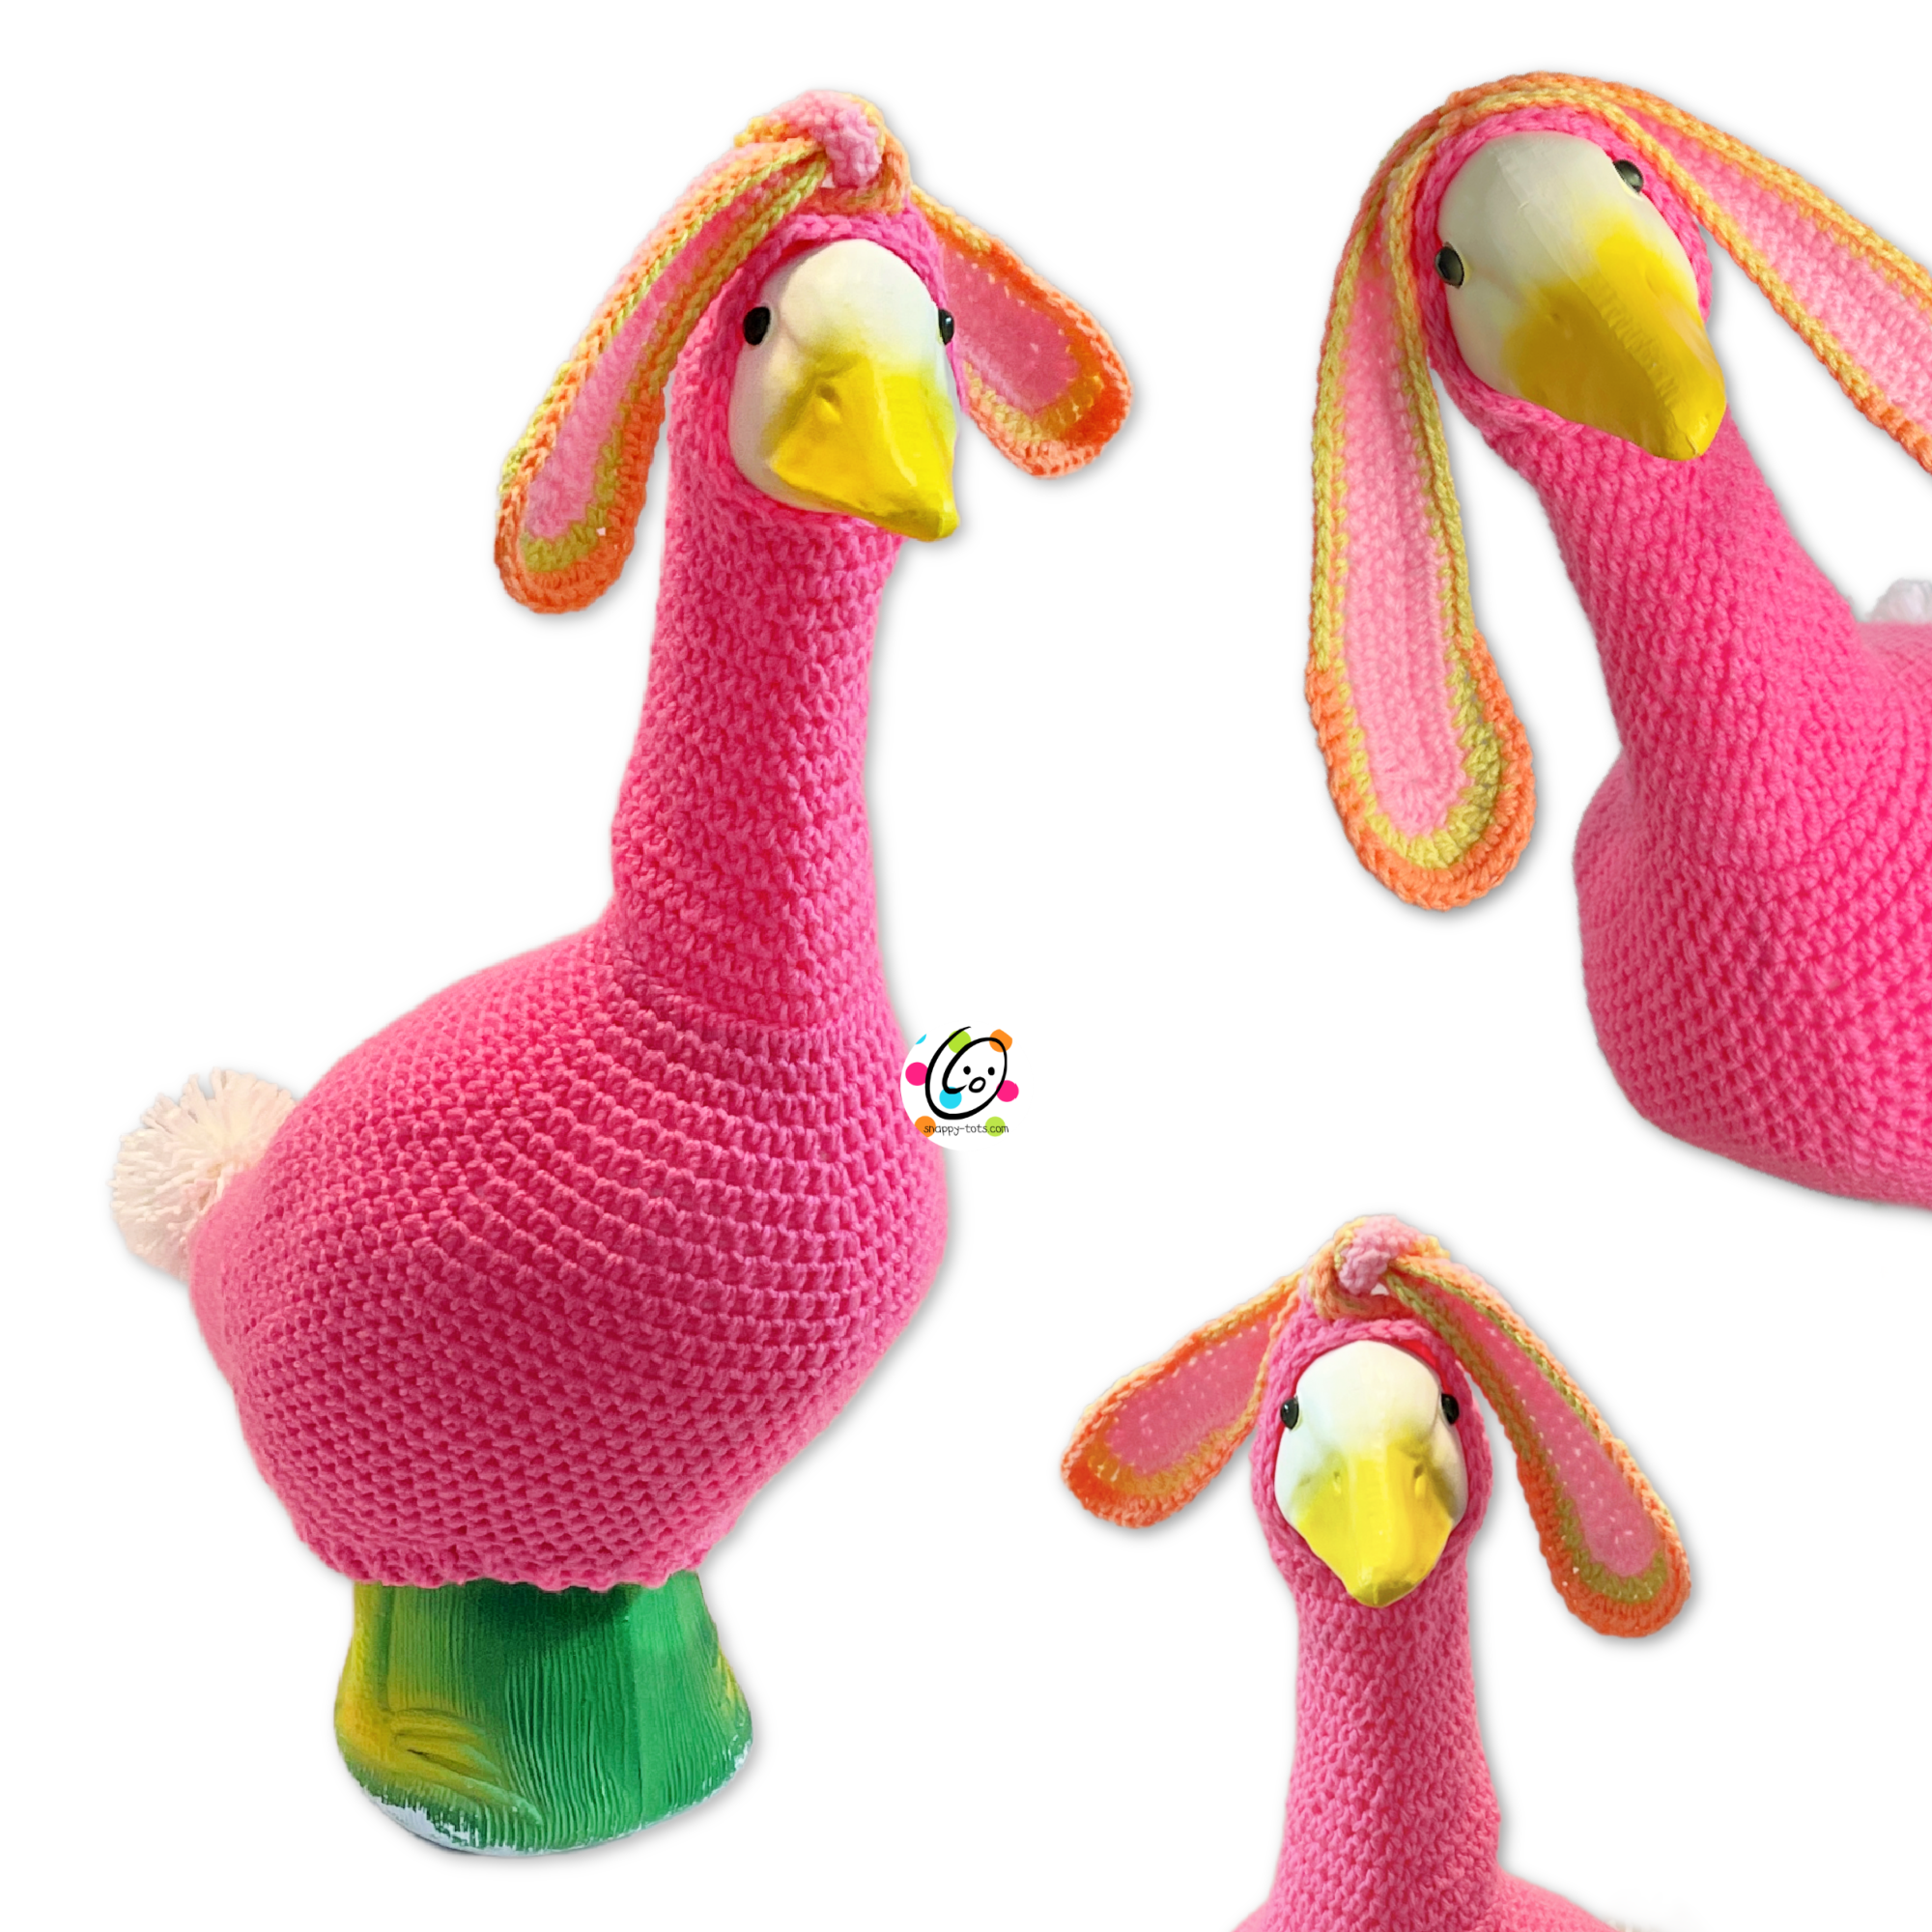
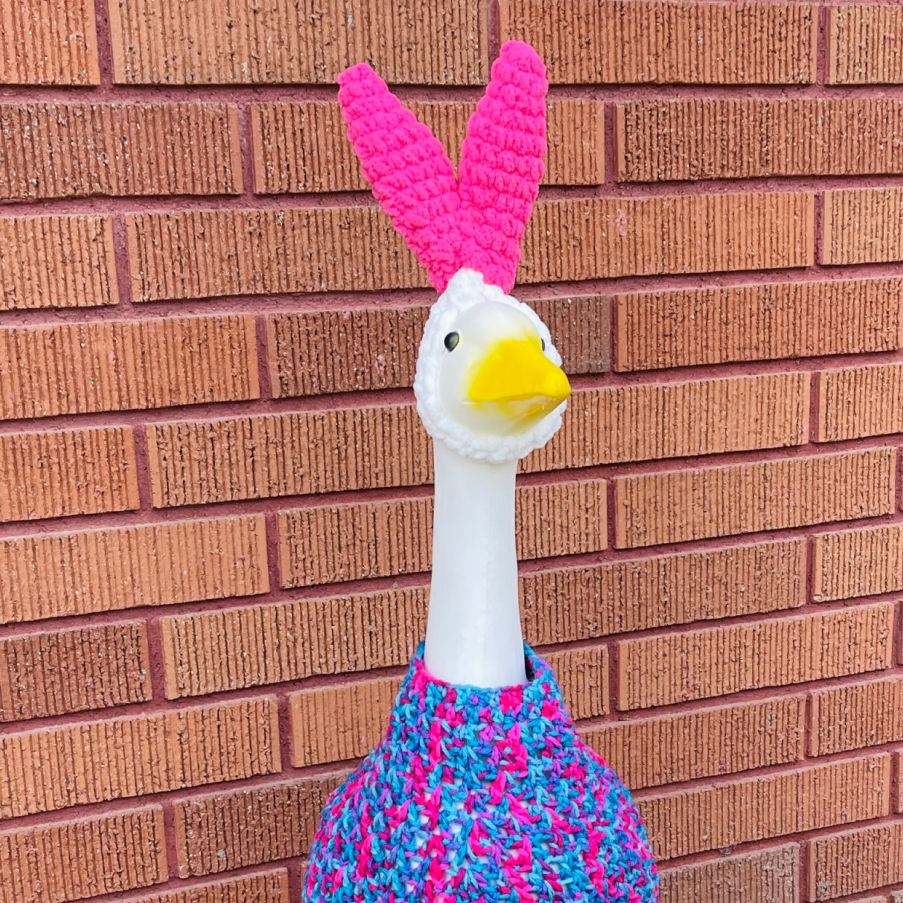
“Goose” had long floppy ears at first. He really liked them that way, but then got busy chasing around the new little bunny friend and decided they needed to be tied up on top of his head and out of the way a bit. If you would prefer stand-up ears, you could use the ones from my “bunny ears” pattern.

Watch for more fancy outfits to come each month. You can find the latest “Ducke and Goose” patterns at THIS LINK. See the full list of goose outfits and accessories at THIS LINK.

Where To Get The Goose

This is designed for a 23” goose statue like the one sold by Miles Kimball: https://www.mileskimball.com/buy-large-white-goose-23-h-310493

It is also available from Amazon: https://amzn.to/3AdRWSP


Goose Bunny Costume Crochet Pattern

The pattern is available to view here on the blog.

An ad-free, downloadable pdf is also available to purchase: Etsy | Ravelry

Special: Save 50% off the pdf until 4/17/22. The discount is available from both of the shops listed above.

Materials

  • Yarn for bunny sample: 325 yards ww yarn for main suit (RHSS Pretty N Pink); 30 yards ww yarn for the ears (RHSS Retro Stripes and Petail Pink); 15 yards ww yarn for the pompom tail (or commercial pompom)
  • Crochet Hook: G (4-4.5mm), I (5.5mm) 
  • Supplies: Yarn needle for weaving in ends, 4 stitch markers (yarn scraps work for this too)
  • Optional: Measuring tape, scissors, commercial pompom
  • Gauge: 4” with an I hook = 14 hdc sts and 10.5 rounds

Tips

  • The first stitch of each row is worked into the same stitch as the turning chain unless noted.
  • Numbers at the beginning of each line may refer to steps and not indicate the number of rows/rounds.
  • Stitch count remains the same unless noted at end of row/round.
  • Additional pictures available on pae 8.
  • If you have any questions about this pattern please contact [email protected].

Bodysuit

This starts at the bottom of the neck and is worked towards the tail. The top/hood section is added after the body is complete.

1. With an I hook and ww yarn (pink in bunny sample), ch 40, sl st in the last ch from hook to form a circle.
    Make sure the chain is not twisted. 

2. Ch 1, hdc in the same ch and in each ch around, sl st in the first st to join. (40sts)

3. Ch 1, hdc in the same st and in each st around, sl st to join.

4. Ch 1, *hdc 19, 2hdc in the next st*, repeat once, sl st to join. (42sts)

5. Ch 1, *hdc 20, 2hdc in the next st*, repeat once, sl st to join. (44sts)

6. Ch 1, *hdc 10, 2hdc in the next st*, repeat to end of round, sl st to join. (48sts)

7. Ch 1, *hdc 11, 2hdc in the next st*, repeat to end of round, sl st to join. (52sts)

8. Ch 1, *hdc 12, 2hdc in the next st*, repeat to end of round, sl st to join. (56sts)

9. Ch 1, *hdc 13, 2hdc in the next st*, repeat to end of round, sl st to join. (60sts)

10. Ch 1, hdc in the same st and in each st to end of round, sl st to join.

11. Ch 1, *hdc 14, 2hdc in the next st*, repeat to end of round, sl st to join. (64sts)

12. Ch 1, *hdc 15, 2hdc in the next st*, repeat to end of round, sl st to join. (68sts)

13. Ch 1, *hdc 16, 2hdc in the next st*, repeat to end of round, sl st to join. (72sts)

14. Ch 1, hdc in the same st and in each st to end of round, sl st to join.

15. Ch 1, *hdc 35, 2hdc in the next st*, repeat once, sl st to join. (74sts)

16. Ch 1, hdc in the same st and in each st to end of round, sl st to join.

17. Ch 1, *hdc 36, 2hdc in the next st*, repeat once, sl st to join. (76sts)

18. Ch 1, hdc in the same st and in each st to end of round, sl st to join.

19. Repeat the previous round for an additional 8 rounds. 

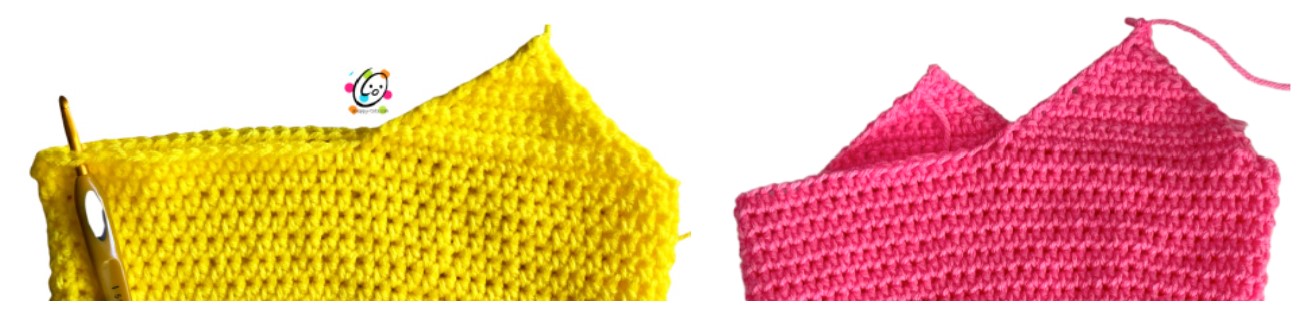
20. This step starts a triangle, wedge shape. Ch 1, sc2tog, sc 16, sc2tog. (18sts) Leave remaining sts unworked.

21. Ch 1, turn, sc2tog, sc in each st until 2 sts remain, sc2tog. (16sts)

22. Repeat the previous row until 4 sts remain.

23. Ch 1, turn, sc2tog, sc2tog. (2sts)

24. Ch 1, turn, sc2tog. Finish off the yarn.

25. Skip 14 sts on the last full round and attach the yarn to the 15th st (see photo below left). Repeat steps 20-24, but do not finish off the yarn at the end of step 24 this time. 

26. This step is worked down the side of the current triangle, across the wider flat edge (not the 14 skipped sts), and up the side of the second triangle. 

Ch 1, turn to work from the RS of the piece. Hdc in the same st, hdc 11 sts evenly spaced down the side of the triangle, hdc2tog at the corner (pick up a st from the side and the row), hdc 20, hdc2tog at the corner (pick up a st from the row and the side), hdc 11 sts evenly up the side of the triangle, hdc in the tip of the 2nd triangle. Do not continue down the opposite side of the rectangle. (46sts)

Steps 27-43 are worked back and forth in rows to extend the piece towards the tail. From this point on, work the hdc sts between the posts of the previous row. This will create a smoother fabric and will blend in better with the section worked in rounds. 

27. Ch 1, turn, sc 9, hdc 28, sc 9.

28. Ch 1, turn, sc2tog, sc 7, hdc 28, sc 7, sc2tog. (44sts)

29. Ch 1, turn, sc2tog, sc 7, hdc 26, sc 7, sc2tog. (42sts)

30. Ch 1, turn, sc 8, hdc 26, sc 8. 

31. Ch 1, turn, hdc in each st/between the posts to end of row.

32-33. Ch 1, turn, hdc between each post to end of row.

34. Ch 1, turn, hdc2tog, hdc 38, hdc2tog. (40sts)

35. Ch 1, turn, *hdc2tog, hdc 8*, repeat to end of row. (36sts)

36. Ch 1, turn, *hdc2tog, hdc 7*, repeat to end of row. (32sts)

37. Ch 1, turn, *hdc2tog, hdc 6*, repeat to end of row. (28sts)

38. Ch 1, turn, *hdc2tog, hdc 5*, repeat to end of row. (24sts)

39. Ch 1, turn, *hdc2tog, hdc 4*, repeat to end of row. (20sts)

40. Ch 1, turn, *hdc2tog, hdc 3*, repeat to end of row. (16sts)

41. Ch 1, turn, *hdc2tog, hdc 2*, repeat to end of row. (12sts)

42. Ch 1, turn, *hdc2tog, hdc*, repeat to end of row. (8sts)

43. Ch 1, turn, *hdc2tog, hdc 2*, repeat once. (6sts). Finish off, leaving a long tail for closing the end.

      With a yarn needle, use the yarn tail to weave in and out of the remaining sts, pull to close and secure the
      yarn tail. Remember this point. It is where the yarn will be attached for step 44.

44. This step adds a band to the bottom opening and helps creates the part that will wrap over the tail.

      First, let’s divide the bottom opening into ¼ sections to make it easier to work the first round.

      Fold the piece in half with the tail at one end and the head at the other. Place a marker in the tail point 
      mentioned in step 43. This will be referred to as the “starting stitch point”.

      Divide the bottom edge in 1/4s and place a marker at each point. 

      See the photo below.

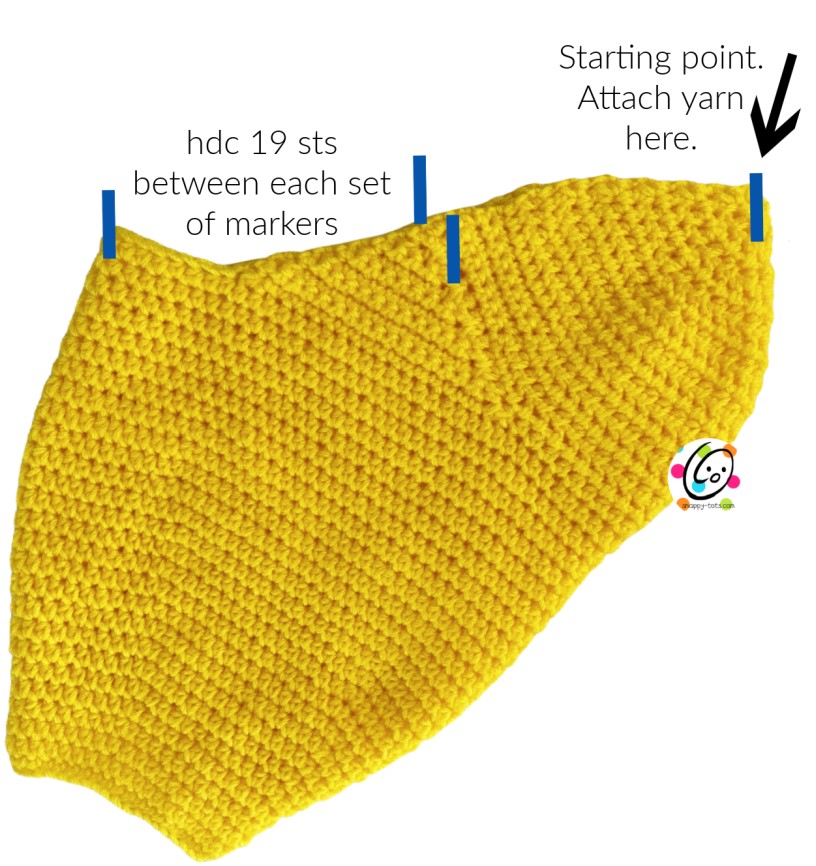
With the right side facing, use the same size hook to attach the same yarn to the starting stitch point. 

Ch 1, hdc 76 sts evenly around the bottom opening, sl st in the first st to join. 

Tip: hdc 19sts between each set of markers.

45. Ch 1, *FPHDC around the next post, BPHDC around the next post*, repeat to end of round, sl st to join.

46. Ch 1, FPHDC2tog, BPHDC2tog, *FPHDC around the next post, BPHDC around the next post*, repeat until
      4 sts remain, FPHDC2tog, BPHDC2tog. (72sts) 

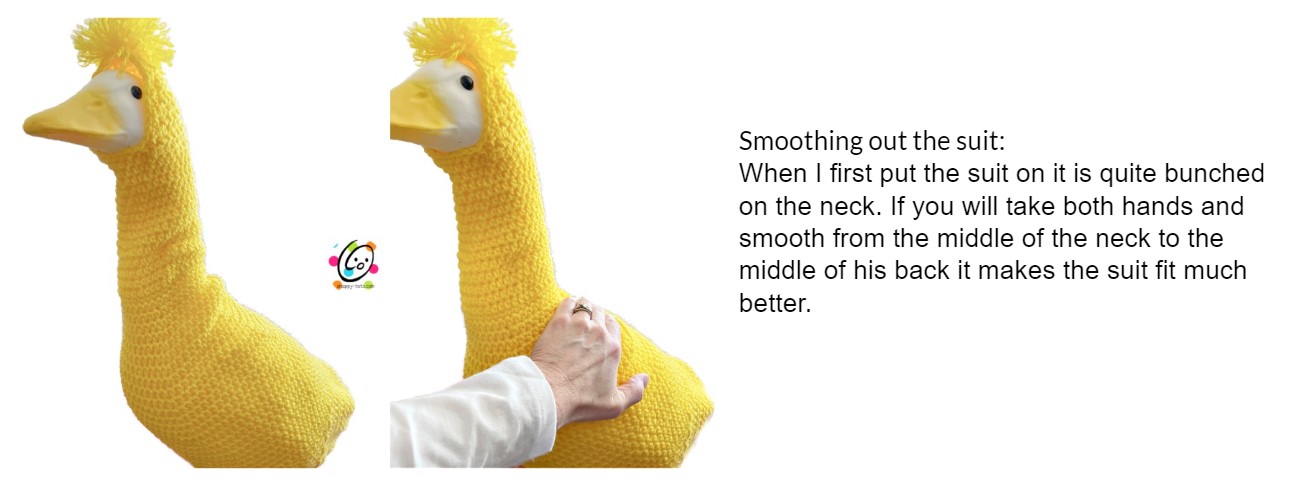
If needed, repeat step 45 to add more rounds. I suggest trying the suit on your goose and smoothing it into place (note on page 6) before adding more rounds.

Finish off and weave in ends.

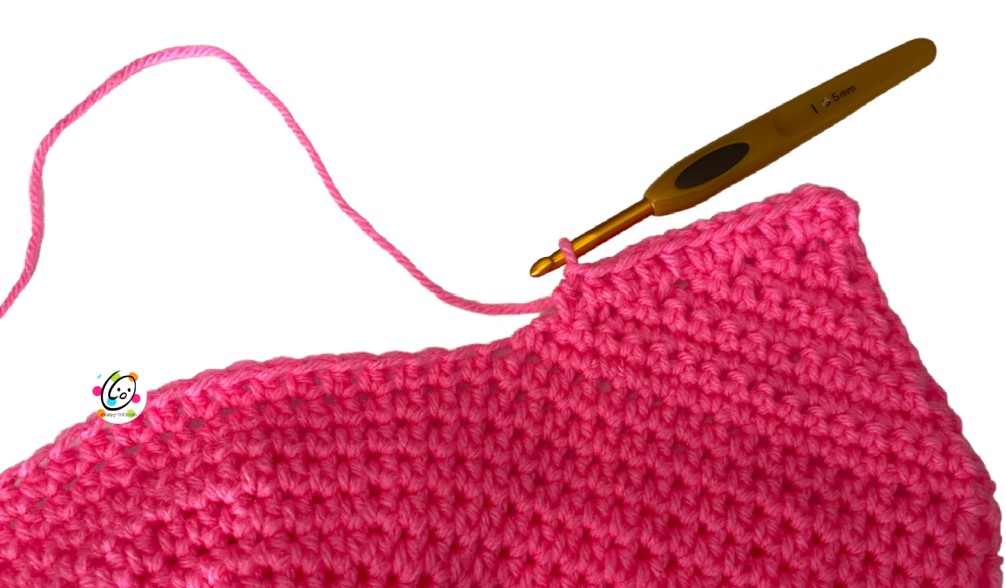
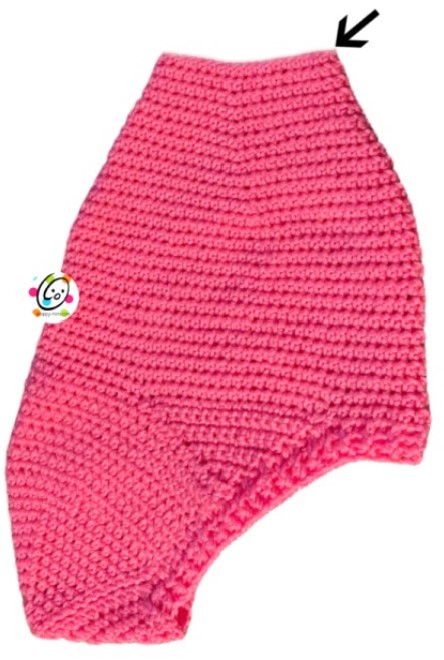
Neck/Head Section (optional)

1. This part starts the neck section. See the photo below for this step. Lay the suit on a flat surface with the feet opening lined up. With an I hook, attach the same yarn to a st on the beginning neck edge at the right. Do not ch 1. Sc in the first st, hdc in each st to end of round. Do not join. Place a marker for working in the round. (40sts)

2. Hdc 8, hdc2tog*, repeat to end of round.(36sts)

3. Hdc in the same st and in each st to end of round.

4. *hdc 7, hdc2tog*, repeat to end of round.(32sts)

5. Hdc in the same st and in each st to end of round.

6. Hdc 14, hdc2tog*, repeat to end of round. (30sts)

7. Hdc in the same st and in each st to end of round.

8. Repeat the previous round for an additional 7 rounds.

9. Sc in the next st, sl st in the next st. This is the new beginning of the round. Ch 1, hdc in the same st and in each st to the end of the round, sl st to join.

From this point on, work the hdc sts between the posts of the previous row. This will create a smoother
fabric and will blend in better with the section worked in rounds. 

10. Ch 1, TURN, hdc in the same st, hdc 24. (25sts) Leave the remaining sts unworked.

11. Ch 1, turn, sc2tog, hdc 21, sc2tog. (23sts)

12. Ch 1, turn, hdc in the same st and in each st across. 

13. Ch 1, turn, sc2tog, hdc 19, sc2tog. (21sts)

14. Ch 1, turn, hdc in the same st and in eah st across. 

15. Ch 1, turn, sc2tog, hdc 17, sc2tog. (19sts)

16. Ch 1, turn, sc2tog, hdc 15, sc2tog. (17sts)

17. Ch 1, turn, sc2tog, sc 13, sc2tog. (15sts)

18. Ch 1, turn, sc2tog, sc 11, sc2tog. (13sts)

19. Ch 1, turn, sc2tog, sc 9, sc2tog. (11sts)

20. Ch 1, turn, sc2tog, sc 7, sc2tog. (9sts)

21. Ch 1, turn, sc2tog, sc 5, sc2tog. (7sts)

22. This step is worked around the outer edge of the opening. Ch 1, sc 11 evenly down the side of the opening.
      Sc2tog at the corner (pick up a st from the side and the bottom row), sc 4, sc2tog (pick up a st from the
      current row and from the side), sc 11 evenly up the side of the opening, sc2tog, sc 3, sc2tog, sl st to join.
      Finish off and weave in ends.

Pompom Tail: Cut a piece of white yarn 12” long. This will be used to tie around the middle of the pompom. Set aside.

  1. Wrap a strand of white yarn around the palm of your hand 60+ times. 
  2. Carefully slide the loops off your hand. 
  3. Use the 12” piece to wrap around the middle of the yarn loops and snugly tie a knot. 
  4. Hold onto the ends of this piece of yarn. 
  5. Trim the loops and pom as desired. 
  6. Use the yarn tails to tie the pompom to the tip of the tail. 

Ears (make 2)

For the bunny sample, I started with a light pink yarn and then changed to RHSS Retro Stripes. 

1. This starts and the center of the ear. With a G hook and ww yarn (light pink in sample), ch 31, sc in the 2nd
    ch from hook and in each ch across. (30sts)

2. Ch 1, turn, sc in the same st and in each st to end of row. 

3. Ch 1, turn, sc in the same st, sc 19, hdc 9, 3hdc in the last st, 3dc in the edge of the piece, 3hdc in the next
    st (back of beginning chain), hdc 9, sc 20. (67sts)

Tip: This step is worked in a U shaped. You should work across the row, into the end (for the tip of the ear) and back down the beginning edge.

4. Finish off the current color and change colors if desired (yelllow in sample). Ch 1, turn, sc in the same st, sc
    25, hdc 4, *2dc in the next st, dc*, repeat 2 more times, 2dc in the next st, hdc 4, sc 26. (71sts)

5. Ch 1, turn, sl st in the same st, sl st 24, sc 7, *2hdc in the next st, hdc*, repeat 3 more times, sc 7, sl st 24.
    (75sts) Finish off, leaving an 8” tail. Set aside. 

Place the two ear pieces with right sides together. Line up the sts of the short, flat end. With a yarn needle and matching yarn, sew the edges together. 

Choose one of the following options for attaching the ears to the hood:

Option A: Sewn flat – Fold the middle, seamed area in half and sew this section to the top of the hood. 

Option B: Middle knot – tie the middle of the ears in a loose knot. With a yarn needle and matching yarn, sew the bottom edge of the knot to the top of the head.

Pompom Pouf For Hair (yellow sample): Cut a piece of matching yarn 12” long. This will be used to tie around the middle of the pompom. Set aside.

1. Wrap a strand of white yarn around the palm of your hand 20 times. 

2. Carefully slide the loops off your hand. 

3. Use the 12” piece to wrap around the middle of the yarn loops and snugly tie a knot. 

4. Hold onto the ends of this piece of yarn. 

5. Trim the loops and pom as desired. 

6. Use the yarn tails to tie the pompom to the top of the hood.


Sleeves (make 2)

The sleeve starts at the top/shoulder.

Leave a long tail in the beginning for attaching sleeve to suit when complete.

1. With an I hook and ww yarn (color to match the suit), start with a magic circle of 8 sc sts (or preferred method for starting a circle of 8 sc sts), pull to close and place a marker for working in the round. (8sts)

2. 2hdc in each st to end of round. (16sts)

3. *2hdc in the next st, hdc 3*, repeat to end of round. (20sts)

4. Hdc in each st to end of round.

5. *2hdc in the next st, hdc 4*, repeat to end of round. (24sts)

6-7. Hdc in each st to end of round.

8. *2hdc in the next st, hdc 11*, repeat once. (26sts)

9. Hdc in each st to end of round.

10. Sc, sl st. This is the new beginning of the round. Ch 1, hdc in the same st and in each st to end of round, sl st to join. 

11. Ch 1, FPHDC around each post from the previous round, sl st to join. 

12. Ch 1, sc in the same st and in each st to end of round, sl st to join. Finish off and weave in ends.

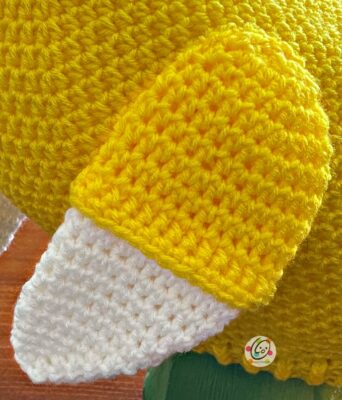
13. The white yarn for the remaining part of the wing will be attached to the inner ridge created from step 11. Pull the top edge back and use an I hook to attach white yarn to a st. See photo below for placement. Ch 1, hdc in the same st and in each st to end of round, sl st to join. (26sts)

14. Ch 1, *hdc2tog, hdc 11*, repeat once, sl st to join. (24sts)

15. Ch 1, hdc2tog, hdc in each st until 2 sts remain, hdc2tog, sl st to join. (22sts)

16. Ch 1, hdc2tog, hdc in each st until 2 sts remain, hdc2tog, sl st to join. (20sts)

17. Ch 1, hdc2tog, hdc in each st until 2 sts remain, hdc2tog, sl st to join. (18sts)

18. Ch 1, hdc in each st to end of round, sl st to join. 

19. Ch 1, hdc2tog, hdc in each st until 2 sts remain, hdc2tog, sl st to join. (16sts)

20. Ch 1, sc2tog, sc in each st until 2 sts remain, sc2tog, sl st to join. (14sts)

21. Ch 1, sc2tog, sc in each st until 2 sts remain, sc2tog, sl st to join. (12sts)

22. Ch 1, sc2tog, sc in each st until 2 sts remain, sc2tog, sl st to join. (10sts)

23. Ch 1, *sc2tog*, repeat to end of round, sl st to join. (5sts) Finish off, leaving a long tail for sewing the end.

With a yarn needle, use the yarn tail to weave in and out of the remaining sts. Pull closed and secure the end.

Notice in the main photo above that one edge of the white wing part tapers towards the end tip and the other stays more straight. Adjust your wing and flatten it to resemble the photo. 

Use the beginning yarn tail to sew the top 1” of the shoulder part of each wing to the body suit. This is easiest when the suit is on the goose. See main photos for placement.

NOTE: if the wing tips will be sewn together, make sure the placement of the wings allows for the tips to meet. You will want them to stay snug against the goose so it will be able to hold things.

Use a yarn needle and white (matching) yarn to sew the tips of the wings together if desired.

Little Bunnies and Chicks

The little friends the geese are holding are “bath buddies” I was working on at the same time as the goose suits. They fit in their arms perfectly and were a cute little addition. The pattern for these little friends is included in the pdf (available soon) and for free on my blog at THIS LINK.

Filed Under: Crochet, Ducke and Goose, Free Patterns

Join My Mailing List

Get the latest snappiness, freebies, and special offers.

You’ll Also Love

Free Pattern: Granny Style Baby Blanket
Ornament Quest #9: Teddy Ornaments
Ornament Quest #25: Gingerbread Snowmen
Next Post >

Free Pattern: Bath Buddies

HI! I am Heidi and I am so glad you are here. I hope you will enjoy my crochet and crafty creations, plus the quirky things I share.

Search For More Snappiness

  • Email
  • Facebook
  • Instagram
  • Pinterest
  • YouTube

Trending

Disclaimer

I may get a commission for purchases made through links in this post/on this site at no extra charge to you.

SnappyTots™ property is owned by Heidi Yates.

Heidi’s Top Crafty and Life Picks

Heidi’s Top Crafty and Life Picks

trending now

instagram

Follow @snappytots

Got the first of the hopscotch pavers base coated Got the first of the hopscotch pavers base coated today and I’ll add the numbers tomorrow. Oila is doing a practice run through to the side. 

We want to make a long hopscotch but starting with a regular one for now until I can find more squares. 
.
.
.
.
#diyyard #hopscotch #summerfun #steppingstones #diysteppingstones
Free cupcakes! Come get the crochet pattern and wh Free cupcakes!
Come get the crochet pattern and whip up a batch 🥳 they are gluten, sugar, AND calorie free!

Click the link in my bio for the free pattern on my blog.  THANK YOU!

Made with @redheartyarns 
.
.
.
.
.

#creativelife  #livecreatively #bhooked #crochetcommunity #crochetedwithlove #crocheters #crochetersofinstagram #crocheteveryday #ilovecrochet #snappytots #makersgonnamake 
#freepattern #freecrochet #freecrochetpattern
#redheartyarns #joycreators #yarnspirations
#supportsmallbusiness #handmade
#handmadewithjoann #joanns
🤔 Do you like Mondays? It’s my favorite day 🤔 Do you like Mondays? 
It’s my favorite day of the week! Perfect time for a fresh start. Leave the past and should-haves behind and give yourself a break!

😛 LET’S DO THIS! Live today with purpose!

Made with @textart.app.
.
.
.
.
.

#mondayquotes #freshstartquotes #newdayquotes #findjoy #restart #stopProcrastinating #letsdothis #newday #freshstart #ilovemondays
#inspirationalmorning 
#whatareyouwaitingfor#resetday 
#PositiveEnergy 
#quotes #motivationalquotes #inspirationalquotes #mirrormessages
🥳 HAPPY BIRTHDAY to one of our favorite snappy 🥳 HAPPY BIRTHDAY to one of our favorite snappy friends, Jonathan Pereira!!! Please help me wish him the best year ever.

Jonathan's mom was one of my very first customers and he had a snappy tots birthday for his 11th birthday. Mr. Chesh even went to visit him!

Since then, every year, his mom gets out all of the snappy hats she made him and everyone that comes wears a hat!!! 

It's been TEN YEARS!! He is 21 today!
.
.
.
.
.

#creativelife  #livecreatively #bhooked #crochetcommunity #crochetedwithlove #crocheters #crochetersofinstagram #crocheteveryday #ilovecrochet #snappytots #makersgonnamake 
#redheartyarns #joycreators #yarnspirations
#supportsmallbusiness #handmade
I LOVE birthdays! When is yours? Please comment an I LOVE birthdays! When is yours? Please comment and let me know. 

My birthday is next week and my shop anniversary is this month. To celebrate I am giving away a different pattern each day, plus a grab bag of crochet goodies. 
Click the link in my bio for a quick link to the event page. 

The giveaway is open worldwide and closes Sunday, 5/22/22.

Come Say Hi

  • Facebook
  • Twitter
  • Pinterest
  • Shop
  • youtube
Please join our creative crew.
  • Facebook
  • Twitter
  • Pinterest
  • Shop
  • youtube

Copyright © 2022 snappy tots · Theme by 17th Avenue