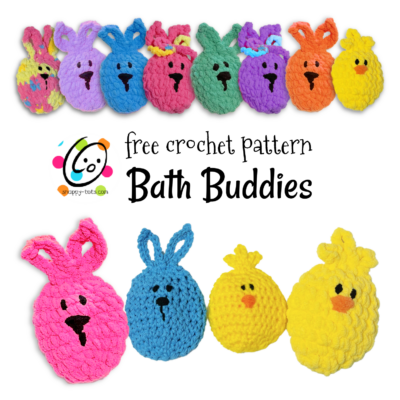
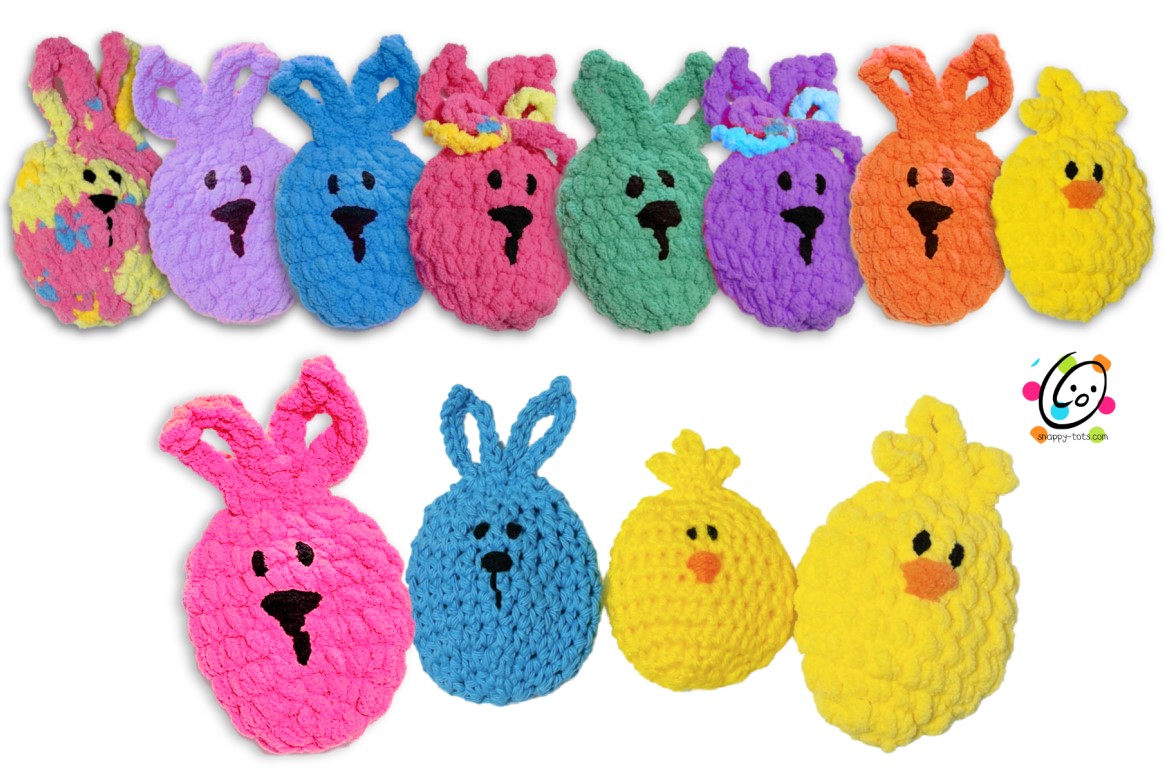
Free Pattern: Bath Buddies
My grandkids LOVE bath time so I wanted to make them some little bunnies and chicks for their baskets. Most are made from blanket yarn, but I did write a version for regular cotton too.I think they will be a lot of fun in the bath. They would make cute gifts for grown-ups too. We all need a little happy chick in our life right?
They take less than 20 minutes each from start to finish and the pattern is so easy that you will have it memorized after the second bunny….so you can whip up a whole litter! (is that what you call a bunch of bunnies?? lol)
I hope you will share pix of the bunnies and chicks you create. I would LOVE to see them.
Bath Buddies Crochet Pattern
The instructions for the bunnies and chicks are below and include both the Bernat Blanket and worsted weight versions.
Blanket Yarn Bath Buddies
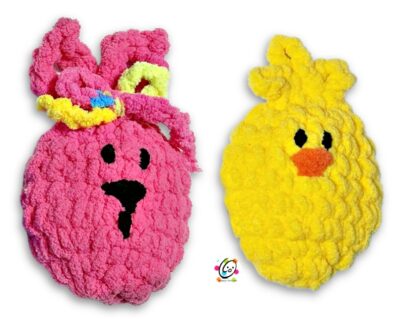
These start at the bottom of the buddy.
Materials and Details
- Yarn: Small amounts of Bernat Blanket yarn
- Crochet Hook: K (6.5mm)
- Misc: Yarn needle
- Measurements: 4″ (6″ with ears)
Bunny
1. With a K hook and Bernat Blanket yarn, ch 2, 8sc in the 2nd ch from hook. Place a marker for working in the round. (8sts)
2. 2sc in each st to end of round. (16sts)
3. *2sc in the next st, sc 7*, repeat once. (18sts)
4. *2sc in the next st, sc 8*, repeat once. (20sts)
5-7. Sc in each st to end of round.
8. *sc2tog, sc 2*, repeat to end of round. (15sts)
9. *sc2tog, sc*, repeat to end of round. (10sts)
10. Sl st in the next st. Flatten the piece, with the current yarn position at the right edge. It is easiest to stitch the eyes and nose at this point. Use a yarn needle and blanket or ww yarn to stitch the features to the center front.
This step seams the top edge together. Working through the stitches of the front and back layers of the top round, ch 1, sc2tog, sc, sc2tog. (3sts)
11. TURN, ch 10, sl st in the next st, ch 10, sl st in the next st.
12. Ch 1, turn, working up the first loop, *sl st 4, ch 2, sl st in the 2nd ch from hook, sl st 5*, sl st between the two ears. Repeat once, then sl st in the same st on the bunny. Finish off and weave in ends.
Bow (optional): With a K hook and blanket yarn, ch 30. Finish off and tie a knot in each end. Pull one end through a st at the base of the ear and tie a bow.
Chick
1. With a K hook and Bernat Blanket yarn, ch 2, 8sc in the 2nd ch from hook. Place a marker for working in the round. (8sts)
2. 2sc in each st to end of round. (16sts)
3. *2sc in the next st, sc 7*, repeat once. (18sts)
4. *2sc in the next st, sc 8*, repeat once. (20sts)
5-7. Sc in each st to end of round.
8. *sc2tog, sc*, repeat to end of round. (15sts)
9. *sc2tog, sc*, repeat to end of round. (10sts)
10. Sl st in the next st. Flatten the piece, with the current yarn position at the right edge. It is easiest to stitch the eyes and beak at this point. Use a yarn needle and blanket or ww yarn to stitch the features to the center front.
This step seams the top edge together. Working through the stitches of the front and back layers of the top round, ch 1, sc2tog, sc, sc2tog. (3sts)
11. TURN, ch 5, sl st in the same st, ch 7, sl st in the next st, ch 4, sl st in the next st. Finish off and weave in ends.
Worsted Weight Yarn Bath Buddies
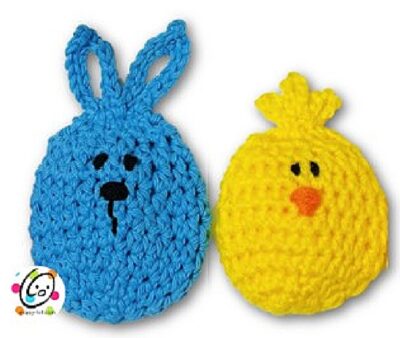
If these will be used with water I suggest using 100% cotton yarn.
These start at the bottom of the buddy.
Materials and Details
- Yarn: Small amounts of worsted weight yarn
- Crochet Hook: H (5mm)
- Misc: Yarn needle
- Measurements: 4″ (6″ with ears)
Bunny
1. With an H hook and worsted weight yarn, start with a magic circle of 8 sc sts (or preferred method of starting a circle of 8 sc sts), pull closed, and place a marker for working in the round. (8sts)
2. 2hdc in each st to end of round. (16sts)
3. *2hdc in the next st, hdc*, repeat to end of round. (24sts)
4-7. Hdc in each st to end of round.
8. *hdc2tog, hdc 4*, repeat to end of round. (20sts)
9. *hdc2tog, hdc 3*, repeat to end of round. (16sts)
10. *sc2tog, sc 2*, repeat to end of round. (12sts)
11. Sl st in the next st. Flatten the piece, with the current yarn position at the right edge. It is easiest to stitch the eyes and nose at this point. Use a yarn needle ww yarn to stitch the features to the center front.
This step seams the top edge together. Working through the stitches of the front and back layers of the top round, ch 1, sc2tog, sc2tog, sc2tog. (3sts)
12. TURN, ch 14, sl st in the next st, ch 14, sl st in the next st.
13. Ch 1, turn, working up the first loop, *sl st 6, ch 2, sl st in the 2nd ch from hook, sl st 7*, sl st between the two ears. Repeat once, then sl st in the same st on the bunny. Finish off and weave in ends.
Bow (optional): With an H hook and worsted weight yarn, ch 30. Finish off and tie a knot in each end. Pull one end through a st at the base of the ear and tie a bow.
Chick
1. With an H hook and worsted weight yarn, start with a magic circle of 8 sc sts (or preferred method of starting a circle of 8 sc sts), pull closed and place a marker for working in the round. (8sts)
2. 2hdc in each st to end of round. (16sts)
3. *2hdc in the next st, hdc*, repeat to end of round. (24sts)
4-7. Hdc in each st to end of round.
8. *hdc2tog, hdc 4*, repeat to end of round. (20sts)
9. *hdc2tog, hdc 3*, repeat to end of round. (16sts)
10. *sc2tog, sc 2*, repeat to end of round. (12sts)
11. Sl st in the next st. Flatten the piece, with the current yarn position at the right edge. It is easiest to stitch the eyes and beak at this point. Use a yarn needle ww yarn to stitch the features to the center front.
This step seams the top edge together. Working through the stitches of the front and back layers of the top round, ch 1, sc2tog, sc2tog, sc2tog. (3sts)
12. TURN, ch 7, sl st in the same st, ch 9, sl st in the next st, ch 7, sl st in the next st. Finish off and weave in ends.
Pin To Save For Later