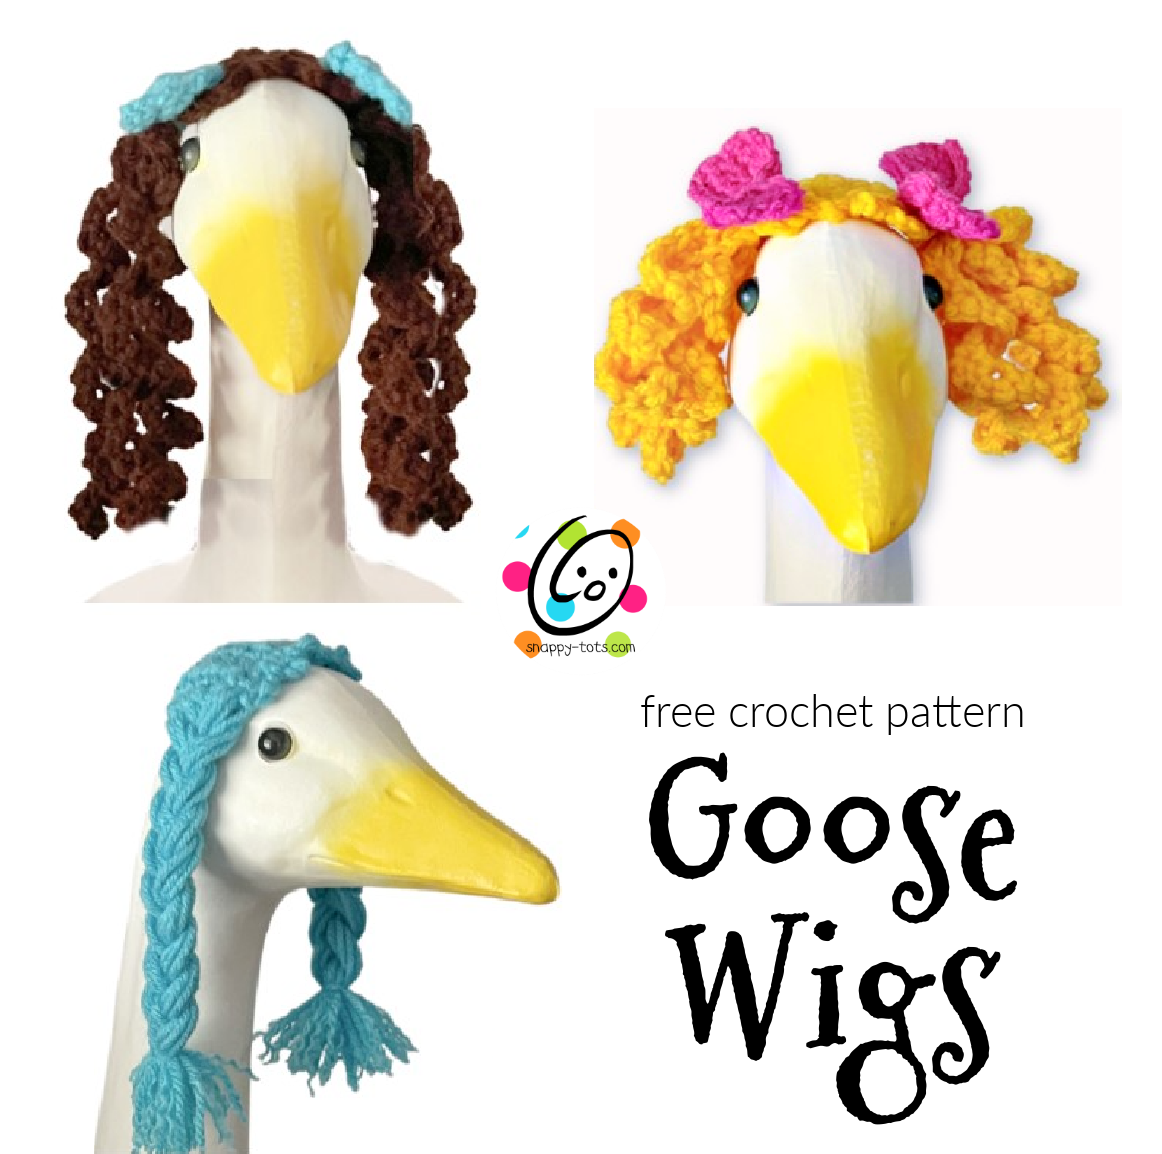
Free Pattern: Goose Wigs
For my birthday, I thought it would be fun to make my goose statue, named “Ducke” (duke), a Miss Snappy wig. Of course, I needed to make one for my parent’s goose too.
Since I wear my hair in braids most of the summer I added a third, braided wig too. I hope you will have fun with these. They are quick and easy to make, plus it lets your goose show off his/her personality.
Watch for more fancy outfits to come each month. You can find the latest “Ducke and Goose” patterns at THIS LINK. See the full list of goose outfits and accessories at THIS LINK.
Where To Get The Goose
This is designed for a 23” goose statue like the one sold by Miles Kimball: https://www.mileskimball.com/buy-large-white-goose-23-h-310493
It is also available from Amazon: https://amzn.to/3AdRWSP
Goose Wigs Crochet Pattern
The pattern is available to view here on the blog.
An ad-free, downloadable pdf is also available to purchase: Ravelry | Etsy
Materials
- Worsted weight yarn. Sample Colors: Red Heart Super Saver Saffron, Coffee, Turqua, Shocking Pink
- Crochet Hook: G (4-4.5mm)
- Supplies: Yarn needle for weaving in ends, velcro adhesive strips or circle for attaching the wig to the top of the head.
Tips
- The first stitch of each row is worked into the same stitch as the turning chain unless noted.
- Numbers at the beginning of each line may refer to steps and not indicate the number of rows/rounds.
- Stitch count remains the same unless noted at end of row/round.
- If you have any questions about this pattern please contact [email protected].
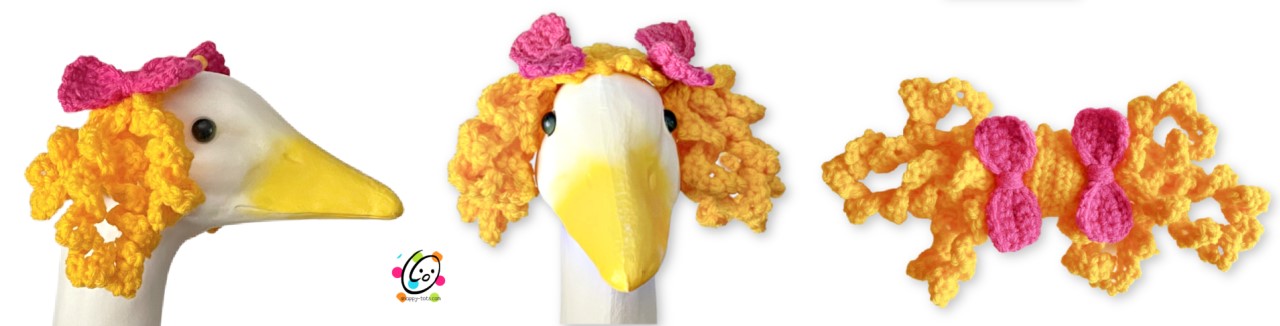
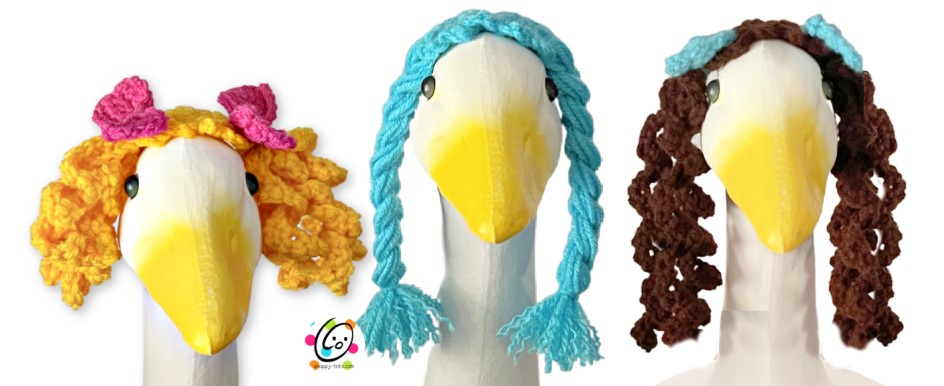
Loopy Wig (yellow sample)
This starts with a small rectangle for the middle.

1. With a G hook and ww yarn (yellow in sample), ch 8, sc in the 2nd ch from hook, hdc 5, sc. (7sts)
2. Ch 1, turn, sc in the same st, hdc 5, sc.
3. Repeat the previous row 4 more times.
4. This step creates the loops. Ch 1, turn, sc2tog, ch 40, 2sc in the 2nd ch from hook, *sk 1, 3sc in the next ch*, repeat to end of chain, insert the hook into the end/tip of the spiral piece and then into the same st on the main hairpiece. Pull up a loop and through all of the loops on the hook. First loop complete.
Sl st in the next st on the hairpiece. Ch 60, 2sc in the 2nd ch from hook, *sk 1, 3sc in the next ch*, repeat to end of chain, insert the hook into the end/tip of the spiral piece and then into the same st on the main hairpiece. Pull up a loop and through all of the loops on the hook. Second loop complete.
Sl st in th next st on the hairpiece. Ch 40, 2sc in the 2nd ch from hook, *sk 1, 3sc in the next ch*, repeat to end of chain, insert the hook into the end/tip of the spiral piece and then into the same st on the main hairpiece. Pull up a loop and through all of the loops on the hook. Third loop complete.
Sc2tog. This step is worked across the edge of the hairpiece to create “bangs”. Ch 4, sl st in the corner of the piece, *ch 4, sl st in the next space*, repeat, evenly spacing the sl sts to create a total of 5 loops across this edge.
This step is worked across the beginning edge of the hairpiece. Ch 1, sc2tog, ch 40, 2sc in the 2nd ch from hook, *sk 1, 3sc in the next ch*, repeat to end of chain, insert the hook into the end/tip of the spiral piece and then into the same st on the main hairpiece. Pull up a loop and through all of the loops on the hook. First loop complete.
Sl st in the next st on the hairpiece. Ch 60, 2sc in the 2nd ch from hook, *sk 1, 3sc in the next ch*, repeat to end of chain, insert the hook into the end/tip of the spiral piece and then into the same st on the main hairpiece. Pull up a loop and through all of the loops on the hook. Second loop complete.
Sl st in th next st on the hairpiece. Ch 40, 2sc in the 2nd ch from hook, *sk 1, 3sc in the next ch*, repeat to end of chain, insert the hook into the end/tip of the spiral piece and then into the same st on the main hairpiece. Pull up a loop and through all of the loops on the hook. Third loop complete.
Sc2tog. Finish off and weave in ends.
Bow pattern is available further down in this post.
Spiral Wig (brown sample)
This starts with a small rectangle for the middle.

1. With a G hook and ww yarn (brown in sample), ch 8, sc in the 2nd ch from hook, hdc 5, sc. (7sts)
2. Ch 1, turn, sc in the same st, hdc 5, sc.
3. Repeat the previous row 4 more times.
4. This step creates the loops. Ch 1, turn, sc2tog, ch 50, 2sc in the 2nd ch from hook, *sk 1, 3sc in the next ch*, repeat to end of chain, sl st in the same st on the main hairpiece. First loop complete.
Sl st in the next st on the hairpiece. Ch 60, 2sc in the 2nd ch from hook, *sk 1, 3sc in the next ch*, repeat to end of chain, sl st in the same st on the main hairpiece. Second loop complete.
Sl st in th next st on the hairpiece. Ch 40, 2sc in the 2nd ch from hook, *sk 1, 3sc in the next ch*, repeat to end of chain, sl st in the same st on the main hairpiece. Third loop complete.
Sc2tog. This step is worked across the edge of the hairpiece to create “bangs”. Ch 4, sl st in the corner of the piece, *ch 4, sl st in the next space*, repeat, evenly spacing the sl sts to create a total of 5 loops across this edge.
This step is worked across the beginning edge of the hairpiece. Ch 1, sc2tog, ch 50, 2sc in the 2nd ch from hook, *sk 1, 3sc in the next ch*, repeat to end of chain, sl st in the same st on the main hairpiece. First loop complete.
Sl st in the next st on the hairpiece. Ch 60, 2sc in the 2nd ch from hook, *sk 1, 3sc in the next ch*, repeat to end of chain, sl st in the same st on the main hairpiece. Second loop complete.
Sl st in th next st on the hairpiece. Ch 40, 2sc in the 2nd ch from hook, *sk 1, 3sc in the next ch*, repeat to end of chain, sl st in the same st on the main hairpiece. Third loop complete.
Sc2tog. Finish off and weave in ends.
Bow pattern is available further down in this post.
Braid Wig (turquoise sample)
This starts with a small rectangle for the middle.

1. With a G hook and ww yarn (turquoise in sample), ch 8, sc in the 2nd ch from hook, hdc 5, sc. (7sts)
2. Ch 1, turn, sc in the same st, hdc 5, sc.
3. Repeat the previous row 4 more times.
4. This step is worked around the outer edge. Ch 1, turn, sc2tog, sc 5.
This step is worked across the edge of the hairpiece to create “bangs”. Ch 4, sl st in the corner of the piece, *ch 4, sl st in the next space*, repeat, evenly spacing the sl sts to create a total of 5 loops across this edge.
This step is worked across the beginning edge of the hairpiece. Ch 1, sc 5, sc2tog. Finish off and weave in ends.
Cut 24 pieces of matching yarn, 16” long and 2 pieces 6” long. Divide the strands into 2 piles.
Working across one edge with the 6 sts, pull 2 strands through each st until the ends are even. Divide the strands into three groups of 8. Loosely braid. Use the 6” long piece to tie around the bottom of the braid. Trim yarn ends as needed.
Tip: I like to pull the yarn tails apart to create a fully, frizzy look as shown in the sample on the goose.
Hairbow (make 2)
1. With a G hook and worsted weight yarn (color of choice), ch 11, sc in the 2nd ch from hook and in each ch across. (10sts)
2. Ch 1, turn, sc in the same st and in each st across.
3. Repeat the previous row for an additional 3 rows.
Finish off and weave in ends.
Cut a long piece of matching yarn to wrap around the center. Attach one end of the yarn to the center back of the bow piece. Tightly wrap the yarn around the middle of the bow several times, cinching it in at the middle. Secure the yarn at the back of the bow.
Use the remaining yarn to wrap around the top edge of the loops/curls where they meet the hairpiece. Pull snug to gather them in slightly.
Repeat for the opposite side.
Velcro
Stick one piece of the sticky adhesive velcro to the underside of the hairpiece and the other side to the top of the goose so it sits where you want the hairpiece.
Pin To Save For Later