

Weekly Wash #40: Frank and Bride Cloths
I needed a couple of Halloween gifts at the last minute so I whipped up these super easy Frank and Bride Cloths. They could also be as treat bags or used as pockets on a bag. I hope you will enjoy making them.
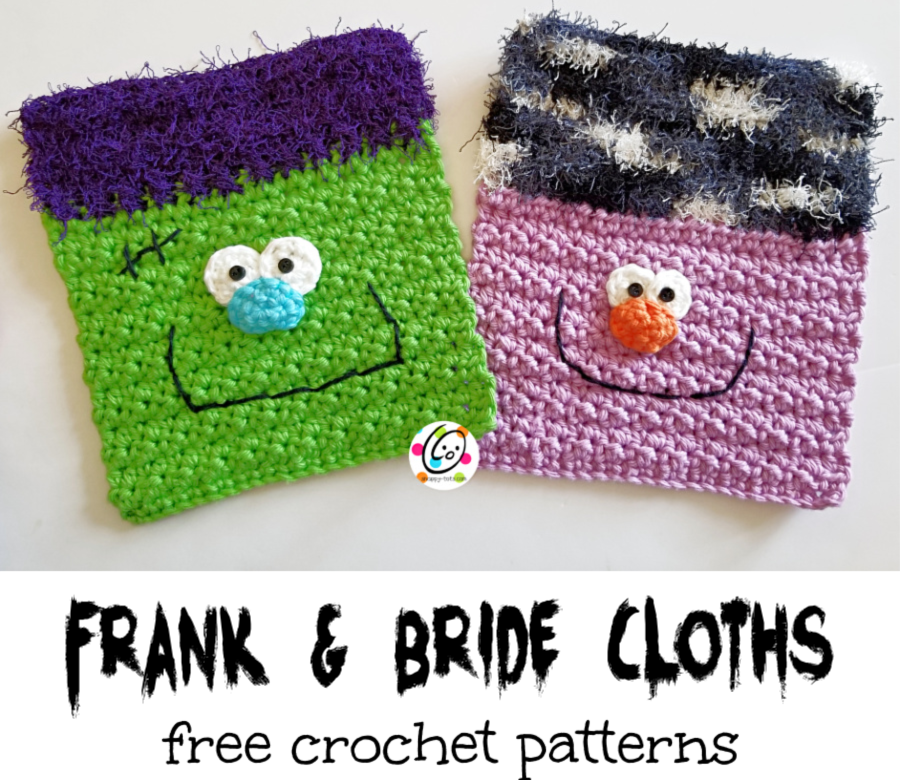
Frank and Bride Cloths Pattern
Please CLICK HERE to add this to your RAVELRY FAVORITES to save for later.
Materials and Details
- Yarn: Frank – 100 yards Red Heart Scrubby Smoothie Lime, 40 yards Red Heart Scrubby Grape; Bride – 100 yards Red Heart Scrubby Smoothie Lavender, 40 yards Red Heart Scrubby Marble; small amounts of white, turquoise and orange yarn. RHSS yarn was used for the nose and eyes in the samples.
- Crochet Hook: H Hook (5mm)
- Notions: 2 small black buttons per cloth for eyes, sewing needle, black thread, yarn needle.
- Gauge: Not needed for this project.
- Measurement: 7.5 ” square
Note: I made the bride a little longer than Frank to show off her hair. These two could be sewn together to make a treat bag. If so, you will want to add 2 rows to the body section of Frank, making them the same length.
Directions for Frank
- With an H hook and green cotton yarn, ch 26, sc in 2nd ch from hook and in each ch across. (25sts)
- Ch 2, turn, hdc in same st, sc in next st, *hdc in next st, sc in next st*, repeat until 1 st remains, hdc.
- Ch 2, turn, hdc in same st, *hdc in next st, sc in next st,*, repeat until 2 sts remain, hdc 2.
- Repeat rows 2 and 3 for a total of 14 rows.
- Ch 2, turn, hdc in each st to end of row.
- Change to scrubby yarn. Ch 2, turn, hdc in same st, FPTR around next post, *hdc in next st, FPTR around next post*, repeat until 1 st remains, hdc in last st.
- Ch 2, turn, hdc in each st to end of row.
- Repeat previous row two more times.
- Ch 1, turn, sc in each st to end of row. Finish off and weave in ends.
Eyes (make 2)
- With an H hook and white yarn, create a magic circle of 6 sc sts (or preferred method for starting a circle of 6 sc sts), pull closed and place a marker for working in the round. (6sts)
- *2sc in next st, sc 2*, repeat once. (8sts) Finish off, leaving a tail for sewing to cloth.
- After both eyes are made, use a yarn needle and each yarn tail to sew the eyes to the center front of the cloth. Use a sewing needle and black thread to sew a small black button on top of each eye.
Nose (make 1)
- With an H hook and turquoise yarn, create a magic circle of 6 sc sts (or preferred method for starting a circle of 6 sc sts), pull closed and place a marker for working in the round. (6sts)
- 2sc in each st to end of round. (12sts) Finish off, leaving a tail for sewing to cloth.
- With a yarn needle, use the yarn tail to sew the nose in place, overlapping the bottom edge of the eyes. Allow the center to mound slightly. Shape as desired.
Mouth and Scar: Stitch in place with a yarn needle and black yarn.
Directions for Frank’s Bride
- With an H hook and lavender cotton yarn, ch 26, sc in 2nd ch from hook and in each ch across. (25sts)
- Ch 2, turn, hdc in same st, sc in next st, *hdc in next st, sc in next st*, repeat until 1 st remains, hdc.
- Ch 2, turn, hdc in same st, *hdc in next st, sc in next st,*, repeat until 2 sts remain, hdc 2.
- Repeat rows 2 and 3 for a total of 12 rows.
- Ch 2, turn, hdc in each st to end of row.
- Change to scrubby yarn. Ch 2, turn, FPHDC around each post from previous round. Note: keep the post st loose. This will allow the scrubby yarn to fill in a little.
- Ch 2, turn, hdc in each st to end of row.
- Repeat previous row 5 more times.
- Ch 1, turn, sc in each st to end of row. Finish off and weave in ends.
Eyes (make 2): With an H hook and white yarn, create a magic circle of 8 sc sts (or preferred method for starting a circle of 8 sc sts), pull closed and sl st to join. (8sts) Finish off, leaving a tail for sewing to cloth.
After both eyes are made, use a yarn needle and each yarn tail to sew the eyes to the center front of the cloth. Use a sewing needle and black thread to sew a small black button on top of each eye.
Nose (make 1)
- With an H hook and orange yarn, create a magic circle of 6 sc sts (or preferred method for starting a circle of 6 sc sts), pull closed and place a marker for working in the round. (6sts)
- 2sc in each st to end of round. (12sts) Finish off, leaving a tail for sewing to cloth.
- With a yarn needle, use the yarn tail to sew the nose in place, overlapping the bottom edge of the eyes. Allow the center to mound slightly. Shape as desired.


One Comment
Comments are closed.