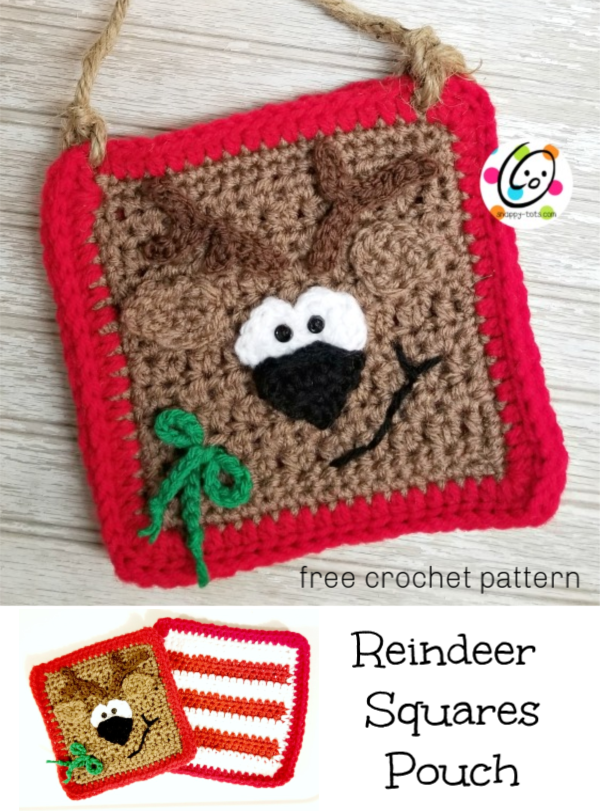
Free Pattern: Reindeer Squares Pouch
When I designed my “Santa’s Reindeer Scarf” I fell in love with all of the little reindeer. I knew I wanted to make them into little bags and other things. I think the possibilities are endless! They would make cute coasters, pillows (alone or sewn together) and more. If you make something from these little guys please share a picture with me.

Reindeer Squares Pattern
An ad-free, downloadable PDF which includes all of the photos and instructions is available for only $2.
Materials and Details
Yarn: worsted weight in choice of colors.
Sample: Red Heart Yarns Cafe, Cherry, Coffee, White, Black. Small amount of green or ribbon for the bow.
Hook: H
Miscellaneous: yarn needle for weaving in ends, two small black buttons, sewing needle, black thread, 18” jute or ribbon for hanger, lightweight black yarn or embroidery floss for smile.
Measurements: 6.5” square
Tips
- The first stitch of each row is worked into the same st as the turning chain.
- Stitch counts remain the same unless noted at end of row.
- Pattern is written with color changes for the sample. Finish off each yarn when changing colors.
- Substitute colors as desired. Try to use similar weight yarns, preferably all the same brand.
Directions
Reindeer Square
1. With H hook and brown yarn, ch 19, sc in each ch to end of row. (18sts) 2-12. Ch 2, turn, hdc in each st to end of row.
13. Ch 1, turn, sc in same st and in each st to end of row.
14. This step is worked around outer edge of block. Ch 1, do not turn. Sc in same st. Sc evenly down side of block, working (sc, ch 1, sc) in the corner. Continue working around outer edge, with (sc, ch 1, sc) in each corner. Sl st in beginning ch to join.
15. Change to red yarn. Ch 2, (hdc, ch 2, 2hdc) in same space, hdc in each st around, working (2hdc, ch 2, 2hdc) in each corner. Sl st in beginning ch 2 to join. Finish off and weave in ends.
Bow: With H hook and green yarn, ch 40. Finish off and tie a knot in each end. Pull ends through stitches on the square and tie a bow.
Reindeer Eyes With H hook and white yarn, ch 7, hdc in 2nd ch from hook, 2dc in next ch, dc, ch 2, sl st in same ch, sl st in next ch, ch 2, dc in same ch, 2dc in next ch, (hdc, sl st) in next ch. Finish off, leaving a tail for sewing to square. Pupils are 2 black buttons, sewn in place with black thread and sewing needle. Mouth is stitched in place with light weight black yarn or embroidery floss and yarn needle.
Nose
1. With H hook, ch 9, sc2tog (2nd and 3rd chs from hook), sc 4, sc2tog. (6sts)
2. Ch 1, turn, sc2tog, sc 2, sc2tog. (4sts)
3. Ch 1, turn, sc2tog, sc2tog. (2sts)
4. Ch 1, turn, sc2tog. Finish off, leaving a tail for sewing in place.

Ears – Make 2
1. With H hook and yarn, start with a magic circle of 5 sts (or preferred method for starting a circle of 5 sc sts), pull closed and place marker for working in the round. (5sts)
2. (hdc, dc) in next st, dc. Ch 1, turn, sl st 2, sc, 2sc in next st, 2sc in next st, 2sc in next st, sl st, sl st 2 in side of dc post. Finish off, leaving a tail for sewing in place.
Antlers – make 2
With an H hook, ch 13, sl st 6, ch 6, sl st 11. Finish off, leaving a tail for sewing in place.
Assembly: with a yarn needle and yarn tails, sew pieces to square.

Striped Square
1. With H hook and white yarn, ch 19, sc in each ch to end of row. (18sts)
2. Ch 2, turn, hdc in each st to end of row.
3. Change to red yarn. Ch 2, turn, hdc in each st to end of row.
4. Ch 2, turn, hdc in each st to end of row.
5. Change to white yarn. Ch 2, turn, hdc in each st to end of row.
6. Ch 2, turn, hdc in each st to end of row.
7. Change to red yarn. Ch 2, turn, hdc in each st to end of row.
8. Ch 2, turn, hdc in each st to end of row.
9. Change to white yarn. Ch 2, turn, hdc in each st to end of row.
10. Ch 2, turn, hdc in each st to end of row.
11. Change to red yarn. Ch 2, turn, hdc in each st to end of row.
12. Ch 2, turn, hdc in each st to end of row.
13. Change to white yarn. Ch 2, turn, hdc in each st to end of row.
14. Ch 1, turn, sc in same st and in each st to end of row.
15. This step is worked around outer edge of block. Ch 1, do not turn. Sc in same st. Sc evenly down side of block, working (sc, ch 1, sc) in the corner. Continue working around outer edge, with (sc, ch 1, sc) in each corner. Sl st in beginning ch to join.
16. Change to red yarn. Ch 2, (hdc, ch 2, 2hdc) in same space, hdc in each st around, working (2hdc, ch 2, 2hdc) in each corner. Sl st in beginning ch 2 to join. Finish off and weave in ends.
Bag Assembly
Stack squares together with wrong sides together and reindeer block towards you. With an H hook, attach red yarn to the 3rd st from the left on the top row. Sl st through both squares to join together. Sl st in each st down side, across the bottom and up the other side. Sl st in the first 3 sts on the top edge. Finish off and weave in ends.
Cute a piece of jute (or ribbon) approximately 18” long. Pull each end through the top row and tie a knot in each end.
Variations
This would make a cute little pillow or hot pad as well. For the hot pad, use cotton yarn.