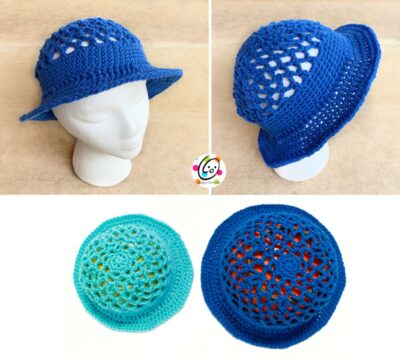
Free Pattern: Breezy Sunhat
Sunhats are great for helping shade the eyes, but I don’t like when they make my head sweat during the 100 plus temps we have been having. This sunhat is designed with an open weave crown to help let in some breeze.
Breezy Sunhat Crochet Pattern
The crochet pattern for this sunhat is available for free below.
A downloadable, ad-free pattern that includes the instructions and all pictures is also available to purchase from my Ravelry Shop.
Materials
- Yarn: 125-150 yards worsted weight in choice of colors (acrylic or cotton). The blue sample is Lily Sugar N Cream (cotton). The teal sample is RHSS Aruba Sea (acrylic).
- Crochet Hook: H (5mm), I (5.5mm)
- Miscellaneous: yarn needle
Measurements
- Gauge
Top: See measurements per step on each size. Band: 1” of sc sts with I hook = 3 sc sts and 4.5 rounds
Finished measurements:
Toddler – 8.5” – 9” side to side, 4.75” top to bottom of sc band section
Child Small – 9” side to side, 5” top to bottom of sc band section
Child Large/Preteen – 10” side to side, 5.5” top to bottom of sc band section
Teen/Adult – 10” side to side, 6” top to bottom of sc band section
- Sizes (some are very close in size): Toddler (up to 24 mths), Child Small, Child Large/Preteen, Teen/Adult
Tips
- For the top section please take a second to read each step. It is not hard, but does need you to pay attention.
- First stitch of each row is worked into the same stitch as the turning chain unless noted.
- The beginning ch is not counted as a stitch.
- Numbers at the beginning of each line may refer to steps and not indicate number of rows.
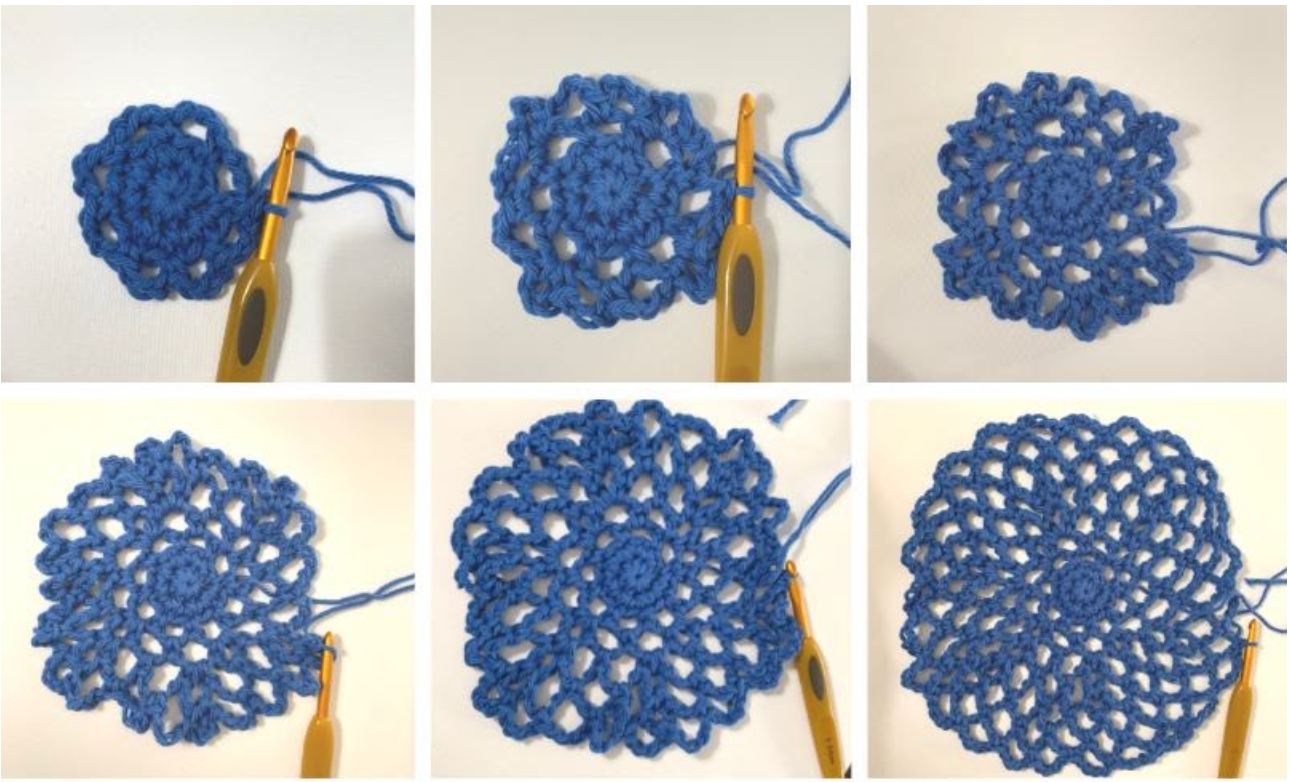
- Photos available at the end of this post.
Toddler ( approximately up to 24 mths)
Note: On measurements starting on step 4 please allow ½” difference. It is tricky to measure this shape the same place each time.
1. With an I hook and yarn, start with a magic circle of 8 sc sts (or preferred method for starting a circle of 8 sc sts). Pull closed and place marker to keep track of the beginning of the round. (8sts)
2. 2sc in each st to the end of the round. (16sts)
3. *ch 3, sk 1, sc*, repeat to end of round. (8 spaces) 2” across.
4. Ch 3, sc in first loop, ch 3, sc in same loop, ch 3, sc in next loop, *ch 3, sc in next loop, ch 3, sc in same loop, ch 3, sc in next loop*, repeat until 1 space remains, ch 3, sc in last space. (12 spaces) 3” measured across, not diagonal.
5. *ch 4, sc in next space, ch 4, sc in next space, ch 4, sc in same space*, repeat to end of round. (18 spaces) 4” across.
6. *ch 4, sc in next space*, repeat to end of round. 5” across.
7-8. *ch 4, sc in next space*, repeat to end of round.
Note: for a slouchy beanie version, add additional rounds to this section.
9. *ch 4, sc in next space*, repeat until 1 space remains, ch 4, 2sc in the last space. This will be the new start of
the round.
10. 3sc in each space to end of round, sl st in first st to join. Note: the “first stitch” is the first of the “2sc in the last space” from the previous round. (56sts)
11-14. Ch 1, sc in the same st and in each st to end of round, sl st in first st to join.
Add rounds for additional length if needed.
Note: end here for a regular, brimless beanie. Finish off and weave in end.
15. Ch 1, *2hdc in the next st, hdc 6*, repeat to end of round, sl st in first st to join. (64sts)
16. Ch 1, FPHDC around each of the next 2 posts, *FPHDC around each of the next 5 posts, 2FPHDC around the next post*, repeat until 2 sts remain, FPHDC around each of the next 2 posts, sl st in first st to join. (74sts)
17. Ch 1, hdc 4, *2hdc in the next st, hdc 6*, repeat to end of round, sl st in first st to join. (84sts)
18. Ch 1, hdc 4, *2hdc in the next st, hdc 7*, repeat to end of round, sl st in first st to join. (94sts)
19. Sl st in each st to end of round. Finish off and weave in ends.
Finger shape the brim to smooth out the edge.
Child Small
Note: On measurements starting on step 4 please allow ½” difference. It is tricky to measure this shape the same place each time.
1. With an I hook and yarn, start with a magic circle of 8 sc sts (or preferred method for starting a circle of 8 sc sts). Pull closed and place marker to keep track of the beginning of the round. (8sts)
2. 2sc in each st to the end of the round. (16sts)
3. *ch 3, sk 1, sc*, repeat to end of round. (8 spaces) 2” across.
4. Ch 3, sc in first loop, ch 3, sc in same loop, ch 3, sc in next loop, *ch 3, sc in next loop, ch 3, sc in same loop, ch 3, sc in next loop*, repeat until 1 space remains, ch 3, sc in last space. (12 spaces) 3” measured across, not diagonal.
5. *ch 4, sc in next space, ch 4, sc in next space, ch 4, sc in same space*, repeat to end of round. (18 spaces) 4” across.
6. *ch 4, sc in next space*, repeat to end of round. 5” across.
7-9. *ch 4, sc in next space*, repeat to end of round.
Note: for a slouchy beanie version, add additional rounds to this section.
10. *ch 4, sc in next space*, repeat until 1 space remains, ch 4, 2sc in the last space. This will be the new start of
the round.
11. 3sc in each space to end of round, sl st in first st to join. Note: the “first stitch” is the first of the “2sc in the last space” from the previous round. (56sts)
12-15. Ch 1, sc in the same st and in each st to end of round, sl st in first st to join.
Add rounds for additional length if needed.
Note: end here for a regular, brimless beanie. Finish off and weave in end.
16. Ch 1, *2hdc in the next st, hdc 6*, repeat to end of round, sl st in first st to join. (64sts)
17. Ch 1, FPHDC around each of the next 2 posts, *FPHDC around each of the next 5 posts, 2FPHDC around the next post*, repeat until 2 sts remain, FPHDC around each of the next 2 posts, sl st in first st to join. (74sts)
18. Ch 1, hdc 4, *2hdc in the next st, hdc 6*, repeat to end of round, sl st in first st to join. (84sts)
19. Ch 1, hdc 4, *2hdc in the next st, hdc 7*, repeat to end of round, sl st in first st to join. (94sts)
20. Ch 1, hdc 4, *2hdc in the next st, hdc 8*, repeat to end of round, sl st in first st to join. (104sts)
21. Sl st in each st to end of round. Finish off and weave in ends.
Finger shape the brim to smooth out the edge.
Child Large – Teen/Adult
Child Large/Preteen – Use an I hook. For smaller heads, start with an H hook.
Teen/Adult – Use an I hook.
Note: On measurements starting on step 4 please allow ½” difference. It is tricky to measure this shape the same place each time. First measurement is with an H hook; Second measurement is with an I hook.
1. With a hook and yarn, start with a magic circle of 8 sc sts (or preferred method for starting a circle of 8 sc sts). Pull closed and place marker to keep track of the beginning of the round. (8sts)
2. 2sc in each st to the end of the round. (16sts)
3. *ch 3, sk 1, sc*, repeat to end of round. (8 spaces) 2”
4. Ch 3, sc in first loop, ch 3, sc in same loop, ch 3, sc in next loop, *ch 3, sc in next loop, ch 3, sc in same loop, ch 3, sc in next loop*, repeat until 1 space remains, ch 3, sc in last space. (12 spaces) 2.75”/3” measured across, not diagonal.
5. *ch 4, sc in next space, ch 4, sc in next space, ch 4, sc in same space*, repeat to end of round. (18 spaces) 3.75”/4”
6. *ch 4, sc in next space, ch 4, sc in next space, ch 4, sc in next space, ch 4, sc in same space*, repeat to end of round. (24 spaces) 5”/5.25”
7. *ch 4, sc in next space*, repeat to end of round. Child Large – 6.25”/6.5”
8-9. *ch 4, sc in next space*, repeat to end of round.
Note: for a slouchy beanie version, add additional rounds to this section.
Adult size only: Repeat step 9 one more time.
10. *ch 4, sc in next space*, repeat until 1 space remains, ch 4, 2sc in the last space. This will be the new start of
the round.
11. *3sc in next space, 3sc in next space, 2sc in next space*, repeat to end of round, sl st in first st to join. Note: the “first stitch” is the first of the “2sc in the last space” from the previous round. (66sts)
12-16. Ch 1, sc in the same st and in each st to end of round, sl st in first st to join.
Add rounds for additional length if needed.
Note: end here for a regular, brimless beanie. Finish off and weave in end.
17. Use an I hook for all sizes for the remainder of the hat. Ch 1, hdc in the same st, hdc in the next st, *2hdc in the next st, hdc 15*, repeat to end of round, sl st in first st to join. (70sts)
18. Ch 1, *FPHDC around the next 6 posts, 2FPHDC around the next post*, repeat to end of round, sl st in first st to join. (80sts)
19. Ch 1, *hdc 7, 2hdc in the next st*, repeat to end of round, sl st in first st to join. (90sts)
20. Ch 1, *hdc 8, 2hdc in the next st*, repeat to end of round, sl st in first st to join. (100sts)
21. Ch 1, *hdc 9, 2hdc in the next st*, repeat to end of round, sl st in first st to join. (110sts)
22. Sl st in each st to end of round. Finish off and weave in ends.
Finger shape the brim to smooth out the edge.
Photos
All sizes start the same. The last two photos are for the larger sizes only.