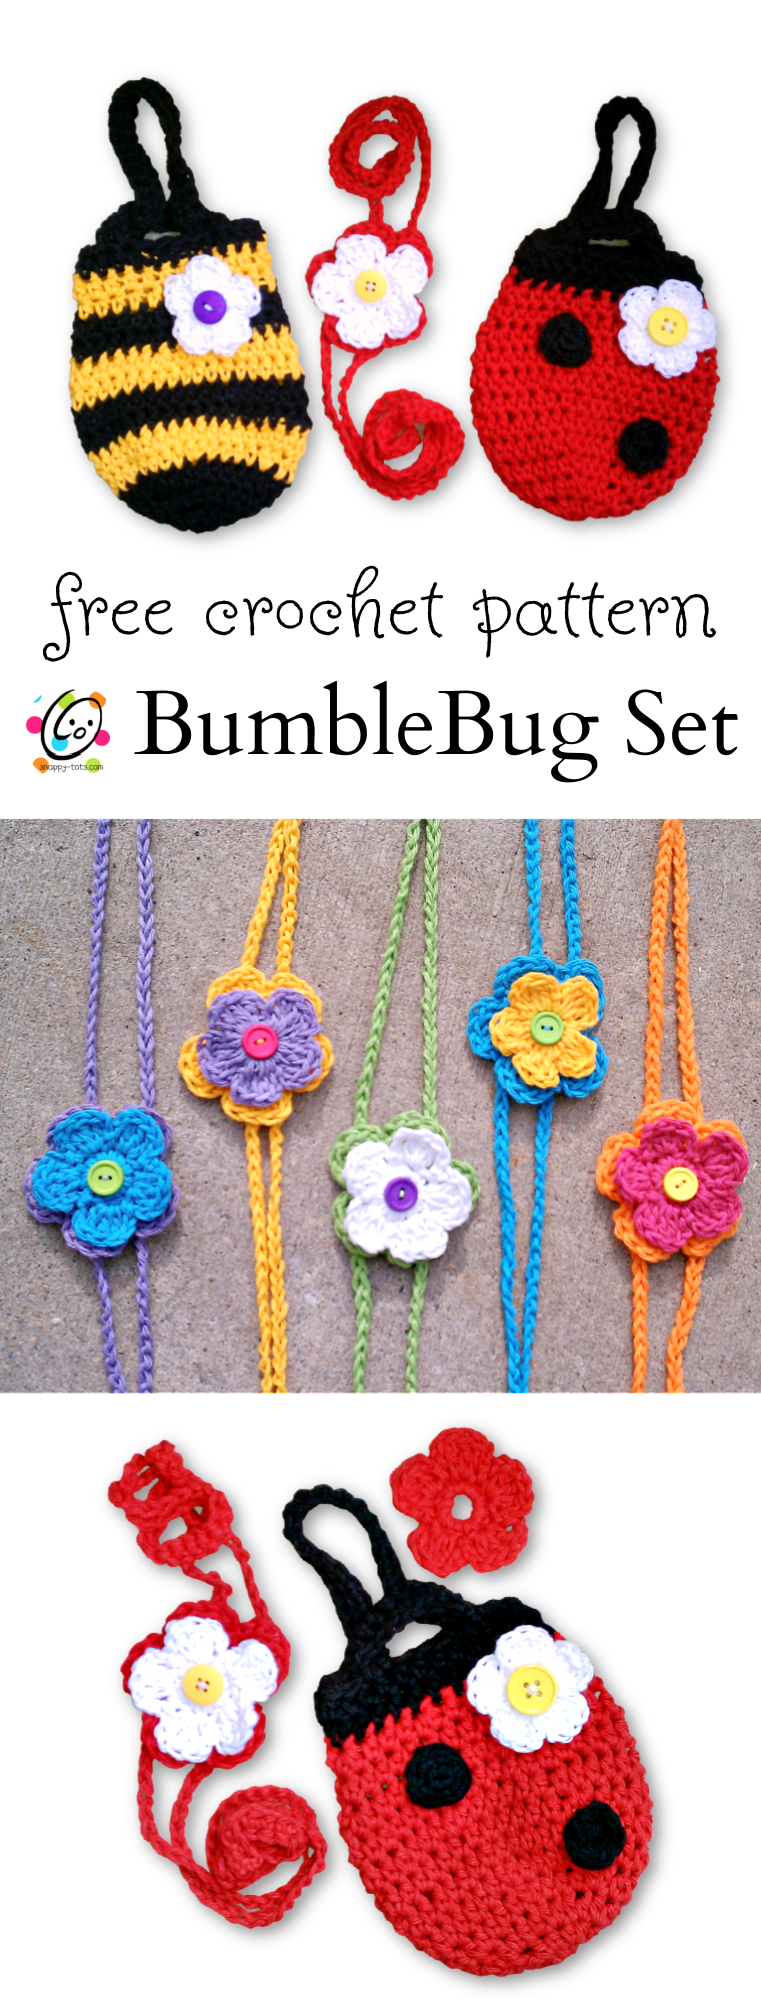
Free Pattern: Bumble Bug Set
I used to have a booth in a local shop and these little bags and matching headbands sold out quickly. They can be used for so many things for a variety of people, plus the “headbands” are cute wrapped around jars, packages, and other decorations. I have also had people use them as bookmarks.
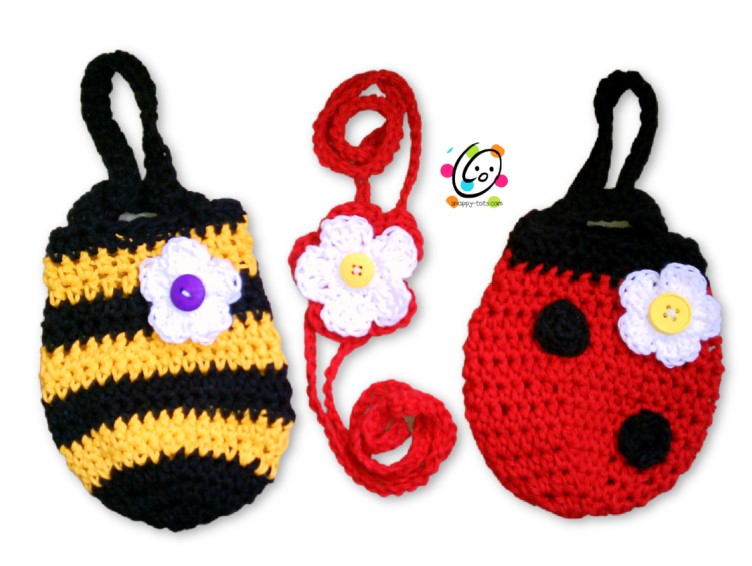
I love creating patterns that have lots of options and I have always loved interchangeable things ever since I had these super cool tennis shoes in elementary school that had velcro pieces you could change. lol. So these flowers are designed to slip over the button. You can sell/give these with one flower or include a few so they can change them to match outfits.
Bumble Bug Set Crochet Pattern
The crochet pattern for this project is available for free below. A downloadable, ad-free pattern that includes the instructions and all pictures is also available to purchase from my Ravelry Shop.
Materials
Materials
- Yarn: Each item – less than 50 yards each worsted weight acrylic or cotton yarn in red, yellow, black, white, misc colors for flowers.
- Crochet Hooks: H (5mm) or J (6mm)
- Supplies: Yarn needle for weaving in ends, scissors, tape measure, one ¾” button per bag/headband
Tips
- The first stitch of each row is worked into the same stitch as the turning chain unless noted.
- Numbers at the beginning of each line may refer to steps and not indicate the number of rows.
- Stitch count remains the same unless noted at end of row/round.
If you have any questions about this pattern please contact [email protected].
Purse Directions
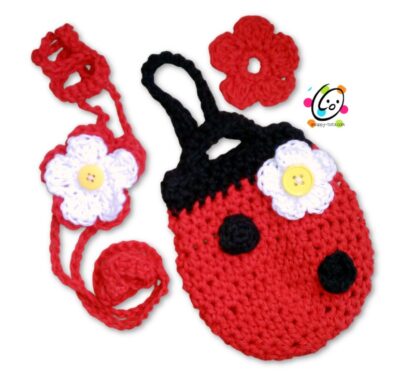
Ladybug (shorter purse)
1. With an H hook and red yarn, start with a magic loop of 6 sc sts (or preferred method of starting a circle of 6 sc sts), pull closed and sl st to join. (6sts)
2. Ch 1, 2hdc in each st to end of round, sl st to join. (12sts)
3. Ch 1, 2 hdc in each st to end of round, sl st to join. (24sts)
4. Ch 1, *hdc 3, 2 hdc in next st*, repeat to end of round, sl st to join. (30sts)
5. Ch 1, *hdc 4, 2 hdc in next st*, repeat to end of round, sl st to join. (36sts)
6-9. Ch 1, hdc in each st to end of round, sl st to join.
10. Ch 1, *hdc 4, hdc 2tog*, repeat to end of round, sl st to join. (30sts)
11. Ch 1, hdc in each st to end of round, sl st to join. Change to black yarn.
12. Ch 1, *hdc 3, hdc 2tog*, repeat to end of round, sl st to join. (24sts)
13. Ch 1, hdc in each st to end of round, sl st to join. Do NOT finish off.
14. This step starts the handles. Ch 11, sk 4 sts, sl st in next st. *Ch 1, turn, sc in each of the ch 11, sl st in next st of rim* repeat once. Sl st 6 sts in last round of rim. Ch 26, sk 4 sts, sl st in next st. *ch 1, turn, sc in each of the ch 26, sl st in last round of rim* repeat once. Sl st in each st until next handle. Finish off and weave in ends.
Spots (make 5)
1. With an H hook and black yarn, start with a magic loop of 5 sc sts (or preferred method of starting a circle of 5sc sts), pull closed and sl st to join. (5sts)
2. Ch 1, 2sc in each st to end of round, sl st to join. (10sts) Finish off, leaving an eight inch tail to use to sew spot to purse. Refer to picture for placement. (10 sts)
Flower
Using the “button on flower” pattern at the end of this pattern, make one white flower. Refer to the picture for placement and sew the button on securely. Slip flower over button.
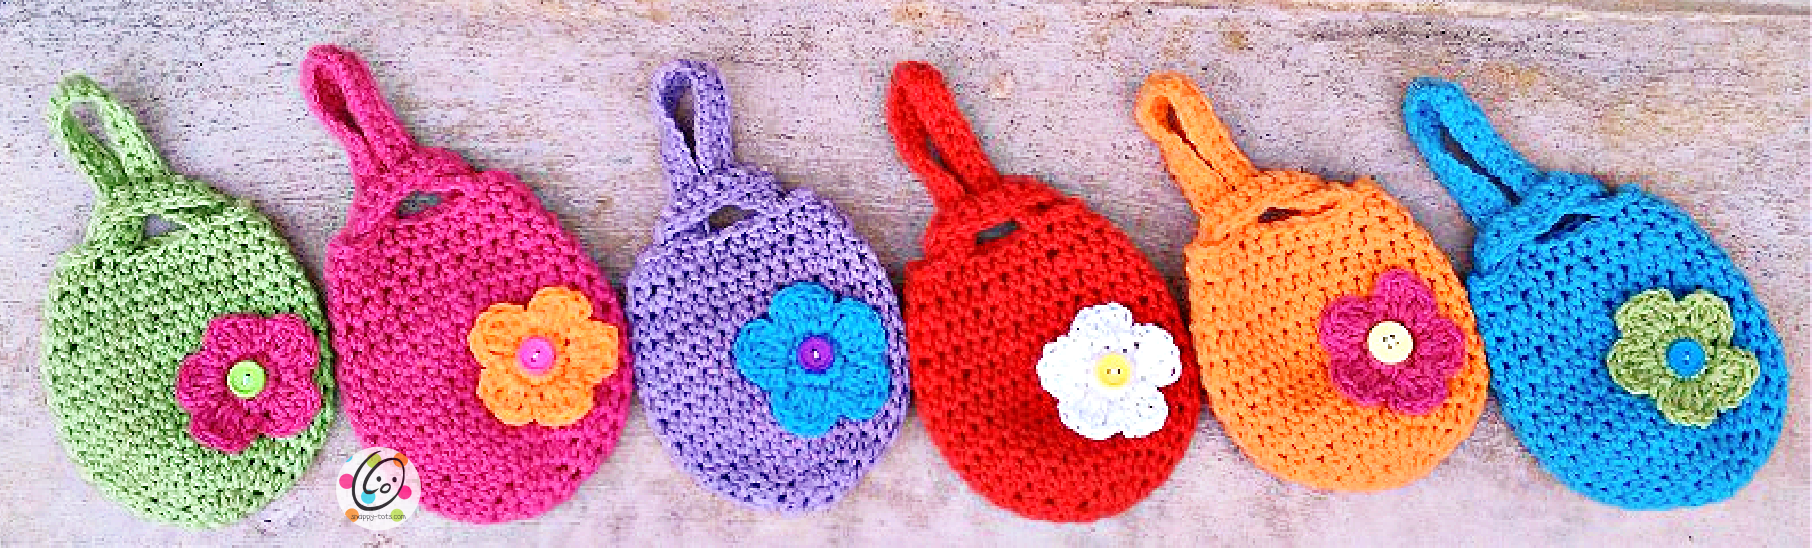
Bumblebee Purse
1. With an H hook and black yarn, start with a magic loop of 6 sc sts (or preferred method of starting a circle of 6 sc sts), pull closed and sl st to join. (6sts)
2. Ch 1, 2hdc in each st to end of round, sl st to join. (12sts)
3. Ch 1, 2 hdc in each st to end of round, sl st to join. (24sts)
4. Ch 1, *hdc 3, 2 hdc in next st*, repeat to end of round, sl st to join. (30sts)
5. Change to yellow yarn. Carry the black yarn on the inside of the bag. Ch 1, *hdc 4, 2 hdc in next st*, repeat to end of round, sl st to join. (36sts)
6. Ch 1, hdc in each st to end of round, sl st to join.
7. Change to black yarn. Carry the yellow yarn on the inside of the bag. Ch 1, hdc in each st to end of round, sl st to join.
8. Ch 1, hdc in each st to end of round, sl st to join.
9. Change to yellow yarn. Ch 1, hdc in each st to end of round, sl st to join.
10. Ch 1, *hdc 4, hdc 2tog*, repeat to end of round, sl st to join. (30sts)
11. Change to black yarn. Ch 1, hdc in each st to end of round, sl st to join.
12. Ch 1, *hdc 3, hdc 2tog*, repeat to end of round, sl st to join. (24sts)
13. Change to yellow yarn. Ch 1, hdc in each st to end of round, sl st to join.
14. Ch 1, hdc in each st to end of round, sl st to join. Finish off the yellow yarn.
15. Change to black yarn. Ch 1, hdc in each st to end of round, sl st to join.
16. This step starts the handles. Ch 11, sk 4 sts, sl st in next st. *Ch 1, turn, sc in each of the ch 11, sl st in next st of rim* repeat once. Sl st 6 sts in last round of rim. Ch 26, sk 4 sts, sl st in next st. *ch 1, turn, sc in each of the ch 26, sl st in last round of rim* repeat once. Sl st in each st until next handle. Finish off and weave in ends.
Flower
Using the “button on flower” pattern below, make one white flower. Refer to the picture for placement and sew the button on securely. Slip flower over button.
Headband Directions

Newborn-12mths
1. With an H hook and worsted weight yarn, ch 81.
2. Turn, sc in second ch from hook and in the next 14. Ch 50, sc in the last 15 ch (make sure beginning
chain has not twisted).
3. Turn, ch 1. Sc 15, ch 50, sc in last 15 sts. Finish off and weave in ends.
Toddler
1. With an H hook and worsted weight yarn, ch 101.
2. Turn, sc in second ch from hook and in the next 19. Ch 60, sc in the last 20 ch (make sure beginning
chain has not twisted).
3. Turn, ch 1. Sc 20, ch 60, sc in last 20 sts. Finish off.
Preteen-adult
1. With an H hook and worsted weight yarn, ch 131.
2. Turn, sc in second ch from hook and in the next 24. Ch 80, sc in the last 25 ch (make sure beginning
chain has not twisted).
3. Turn, ch 1. Sc 25, ch 80, sc in last 25 sts. Finish off and weave in ends.
Large Band Flower
1. With a J hook and same yarn as band (or different is desired), ch 5 and join to form a circle (or do a
magic loop of 5). Pull snug to close hole.
2. 2 hdc in each st, sl st to first sc (10 sts).
3. In first st, *Ch 2, 3 dc, ch 2, then sl st in next st*. Repeat until 5 petals are made.
To attach flower to band:
Lay band out on a flat surface, wrong side up and make sure it is not twisted. Slide flower, wrong side up, underneath band at the half way mark (or off to one side if desired. Remember, the band can be tied anywhere so the flower can be positioned in different places on the head). Evenly space the bands on the outer edges of the flower. At this point, I like to pin the strands to the flower to make sure they don’t slip around while I stitch them together. Using a needle and thread or matching yarn, sew the flower to the bands.
Flip over and sew the button in the center of the flower.
Button-on flower
1. With an H hook and yarn, ch 5, join to form a circle. Do not pull end to close circle.
2. Sc 10 in circle, sl st to first sc (10 sts).
3. In first st, (ch 2, 3 dc, ch 2), sl st in next st. *(ch 2, 3 dc, ch 2) in next st. sl st in next sc.*
continue until 5 petals are made. Finish off.
Note: For a smaller flower, omit step #1 and work petals right into beginning circle. (yellow flower in picture)
Button-on heart
1. With an H hook and worsted weight yarn, ch 5, join to form a circle. Do not pull end to close circle.
2. Ch 1, sc 7 in circle, sl st to first sc (7 sts).
3. Sl st in first sc, 5 hdc in next st, hdc, hdc, (hdc, ch 1, hdc) in next st, hdc, hdc, 5 hdc, sl st in first sc. Finish off and weave in ends.
4. Slightly tug to make the heart shape more pronounced.
Note: Change hook sizes for larger and smaller flowers.
Pin To Save For Later