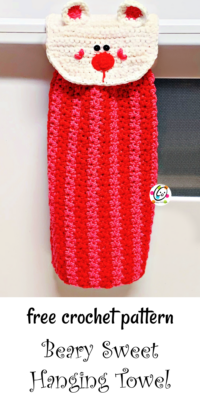
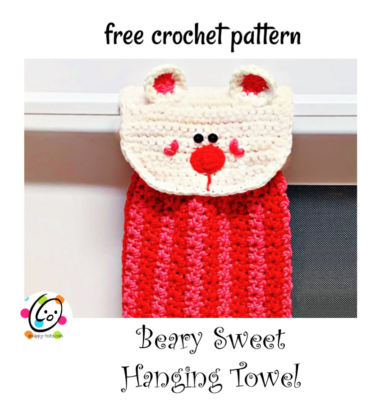
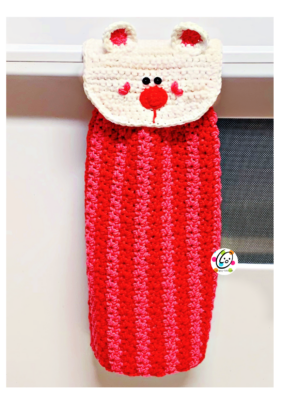
Free Pattern: Beary Sweet Hanging Towel
Last year for Valentine’s Day I designed a “Beary Sweet Pouch“. I have always thought it would be cute as a hanging hand towel too. I definitely need some color in my life lately as the winter blahs are setting in. Northern Utah is either frozen and covered in snow or mucky mud…it changes daily.
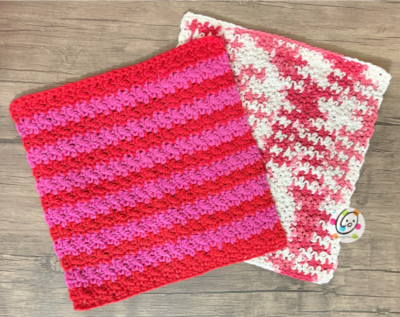
I made some cloths to match! I used my “White Board Cleaners” pattern.
Beary Sweet Hanging Towel Pattern
This pattern is available for free below. A downloadable file of this pattern is available to purchase from my pattern shops: Ravelry | Etsy
Materials
- Worsted Weight Cotton Yarn: 100 yards red, 100 yards pink, 100 yards white
- Crochet Hooks: H (5mm), I (5.5mm)
- Notions: Yarn needle, 2 small black buttons for eyes, sewing needle, black thread, white thread, one ¾” button.
Measurements
- Finished Measurements: Towel – 10” wide x 12” long; With Bear (unfolded) – 19.5” ; With Bear (when hanging/folded) – 15.5-16””
- Gauge: not needed for this project.
Tips
- The first stitch of each row is worked into the same stitch as the turning chain.
- Numbers at the beginning of each line may refer to steps and might not indicate the number of rows.
- Stitch count remains the same unless noted at end of row/round.
If you have any questions about this pattern please contact [email protected].
Directions
Cloth
This piece starts at one long side. As written, cloth is 10” wide. Add additional rows for a wider cloth if desired.
Striped Cloth Section
Tip: For the cloth section, the yarn colors not in use can be carried across one edge. After the striped section, one row of sc is worked across the edge and will cover this yarn. This will prevent you from having to weave in all of the ends.
1. With an I hook and red yarn, ch 41, sc in 2nd ch from hook and in each ch across. (40sts)
2. Ch 1, turn, sc in the same st and in each st across.
3. Ch 2, turn, hdc in same st, sc in next st, *hdc in next st, sc in next st*, repeat to end of row.
4. Change to pink yarn. Ch 2, turn, hdc in same st, sc in next st, *hdc in next st, sc in next st*, repeat to end of row.
5. Ch 2, turn, hdc in same st, sc in next st, *hdc in next st, sc in next st*, repeat to end of row.
6. Change to red yarn. Ch 2, turn, hdc in same st, sc in next st, *hdc in next st, sc in next st*, repeat to end of row.
7. Ch 2, turn, hdc in same st, sc in next st, *hdc in next st, sc in next st*, repeat to end of row.
8. Change to pink yarn. Ch 2, turn, hdc in same st, sc in next st, *hdc in next st, sc in next st*, repeat to end of row.
9. Ch 2, turn, hdc in same st, sc in next st, *hdc in next st, sc in next st*, repeat to end of row.
10. Repeat steps 6-9 until there are 14 stripes from beginning edge.
11. Change to red yarn. Ch 2, turn, hdc in same st, sc in next st, *hdc in next st, sc in next st*, repeat to end of row.
12-13. Ch 1, turn, sc in the same st and in each st to end of row.
14. Turn piece to work across the edge of the sts. If you carried the yarns across the edge of the piece and this is NOT that edge, repeat step #13 one time. Ch 1, sc 30 sts evenly across the edge of the cloth.
15. Turn, Do NOT ch 1. Skip 10 sts, sl st in FLO of the next st, sl st in FLO of next 9 sts (first photo at left below). Fold the left edge of the cloth in towards you (photo at right below). Working into the st of the folded layer and FLO of the front layer at the same time, sl st 5. (20sts)

16. Ch 1, turn, sc in the same st and in each st to end of row.
17. This step creates the buttonhole. Ch 1, turn, sc in the same st, sc 8, ch 2, sk 2, sc 9. (20 sts)
18. Change to white yarn. Ch 1, turn, sc in the same st, sc 8, sc 2 around ch, sc 9. (20 sts)
19. Ch 1, turn, sc in the same st and in each st to end of row.
20. Repeat previous row for an additional 17 rows.
21. Ch 1, turn, sc2tog, sc in each st until 2 sts remain, sc2tog. (18sts)
22. Repeat previous row two more times. (14sts)
23. Ch 1, turn, sc2tog, sc, hdc 8, sc, sc2tog. (12sts). Finish off and weave in ends.
24. This step is worked around the white section from the same side as the folded side of the cloth. This might sound wrong, but it is done this way so the right side of the head will be on top of the cloth when buttoned in place. Attach white yarn to the right edge where it meets the red. Ch 1, sc evenly down the side and around the entire head/white section, working 2sc at the rounded points to help it curve. Finish off and weave in ends.

Button Closure
Fold the white section in half so the bottom edge of the face (rounded edge) overlaps the red section approximately 1.5”.
The sides of the head should line up with the sides of the white section underneath.
Decide where you would like the button. It should be sewn approximately 1.25-1.5” from the bottom edge. It will end up being behind the nose area.
With white yarn and a sewing needle sew the button to the wrong side (opposite side of sc border) of the head.

Features
These are sewn on the “right side” of the head, the side that was towards you when working the sc border from step 23.
Nose
1. With an H hook and red yarn, start with a magic circle of 6 sc sts (or preferred method for starting a circle of 6 sc sts), pull closed and sl st to join. (6sts)
2. Ch 1, 2sc in each st to end of row. (12sts) Finish off, leaving along yarn tail for sewing in place.
With a yarn needle, use the yarn tail to sew the nose to the center front of the white piece (make sure sc edging/RS is facing up). Stitch the line down from the nose.
Cheeks: With a yarn needle and light pink yarn, create the cheeks by taking a few stitches in a “V” shape.
Eyes: With a sewing needle and thread, sew the buttons above the nose.
Ears (make 2)
1. With an H hook and color for center of ear (pink, red or lavender), start with a magic circle of 8 hdc sts (or preferred method for starting a circle of 8 hdc sts), pull closed and sl st to join. (8sts)
2. Change to white yarn. Ch 2, 2hdc in the same st, 2hdc in each of the next 5 sts, sc 2, sl st to join. (16sts) Finish off, leaving a tail for sewing in place.
Fold the cloth and button to find placement for the ears. With a yarn needle and yarn tail, sew one edge of each ear just down from the top of the fold.
Pin To Save For Later