

Free Pattern: Snappy Bot Beanie
When my youngest son was little he loved a show with a robot character. We have had a lot of fun with this hat over the years. I recently updated it for a better fit.
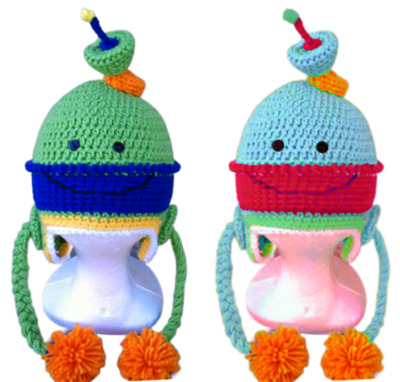
Snappy Bot Beanie Crochet Pattern
The pattern for this project is available for free below. An ad-free, downloadable PDF that includes all of the photos and instructions is available for in my Ravelry Shop: Click HERE
Materials & Details
- Yarn: 125-150 yards worsted weight in choice of colors Sample colors for original version: Red Heart Spring Green, Blue, Pumpkin, Bright Yellow, White Sample colors for new version: Red Heart Turqua, Cherry, Spring Green, White
- Crochet Hook: G (4.25-4.5mm), I (5.5mm)
- Miscellaneous: yarn needle, 2 small black buttons, black thread and sewing needle, stuffing
- Gauge: 4” with an I hook = 13 hdc sts, 10 rounds
- Sizes: Child Large, Teen/Adult
Tips
- The first stitch of each row is worked into the same stitch as the turning chain unless noted.
- Numbers at the beginning of each line may refer to steps and not indicate the number of rows.
Directions – Child Large (8-12 years)

Base Hat
Sample shown is the teen/adult size but made the same way.
1. With an I hook and worsted weight yarn (blue in sample above), start with a magic circle of 8 sc sts (or preferred method for starting a circle of 8 sc sts). Pull closed and place a marker for working in the round. (8sts)
2. 2sc in each st to the end of the round. (16sts)
3. *hdc, 2hdc in the next st*, repeat to end of round. (24sts)
4. *hdc 2, 2hdc in the next st*, repeat to end of round. (32sts) 3” across
5. *hdc 3, 2hdc in the next st*, repeat to end of round. (40sts) 3.75” across
6. *hdc 4, 2hdc in the next st*, repeat to end of round. (48sts) 4.5” across
7. *hdc 5, 2hdc in the next st*, repeat to end of round. (56sts) 5.25” across
8. Sc in the next st, sl st in the next st. This is done to lower the height of the round and is the new beginning of the round.
Finish off the current yarn and change colors (red in sample above). Work this round in FLO. Ch 1, dc in each st to end of round, sl st to join. (56sts)
9. This step creates a ridge and is worked into the current sts and the back loops from the previous round. Ch 1. YO and insert hook in the current st AND in the remaining loop (back loop) from the previous round, pull up a loop, YO and pull through all loops on hook. One hdc complete. Continue working one hdc in each set of sts (current st and remaining loop) to end of round, sl st to join. Check st count. (56sts)
10. Ch 1, hdc in the same st and in each st to end of round, sl st to join.
11. Repeat the previous round for an additional 2 rounds (or until hat is 1” shorter than desired length).
12. Finish off the current yarn and change colors (blue in sample above). Ch 1, sc in the same st and in each st to end of round, sl st to join.
13. This step starts the first earflap. Ch 1, sc in the same st, sc 13. (14sts) Leave remaining sts unworked.
14. Ch 1, turn, sc in the same st, sc 13.
15. Repeat for an additional 4 rows.
16. Ch 1, turn, sc2tog, sc in each st until 2 sts remain, sc2tog. (12sts)
17. Repeat the previous row until 4 sts remain. Finish off and weave in ends.
18. Starting on the RS of the hat, skip 14 sts from the left edge of the earflap. With an I hook, attach matching yarn to the next st and repeat steps 13-17.
19. With an I hook and contrasting yarn (green in sample above), ch 1, sc in each stitch around the entire bottom of the hat and earflaps, working 2sc in each bottom corner of the earflaps, sl st to join at end of round.
20. Ch 1, sc in the same st and in each st to end of round, sl st to join. Finish off and weave in ends.
21. Attach white to center bottom of one ear flap. Working in BLO, sc in each stitch up the side of the flap, across the center front, and down the other flap, stopping in the center bottom. Finish off and weave in ends.
Skip to “Features” below.
Directions – Teen/Adult
Base Hat
1. With an I hook and worsted weight yarn (blue in sample above), start with a magic circle of 8 sc sts (or preferred method for starting a circle of 8 sc sts). Pull closed and place a marker for working in the round. (8sts)
2. 2sc in each st to the end of the round. (16sts)
3. *hdc, 2hdc in the next st*, repeat to end of round. (24sts)
4. *hdc 2, 2hdc in the next st*, repeat to end of round. (32sts) 3” across
5. *hdc 3, 2hdc in the next st*, repeat to end of round. (40sts) 3.75” across
6. *hdc 4, 2hdc in the next st*, repeat to end of round. (48sts) 4.5” across
7. *hdc 5, 2hdc in the next st*, repeat to end of round. (56sts) 5.25” across
8. *hdc 6, 2hdc in the next st*, repeat to end of round. (64sts) 6” across
9. Sc in the next st, sl st in the next st. This is done to lower the height of the round and is the new beginning of the round.
Finish off the current yarn and change colors (red in sample above). Work this round in FLO. Ch 1, dc in each st to end of round, sl st to join. (64sts)
10. This step creates a ridge and is worked into the current sts and the back loops from the previous round. Ch 1. YO and insert hook in the current st AND in the remaining loop (back loop) from the previous round, pull up a loop, YO and pull through all loops on hook. One hdc complete. Continue working one hdc in each set of sts (current st and remaining loop) to end of round, sl st to join. Check st count. (64sts)
11. Ch 1, hdc in the same st and in each st to end of round, sl st to join.
12. Repeat the previous round for an additional 4 rounds (or until hat is 1” shorter than desired length).
13. Finish off the current yarn and change colors (blue in sample above). Ch 1, sc in the same st and in each st to end of round, sl st to join.
14. This step starts the first earflap. Ch 1, sc in the same st, sc 15. (16sts) Leave remaining sts unworked.
15. Ch 1, turn, sc in the same st, sc 15.
16. Repeat for an additional 4 rows.
17. Ch 1, turn, sc2tog, sc in each st until 2 sts remain, sc2tog. (14sts)
18. Repeat the previous row until 4 sts remain. Finish off and weave in ends.
19. Starting on the RS of the hat, skip 16 sts from the left edge of the earflap. With an I hook, attach matching yarn to the next st and repeat steps 14-18.
20. With an I hook and contrasting yarn (green in sample above), ch 1, sc in each stitch around the entire bottom of the hat and earflaps, working 2sc in each bottom corner of the earflaps, sl st to join at end of round.
21. Ch 1, sc in the same st and in each st to end of round, sl st to join. Finish off and weave in ends.
22. Attach white to center bottom of one ear flap. Working in BLO, sc in each stitch up the side of the flap, across the center front, and down the other flap, stopping in the center bottom. Finish off and weave in ends.
Features – Both Sizes
Use a G hook for Child/Preteen; Use an I hook for Teen/Adult
ARMS (make 2)
1. With a G/I hook and worsted weight yarn (green in main sample), start with a magic circle of 6 sc sts (or preferred method for starting a circle of 6 sc sts). Pull closed and place a marker for working in the round. (6sts)
2. 2sc in each stitch to end of round. (12sts)
2. *sc, 2 sc in next st*, repeat to end of round. (18sts)
3. *sc 2, 2 sc in next st*, repeat to end of round. (24sts)
4. *sc 2, sc2tog*, repeat to end of round. (18sts). Finish off, leaving a long tail for attaching to hat.
With yarn needle and yarn tail, sew each arm circle to the middle of the earflap.
BRAIDS: Cut 6, 20” strands of worsted weight yarn (green in main sample). Fold hat in half to find placement. Use a yarn needle to pull end through center of arm circle. Pull through until even with other end and braid. Repeat for other side. Tie a piece of matching yarn around the bottom of the braid to hold.
POMPOMS: Hold one strand of yarn (orange in main sample), and wrap 30-40 times around the palm of your hand (wrap more times for a thicker pom). Carefully slide the yarn off your hand and wrap an 8” length of yarn around the center, pulling tight and knotting to hold in place. Do NOT cut this piece of yarn. Cut loops of pompom. Thread end of the yarn you tied around the pom through a yarn needle. Pull through end of the braids. Firmly tie a knot. Trim pompom as desired.
Satellite Dish (top of head)
Blue Antenna
Base: With a G/I hook and worsted weight yarn (blue in main sample), start with a magic circle of 6 sc sts (or preferred method for starting a circle of 6 sc sts). Finish off, leaving a yarn tail for sewing in place.
Antenna: With a G hook and blue yarn, ch 6, sl st in the 2nd ch from hook and in each ch across. (5sts) Finish off, leaving 6” yarn tails. Set aside.
Yellow knob: With a G hook and worsted weight yarn (yellow in main sample), create a magic circle of 5 sc sts (or preferred method for starting a circle of 5 sc sts). Finish off, pulling the yarn tightly to create a bulge in the middle. Use the yarn tails to attach this to the top of the antenna in the center of the dish.
Center Piece
1. With a G/I hook and worsted weight yarn (green in main sample), start with a magic circle of 6 sc sts (or preferred method for starting a circle of 6 sc sts). Pull closed and place a marker for working in the round. (6sts)
2. 2sc in each stitch to end of round. (12sts)
3. 2sc in each stitch to end of round. (24sts)
4. Working in BLO, sc in each stitch to end of round.
5. *sc 2, sc2tog*, repeat to end of round. (18sts)
It is easier to attach the antenna pieces at this point. Use a yarn needle to sew the blue circle in the middle of large green circle you have just made.
Pull the yarn tails from the antenna through the center of the blue circle, to the back side of the green dish and tie a knot.
6. Sc in each stitch to end of round
7. *sc, sc2tog*, repeat to end of round. (12sts)
8-9. Sc in each stitch to end of round. Stuff firmly.
10. *sc2tog*, repeat to end of round. (6sts) Finish off and weave in ends.
Orange Base
1. With a G/I hook and worsted weight yarn (orange in main sample), start with a magic circle of 6 sc sts (or preferred method for starting a circle of 6 sc sts). Pull closed and place a marker for working in the round. (6sts)
2. 2sc in each stitch to end of round. (12sts)
3. 2sc in each stitch to end of round. (24sts)
4. Working in BLO, sc in each st to end of round.
5. *sc2tog, sc 10*, repeat once. (22sts) Finish off, leaving a long tail for sewing in place.
Use a yarn needle and yarn tail to sew the orange base approximately 2” from the top center of hat.
Place the green satellite on top of the orange base and slightly to the side. Sew this in place. Weave in all ends.
Eyes: With a black thread and sewing needle, sew the buttons just above the color change and center front.
Smile: With a yarn needle and black yarn, stitch a smile center front.


