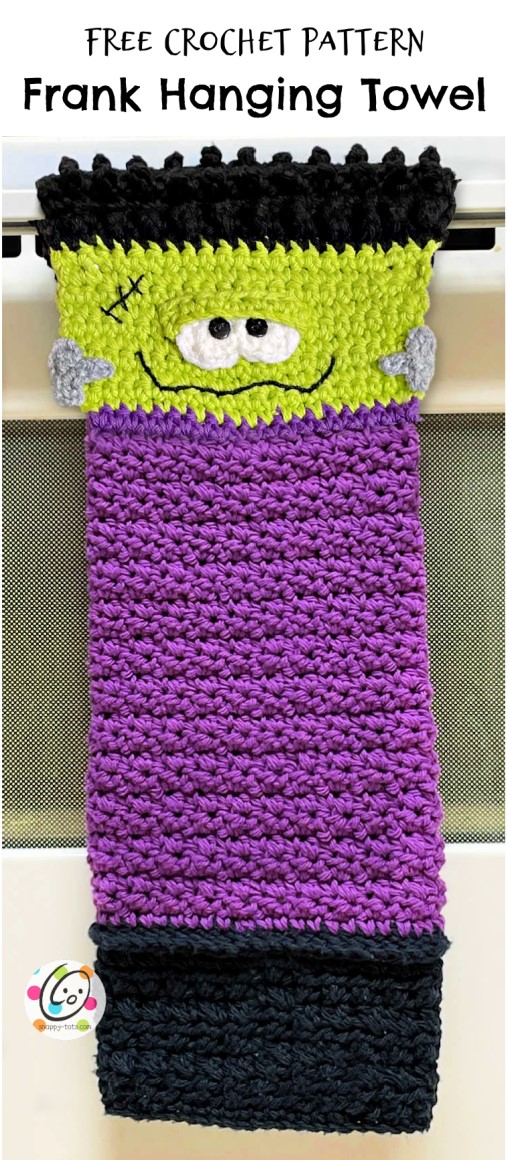
Free Pattern: Frank Hanging Towel
Halloween is one of my favorite holidays. Ever since I made my Frank & Bride Cloths in 2018 I have wanted to make a hanging towel to match.
I decided to make “Frank” similar to some of my other cloths so the bottom opens up to a nice sized towel. With two guys in the house they won’t use it unless it “looks like a cloth” lol. This pattern was #41 in our “weekly wash” event.
More Free Hanging Towel Patterns You Might Enjoy
- Penguin Hanging Towel
- Spring Hanging Towel
- Happy Hanging Towel
- Beary Sweet Hanging Towel
- Bee Happy Hanging Towel
Frank Hanging Towel Pattern
This pattern is available to view here on the blog. An ad-free, downloadable pdf is also available to purchase: Ravelry
Materials
- Yarn: 320-340 yds worsted weight COTTON yarn
- Sample Yarns: Sugar and Cream in the following colors Pants: 120 yds Black Currant Hair: 75 yds Black Face: 25 yds Hot Green Small amounts of white, grey
- Crochet Hooks: H (5mm), I (5.5mm)
- Notions: Yarn needle for weaving in ends, 2 large sew-on snaps, black embroidery floss
- Optional: Measuring tape, scissors
Measurements
Finished Measurements: 12” wide (unfolded) x 16” long Gauge: not needed for this project.
Tips The first stitch of each row is worked into the same stitch as the turning chain. Numbers at the beginning of each line may refer to steps and not indicate the number of rows. Stitch count remains the same unless noted at end of row/round. If you have any questions about this pattern please contact [email protected].
Directions
This project starts at the bottom straight edge of the cloth.
- With an I hook and black cotton yarn, ch 45, sc in 2nd ch from hook and in each ch across. (44sts)
- Ch 2, turn, hdc in the same st, *sk 1, hdc in the next st, hdc in the skipped st*, repeat until 1 st remains, hdc in the last st.
- Ch 2, turn, hdc in the same st, hdc in the next st, *sk 1, hdc in the next st, hdc in the skipped st*, repeat until 2 sts remain, hdc 2.
- Repeat steps 2-3 three more times.
- Ch 1, turn, FPS around each post to end of row. Make sure to FPSC around the last post and check the st count. (44sts)
- Finish off the current yarn and change to purple cotton yarn. Ch 1, turn, *sc2tog, sc 9*, repeat to end of row. (40sts)
- Ch 1, turn, hdc in the same st, sc in the next st, *hdc in the next st, sc in the next st*, repeat to end of row.
- Change to an H hook. Repeat the previous row until the cloth measures 11” from the beginning edge.
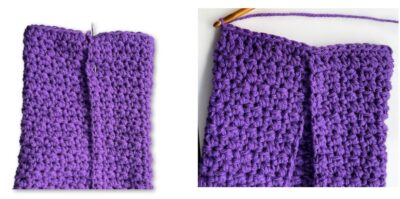
- Finish off the yarn. This step creates the folded top of the towel. Lay the towel on a flat surface, right side down. The ridge at the top of the black section is on the “right side”. Fold in the sides, overlapping 2sts at the middle.
- With an H hook, attach purple cotton yarn to the first sts at the right. For this step, we will work through the stitches on both layers of the towel. See photos below. (18sts)
- Finish off the purple. Change to an I hook and green yarn for the face. Ch 1, turn, 2sc in the same st, sc in each st until 1 st remains, 2sc in the last st. (20sts)
- Ch 1, turn, 2sc in the same st, sc in each st until 1 st remains, 2sc in the last st. (22sts)
- Ch 1, turn, sc in the same st and in each st to end of row.
- Repeat the previous step for an additional 7 rows.
- Finish off the green yarn and change to black yarn for the hair. Ch 1, turn. You should now be working on the RS of the piece. 2sc in the same st, sc in each st to end of row. (23sts)
- Ch 1, turn, sc in the same st, *tr in the next st, sc in the next st*, repeat to end of row.
- Ch 1, turn, sc in the same st and in each st to end of row.
- Repeat steps 16-17 once more.
- Ch 1, turn, sc in the same st, *tr in the next st, sc in the next st*, repeat to end of row.
- Ch 1, turn, sc in the same st and in each st to end of row.
- Repeat the previous row for an additional 5 rows.
- Ch 1, turn, sc2tog, sc in each st until 2 sts remain, sc2tog. (21sts)
23-24. Ch 1, turn, sc in the same st and in each st to end of row. Finish off and weave in ends.
Eyes (make 2)
- With an H hook and white yarn, create a magic circle of 6 sc sts (or preferred method of creating a circle of 6 sc sts), pull closed and sl st to join. (6sts)
- Ch 1, 2sc in each st to end of round, sl st to join. (12sts) Finish off, leaving a long tail for sewing in place. With a yarn needle, use the yarn tails to sew the eyes to the middle of the green section, overlapping eachother a little in the middle.
With a sewing needle and black thread, sew a small black button on top of each eye piece.
Mouth and Scar: Use a yarn needle and black embroidery floss to stitch these in place. See the main photo for placement.
Eyebrow (make 1) With an I hook and green yarn, ch 10, sc in the 2nd ch from hook and in each ch across. Finish off, leaving a yarn tail for sewing in place. Place the eyebrow piece so it overlaps the top section of the eyes and buttons. With a yarn needle, use the yarn tail to sew the beginning edge of the eyebrow to the face. See main photo for placement.
Screws (make 2)
- With an H hook and grey yarn, ch 4, sc in the 2nd ch from hook and in each ch. (3sts)
- Ch 1, turn, sl st 2, ch 3, sl st in the 2nd ch from hook, sl st in the next ch and in the same st on the screw. Sl st in the next st. Finish off, leaving a yarn tail for sewing in place.
With a yarn needle, use the yarn tails to sew each screw to the bottom section of the head at the sides. See main photo for placement.
Closure To attach the towel around a towel bar, one or two snaps are sewn to the back of the head. With matching thread or yarn, sew each snap piece to the back of the head section. See photos below for placement. The hair should fold next to the last row of tr nubs.

One snap closure: One piece is sewn at the bottom, center edge of the head and the opposite piece is sewn to the top, center edge.
Two snap closure (shown in photo above): One piece of each snap is sewn in a bottom corner of the head and the opposite piece is sewn to the top corners.
Pin To Save For Later