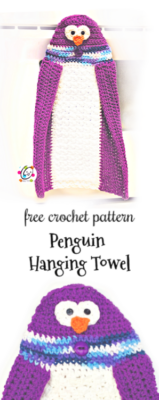
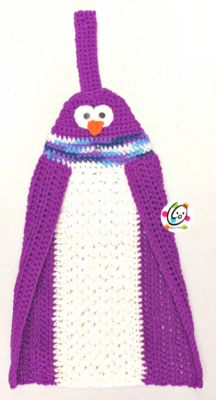
Free Crochet Pattern: Penguin Hanging Towel
Penguins are one of my favorites and I thought they would make a cute hanging towel. Winter in Utah can get pretty blah in January so I wanted to make my penguin a little more colorful. Of course he would be cute in traditional black as well.

He has a strap at the back to hook around an oven handle. Slip the button through his scarf section to the front.
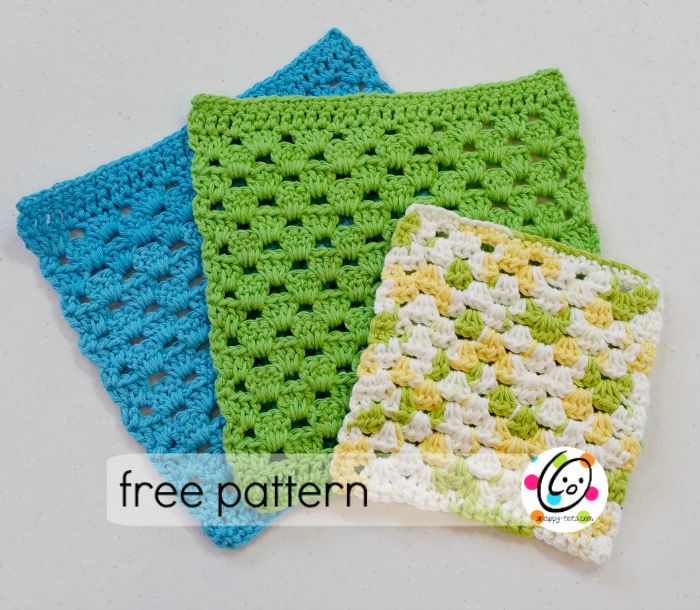
This pattern completes my 4 piece set for the month. I hope you enjoy all of these patterns.
- Week #1: January Washcloth
- Week #2: January Scrubbie
- Week #3: Chill Buddy
Penguin Hanging Towel
This pattern is available to follow along for free below. An ad-free, downloadable version is also available to purchase for a small fee from my shops: Etsy | Ravelry
- Yarn: 200 yards ww purple or black cotton for main part of penguin, 200 yards ww white cotton for tummy, 30 yards ww cotton for scarf, small amount of orange cotton.
- Sample Colors: Peaches & Cream Black Currant, Peaches & Cream Blue Moon Ombre, White, Orange
- Crochet Hook: H (5mm), I (5.5mm)
- Miscellaneous: Yarn needle for weaving in ends, black thread, sewing needle, 2 small black buttons for eyes (¼” – ⅜”), 1 large button for closure (¾”), pins
- Finished Measurements: 12” wide x 17” long
Tips
- Numbers at the beginning of each line may refer to steps and not indicate number of rows.
- Stitch count remains the same unless noted at end of row.
- If you have any questions about this pattern please contact [email protected].
Directions
1. With an I hook and purple or black yarn, ch 41, sc in the 2nd ch from hook and in each ch across. (40sts)
2-8. Ch 2, turn, hdc in the same st and in each st to end of row.
9. Change to white yarn. Ch 2, turn, hdc in the same st and in each st to end of row.
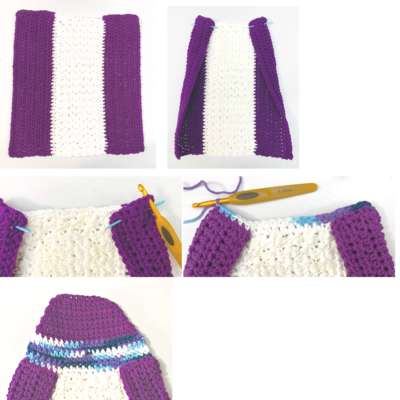
10. Ch 1, turn, hdc between the first two posts (see photo “a” below for placement), *sk 1, (sc, dc) between the next 2 posts* (see photo “b” below for placement), repeat until 1 st remains, hdc between the last 2 posts. (40sts)

11-21. Repeat previous row.
22. Ch 2, turn, hdc in the same st and in each st to end of row.
23. Change to purple or black yarn. Ch 2, turn, hdc in the same st and in each st to end of row.
24-29. Repeat previous row.
30. Ch 1, turn, sc in the same st and in each st to end of row.
31. Ch 1, turn, sl st in the NEXT st and in each st to end of row. Make sure to not work these sts too snug.
32. This step is worked across the top edge of the piece. Ch 1, pivot to the left, sc 10 sts evenly across the purple section, changing to white yarn during the 10th st. With white yarn, sc 14 sts evenly spaced across the white section, changing to purple yarn during the 14th st. With purple yarn, sc 10 sts evenly across the purple section. (34sts)
33. Ch 1, pivot to the left to work across the side of the piece (beginning edge). Sl st in the next st and in each st to end of row. Make sure to not work these sts too snug. Finish off and weave in ends.
Lay the piece on a flat surface. Fold the edges toward the middle so the two outer sts of the purple (or black) sections overlap the first two sts of the white section. Pin in place.
34. With an I hook, attach yarn for the scarf section to the corner of the top edge. Working through both layers of the folded pieces, Ch 1, sc 6 across the purple (black) section, sc 10 across the white section, sc 6 across the purple (black) section. (22sts)
35-37. Ch 1, turn, sc in the same st and in each st to end of row.
38. This step creates the center button hole. Ch 1, turn, sc in the same st, sc 9, ch 2, sk 2, sc 10.
39. Ch 1, turn, sc in the same st, sc 9, 2sc in the ch 2 space, sc 10.
40. Ch 1, turn, sc2tog, sc 18, sc2tog. (20sts)
41. Change to purple (black) yarn. Ch 1, turn, sc in the same st and in each st to end of row.
42. Ch 1, turn, sc2tog, sc 16, sc2tog. (18sts)
43. Ch 1, turn, sc in the same st and in each st to end of row.
44. Ch 1, turn, sc2tog, sc 16, sc2tog. (16sts)
45. Ch 1, turn, sc in the same st and in each st to end of row.
46. Ch 1, turn, sc2tog, sc 12, sc2tog. (14sts)
47. Ch 1, turn, sc in the same st and in each st to end of row.
48. Ch 1, turn, sc2tog, sc 10, sc2tog. (12sts)
49. Ch 1, turn, sc in the same st, sc, hdc 6, sc, sc2tog. (10sts) Finish off and weave in ends.
Eyes (make 2)
1. With an H hook and white yarn, start with a magic circle of 6 sc sts (or preferred method for creating a circle of 6 sc sts), pull closed and place a marker for working in the round. (6sts)
2. 2sc in each st to end of round, sl st to join. (12sts) Finish off, leaving a long tail for sewing eye in place.
With a yarn needle, use the yarn tail to sew each eye to the center front of the penguin.
With a sewing needle and black thread, sew a button to the top of each white eye piece.
Beak
1. Leave a yarn tail in the beginning for sewing in place. With an H hook and orange yarn, ch 5. Starting in the 2nd ch from the hook, sc2tog, sc2tog. (2sts)
2. Ch 1, turn, sc2tog. Finish off and weave in end.
With a yarn needle and beginning yarn tail, sew the beginning edge of the beak in place, overlapping the bottom edge of eyes slightly.
Strap
1. With an H hook and purple (black) yarn, ch 20, sc in the 2nd ch from hook and in each ch across. (19sts)
2-3. Ch 1, turn, sc in the same st and in each st to end of row.
4. This step is worked around the outer edge of the strap. Ch 1, turn, sl st in the next st and in each st across, working (sl st, ch 1, sl st) in the corner, sl st evenly across the short end, working (sl st, ch 1, sl st) in the corner, sl st in the next st and in each st across. Finish off, leaving a long tail for sewing the short end in place.
Place the short end of the strap (the end with the yarn tail) next to the center back of the penguin, at the top edge. With the strap pointing out, away from the top of the penguin, use a yarn needle and the yarn tail to sew the edges together.
With a needle and matching thread, sew the button to the back of the strap.
Pin To Save For Later