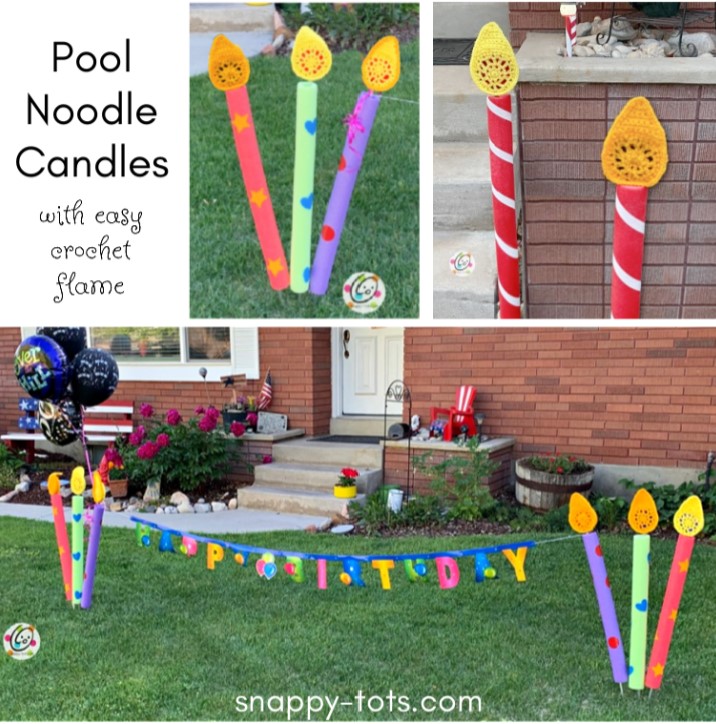
Cricut Craft: 13th Birthday Shirt
Our youngest son, and snappy model, Hayden turned 13 recently. He has LOVED helping come up with t shirt ideas over the past few months so I wanted to make him a special t shirt. Last year for his birthday we gave him a shirt that had “(the square root of 144) years old”. He had a lot of fun wearing that shirt. Since that shirt didn’t fit anymore… in more ways than one… I made him a new version.

We let him open it in the morning of his birthday so he could wear it for his party. He LOVES it!

Luckily we all were feeling good enough (after a month of the flu) to take him, his cousin and a friend to see the new Star Wars. It was a fun day. We also had both sets of grandparents over for cake.
A Special Gift
On a side note… Because Hayden’s brother and sister and their families are stationed far away in the military they weren’t able to be home for his special day. I decided to ask them, the grand parents, my sister’s family and some aunts and uncles to each do a short video for him, offering some words of advice for this new teenager. It turned out to be the best part of his day! Everyone came through and did a great job with their video birthday wishes. If you ever need a special gift I highly suggest this. It is also something he can rewatch as a reminder of how much he is loved and supported.
HOW TO MAKE A SHIRT TOO
Materials We Used
- Cricut Maker
- Cricut Everyday Iron On Vinyl: Black
- Computer or other device to access Cricut Design Space
- Weeder tool, Standard Grip Cutting Mat
- T Shirt
- Cut Files in Cricut Design Space: CLICK HERE
Making The Iron On
Step 1: The Graphics
Click on the link above in materials and cut the design. Check your measurements first.
For tips on using design space, check out Design Space For Beginners.
Step 2: Cutting the Iron On
- Place your iron on vinyl shiny plastic-side DOWN on your standard grip cutting mat.
- Follow the guided steps.
- Make sure to click “Mirror Image (for iron-on)” so it flips your image.
- Don’t peel the Cricut vinyl sheet off the mat yet. We are going to remove the extra vinyl that’s not part of your design first.
- Use the Cricut weeding tool to remove any unwanted vinyl. Make sure you get every little piece out of the letter centers too. When done, peel the piece off the mat.
- Cut around the outer edge of the vinyl to remove the extra film. You will want to cut pretty close to the edges of the different pieces.
Step 3: Applying The Iron On
Place the shirt on an EasyPress Mat. Check placement and make sure it is straight.
Temp Settings: Need to know the temperature to use for your fabric? Cricut has an online heat guide you can use. I also really like the downloadable charts from “Hey, Let’s Make Stuff”.
When the EasyPress has reached the necessary heat, place it on top of the vinyl. Push the button to begin the timer for 30 seconds.
Flip the shirt over. Cricut suggests also ironing from the back of the piece,
Allow the vinyl to cool a bit and peel off the film.
WHAT WE LEARNED
How Tos: Links I found super helpful with this project
~ Wash the t-shirt first WITHOUT fabric softener. Woa! I have seen people say “don’t wash the shirt first” so many times, but CRICUT says YES, wash it first and the tip for leaving out the softener is one I should have known! Check out their tips for “How to Make Sure Your Iron-On Lasts…“
50 T Shirt Tuesdays
This year, to celebrate my 50th birthday, I am celebrating all year long with some special series. I hope you will follow Hayden and I (and some other special people in our world) for 50 different t shirts, one each week on “T Shirt Tuesday”.
Pin To Save For Later